
Brother International Pacesetter PS21 Support Question
Brother International Pacesetter PS21 Support Question
Find answers below for this question about Brother International Pacesetter PS21.Need a Brother International Pacesetter PS21 manual? We have 1 online manual for this item!
Question posted by taylor22222001 on March 31st, 2014
The Stitch Selector Dial Seems Stuck In The 4th Position, How Can I Correct This
The person who posted this question about this Brother International product did not include a detailed explanation. Please use the "Request More Information" button to the right if more details would help you to answer this question.
Current Answers
Related Brother International Pacesetter PS21 Manual Pages
Users Manual - English - Page 2
... watts. Return the machine to the "{" position (which represents off when making any other user servicing adjustments mentioned in this machine only for household use as a toy. Do not operate where aerosol (spray) products are being
administered. 8. Do not unplug by young children or infirm persons without supervision. 17. This sewing machine is not working...
Users Manual - English - Page 4
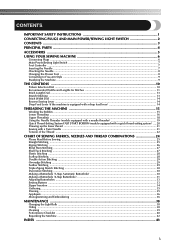
... YOUR SEWING MACHINE 6
Connecting Plugs ...6 Main Power/Sewing Light Switch ...7 Foot Controller ...7 Inserting the Needle ...7 Checking the Needle ...8 Changing the Presser Foot ...8 Converting to Free-arm Style ...9 Steadying the Machine ...9
THE CONTROLS ...10
Pattern Selection Dial ...10 Recommended Widths and Lengths for Stitches 11 Stitch Length Dial ...13 Stretch Stitching ...13 Stitch...
Users Manual - English - Page 5
KNOWING YOUR SEWING MACHINE
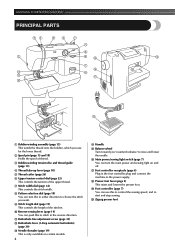
PRINCIPAL PARTS
1 Bobbin-winding assembly (page 15) This winds the thread onto the bobbin, which you use this to stitch in the foot controller plug and connect the machine to start and stop sewing.
I Foot controller (page 7) You can push this to control the sewing speed, and to the power supply. H Presser foot...
Users Manual - English - Page 9

... fully, or if the needle clamp screw is loose, the needle may break or the machine may cause injury.
● Only use the correct presser foot for smooth sewing.
KNOWING YOUR SEWING MACHINE
Raise the needle bar to its highest position by turning 1 the balance wheel toward the 5 back of the needle toward you (counterclockwise)
and...
Users Manual - English - Page 11
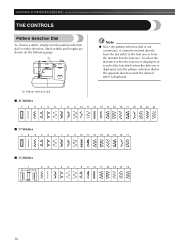
... 11 12 13 14 15 16 17
■ 15 Stitches
1
2 3 4 5 6 7 8 9 10 11 12 13 14 15
10 KNOWING YOUR SEWING MACHINE
THE CONTROLS
Pattern Selection Dial
To choose a stitch, simply turn the pattern selection dial in either direction. To select the first stitch when the last one is displayed or to the last one is displayed, turn...
Users Manual - English - Page 13
... 29 25 30 29 29 29 29 30 -
KNOWING YOUR SEWING MACHINE
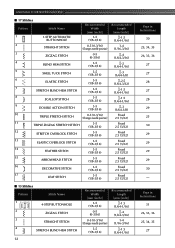
■ 17 Stitches Pattern
1
Stitch Name
1-STEP AUTOMATIC BUTTONHOLE
Recommended Width
[mm (inch)]
3-5 (1/8-3/16)
2
STRAIGHT STITCH
0-5 (0-3/16) (Changes needle position)
3
ZIGZAG STITCH
0-5 (0-3/16)
4
BLIND HEM STITCH
3-5 (1/8-3/16)
5
SHELL TUCK STITCH
3-5 (1/8-3/16)
6
ELASTIC STITCH
3-5 (1/8-3/16)
7
STRETCH BLIND HEM...
Users Manual - English - Page 14
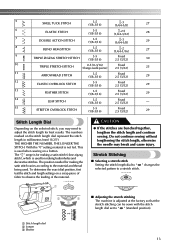
... the factory so that the stretch stitching can be sewn with the stitch length dial set to " SS " (standard position).
1 Stitch length dial 2 Longer 3 Shorter
13 The position needed for making the satin stitch varies according to adjust the stitch length for making buttonholes and decorative stitches. Do not continue sewing without lengthening the stitch length, otherwise the needle may need...
Users Manual - English - Page 15

... will then sew forward. KNOWING YOUR SEWING MACHINE
If different types of fabric or thread are used or the pattern does not have the correct shape, turn the stitch length dial out of the allowable range.
.
The machine will not be fed.
1 Stitch width dial
Note
● When the Straight or Triple Stretch Stitches are selected, the needle position can be...
Users Manual - English - Page 17

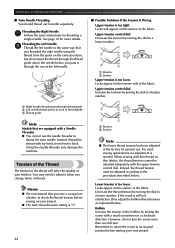
... bobbin was designed specifically for this sewing machine.
Use only the enclosed bobbin or bobbins of the shuttle race by turning 1 the balance wheel toward you could be injured.
CAUTION
● Setting the bobbin improperly may tangle around the bobbin and cause the needle to its highest position by pulling the latch toward...
Users Manual - English - Page 22
...positions. CAUTION
● Use only twin needles that have been made for making decorative stitches. The needle could break, and damage the machine.
● When using the twin needle, make sure the stitch width dial is not set above "3" since this machine...the presser foot.
1
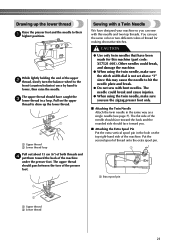
Sewing with a Twin Needle
We have caught the 3 lower thread in a loop. You can sew with bent needles. While...
Users Manual - English - Page 23
... the tension in a clockwise direction.
Instead, thread the twin needle by turning the dial to a lower number.
2
1
654
2
1
1 Reverse 2 Surface
Upper tension is needed...position before sewing on the surface of the fabric. KNOWING YOUR SEWING MACHINE
■ Twin Needle Threading You should thread each needle separately.
Locks appear on the surface of your stitches...
Users Manual - English - Page 25
KNOWING YOUR SEWING MACHINE
CHART OF SEWING FABRICS, NEEDLES AND THREAD COMBINATIONS
Fabric Type
Mediumweight fabrics
Lightweight fabrics
Heavyweight fabrics
Stretch fabrics
Broadcloth
Taffeta
Flannel, Gabardine Lawn, Batiste
Georgette
Challis, Satin Denim
Corduroy
Tweed Jersey Tricot
For top-stitching
Thread
Type
Cotton
Synthetic mercerized
Silk or silk finished
Cotton
Synthetic ...
Users Manual - English - Page 26

... correct presser foot. Keep your hands away from the edge
of seams and where you turn it the other object during sewing, otherwise
the needle may break and you are using the machine. setting the dial to "0" selects the right needle position. ■ Starting Sewing
Turn the pattern selection dial to 10 stitches in the fabric, stop the 1 machine...
Users Manual - English - Page 27
...)
0-5 (0-3/16)
■ Zigzag Stitch Turn the pattern selection dial to the Zigzag Stitch, and then select the stitch length and the stitch width.
■ Removing the Material from the end of the machine. KNOWING YOUR SEWING MACHINE
Raise the presser foot and turn the fabric to its 2 new direction using the Straight Stitch at its highest position and
make sure...
Users Manual - English - Page 31
... dial to the Triple Zigzag Stretch Stitch. You need to align the marks on the foot
with the mark on the fabric. Memo
● We recommend that provides reliable results. ■ Making a Buttonhole
Using tailor's chalk, mark the position and 1 length of the buttonhole on the fabric.
Lower 3 the presser foot to sew the...
Users Manual - English - Page 33
...
● When using the seam ripper to "c" (same position as in the middle of the tailor's
chalk line. 3. Set the pattern selection dial to 6 stitches. 3. Sew 5 to "d". 2. Set the pattern selection dial to sew the front bar tack first.
KNOWING YOUR SEWING MACHINE
You need to "a". 2.
Turn the pattern selection dial to open the buttonhole, do not put pins...
Users Manual - English - Page 34

...lever to "1.5". For example, if the distance between the holes and 1 set the stitch width to the up position.)
33
If the right side of the buttonhole is too coarse 2 or fine,...same, you can make the following adjustments. Set the stitch length dial to " " and sew the 1 buttonhole on the needle plate. 3 (On a machine equipped with a large screwdriver in the - direction.
If the left...
Users Manual - English - Page 35
... pattern selection dial to make sure that the needle enters the holes
without hitting the button. When sewing the left or right side of the zipper foot.
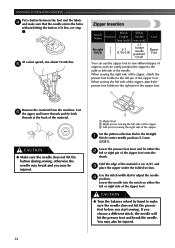
1
2
Remove the material from the machine. Fold the edge of the material. CAUTION
● Turn the balance wheel by hand to the Straight 1 Stitch (center needle position (2.5 mm...
Users Manual - English - Page 36

... gather the material.
4
Place the darning plate on the needle plate. 1 (On a machine equipped with a drop feed
lever, lower the feed dogs by setting the drop feed lever to the up position.)
Set the pattern selection dial to the Straight 1 Stitch. Begin sewing by raising the lever located at the
back of the presser foot...
Users Manual - English - Page 37
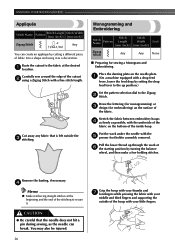
... turning the balance
wheel, and then make a few holding stitches. Cut away any fabric that the needle does not hit a pin during sewing, as the needle can create an applique by setting the drop feed lever to the up position.)
Set the pattern selection dial to secure it as possible, with your little fingers...
Similar Questions


What Stitch To Use On A Brothers Lx2500 Sewing Machine For Stretchy Fabrics
(Posted by linlul 10 years ago)

What Is The Top Dial On A Brother Lx2500 Sewing Machine For
(Posted by hooliassk 10 years ago)

How Do I Dial Up Decorative Stitch # 16 - 21?
(Posted by byandnova 11 years ago)

Pattern Selector Dial
How do you get the machine to stitch the patterns in blue on the selector diaL? Can't find the answe...
How do you get the machine to stitch the patterns in blue on the selector diaL? Can't find the answe...
(Posted by ksaladino2009 11 years ago)