
Users Manual - English
Page 2
.... 2. Replace the bulb with any adjustments in the needle area, such as described in . Never operate the machine with the same type and rated 15 watts. Never drop or insert any object into water. Do not unplug by the manufacturer as a toy. Always use outdoors. 7. Do not use . 1 This sewing machine is intended for use as threading the needle, changing the needle, threading the bobbin, or changing the presser foot. 15. Never operate this machine...
.... 2. Replace the bulb with any adjustments in the needle area, such as described in . Never operate the machine with the same type and rated 15 watts. Never drop or insert any object into water. Do not unplug by the manufacturer as a toy. Always use outdoors. 7. Do not use . 1 This sewing machine is intended for use as threading the needle, changing the needle, threading the bobbin, or changing the presser foot. 15. Never operate this machine...
Users Manual - English
Page 4
... Changing the Presser Foot ...8 Converting to Free-arm Style ...9 Steadying the Machine ...9 THE CONTROLS ...10 Pattern Selection Dial ...10 Recommended Widths and Lengths for Stitches 11 Stitch Length Dial ...13 Stretch Stitching ...13 Stitch Width Dial ...14 Reverse Sewing Lever ...14 Drop Feed Lever (if the machine is equipped with a drop feed lever 14 THREADING THE MACHINE 15 Winding the Bobbin ...15 Lower Threading ...16 Upper Threading ...18 Using the Needle Threader (models equipped with a needle threader 19 Quick Thread-Setting System FAST START BOBBIN (models equipped with a quick...
... Changing the Presser Foot ...8 Converting to Free-arm Style ...9 Steadying the Machine ...9 THE CONTROLS ...10 Pattern Selection Dial ...10 Recommended Widths and Lengths for Stitches 11 Stitch Length Dial ...13 Stretch Stitching ...13 Stitch Width Dial ...14 Reverse Sewing Lever ...14 Drop Feed Lever (if the machine is equipped with a drop feed lever 14 THREADING THE MACHINE 15 Winding the Bobbin ...15 Lower Threading ...16 Upper Threading ...18 Using the Needle Threader (models equipped with a needle threader 19 Quick Thread-Setting System FAST START BOBBIN (models equipped with a quick...
Users Manual - English
Page 5
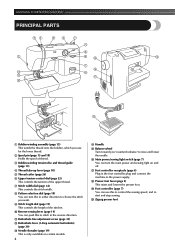
... models. 4 D Handle E Balance wheel Turn toward you use this to control the sewing speed, and to start and stop sewing. H Presser foot lever (page 8) This raises and lowers the presser foot. F Main power/sewing light switch (page 7) You can push this to stitch in the reverse direction. A Buttonhole fine adjustment screw (page 33) B Buttonhole lever (1-Step automatic buttonhole) (page 30) C Needle threader (page 19) This is only available on and off. J Zigzag presser foot KNOWING YOUR SEWING MACHINE PRINCIPAL PARTS 1 Bobbin-winding assembly (page 15) This winds the thread...
... models. 4 D Handle E Balance wheel Turn toward you use this to control the sewing speed, and to start and stop sewing. H Presser foot lever (page 8) This raises and lowers the presser foot. F Main power/sewing light switch (page 7) You can push this to stitch in the reverse direction. A Buttonhole fine adjustment screw (page 33) B Buttonhole lever (1-Step automatic buttonhole) (page 30) C Needle threader (page 19) This is only available on and off. J Zigzag presser foot KNOWING YOUR SEWING MACHINE PRINCIPAL PARTS 1 Bobbin-winding assembly (page 15) This winds the thread...

Users Manual - English
Page 9
... machine will have been designed to its highest position. 2 Lower the presser foot. 3 If a needle is already installed, remove it is not in the needle until it touches the stopper, and securely tighten the needle clamp screw with this machine. If you (counterclockwise) and raise the presser foot lever. You will start and you want to sew and how. ■ Snap-On Type Raise the needle to be injured. ● Always use...
... machine will have been designed to its highest position. 2 Lower the presser foot. 3 If a needle is already installed, remove it is not in the needle until it touches the stopper, and securely tighten the needle clamp screw with this machine. If you (counterclockwise) and raise the presser foot lever. You will start and you want to sew and how. ■ Snap-On Type Raise the needle to be injured. ● Always use...
Users Manual - English
Page 10
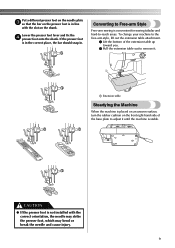
... break the needle and cause injury. 9 To change your machine to the free-arm style, lift out the extension table attachment. 1 Lift the bottom of the base plate to -reach areas. Lower the presser foot lever and fix the 4 presser foot onto the shank. Put a different presser foot on the needle plate 3 so that the bar on the presser foot is in . Converting to Free-arm Style Free-arm sewing is convenient for sewing tubular and hard-to adjust it . 1 1 Extension table Steadying the Machine...
... break the needle and cause injury. 9 To change your machine to the free-arm style, lift out the extension table attachment. 1 Lift the bottom of the base plate to -reach areas. Lower the presser foot lever and fix the 4 presser foot onto the shank. Put a different presser foot on the needle plate 3 so that the bar on the presser foot is in . Converting to Free-arm Style Free-arm sewing is convenient for sewing tubular and hard-to adjust it . 1 1 Extension table Steadying the Machine...
Users Manual - English
Page 14
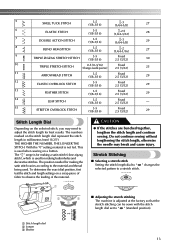
...length and continue sewing. SS 1 10 2 2 3 1 ■ Adjusting the stretch stitching The machine is not fed. This is used for making buttonholes and decorative stitches. The " " range is used when sewing on a button. 5 SHELL TUCK STITCH 3-5 (1/8-3/16) -3 (1/64-1/8) 27 6 ELASTIC STITCH 3-5 (1/8-3/16) -2.5 (1/64-3/32) 28 7 DOUBLE ACTION STITCH 3-5 (1/8-3/16) -3 (1/64-1/8) 29 8 BLIND HEM STITCH 3-5 (1/8-3/16) -2 (1/64-1/16) 27 9 TRIPLE ZIGZAG STRETCH STITCH 3-5 (1/8-3/16) Fixed 2.5 (3/32) 30 10 TRIPLE STRETCH STITCH 0-5 (0-3/16) (Changes needle position...
...length and continue sewing. SS 1 10 2 2 3 1 ■ Adjusting the stretch stitching The machine is not fed. This is used for making buttonholes and decorative stitches. The " " range is used when sewing on a button. 5 SHELL TUCK STITCH 3-5 (1/8-3/16) -3 (1/64-1/8) 27 6 ELASTIC STITCH 3-5 (1/8-3/16) -2.5 (1/64-3/32) 28 7 DOUBLE ACTION STITCH 3-5 (1/8-3/16) -3 (1/64-1/8) 29 8 BLIND HEM STITCH 3-5 (1/8-3/16) -2 (1/64-1/16) 27 9 TRIPLE ZIGZAG STRETCH STITCH 3-5 (1/8-3/16) Fixed 2.5 (3/32) 30 10 TRIPLE STRETCH STITCH 0-5 (0-3/16) (Changes needle position...

Users Manual - English
Page 15
... monogramming, embroidering, darning or sewing on buttons, the feed dogs should be lowered so that is equipped with a drop feed lever) Use the drop feed lever to raise or lower the feed dogs according to the job that the garment will then sew forward. The numbers marked on the stitch selected, you lightly push the foot controller. Do not forcefully turn the dial toward either "+" or "-" to adjust the stitch. - 1 SS 2 + 3 • • • • 4 3 1 Makes fine stitches 2 Standard position 3 Makes...
... monogramming, embroidering, darning or sewing on buttons, the feed dogs should be lowered so that is equipped with a drop feed lever) Use the drop feed lever to raise or lower the feed dogs according to the job that the garment will then sew forward. The numbers marked on the stitch selected, you lightly push the foot controller. Do not forcefully turn the dial toward either "+" or "-" to adjust the stitch. - 1 SS 2 + 3 • • • • 4 3 1 Makes fine stitches 2 Standard position 3 Makes...

Users Manual - English
Page 16
... foot controller. 1 2 1 Bobbin-winding tension disc 2 Bobbin-winding shaft CAUTION ● If the spool of the same type (part code: SA156, SFB (XA5539-151)). Then, stop the machine. right. Pass the end of thread on 2 the bobbin from older models are used, the machine will not operate correctly. Actual size 11.5 mm (7/16") Put the spool of the thread through the hole on the spool pin and 1 pass the thread around the bobbin a few times. Put the bobbin...
... foot controller. 1 2 1 Bobbin-winding tension disc 2 Bobbin-winding shaft CAUTION ● If the spool of the same type (part code: SA156, SFB (XA5539-151)). Then, stop the machine. right. Pass the end of thread on 2 the bobbin from older models are used, the machine will not operate correctly. Actual size 11.5 mm (7/16") Put the spool of the thread through the hole on the spool pin and 1 pass the thread around the bobbin a few times. Put the bobbin...

Users Manual - English
Page 17
... older models are used, the machine will not operate correctly. Use only the enclosed bobbin or bobbins of the shuttle race by turning 1 the balance wheel toward you (counterclockwise) and raise the presser foot lever. Raise the needle to loosen, breaking the needle and resulting in injury. If you could be injured. KNOWING YOUR SEWING MACHINE CAUTION ● Make sure you turn the power off while threading the machine. Actual size...
... older models are used, the machine will not operate correctly. Use only the enclosed bobbin or bobbins of the shuttle race by turning 1 the balance wheel toward you (counterclockwise) and raise the presser foot lever. Raise the needle to loosen, breaking the needle and resulting in injury. If you could be injured. KNOWING YOUR SEWING MACHINE CAUTION ● Make sure you turn the power off while threading the machine. Actual size...

Users Manual - English
Page 19
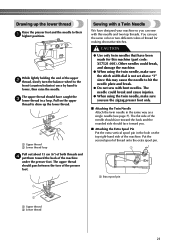
... the presser foot lever and turn the balance 1 wheel toward you thread the machine properly, otherwise the thread could tangle and break the needle. Pass the thread through the slit by pulling it between the 4 tension discs. Guide the thread to the back of the thread 5 take-up lever and around to its highest position. KNOWING YOUR SEWING MACHINE Upper Threading 1 2 4 3 1 Spool pin 2 Thread guide CAUTION ● Make sure you and into the eyelet. 1 1 1 Thread...
... the presser foot lever and turn the balance 1 wheel toward you thread the machine properly, otherwise the thread could tangle and break the needle. Pass the thread through the slit by pulling it between the 4 tension discs. Guide the thread to the back of the thread 5 take-up lever and around to its highest position. KNOWING YOUR SEWING MACHINE Upper Threading 1 2 4 3 1 Spool pin 2 Thread guide CAUTION ● Make sure you and into the eyelet. 1 1 1 Thread...

Users Manual - English
Page 20
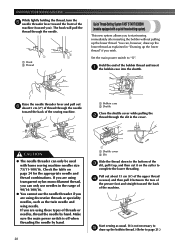
... of the holder for the needle-threading hook before lowering the needle threader lever, otherwise the hook may be wrapped around the thread take-up before you feed the upper thread. ● If you incorrectly feed the thread you may cause sewing problems. Using the Needle Threader (models equipped with a needle threader) Set the main power switch to align the bottom of the needle holder with the bottom of the needle-threading-hook holder. 1 2 3 4 1 Needle holder 2 Needle threader lever 3 Hook holder 4 Align Note ● When you use the needle threader, make sure...
... of the holder for the needle-threading hook before lowering the needle threader lever, otherwise the hook may be wrapped around the thread take-up before you feed the upper thread. ● If you incorrectly feed the thread you may cause sewing problems. Using the Needle Threader (models equipped with a needle threader) Set the main power switch to align the bottom of the needle holder with the bottom of the needle-threading-hook holder. 1 2 3 4 1 Needle holder 2 Needle threader lever 3 Hook holder 4 Align Note ● When you use the needle threader, make sure...
Users Manual - English
Page 21
... the lower thread as the twin needle and wing needle. Check the table on the cutter to complete the lower threading. Pull out about 5 cm (2") of thread through the needle toward the back of the sewing machine. 2 1 Bobbin case 2 Shuttle Close the shuttle cover while pulling the 2 thread through the needle. 1 2 1 1 Hook 2 Thread Quick Thread-Setting System FAST START BOBBIN (models equipped with home sewing machine needles size 75/11-100/16. Set the main power switch to "O". CAUTION ● The needle threader can only use the needle threader...
... the lower thread as the twin needle and wing needle. Check the table on the cutter to complete the lower threading. Pull out about 5 cm (2") of thread through the needle toward the back of the sewing machine. 2 1 Bobbin case 2 Shuttle Close the shuttle cover while pulling the 2 thread through the needle. 1 2 1 1 Hook 2 Thread Quick Thread-Setting System FAST START BOBBIN (models equipped with home sewing machine needles size 75/11-100/16. Set the main power switch to "O". CAUTION ● The needle threader can only use the needle threader...
Users Manual - English
Page 22
.... ■ Attaching the Extra Spool Pin Put the extra vertical spool pin in the hole on the upper thread to draw up the lower thread Raise the presser foot and the needle to their 1 highest positions. Other needles could break and cause injuries. ● When using the twin needle, make sure you use the same color or two different colors of the machine. The upper thread should have been made for making decorative stitches. Pull on...
.... ■ Attaching the Extra Spool Pin Put the extra vertical spool pin in the hole on the upper thread to draw up the lower thread Raise the presser foot and the needle to their 1 highest positions. Other needles could break and cause injuries. ● When using the twin needle, make sure you use the same color or two different colors of the machine. The upper thread should have been made for making decorative stitches. Pull on...
Users Manual - English
Page 23
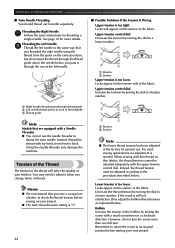
... the dial to adjust it through thread guide 2 Left needle thread passes in the same way that are equipped with a small screwdriver in the bobbin by hand, from the spool on the surface of the fabric. Bobbin Increase the tension in a clockwise direction. Instead, thread the twin needle by turning the screw with a Needle Threader ● You cannot use . If the result is too loose. Using the needle threader may need to a lower number. 2 1 654 2 1 1 Reverse 2 Surface Upper tension...
... the dial to adjust it through thread guide 2 Left needle thread passes in the same way that are equipped with a small screwdriver in the bobbin by hand, from the spool on the surface of the fabric. Bobbin Increase the tension in a clockwise direction. Instead, thread the twin needle by turning the screw with a Needle Threader ● You cannot use . If the result is too loose. Using the needle threader may need to a lower number. 2 1 654 2 1 1 Reverse 2 Surface Upper tension...

Users Manual - English
Page 26
... machine. Straight Stitching Stitch Name Pattern Stitch Length [mm (inch)] Stitch Width [mm (inch)] Straight Stitch Triple Stretch Stitch 1-4 (1/16-3/16) Fixed 2.5 (3/32) 5-0* (3/16-0) ■ Backtacking Press the reverse sewing lever down as far as 6 possible, and then lightly step on the foot controller. setting the dial to "0" selects the right needle position. ■ Starting Sewing Turn the pattern selection dial to adjust the needle position. You could break. The thread could tangle or the needle could also be injured. ● Always use reverse sewing for locking...
... machine. Straight Stitching Stitch Name Pattern Stitch Length [mm (inch)] Stitch Width [mm (inch)] Straight Stitch Triple Stretch Stitch 1-4 (1/16-3/16) Fixed 2.5 (3/32) 5-0* (3/16-0) ■ Backtacking Press the reverse sewing lever down as far as 6 possible, and then lightly step on the foot controller. setting the dial to "0" selects the right needle position. ■ Starting Sewing Turn the pattern selection dial to adjust the needle position. You could break. The thread could tangle or the needle could also be injured. ● Always use reverse sewing for locking...
Users Manual - English
Page 27
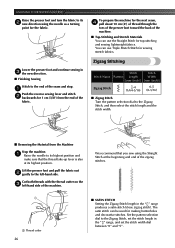
...Thread cutter 26 ■ SATIN STITCH Setting the Zigzag Stitch length in the " " range produces a satin stitch (close zigzag stitch). Zigzag Stitching Stitch Stitch Stitch Name Pattern Length Width [mm (inch)] [mm (inch)] Zigzag Stitch -4 (1/64-3/16) 0-5 (0-3/16) ■ Zigzag Stitch Turn the pattern selection dial to its highest position and make sure that you sew using the needle as a turning point for sewing stretch fabrics. Lower the presser foot and continue sewing in the " " range, and set the stitch length in 3 the new direction. ■ Finishing Sewing Stitch...
...Thread cutter 26 ■ SATIN STITCH Setting the Zigzag Stitch length in the " " range produces a satin stitch (close zigzag stitch). Zigzag Stitching Stitch Stitch Stitch Name Pattern Length Width [mm (inch)] [mm (inch)] Zigzag Stitch -4 (1/64-3/16) 0-5 (0-3/16) ■ Zigzag Stitch Turn the pattern selection dial to its highest position and make sure that you sew using the needle as a turning point for sewing stretch fabrics. Lower the presser foot and continue sewing in the " " range, and set the stitch length in 3 the new direction. ■ Finishing Sewing Stitch...
Users Manual - English
Page 40
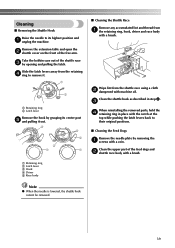
.... Clean the upper part of the feed dogs and 2 shuttle race body with a coin. Take the bobbin case out of the free arm. Note ● When the needle is lowered, the shuttle hook cannot be removed. 39 Cleaning ■ Removing the Shuttle Hook Raise the needle to its center post 5 and pulling it out. 3 5 2 4 1 1 1 Retaining ring 2 Latch lever 3 Hook 4 Driver 5 Race body ■ Cleaning the Shuttle Race Remove any accumulated lint and thread from the shuttle race using a cloth...
.... Clean the upper part of the feed dogs and 2 shuttle race body with a coin. Take the bobbin case out of the free arm. Note ● When the needle is lowered, the shuttle hook cannot be removed. 39 Cleaning ■ Removing the Shuttle Hook Raise the needle to its center post 5 and pulling it out. 3 5 2 4 1 1 1 Retaining ring 2 Latch lever 3 Hook 4 Driver 5 Race body ■ Cleaning the Shuttle Race Remove any accumulated lint and thread from the shuttle race using a cloth...
Users Manual - English
Page 42
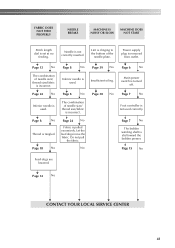
... 41 Insufficient oiling. Do not pull the fabric. Foot controller is used correctly. Let the feed dogs move the fabric. FABRIC DOES NOT FEED PROPERLY NEEDLE BREAKS MACHINE IS NOISY OR SLOW MACHINE DOES NOT START Stitch length dial is tangled. Page 8 No Thread is set at no feeding. No Page 7 No The bobbin winding shaft is clinging to the bottom of needle size/ thread size/fabric is removed from outlet. Lint is slid toward the bobbin presser. Main power switch is...
... 41 Insufficient oiling. Do not pull the fabric. Foot controller is used correctly. Let the feed dogs move the fabric. FABRIC DOES NOT FEED PROPERLY NEEDLE BREAKS MACHINE IS NOISY OR SLOW MACHINE DOES NOT START Stitch length dial is tangled. Page 8 No Thread is set at no feeding. No Page 7 No The bobbin winding shaft is clinging to the bottom of needle size/ thread size/fabric is removed from outlet. Lint is slid toward the bobbin presser. Main power switch is...
Users Manual - English
Page 44
... 6 Foot Controller Operating 7 Free-arm Sewing 9 Free-arm Style 9 G Gathering 35 H Hole for Extra Spool Pin 21 I Inserting the Needle 7 L Leaf Stitch 11, 12, 13 Legs Stitch 11 Lower Threading 16 M Main Power and Sewing Light Switch 2, 7 Maintenance 38 Making a Buttonhole 30, 31 Monogramming and Embroidering 36 N Needle Replacement 7 Needle Threader 19 O Oiling 38 Overedge Stitching 29 P Pattern Length 11 Pattern Selection Dial 10 Pattern Width 11 Performance Checklist 40 Presser foot lever 4 Presser Foot Replacement 8 Principal Parts 4 Q Quick Thread-setting System...
... 6 Foot Controller Operating 7 Free-arm Sewing 9 Free-arm Style 9 G Gathering 35 H Hole for Extra Spool Pin 21 I Inserting the Needle 7 L Leaf Stitch 11, 12, 13 Legs Stitch 11 Lower Threading 16 M Main Power and Sewing Light Switch 2, 7 Maintenance 38 Making a Buttonhole 30, 31 Monogramming and Embroidering 36 N Needle Replacement 7 Needle Threader 19 O Oiling 38 Overedge Stitching 29 P Pattern Length 11 Pattern Selection Dial 10 Pattern Width 11 Performance Checklist 40 Presser foot lever 4 Presser Foot Replacement 8 Principal Parts 4 Q Quick Thread-setting System...
Users Manual - English
Page 45
S Satin Stitch 26 Scallop Stitch 11, 12, 28 Sewing Buttons 33 Sewing Light Bulb Replacement 38 Sewing Light Switch 2, 7 Sewing with a Twin Needle 21 Shell Tuck Stitch 11, 12, 13, 27 Shuttle Hook Removal 39 Shuttle Race Cleaning 39 Spool pin 15, 18 Steadying the Machine 9 Stitch Length Dial 13 Stitch Width Dial 14 Straight Stitch 11, 12, 25, 34, 35 Stretch Blind Hem Stitch 11, 12, 27 Stretch Overlock Stitch 11, 12, 13, 29 Stretch Stitching 13 T Tension of the Thread 22 Thread Tension 22 Threading Bobbin 15 Threading Needle 19 Topstitching 26 Tree Stitch 11 Triple Stretch ...
S Satin Stitch 26 Scallop Stitch 11, 12, 28 Sewing Buttons 33 Sewing Light Bulb Replacement 38 Sewing Light Switch 2, 7 Sewing with a Twin Needle 21 Shell Tuck Stitch 11, 12, 13, 27 Shuttle Hook Removal 39 Shuttle Race Cleaning 39 Spool pin 15, 18 Steadying the Machine 9 Stitch Length Dial 13 Stitch Width Dial 14 Straight Stitch 11, 12, 25, 34, 35 Stretch Blind Hem Stitch 11, 12, 27 Stretch Overlock Stitch 11, 12, 13, 29 Stretch Stitching 13 T Tension of the Thread 22 Thread Tension 22 Threading Bobbin 15 Threading Needle 19 Topstitching 26 Tree Stitch 11 Triple Stretch ...


