
Brother International Pacesetter PS21 Support Question
Brother International Pacesetter PS21 Support Question
Find answers below for this question about Brother International Pacesetter PS21.Need a Brother International Pacesetter PS21 manual? We have 1 online manual for this item!
Question posted by byandnova on January 9th, 2013
How Do I Dial Up Decorative Stitch # 16 - 21?
The person who posted this question about this Brother International product did not include a detailed explanation. Please use the "Request More Information" button to the right if more details would help you to answer this question.
Current Answers
Related Brother International Pacesetter PS21 Manual Pages
Users Manual - English - Page 2
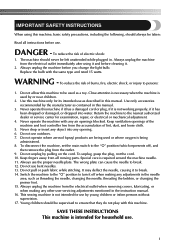
...manual. 16. DANGER - WARNING - Do not operate where aerosol (spray) products are being
administered. 8. It may deflect the needle, causing it .
2.
Always unplug the machine from ... is required around the machine needle. 11.
Switch the machine to the "{" position to persons:
1. Do not pull or push fabric while stitching. This sewing machine is used as threading ...
Users Manual - English - Page 4
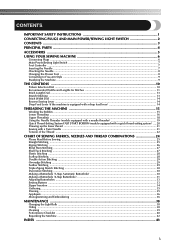
... Style ...9 Steadying the Machine ...9
THE CONTROLS ...10
Pattern Selection Dial ...10 Recommended Widths and Lengths for Stitches 11 Stitch Length Dial ...13 Stretch Stitching ...13 Stitch Width Dial ...14 Reverse Sewing Lever ...14 Drop Feed Lever (if the machine is equipped with a drop feed lever 14
THREADING THE MACHINE 15
Winding the Bobbin ...15 Lower Threading ...16 Upper Threading ...18...
Users Manual - English - Page 5
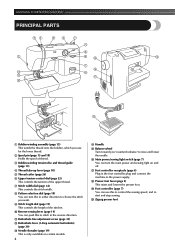
... the upper thread. 7 Stitch width dial (page 14)
This controls the stitch width. 8 Pattern selection dial (page 10)
You can turn this in the foot controller plug and connect the machine to the power supply. G Foot controller receptacle (page 6) Plug in either direction to choose the stitch you (counterclockwise) to start and stop sewing.
A Buttonhole fine adjustment...
Users Manual - English - Page 11
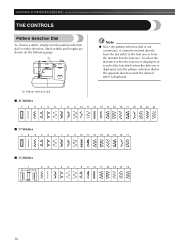
... opposite direction until the desired stitch is displayed.
1 Pattern selection dial
■ 21 Stitches
1 2 3 4 5 6 7 8 9 10 11 12 13 14 15 16 17 18 19 20 21
■ 17 Stitches
1 2 3 4 5 6 7 8 9 10 11 12 13 14 15 16 17
■ 15 Stitches
1
2 3 4 5 6 7 8 9 10 11 12 13 14 15
10 KNOWING YOUR SEWING MACHINE
THE CONTROLS
Pattern Selection Dial
To choose a stitch, simply turn the pattern...
Users Manual - English - Page 12
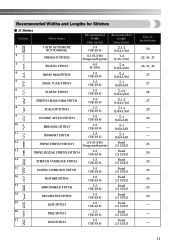
...16)
14
STRETCH OVERLOCK STITCH
3-5 (1/8-3/16)
15
ELASTIC OVERLOCK STITCH
3-5 (1/8-3/16)
16
FEATHER STITCH
3-5 (1/8-3/16)
17
ARROWHEAD STITCH
3-5 (1/8-3/16)
18
DECORATIVE STITCH
3-5 (1/8-3/16)
19
LEAF STITCH
3-5 (1/8-3/16)
20
TREE STITCH
3-5 (1/8-3/16)
21
LEGS STITCH
3-5 (1/8-3/16)
Recommended Length
[mm (inch)]
-1.5 (1/64-1/16)
1-4 (1/16-3/16)
-4 (1/64-3/16)
-2 (1/64-1/16...
Users Manual - English - Page 13
...SEWING MACHINE
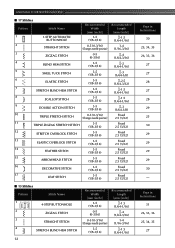
■ 17 Stitches Pattern
1
Stitch Name
1-STEP AUTOMATIC BUTTONHOLE
Recommended Width
[mm (inch)]
3-5 (1/8-3/16)
2
STRAIGHT STITCH
0-5 (0-3/16) (Changes needle position)
3
ZIGZAG STITCH
0-5 (0-3/16)
4
BLIND HEM STITCH
3-5 (1/8-3/16)
5
SHELL TUCK STITCH
3-5 (1/8-3/16)
6
ELASTIC STITCH
3-5 (1/8-3/16)
7
STRETCH BLIND HEM STITCH
3-5 (1/8-3/16)
8
SCALLOP STITCH...
Users Manual - English - Page 14
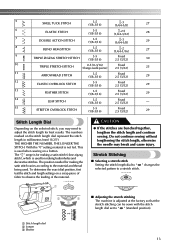
... buttonholes and decorative stitches. CAUTION
● If the stitches are bunched together, lengthen the stitch length and continue sewing. SS
1
10
2
2
3
1
■ Adjusting the stretch stitching The machine is used . 5
SHELL TUCK STITCH
3-5 (1/8-3/16)
-3 (1/64-1/8)
27
6
ELASTIC STITCH
3-5 (1/8-3/16)
-2.5 (1/64-3/32)
28
7
DOUBLE ACTION STITCH
3-5 (1/8-3/16)
-3 (1/64-1/8)
29...
Users Manual - English - Page 15

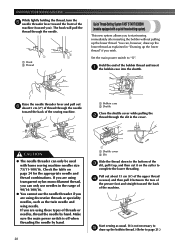
... down. 3 Down position: Feed dogs are up.
14
To sew forward, release the reverse sewing lever. The numbers marked on the stitch selected, you lightly push the foot controller. Do not forcefully turn the dial toward either "+" or "-" to adjust the stitch width. KNOWING YOUR SEWING MACHINE
If different types of fabric or thread are used or...
Users Manual - English - Page 21
... the machine. Set the main power switch to page 21.) Check the table on the cutter to start sewing immediately after inserting the bobbin without pulling up the lower thread. Make sure the main power switch is not necessary to 5 draw up , and then cut it between the toes of 90/14-100/16...
Users Manual - English - Page 22
...
We have been made for making decorative stitches. The upper thread should pass between the toes of the presser foot.
1
Sewing with bent needles. The needle could break, and damage the machine.
● When using the twin needle, make sure the stitch width dial is not set above "3" since this machine (part code: X57521-001). Drawing up...
Users Manual - English - Page 23
... tension control dial.
When sewing with thin thread on the extra spool pin, but do not turn . Using the needle threader may need to adjust it through the eye of the left needle in front of fabric to its original position before sewing on the reverse side of the fabric.
KNOWING YOUR SEWING MACHINE
■...
Users Manual - English - Page 25
...needle 90/14 - 100/16. KNOWING YOUR SEWING MACHINE
CHART OF SEWING FABRICS, NEEDLES AND THREAD ...COMBINATIONS
Fabric Type
Mediumweight fabrics
Lightweight fabrics
Heavyweight fabrics
Stretch fabrics
Broadcloth
Taffeta
Flannel, Gabardine Lawn, Batiste
Georgette
Challis, Satin Denim
Corduroy
Tweed Jersey Tricot
For top-stitching...
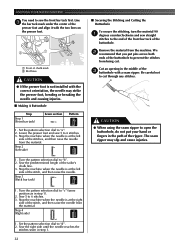
Users Manual - English - Page 27
... (4") of thread through the
toes of the presser foot toward the back of the machine. Lower the presser foot and continue sewing in the " " range, and set the stitch width dial between "0" and "5". To prepare the machine for making buttonholes and decorative stitches. Cut both threads with the thread cutter on the 3 left -hand side.
Set the...
Users Manual - English - Page 29
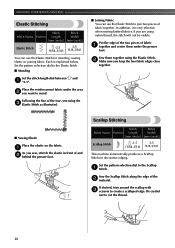
... use the Elastic Stitch to the Elastic Stitch.
■ Mending
Set the stitch length dial between " " and 1 "2.5".
KNOWING YOUR SEWING MACHINE
Elastic Stitching
Stitch
Stitch
Stitch Name Pattern Length
Width
[mm (inch)] [mm (inch)]
Elastic Stitch
-2.5
3-5
(1/64-3/32) (1/8-3/16)
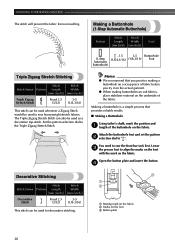
You can use the Elastic Stitch for decorative edging. Set the pattern selection dial to join two...
Users Manual - English - Page 31
... Name Pattern Length
Width
[mm (inch)] [mm (inch)]
Decorative Stitch
Fixed 2.5
3-5
(3/32)
(1/8-3/16)
This stitch can be used to sew heavyweight stretch fabrics. KNOWING YOUR SEWING MACHINE
The stitch will prevent the fabric from unravelling. Making a Buttonhole (1-Step Automatic Buttonhole)
Stitch
Stitch
Pattern
Length Width
Foot
[mm (inch)] [mm (inch)]
-1.5
3-5 Buttonhole...
Users Manual - English - Page 33
... at the left
side of the ripper. Sew the right side until the needle reaches the
stitches sewn in the path of the stitch, and then raise the needle. KNOWING YOUR SEWING MACHINE
You need to "d". 2. Stop the machine when the needle is at the left
side of the stitch, and then raise the needle from the...
Users Manual - English - Page 35
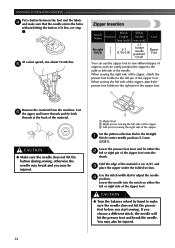
... to the right pin of the zipper foot.
At a slow speed, sew about 10 stitches.
5
Zipper Insertion
Stitch
Stitch
Stitch Name
Pattern
Length
Width
[mm (inch)] [mm (inch)]
Straight Stitch
2-3 (1/16-1/8)
2.5 (center needle position) (3/32)
Foot
Zipper Foot
You can use the zipper foot to sew different types of zippers, and can easily position the zipper to the...
Users Manual - English - Page 37
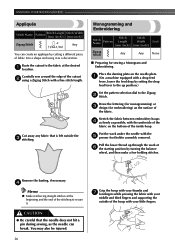
KNOWING YOUR SEWING MACHINE
Appliqués
Stitch Name
Pattern
Stitch Length [mm (inch)]
Stitch Width [mm (inch)]
Zigzag Stitch
-2
Any
(1/64-1/16)
You can break.
Baste the cutout to the Zigzag 2 Stitch. Carefully sew around the edge of fabric into a shape and using a Zigzag Stitch with a drop feed
lever, lower the feed dogs by setting the drop feed lever to the...
Users Manual - English - Page 44
...
H
Hole for Extra Spool Pin 21
I
Inserting the Needle 7
L
Leaf Stitch 11, 12, 13
Legs Stitch 11 Lower Threading 16
M
Main Power and Sewing Light Switch 2, 7
Maintenance 38
Making a Buttonhole 30, 31
Monogramming and Embroidering 36
N
Needle Replacement 7 Needle Threader 19
O
Oiling 38 Overedge Stitching 29
P
Pattern Length 11 Pattern Selection Dial 10 Pattern Width 11 Performance...
Users Manual - English - Page 45
S
Satin Stitch 26
Scallop Stitch 11, 12, 28
Sewing Buttons 33 Sewing Light Bulb Replacement 38
Sewing Light Switch 2, 7
Sewing with a Twin Needle 21
Shell Tuck Stitch 11, 12, 13, 27
Shuttle Hook Removal 39 Shuttle Race Cleaning 39
Spool pin 15, 18
Steadying the Machine 9 Stitch Length Dial 13 Stitch Width Dial 14
Straight Stitch 11, 12, 25, 34, 35 Stretch Blind Hem Stitch 11...
Similar Questions

How To Do Buttonhole Stitch In Brother Sewing Machine 2600i
(Posted by bradFr 9 years ago)

The Stitch Selector Dial Seems Stuck In The 4th Position, How Can I Correct This
(Posted by taylor22222001 10 years ago)

Brother 17-stitch Free-arm Sewing Machine Lx2500 How To Set Tension
(Posted by laptoprustar 10 years ago)

What Is The Top Dial On A Brother Lx2500 Sewing Machine For
(Posted by hooliassk 10 years ago)

How To Make More Decorative Stitches Than The Original 39.
I just bought my Brother CS-770 earlier today. However, I wonder why there are no instructions how t...
I just bought my Brother CS-770 earlier today. However, I wonder why there are no instructions how t...
(Posted by darross 11 years ago)