Brother International HE-240 Support Question
Brother International HE-240 Support Question
Find answers below for this question about Brother International HE-240.Need a Brother International HE-240 manual? We have 4 online manuals for this item!
Question posted by mamawcrochet on August 1st, 2014
Bobbin Thread Showing In Design On He1 Machine
Please help!! The bobbin thread is coming through to the right side of my fabric. Very little of the top thread being pulled at all. How do I fix this? Thank you.
Current Answers
Related Brother International HE-240 Manual Pages
Users Manual - English - Page 14
....
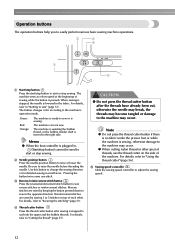
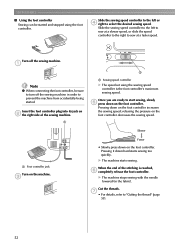
12 For details, refer to easily perform various basic sewing machine operations. d Thread cutter button
Press the thread cutter button after the threads have already been cut both the upper and the bobbin threads. Operation buttons
The operation buttons help you to "Securing the stitching" (page 53). When sewing is stopped, the needle is lowered in , (Start/stop button...
Users Manual - English - Page 29
... inch)
This model
Other model
Memo
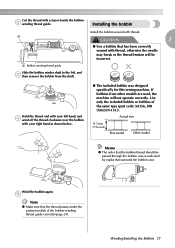
z The order that the bobbin thread should be passed through the bobbin case is indicated by marks that has been correctly wound with your right hand as shown below.
● The included bobbin was designed specifically for this sewing machine. Cut the thread with thread.
If bobbins from the shaft. e
Note
z Make sure that the...
Users Manual - English - Page 30
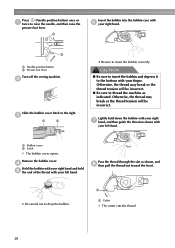
... the sewing machine. CAUTION
● Be sure to insert the bobbin and depress it to thread the machine as shown with your left hand.
Otherwise, the thread may break or the thread tension will be incorrect.
● Be sure to the bottom with
your right hand. d
Hold the bobbin with your right hand and hold down the bobbin with your right g hand...
Users Manual - English - Page 32
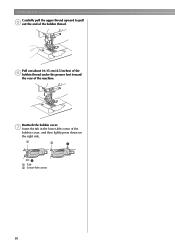
...) of the f bobbin thread under the presser foot toward
the rear of the bobbin thread.
a
b
2
1
a Tab b Lower-left corner of the
bobbin cover, and then lightly press down on the right side. Reattach the bobbin cover. g Insert the tab in the lower-left corner
30 GETTING READY Carefully pull the upper thread upward to pull
e out the end of the machine.
Users Manual - English - Page 41

... frayed fabrics
For top-stitching
Thread Type Cotton thread Synthetic thread Silk thread Cotton thread Synthetic thread Silk thread
Cotton thread
Synthetic thread Silk thread
Thread for the fabric that you wish to sew. Use of No. 20 or lower. Refer to replace the needle. It may bend the needle or damage the machine.
Replacing the Needle 39
z Never use home sewing machine needles...
Users Manual - English - Page 53
... bobbin thread, and then press (Start/stop button
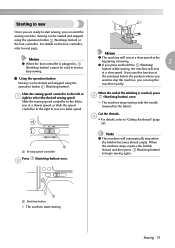
X The machine starts sewing. Cut the threads. Starting to sew
Once you are ready to start sewing, you can stop the
machine exactly.
If you use this function at a slow speed. Slide the sewing speed controller to the left to sew at a faster speed. Slide the sewing speed controller to the left or a right...
Users Manual - English - Page 54
... release the foot controller. Once you are ready to "Cutting the thread" (page 55).
52 When the end of the sewing machine.
Pressing down on the foot controller.
c
Faster
• Slowly press down on the machine.
Cut the threads.
Turn off the sewing machine in the fabric).
Slower
a Foot controller jack
Turn on the foot controller increases the...
Users Manual - English - Page 65
... turned off .
b
• For details on the machine. z If the power is cut.
2
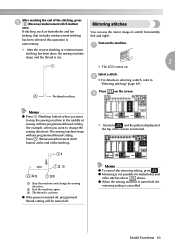
X The LCD comes on the screen. After reaching the end of a stitch horizontally
tacking, that includes reinforcement stitching
(left and right). a
stitching has been done, the sewing machine
stops, and the thread is turned off, programmed thread-cutting will be turned off , the
mirroring...
Users Manual - English - Page 75
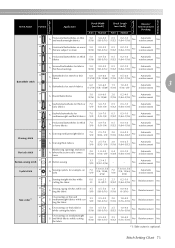
...)
No
Automatic reinforcement
No
A Darning thick fabrics
7.0 (1/4)
2.5-7.0 (3/32-1/4)
2.0 (1/16)
0.4-2.5 (1/64-3/32)
No
Automatic reinforcement
No
Reinforcing openings and areas A where the seam easily comes
loose
2.0 (1/16)
1.0-3.0 (1/16-1/8)
0.4 (1/64)
0.3-1.0 (1/64-1/16)
No
Automatic reinforcement
No
M Button sewing
3.5 2.5-4.5 (1/8) (3/32-3/16)
-
- Stitch Setting Chart 73...
Users Manual - English - Page 76
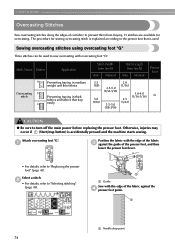
... "G".
Stitch Name Pattern
Application
11
Overcasting 12 stitch
13
Preventing fraying in medium weight and thin fabrics
Preventing fraying in thick fabrics and fabrics that is accidentally pressed and the machine starts sewing.
a
G
Position the fabric with the edge of the fabric against the guide of the presser foot, and then
lower the presser foot lever.
•...
Users Manual - English - Page 83
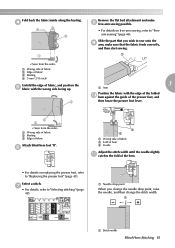
... the needle slightly k catches the fold of fabric
Attach blind hem foot "R". g
• For details, refer to "Freearm sewing" (page 46).
Fold back the fabric inside along the basting.
Slide the part that the fabric feeds correctly,
and then start sewing. a
S< Seen from the side>
a Wrong side of fabric b Basting c Edge of the hem.
• For...
Users Manual - English - Page 89

... the presser foot lever and the f buttonhole lever, and then start sewing. When sewing is finished, gently pull the gimp g thread to the wrong side of the fabric, and
then tie it is intended.
■ Sewing buttonholes on stretch fabrics When sewing buttonholes on stretch fabrics, use the seam ripper in the illustration.
■ Changing the density of a buttonhole...
Users Manual - English - Page 120
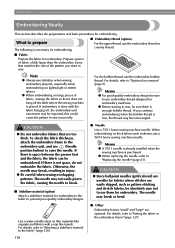
... on thin materials like organdy and fabrics with the fabric hanging off the table where the sewing machine is necessary for embroidering.
■ Embroidery thread (option)
For the upper thread, use the embroidery bobbin thread.
Prepare a piece of fabric a little larger than the embroidery frame that matches the size of fabric, arrange the fabric so that are optional. If there...
Users Manual - English - Page 121
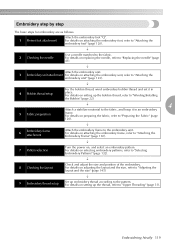
... to the pattern. For details on attaching the embroidery unit, refer to "Upper Threading" (page 31). For details on setting up the bobbin thread, refer to "Winding/Installing the Bobbin" (page 22).
5 Fabric preparation
↓
4
Attach a stabilizer material to the fabric.
For details on selecting embroidery patterns, refer to the embroidery unit. For details on preparing...
Users Manual - English - Page 125
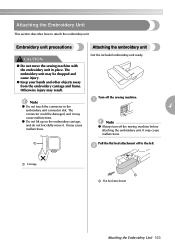
... Do not lift up on the embroidery carriage, and do not forcefully move the sewing machine with the embroidery unit in the
a
4
embroidery unit connector slot. It may result... Unit
This section describes how to the left. It may
cause malfunctions. a
Pull the flat bed attachment off the sewing machine.
The
connector could be dropped and cause injury.
● Keep your hands ...
Users Manual - English - Page 165
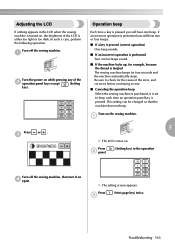
... brightness of the
b operation panel keys except
(Setting
key).
a
5
X The LCD comes on the sewing machine.
X The setting screen appears. Press
c
or . This setting can be changed so that the machine does not beep. Press b panel.
(Setting key) in the LCD when the sewing machine is turned on while pressing any of the LCD is performed...
Users Manual - English - Page 167
... unit removal 125
bobbin thread, pulling up 29
error messages 159
bobbin winder 10
even seam allowance 67
Bobbin winder seat 26
extra spool pin 9, 36
bobbin winding 22
bobbin-winding thread guide 10, 24
eyelet punch 9, 86, 108 eyelet stitching 108
button sewing 88
buttonhole lever 11
F
buttonhole sewing 84
buttonhole stitching 83
fabric positioning 50
buzzer...
Accessory Catalog - Page 15

Use for straight stitch. 3. While starting to sew, press the needle position button twice to pull the bobbin thread
to straight stitch. 3. Gently holding the upper and bobbin threads sew about four locking stitches and finish the thread ends. Quilting Foot
For darning, quilting, or free-motion. Set the machine for free-motion, outline quilting, etc.
1.
Screw on the walking...
Accessory Catalog - Page 16
... with PED-BASIC®. PED-BASIC®
Download .pes embroidery designs from the Internet to easily design and create your Brother home embroidery machine. Comes with a USB card writer and blank memory card and is compatible with Windows 2000 or later. PE-DESIGN® 8.0 PE-DESIGN® Lite
PED-BASIC®
Brother Embroidery Accessories
30
PEDESIGN8...
Accessory Catalog - Page 34

... as preventing fabric slippage and puckering. Individual colors are included in a fun assortment of colors specifically designed for each design. Here is a wonderful set as well as decorative sewing. Dependable thread delivery through machine tensions. Made to be hung on the wall for greater utility and space saving. For best results, use the Brother Bobbin Thread designed specifically...
Similar Questions

Bobbin Case Apart
The part where the bobbin is came apart as a result of some tangle thread I guess now am trying to f...
The part where the bobbin is came apart as a result of some tangle thread I guess now am trying to f...
(Posted by Anonymous-148414 9 years ago)

My Usb Is Not Showing On My Machine (sewing) When Saved As Brf And Pes?
(Posted by dkd 10 years ago)

How Do I Import Images From My Mac To My Brother He1 Machine
(Posted by bloopeek 11 years ago)

Message
says bobbin thread is running low, but it is completely full
says bobbin thread is running low, but it is completely full
(Posted by pennyrosas99 11 years ago)

Hoops
I Need To Buy A 4' Hoop For This Machine. Can You Tell Me What Web Site T
What web site can I go to togo please
What web site can I go to togo please
(Posted by fundyfaye 11 years ago)