Users Manual - English
Page 4
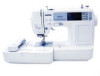
... machine needle. • Switch the sewing machine to the symbol "O" position to turn it off when making any adjustments in the needle area. • Do not use a damaged or incorrect needle plate, as it could cause the needle to break. • Do not push or pull the fabric when sewing, and follow the troubleshooting table in this product are being used . • Always consult the operation manual when replacing or installing any opening...
... machine needle. • Switch the sewing machine to the symbol "O" position to turn it off when making any adjustments in the needle area. • Do not use a damaged or incorrect needle plate, as it could cause the needle to break. • Do not push or pull the fabric when sewing, and follow the troubleshooting table in this product are being used . • Always consult the operation manual when replacing or installing any opening...
Users Manual - English
Page 11
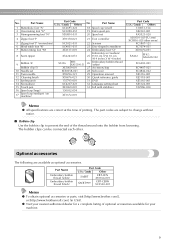
...-001 182986-024 Memo z All specifications are correct at the time of printing. Part Name 18 Spool cap (small) 19 Extra spool pin 20 Spool net 4 Zipper foot "I" X59370-021 21 Foot controller 5 Zigzag foot "J" (on machine) 6 Blind stitch foot "R" 7 Button fitting foot "M" 8 Seam ripper 9 Bobbin (4) Bobbin clip (3) 10 Needle set 11 Twin needle 12 Cleaning brush 13 Eyelet punch 14 Screwdriver 15 Touch pen 16 Spool cap (large) 17 Spool cap (medium) (on machine) XC3021-031 XC4051-031 XE2137...
...-001 182986-024 Memo z All specifications are correct at the time of printing. Part Name 18 Spool cap (small) 19 Extra spool pin 20 Spool net 4 Zipper foot "I" X59370-021 21 Foot controller 5 Zigzag foot "J" (on machine) 6 Blind stitch foot "R" 7 Button fitting foot "M" 8 Seam ripper 9 Bobbin (4) Bobbin clip (3) 10 Needle set 11 Twin needle 12 Cleaning brush 13 Eyelet punch 14 Screwdriver 15 Touch pen 16 Spool cap (large) 17 Spool cap (medium) (on machine) XC3021-031 XC4051-031 XE2137...

Users Manual - English
Page 12
... guide when winding the bobbin thread and threading the machine. e LCD (liquid crystal display) (touch panel) (page 18) Setting for the selected stitch or pattern and error messages appear in the connector for the embroidery unit. i Operation buttons (page 12) Use these descriptions to operate the machine. h Presser foot lever (page 50) Raise and lower the presser foot lever to thread the needle. m Thread tension dial (page 59, 145) Adjust the upper thread tension with this thread guide cover when winding the bobbin thread and threading the machine. Before using the sewing...
... guide when winding the bobbin thread and threading the machine. e LCD (liquid crystal display) (touch panel) (page 18) Setting for the selected stitch or pattern and error messages appear in the connector for the embroidery unit. i Operation buttons (page 12) Use these descriptions to operate the machine. h Presser foot lever (page 50) Raise and lower the presser foot lever to thread the needle. m Thread tension dial (page 59, 145) Adjust the upper thread tension with this thread guide cover when winding the bobbin thread and threading the machine. Before using the sewing...

Users Manual - English
Page 13
... embroidery card. Do not cover the air vent while the sewing machine is installed onto the presser foot holder. f Foot controller jack (page 52) Insert the plug on and off. d Air vent The air vent allows the air surrounding the motor to use your machine. 11 b Thread guide disk (page 34) Pass the thread through the needle bar thread guide. g Power supply jack (page 17) Insert the plug on the fabric as the sewing takes place. g Feed dogs...
... embroidery card. Do not cover the air vent while the sewing machine is installed onto the presser foot holder. f Foot controller jack (page 52) Insert the plug on and off. d Air vent The air vent allows the air surrounding the motor to use your machine. 11 b Thread guide disk (page 34) Pass the thread through the needle bar thread guide. g Power supply jack (page 17) Insert the plug on the fabric as the sewing takes place. g Feed dogs...
Users Manual - English
Page 14
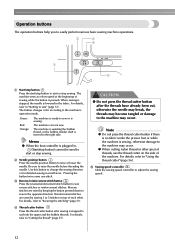
... no fabric under the presser foot or while the machine is stopped to cut , otherwise the needle may break, the threads may become tangled or damage to change the sewing direction or for detailed sewing in the opposite direction. Operation buttons The operation buttons help you to raise or lower the needle. The machine can not sew. b Needle position button Press the needle position button to easily perform various basic sewing machine operations. For details, refer to "Starting to adjust the sewing speed. 12 Reverse stitches...
... no fabric under the presser foot or while the machine is stopped to cut , otherwise the needle may break, the threads may become tangled or damage to change the sewing direction or for detailed sewing in the opposite direction. Operation buttons The operation buttons help you to raise or lower the needle. The machine can not sew. b Needle position button Press the needle position button to easily perform various basic sewing machine operations. For details, refer to "Starting to adjust the sewing speed. 12 Reverse stitches...

Users Manual - English
Page 23
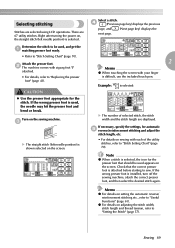
... can be displayed. Press the item to the corresponding page in this Operation Manual. bobbin winding / setting bobbin thread / needle replacement / embroidery unit attachment / Example: Upper threading embroidery frame attachment / embroidery foot attachment / presser foot replacement on the LCD display for the selected topic appears. X The sewing machine help key) on the sewing machine. Checking machine operating Press (Next page key) to switch to the previous page. Press (Sewing machine help screen appears. Turn on b the display panel. a X The LCD...
... can be displayed. Press the item to the corresponding page in this Operation Manual. bobbin winding / setting bobbin thread / needle replacement / embroidery unit attachment / Example: Upper threading embroidery frame attachment / embroidery foot attachment / presser foot replacement on the LCD display for the selected topic appears. X The sewing machine help key) on the sewing machine. Checking machine operating Press (Next page key) to switch to the previous page. Press (Sewing machine help screen appears. Turn on b the display panel. a X The LCD...
Users Manual - English
Page 51
... adjusting the stitch width, stitch length and thread tension, refer to "Useful Functions" (page 61). Sewing 49 Select a stitch. There are selected using LCD operations. Attach the presser foot. If the wrong presser foot is shown selected on sewing with each of selected stitch, the stitch width and the stitch length are displayed. c X The straight stitch (left needle position) is installed, turn off the sewing machine, attach the correct presser foot, and then select the desired stitch again. z For details on setting the automatic reverse...
... adjusting the stitch width, stitch length and thread tension, refer to "Useful Functions" (page 61). Sewing 49 Select a stitch. There are selected using LCD operations. Attach the presser foot. If the wrong presser foot is shown selected on sewing with each of selected stitch, the stitch width and the stitch length are displayed. c X The straight stitch (left needle position) is installed, turn off the sewing machine, attach the correct presser foot, and then select the desired stitch again. z For details on setting the automatic reverse...
Users Manual - English
Page 54
...the stitching is the foot controller's maximum sewing speed. Cut the threads. Turn off the sewing machine in the fabric). releasing the pressure on the foot controller increases the sewing speed; X The machine starts sewing. X The machine stops sewing with the needle lowered (in order to prevent the machine from accidentally being started and stopped using the sewing speed controller is reached, f completely release the foot controller. g • For details, refer to start sewing, slowly e press down on the machine. a a a Sewing speed controller X The speed set using...
...the stitching is the foot controller's maximum sewing speed. Cut the threads. Turn off the sewing machine in the fabric). releasing the pressure on the foot controller increases the sewing speed; X The machine starts sewing. X The machine stops sewing with the needle lowered (in order to prevent the machine from accidentally being started and stopped using the sewing speed controller is reached, f completely release the foot controller. g • For details, refer to start sewing, slowly e press down on the machine. a a a Sewing speed controller X The speed set using...
Users Manual - English
Page 59
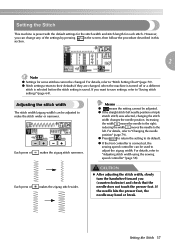
... changes the needle position. For details, refer to "Stitch Setting Chart" (page 70). For details, refer to "Changing the needle position" (page 79). reducing the width moves the needle to make the stitch wider or narrower. For details, refer to their defaults if they are changed . z If the foot controller is saved. If the needle hits the presser foot, the needle may bend or break. z Stitch settings return to "Adjusting stitch width using the sewing speed controller...
... changes the needle position. For details, refer to "Stitch Setting Chart" (page 70). For details, refer to "Changing the needle position" (page 79). reducing the width moves the needle to make the stitch wider or narrower. For details, refer to their defaults if they are changed . z If the foot controller is saved. If the needle hits the presser foot, the needle may bend or break. z Stitch settings return to "Adjusting stitch width using the sewing speed controller...
Users Manual - English
Page 87
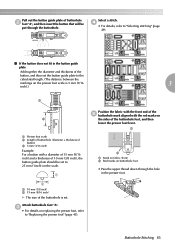
... "Selecting stitching" (page 49). ■ If the button does not fit in the presser foot. 2 a 10 mm (3/8 inch) b 15 mm (9/16 inch) X The size of the buttonhole is 5 mm (3/16 3 inch).) a b c a Presser foot scale b Length of buttonhole (diameter + thickness of button) c 5 mm (3/16 inch) Example: For a button with the red marks on buttonhole foot • Pass the upper thread down through the hole in the button guide plate Add together...
... "Selecting stitching" (page 49). ■ If the button does not fit in the presser foot. 2 a 10 mm (3/8 inch) b 15 mm (9/16 inch) X The size of the buttonhole is 5 mm (3/16 3 inch).) a b c a Presser foot scale b Length of buttonhole (diameter + thickness of button) c 5 mm (3/16 inch) Example: For a button with the red marks on buttonhole foot • Pass the upper thread down through the hole in the button guide plate Add together...
Users Manual - English
Page 90
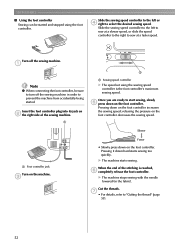
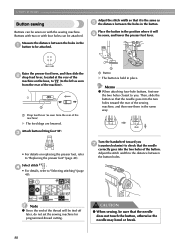
... to be attached. a a Drop feed lever (as seen from the rear of the thread will f be sewn, and lower the presser foot lever. Note z Since the end of the machine) X The feed dogs are lowered. c • For details on replacing the presser foot, refer to the left as seen from the rear of the machine). UTILITY STITCHES Button sewing Buttons can be sewn on with four holes can be attached. Raise the presser foot lever, and...
... to be attached. a a Drop feed lever (as seen from the rear of the thread will f be sewn, and lower the presser foot lever. Note z Since the end of the machine) X The feed dogs are lowered. c • For details on replacing the presser foot, refer to the left as seen from the rear of the machine). UTILITY STITCHES Button sewing Buttons can be sewn on with four holes can be attached. Raise the presser foot lever, and...
Users Manual - English
Page 104
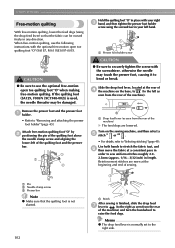
... stitching" (page 49). a Pin b Needle clamp screw c Presser bar Note z Make sure that the fabric can be damaged. When free-motion quilting, use the optional free-motion open toe quilting foot "O" (SA187, F061 (XE1097-001)). Turn on the base, to (to the right as seen from the rear of sewing. Attach free-motion quilting foot "O" by b positioning the pin of the quilting foot above the needle clamp screw and aligning the lower-left as seen from the rear of the machine) X The feed dogs are...
... stitching" (page 49). a Pin b Needle clamp screw c Presser bar Note z Make sure that the fabric can be damaged. When free-motion quilting, use the optional free-motion open toe quilting foot "O" (SA187, F061 (XE1097-001)). Turn on the base, to (to the right as seen from the rear of sewing. Attach free-motion quilting foot "O" by b positioning the pin of the quilting foot above the needle clamp screw and aligning the lower-left as seen from the rear of the machine) X The feed dogs are...

Users Manual - English
Page 156
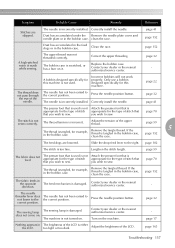
... Replace the presser foot. service center. Only use the start /stop button was pressed, even though the foot controller is not Attach the presser foot that you wish to sew. Lower the presser foot lever. The needle is incorrectly installed. Select a thread and needle that are appropriate for this machine is not used is connected. Loosen the upper thread tension. The spool is incorrectly installed. Incorrect bobbins will not work properly. Visit us at [http://solutions.brother.com]. The presser foot lever is loose. The needle clamp screw...
... Replace the presser foot. service center. Only use the start /stop button was pressed, even though the foot controller is not Attach the presser foot that you wish to sew. Lower the presser foot lever. The needle is incorrectly installed. Select a thread and needle that are appropriate for this machine is not used is connected. Loosen the upper thread tension. The spool is incorrectly installed. Incorrect bobbins will not work properly. Visit us at [http://solutions.brother.com]. The presser foot lever is loose. The needle clamp screw...
Users Manual - English
Page 159
... use a bobbin designed specifically for the type of stitch that is tangled in the bobbin case. page 22 The thread does not pass through the eye of the LCD. Correctly install the needle. page 152 5 The feed dogs are skipped. Slide the drop feed lever to the the correct position. Remove the tangled thread. Press the needle position button. you wish to sew. page 59 The thread is scratched, or has a burr on . Attach the presser foot...
... use a bobbin designed specifically for the type of stitch that is tangled in the bobbin case. page 22 The thread does not pass through the eye of the LCD. Correctly install the needle. page 152 5 The feed dogs are skipped. Slide the drop feed lever to the the correct position. Remove the tangled thread. Press the needle position button. you wish to sew. page 59 The thread is scratched, or has a burr on . Attach the presser foot...
Users Manual - English
Page 167
...5 bobbin installation 27 embroidery unit removal 125 bobbin thread, pulling up 29 error messages 159 bobbin winder 10 even seam allowance 67 Bobbin winder seat 26 extra spool pin 9, 36 bobbin winding 22 bobbin-winding thread guide 10, 24 eyelet punch 9, 86, 108 eyelet stitching 108 button sewing 88 buttonhole lever 11 F buttonhole sewing 84 buttonhole stitching 83 fabric positioning 50 buzzer 163 fagoting 110 fagoting stitch 109 C care 152 feed dogs 11 flat bed attachment 10 foot controller 9, 52 changing sewing direction 65 foot controller jack...
...5 bobbin installation 27 embroidery unit removal 125 bobbin thread, pulling up 29 error messages 159 bobbin winder 10 even seam allowance 67 Bobbin winder seat 26 extra spool pin 9, 36 bobbin winding 22 bobbin-winding thread guide 10, 24 eyelet punch 9, 86, 108 eyelet stitching 108 button sewing 88 buttonhole lever 11 F buttonhole sewing 84 buttonhole stitching 83 fabric positioning 50 buzzer 163 fagoting 110 fagoting stitch 109 C care 152 feed dogs 11 flat bed attachment 10 foot controller 9, 52 changing sewing direction 65 foot controller jack...
Users Manual - English
Page 168
... 139 pattern retrieving 150 piecing 99 piecing straight stitch 97 plug 17 positioning fabric 50 power supply cord 17 power supply jack 11, 17 power switch 11, 17 preparations for embroidering 118 presser foot 11 presser foot holder 11, 45 presser foot holder installation 45 presser foot holder removal 45 presser foot lever 10 presser foot replacement 43 previous page key 13 pulling up bobbin thread 29 Q quick reference guide 9 quilting 100 quilting guide 101 quilting stippling 97 quilting stitch 97 R race 152 reinforcement stitching 53, 103 release button 125 removing...
... 139 pattern retrieving 150 piecing 99 piecing straight stitch 97 plug 17 positioning fabric 50 power supply cord 17 power supply jack 11, 17 power switch 11, 17 preparations for embroidering 118 presser foot 11 presser foot holder 11, 45 presser foot holder installation 45 presser foot holder removal 45 presser foot lever 10 presser foot replacement 43 previous page key 13 pulling up bobbin thread 29 Q quick reference guide 9 quilting 100 quilting guide 101 quilting stippling 97 quilting stitch 97 R race 152 reinforcement stitching 53, 103 release button 125 removing...

Accessory Catalog
Page 13
... bobbin cover. The intervals of tucks can be adjusted. 1. www.brother.com Install and manually thread a twin needle. 2. Move fabric about 1" (2.5 cm) past the needle to sew the first row in one of stitch length, tuck setting and depth setting. 2. SA143 AFJKM Ruffler Foot Makes ruffles with this presser foot. 1. Adjust the amount of tuck or gather by placing the completed row in the center position. 3. The ruffling blade on lightweight fabric. Use a stiff card to guide...
... bobbin cover. The intervals of tucks can be adjusted. 1. www.brother.com Install and manually thread a twin needle. 2. Move fabric about 1" (2.5 cm) past the needle to sew the first row in one of stitch length, tuck setting and depth setting. 2. SA143 AFJKM Ruffler Foot Makes ruffles with this presser foot. 1. Adjust the amount of tuck or gather by placing the completed row in the center position. 3. The ruffling blade on lightweight fabric. Use a stiff card to guide...

Accessory Catalog
Page 15
... quilting is needed. 1. Set the machine for thick layers of the foot gives you wide visibility in place while stitches are free to hold the fabric firmly. 5. Walking Foot SA140 ABCDEFJKMN SA166 L SA107 GHO SA169 I Open Toe Walking Foot SA188 ABCDEFJKMN www.brother.com Lower the feed dogs. 3. The foot raises and lowers with the pin over the needle clamp screw. 2. Place the fabric beneath the presser foot. 4. While starting to sew, press the needle position button twice to pull the bobbin thread...
... quilting is needed. 1. Set the machine for thick layers of the foot gives you wide visibility in place while stitches are free to hold the fabric firmly. 5. Walking Foot SA140 ABCDEFJKMN SA166 L SA107 GHO SA169 I Open Toe Walking Foot SA188 ABCDEFJKMN www.brother.com Lower the feed dogs. 3. The foot raises and lowers with the pin over the needle clamp screw. 2. Place the fabric beneath the presser foot. 4. While starting to sew, press the needle position button twice to pull the bobbin thread...

Accessory Catalog
Page 34
..., use the Brother Bobbin Thread designed specifically for your fabric properly with other sewing and embroidery machine brands. Available in the most intricate designs. All 61 exclusive Brother palette colors are strong, soft and smooth, and perfectly balanced to last a long time. Here is a wonderful set as well as preventing fabric slippage and puckering. C (White only): The 1,000-meter (approx. 1,100-yds) spun thread is Project Book...
..., use the Brother Bobbin Thread designed specifically for your fabric properly with other sewing and embroidery machine brands. Available in the most intricate designs. All 61 exclusive Brother palette colors are strong, soft and smooth, and perfectly balanced to last a long time. Here is a wonderful set as well as preventing fabric slippage and puckering. C (White only): The 1,000-meter (approx. 1,100-yds) spun thread is Project Book...

Accessory Catalog
Page 40
... the fabric lightly with the LC1 presser foot included in the machine. 2. Set up your machine for a chain stitch, the center needle. 2. Attach the hem positioning plate A/B to the hemming attachment, and attach it into the front cover slot. 3. The stitches are always smooth. 1. Fold fabric and set through the holder). 4. Insert the tab on the bias tape attachment into the guide. 4. Open the seams. 4. SA226CV www.brother.com Sew as folding them. Sew. Attaching 12 mm (approx. 1/2") bias tape: Use...
... the fabric lightly with the LC1 presser foot included in the machine. 2. Set up your machine for a chain stitch, the center needle. 2. Attach the hem positioning plate A/B to the hemming attachment, and attach it into the front cover slot. 3. The stitches are always smooth. 1. Fold fabric and set through the holder). 4. Insert the tab on the bias tape attachment into the guide. 4. Open the seams. 4. SA226CV www.brother.com Sew as folding them. Sew. Attaching 12 mm (approx. 1/2") bias tape: Use...


