
Bernina Bernette 340 deco Support Question
Bernina Bernette 340 deco Support Question
Find answers below for this question about Bernina Bernette 340 deco.Need a Bernina Bernette 340 deco manual? We have 1 online manual for this item!
Question posted by ederprop on September 12th, 2013
Machine Will Not Turn On
My Bernette will not turn on. I have tested cable and electricty is flowing through. It was working perfectly yesterday.
Current Answers
Related Bernina Bernette 340 deco Manual Pages
User Guide - Page 2

...Replacement parts for its intend ed use of double-insulated machines.
1.
Do not dispose of electrical shock:
1. DANGER
To ...working properly • it has been dropped or damaged, • it in
the needle area, such as a toy. Never operate this sewing computer only for a doubleinsulated product must be taken on the cord, instead, grasp the plug
before cleaning. Turn...
User Guide - Page 3
..., the concise, easy-to-learn user interface and the many features and high stitch quality that the Deco 340 provides. These features combined with help to buy the bernette Deco 340. Please visit your decision to enhance your sewing experience easier and even more satisfactory. We are happy, to welcome you in order to keep you...
User Guide - Page 5
...
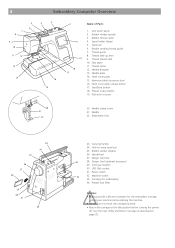
behind your machine before starting the machine. • Do not force to move the carriage by hand. • Return the carriage to the idle position before turning the power... Return Carriage as described on page 25. Carrying handle
24. Design Card (optional accessory)
29. Machine socket
33. Start/Stop button 18. Needle 22. Face plate 11. Needle plate 14. 4
Embroidery...
User Guide - Page 8
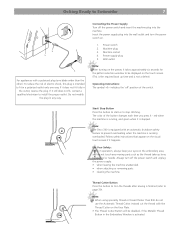
... Thread Cutter. Thread Cutter Button Press this button to trim the threads after sewing is stopped. Machine plug 3.
Always turn the power switch on the touch screen. (This is the required boot up...the outlet, reverse the plug.
Insert the power supply plug into the machine. The color of the switch. Note: The Deco 340 is equipped with a polarized plug (one blade wider than #30 ...
User Guide - Page 9
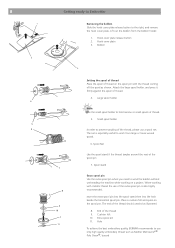
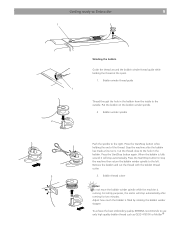
... please use a spool net.
Cushion felt 10. Hole
To achieve the best embroidery quality, BERNINA recommends to work from the bobbin holder.
1. Hook cover plate release button 2. Hook cover plate 3. Bobbin
2 3
4
5... the hook cover plate release button to wind the bobbin without unthreading the machine while working with the thread coming off the spool as shown. Insert the extra spool...
User Guide - Page 10
...stop automatically. Bobbin thread cutter
Notes: Do not move the bobbin winder spindle while the machine is filled by rotating the bobbin winder stopper. Adjust how much the bobbin is running ... When the bobbin is fully wound it will stop automatically after the bobbin has made a few turns. To achieve the best embroidery quality, BERNINA recommends to the hole in the bobbin from the ...
User Guide - Page 12
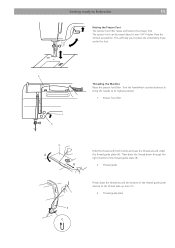
... thread guide plate and up to place the embroidery hoop under the thread guide plate (A). Turn the handwheel counterclockwise to bring the needle to Embroider
11
Raising the Presser Foot The presser ... the thread around under the foot.
2
1 3
Threading the Machine Raise the presser foot lifter. The presser foot can be raised about 6 mm (1/4") higher than the normal up lever (C).
3....
User Guide - Page 17
... should be
consistent.
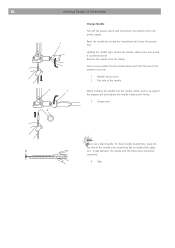
4. Holding the needle tight, loosen the needle clamp screw by turning the handwheel and lower the presser foot. To check needle straightness, place the
flat side of the ...needle to Embroider
1
3
1
2
Change Needle
Turn off the power switch and disconnect the machine from the clamp. Raise the needle by turning it up against the stopper pin and tighten the ...
User Guide - Page 18
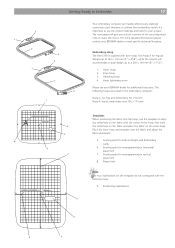
Embroidery Hoop The Deco 340 is important to use the template to align the centerlines on the fabric with the center of the most important rules to Embroider
17
3 1
2
1
4 3
2 4
7
Your ...
User Guide - Page 20
... knob clockwise.
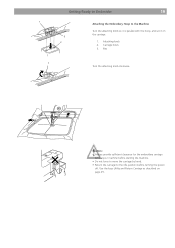
Getting Ready to Embroider
19
1
3 2
Attaching the Embroidery Hoop to the idle position before starting the machine. • Do not force to move the carriage by hand. • Return the carriage to the Machine
Turn the attaching knob so it is parallel with the hoop, and set it on page 25.
User Guide - Page 26
1
2
3
4
5
6
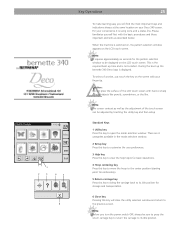
Key Operations
25
To make learning easy you turn the power switch OFF, always be sure to press the return carriage key ...the required boot up the bernette 340 Deco logo is switched on, the pattern selection window appears on the LCD touch screen.
To select a function, just touch the key on your convenience it is not a defect. When the machine is displayed. During the ...
User Guide - Page 27
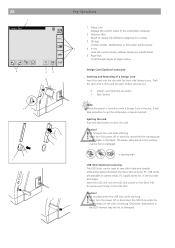
... Tabs:
A.B.C
Touch to choose the different categories on the Deco 340. Caution! • Do not eject the card while stitching. • Never turn the power off or eject the card while the warning sign...(on with the front side facing to save stitch data and transfer embroidery designs between the Deco 340 and your PC. Otherwise, data stored in the memory may be lost or damaged.
=...
User Guide - Page 37
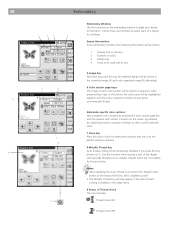
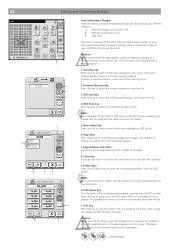
Screen Information In the embroidery window, the following information will be shown.
1 Sewing time in minutes 2 Number of colors 3 Design size 4 Hoop to be... thread cutting will start to stitch out the selected color.
7 Close key Press this function when sewing a part of the Deco 340 is shown on the fabric. Further there are not suitable for stitching. Embroider specific color sections: ...
User Guide - Page 40
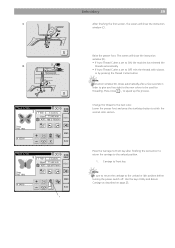
...will show the instruction window (D). • If Auto Thread Cutter is set to ON, the machine has trimmed the
threads automatically. • If Auto Thread Cutter is set to OFF, trim... color section. Lower the presser foot and press the start/stop button to the unload or idle position before turning the power switch off. Press the Carriage to Front key after a few seconds in order to give you ...
User Guide - Page 53
...Save dialog box. Caution: Never turn off the power, eject the Design Card or remove the USB Stick when the warning sign or hourglass appears on the Deco 340 B. Otherwise, data stored in ... the editing window embroidery design can be automatically assigned, starting from M_001 in memory of the Deco 340 can be lost or damaged.
= warning sign ATA Personal Design Card C. This will be ...
User Guide - Page 55
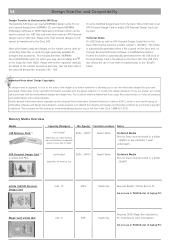
... («Card/Machine Write»). ...Deco 340 a USB Stick or an ATA Personal Design Card (= artista 200 Personal Design Card) can read all BERNINA design cards.
To run non licensed designs from OESD. Magic Card artista (#2)
max. 6
Requires OESD Magic Box attached to
EXP
Read only
PC.
54
Design Transfer and Compatibility
Design Transfer to the bernette 340 Deco The bernette 340 Deco...
User Guide - Page 57
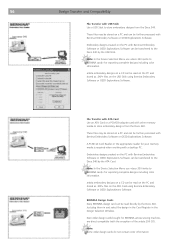
... appropriate reader for BERNINA artista sewing machine, are direct compatible (with Bernina...Window. Note: In the Device Selection Menu use «deco 330 (write to the Deco 340 by the Deco 340. File Transfer with ATA Card Use an ATA Card ....
Even older design cards bought for your memory media is required when working with USB Stick Use a USB Stick to BERNINA card)» for exporting...
User Guide - Page 59
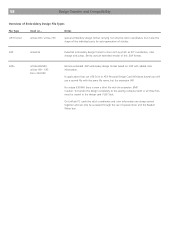
... and Compatibility
Overview of this .EXP format.
.EXP+
artista 630/640, artista 160 - 185 Deco 330/340
Bernina extended .EXP embroidery design format based on ... In applications that use of stitches.
.EXP
...driver and the Reader/ Writer box.
Caution: To transfer the design completely to the sewing computer both or all three files must be accessed through the use USB Stick or ATA...
User Guide - Page 60
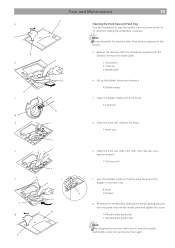
...in this section.
Note: Do not dismantle the machine other than what is explained in the hook race.
8 Knob..., aligning the needle plate guide pins with the machine.
a Remove the setscrew with the screwdriver supplied ...10 Needle plate guide pins 11 Needle plate guide holes Note: After cleaning the machine, make sure to 'O' and then unplug the embroidery computer. (1) a
1
(2)
2
b...
User Guide - Page 62

... is not set in the
thread holder when starting the machine. 6 Sewing speed is too high for some
reason when embroidering. 5...turn smoothly. Patterns distorted Function keys do not work properly.
1 The fabric is not pulled tightly on the
embroidery hoop. 7 A stabilizer is caught or pulled for the design being used . 7 The needle thread on the LCD touch panel
1 the machine is not working...
Similar Questions

Bernette Deco 340 Embroidery Machine
I am seeking an Embroidery Foot no 22 for the Bernette Deco 340
I am seeking an Embroidery Foot no 22 for the Bernette Deco 340
(Posted by baxterclan 1 year ago)

New Bulb Not Working In Sewing Machine Bernette 12 What Can It Be
(Posted by Anonymous-152221 8 years ago)

Software For Deco 340
how do I get the Artlink v6 software loaded on my PC
how do I get the Artlink v6 software loaded on my PC
(Posted by Anonymous-126604 10 years ago)

How Do I Reset Timing On Bernette 340 Embroidery Machine?
I have an Bernina Bernette 340 deco embroidery machine. I desperately need instructions for resettin...
I have an Bernina Bernette 340 deco embroidery machine. I desperately need instructions for resettin...
(Posted by amykcamp 10 years ago)

My Sewing Machine Bernette 15 Stops Working
After 1 day using my Bernette 15 stops working - engine hoots but doesn't rotate spindle and hand wh...
After 1 day using my Bernette 15 stops working - engine hoots but doesn't rotate spindle and hand wh...
(Posted by sgrayxx 12 years ago)