Asus PA246Q Support Question
Asus PA246Q Support Question
Find answers below for this question about Asus PA246Q.Need a Asus PA246Q manual? We have 1 online manual for this item!
Question posted by danandme on June 2nd, 2012
Loosen Of The Arm From Its Base
Swivel adjustment left or right is very hard to do it. I need loosen the arm from the base, do you know how?
Current Answers
Answer #1: Posted by cljeffrey on August 18th, 2012 12:27 PM
cljeffrey

Member since:
July 17th, 2012 Points: 1,054,453

Member since:
July 17th, 2012 Points: 1,054,453
Hello my name is Jeffrey and I work for Asus Customer Loyalty Team in the U.S
Looking on the bottom of the base you will notice four special screws that require a square driver. All you have to do is loosen those square screws then you will be able to loosen it.
If you have any questions or comments you can email me at [email protected]
ASUS strives to meet and exceeds our customer expectations within our warranty policy.
Regards,
Jeffrey
ASUS Customer Loyalty
Related Asus PA246Q Manual Pages
User Manual - Page 2

... 1-2
1.3.1 Front view 1-2 1.3.2 Back view 1-3 1.3.3 QuickFit Function 1-4 Chapter 2: Setup 2.1 Detaching the arm/base (for VESA wall mount 2-1 2.2 Adjusting the monitor 2-2 2.3 Connecting the cables 2-3 2.4 Turning on the monitor 2-3 Chapter 3: General instructions 3.1 OSD (On-Screen Display) menu 3-1 3.1.1 How to reconfigure 3-1 3.1.2 OSD function introduction 3-1 3.2 Specifications...
User Manual - Page 3
... cause harmful interference to radio communications.
Causing Equipment Regulations. This equipment has been tested and found to comply with the limits for connection of the monitor to the graphics card is subject to the following measures: • Reorient or relocate the receiving antenna. • Increase the separation between the equipment and...
User Manual - Page 4

...shock. • Avoid dust, humidity, and temperature extremes. The dangerous high voltages inside the
monitor may become wet. Never place this product near or over a radiator or heat source unless ...yourself.
This symbol of time. Safety information
• Before setting up the monitor, carefully read all cables are correctly connected and the
power cables are not damaged. Do ...
User Manual - Page 5

.... NOTE: Tips and additional information to the nature of the fluorescent light. Clean the monitor surface with the monitor. The following symptoms are normal with mild cleaner.
• Avoid using a cleaner containing... the display by yourself! Stubborn stains may be removed with a cloth dampened with the monitor:
• The screen may flicker during the initial use due to aid in this ...
User Manual - Page 7

... can enjoy the convenience and delightful visual experience that enhance your retailer immediately.
Thank you !
1.2 Package contents
Check your package for the following items: LCD monitor Quick start guide Warranty card Power cord VGA cable DVI cable DisplayPort cable USB cable Support CD Cable tie Color Calibration Testing Report
If any...
User Manual - Page 8

...• Exits the OSD menu or goes back to the previous menu when the OSD menu is active.
• Automatically adjusts the image to 1.3.3 QuickFit Function).
2. 1.3 Monitor introduction
1.3.1 Front view
1
2
3
4
5
6
7
1. MENU button:
• Turns on the OSD menu.
QuickFit...VGA mode only).
3.
• Decreases values or moves your selection left/down.
• Contrast hotkey
4.
User Manual - Page 9

... table.
Power switch. This port is for connection for connection with the monitor.
7. ASUS PA246 Series LCD Monitor
1-3 This port connects the power cord. 3. AC-IN port. Press ...button (Input Select button) to turn on /off power. 2.
5. • •
6. •
Increases values or moves your selection right...
User Manual - Page 10

... (built-in Push Ejection Mechanism): SD / MS / MMC/xD - Grid patterns The grid patterns facilitate designers and users to organize content and layout on the monitor.
9. Earphone jack.
8. with USB devices, such as USB keyboard/mouse, USB flash drive, etc. Kensington lock slot.
10. direct insertion MS Duo / Mini-SD / TransFlash...
User Manual - Page 11

... photographers and other users to view their photos in real size on the screen. Photo 4x6, 3x5, 2x2
Photo 8x10, 5x7
ASUS PA246 Series LCD Monitor
1-5 Paper size QuickFit provides numerous commonly used standard paper sizes for users to accurately view and edit their documents in real size on the screen...
User Manual - Page 13

Use a screwdriver to the monitor. ASUS PA246 Series LCD Monitor
2-1 2.1 Detaching the arm/base (for VESA wall mount. Have the front of this monitor is specially designed for VESA wall mount)
The detachable arm/base of the monitor face down on the arm (Figure 1), and then
detach the arm/base from the monitor (Figure 2).
(Figure 1)
(Figure 2)
We recommend that you cover the table...
User Manual - Page 14
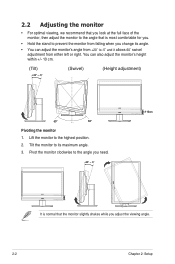
...730; and it allows 60˚ swivel adjustment from +20˚ to its angle.
• You can also adjust the monitor's height within +/- 10 cm.
(Tilt)
+20° ~ -5°
(Swivel)
(Height adjustment)
10cm
60°
60°
0°
Pivoting the monitor
1. You can adjust the monitor's angle from either left or right. 2.2 Adjusting the monitor
• For optimal viewing, we recommend...
User Manual - Page 15

...connected, you can choose the desired signal from the Input Select item in white to show that the monitor is fed.
• To use the earphone: connect the end with plug type to a power ...outlet.
• To connect the VGA/HDMI/DVI/DisplayPort cable: a. ASUS PA246 Series LCD Monitor
2-3 b. See page 1-2 for the location of the VGA/HDMI/DVI/DisplayPort cable to your computer's USB ...
User Manual - Page 17

... setting or return to navigate through the sub-menu functions.
ASUS PA246 Series LCD Monitor
3-1 Highlight the
desired function and press the MENU button to navigate
through the functions. Press
, and
to activate the OSD menu.
2. To adjust other functions, repeat steps 1-3.
3.1.2 OSD function introduction
1. If the function
selected has a sub-menu...
User Manual - Page 18
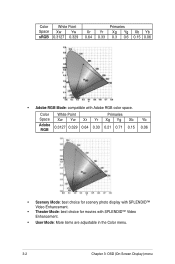
... Yr Xg Yg Xb Yb 0.64 0.33 0.3 0.6 0.15 0.06
• Adobe RGB Mode: compatible with SPLENDID™ Video Enhancement.
• User Mode: More items are adjustable in the Color menu.
3-2
Chapter 3: OSD (On-Screen Display) menu Color White Point
Primaries
Space Xw Yw Xr Yr Xg Yg Xb Yb
Adobe RGB...
User Manual - Page 19

...function. Color Set a desired color setting from this menu.
• Brightness: the adjusting range is from 0 to 100.
• Hue: shifts the image color between ...is a hotkey to
• Saturation: the adjusting range is from 0 to 2.2 or 1.8 (D50).
• Advanced Setting:
* 6-axis Hue adjustment. ASUS PA246 Series LCD Monitor
3-3 activate this function. Function
Standard sRGB Mode...
User Manual - Page 20

Image Set the image related setting from this menu.
• Sharpness: the adjusting range is from 0 to 100. • Aspect Control: adjusts the aspect ratio to the factory default value.
3. * 6-axis Saturation adjustment.
* Adjusts the gain levels for R, G, B.
* Adjusts the black level offset values for R, G, B. • Color Reset:
* Current Splendid color mode reset: Resets the color...
User Manual - Page 21

... is from 0 to 100.
• AUTO Adjust.: Automatically adjusts the image to Right-Top, Left-Top,
Right-Bottom, or Left-Bottom.
• Switch: Switches the sources of the image. With a wrong phase adjustment, the screen shows horizontal disturbances.
• Clock (pixel frequency) controls the number of pixels scanned by the monitor.
• PIP Mode: turns the PIP function...
User Manual - Page 22

... 10 to 120 seconds. * Enables or disables the DDC/CI function. * Adjusts the OSD background from opaque to restore the default settings.
3-6
Chapter 3: OSD (On-Screen Display) menu Input Select In this function, you to transparent.
• Information: shows the monitor information. • Language: there are 10 languages for your selection, including...
User Manual - Page 23

... colors Response time SPLENDID™ Video Enhancement SPLENDID™ selection Auto adjustment Color temperature selection Digital input Analog input Earphone jack Colors Power LED Tilt Swivel Height Adjustment Kensington lock AC input voltage Power consumption
Temperature (Operating) Temperature (Non... Specifications summary (PA246)
Panel Type Panel size Max. ASUS PA246 Series LCD Monitor
3-7
User Manual - Page 24

... ON mode.
• Make sure the signal cable is properly connected the monitor and the computer.
• Inspect the signal cable and make sure
not look white)
that the computer sound card driver is too light or dark
• Adjust the Contrast and Brightness settings via OSD. 3.3
Troubleshooting (FAQ)
Problem
Possible Solution...
Similar Questions


Asus Monitor Model Vk278q How Do I Adjust The Tilt Of Monitor Base
(Posted by gpa121848 10 years ago)

Asus Pa246q Loose Setting
HI, I prefer AdobeRGB mode for VGA input from a PC, and Scenery mode for HDMI input from STB. When i...
HI, I prefer AdobeRGB mode for VGA input from a PC, and Scenery mode for HDMI input from STB. When i...
(Posted by danandme 11 years ago)
Asus Pa246q Breaks
HI, can i get rid/how of those break/pause on the image, even if it's HD or standard content, to the...
HI, can i get rid/how of those break/pause on the image, even if it's HD or standard content, to the...
(Posted by danandme 11 years ago)

How To Remove The Support Piece That Connects The Monitor To The Vh196t-p Base?
(Posted by helpowl3488 12 years ago)