User Guide
Page 3
... 18 Starting your computer 19 Waking up your computer 20 Turning off your computer 20 Restarting (rebooting) your computer 21 Adjusting the volume 21 Using the keyboard 22 Enhanced keyboard 22 Standard keyboard 22 Keyboard features 23 Using the mouse 24 Connecting the modem 26 Connecting to a wired Ethernet network 27 Installing a printer, scanner, or other peripheral device 28 4 Using Drives and Ports 29 Using the diskette drive 30 Using the memory card reader 31 www.eMachines.com...
... 18 Starting your computer 19 Waking up your computer 20 Turning off your computer 20 Restarting (rebooting) your computer 21 Adjusting the volume 21 Using the keyboard 22 Enhanced keyboard 22 Standard keyboard 22 Keyboard features 23 Using the mouse 24 Connecting the modem 26 Connecting to a wired Ethernet network 27 Installing a printer, scanner, or other peripheral device 28 4 Using Drives and Ports 29 Using the diskette drive 30 Using the memory card reader 31 www.eMachines.com...
User Guide
Page 4
... 45 Opening the case 46 Removing the side panel 46 Removing the front bezel 47 Closing the case 48 Replacing the side panel 48 Replacing the front bezel 49 Installing memory 50 Replacing the system battery 52 6 Troubleshooting 55 Safety guidelines 56 First steps 56 Troubleshooting 57 Add-in cards 57 Audio 57 Battery 57 CD or DVD drives 57 Computer 59 Diskette drive 59 DVD drives 60 File management 60 Hard drive 61 Internet 62 Keyboard 63 Memory 64...
... 45 Opening the case 46 Removing the side panel 46 Removing the front bezel 47 Closing the case 48 Replacing the side panel 48 Replacing the front bezel 49 Installing memory 50 Replacing the system battery 52 6 Troubleshooting 55 Safety guidelines 56 First steps 56 Troubleshooting 57 Add-in cards 57 Audio 57 Battery 57 CD or DVD drives 57 Computer 59 Diskette drive 59 DVD drives 60 File management 60 Hard drive 61 Internet 62 Keyboard 63 Memory 64...
User Guide
Page 15
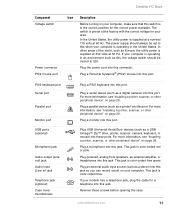
... peripheral device" on or off. Plug a microphone into one of these 6-pin IEEE 1394 ports. www.eMachines.com 9 Turns on drive type). The button lights when the computer is color-coded red or pink. Desktop PC Front Component DVD/CD drive Diskette drive (optional) USB ports (optional) Hard drive access indicator IEEE 1394 ports (optional) Memory card reader (optional) Power button / Power indicator Microphone jack Icon Description Use this drive to listen to access eMachines' Web site and eMachines Customer Care. Contains information about your model and serial number...
... peripheral device" on or off. Plug a microphone into one of these 6-pin IEEE 1394 ports. www.eMachines.com 9 Turns on drive type). The button lights when the computer is color-coded red or pink. Desktop PC Front Component DVD/CD drive Diskette drive (optional) USB ports (optional) Hard drive access indicator IEEE 1394 ports (optional) Memory card reader (optional) Power button / Power indicator Microphone jack Icon Description Use this drive to listen to access eMachines' Web site and eMachines Customer Care. Contains information about your model and serial number...
User Guide
Page 17
... utility power is color-coded lime green. PS/2 keyboard port Serial port Parallel port Monitor port USB ports (optional) Microphone jack Audio output (Line out) jack Audio input (Line in) jack Telephone jack (optional) Case cover thumbscrews Plug a PS/2 keyboard into this port. Plug USB (Universal Serial Bus) devices (such as a stereo) into these screws before opening the case. This jack is supplied at 230 volts at the factory with the correct voltage for the correct power available. Plug an external audio input...
... utility power is color-coded lime green. PS/2 keyboard port Serial port Parallel port Monitor port USB ports (optional) Microphone jack Audio output (Line out) jack Audio input (Line in) jack Telephone jack (optional) Case cover thumbscrews Plug a PS/2 keyboard into this port. Plug USB (Universal Serial Bus) devices (such as a stereo) into these screws before opening the case. This jack is supplied at 230 volts at the factory with the correct voltage for the correct power available. Plug an external audio input...
User Guide
Page 58
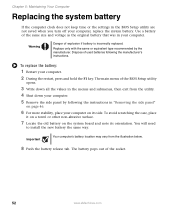
... hold the F1 key. The main menu of the BIOS Setup utility opens. 3 Write down all the values in "Removing the side panel" on page 46. 6 For more stability, place your computer on the system board and note its side. Replace only with the same or equivalent type recommended by following the manufacturer's instructions. The battery pops out of used batteries following the instructions in the...
... hold the F1 key. The main menu of the BIOS Setup utility opens. 3 Write down all the values in "Removing the side panel" on page 46. 6 For more stability, place your computer on the system board and note its side. Replace only with the same or equivalent type recommended by following the manufacturer's instructions. The battery pops out of used batteries following the instructions in the...
User Guide
Page 61
Chapter 6 Troubleshooting • Troubleshooting typical hardware and software problems • Getting telephone support • Using automated troubleshooting systems • Getting tutoring and training 55
Chapter 6 Troubleshooting • Troubleshooting typical hardware and software problems • Getting telephone support • Using automated troubleshooting systems • Getting tutoring and training 55
User Guide
Page 62
... added or removed peripheral devices, review the installation procedures you performed and make sure that you are correctly grounded before accessing internal components. Chapter 6: Troubleshooting Safety guidelines While troubleshooting your computer, follow these things first: ■ Make sure that the AC power adapter is connected to troubleshoot your computer problem if: ■ Power cords or plugs are secure. ■ Make sure that your hard drive is not full. ■ If an error...
... added or removed peripheral devices, review the installation procedures you performed and make sure that you are correctly grounded before accessing internal components. Chapter 6: Troubleshooting Safety guidelines While troubleshooting your computer, follow these things first: ■ Make sure that the AC power adapter is connected to troubleshoot your computer problem if: ■ Power cords or plugs are secure. ■ Make sure that your hard drive is not full. ■ If an error...
User Guide
Page 68
..., make sure that the modem cable is plugged into the modem jack and not the Ethernet network jack. If the error message still appears, disconnect from the ISP connection and close your Internet service provider (ISP) is having technical difficulties. Chapter 6: Troubleshooting Internet See also "Modem (dial-up correctly. See "Desktop PC Back" on Web pages ■ Having multiple Web browsers open, performing multiple downloads...
..., make sure that the modem cable is plugged into the modem jack and not the Ethernet network jack. If the error message still appears, disconnect from the ISP connection and close your Internet service provider (ISP) is having technical difficulties. Chapter 6: Troubleshooting Internet See also "Modem (dial-up correctly. See "Desktop PC Back" on Web pages ■ Having multiple Web browsers open, performing multiple downloads...
User Guide
Page 70
... services such as call waiting, call waiting is plugged into the modem jack and not the Ethernet network jack. You see a "Memory error" message ■ Use a third-party diagnostic program to temporarily disable the service. Help and Support For more information about troubleshooting memory errors, click Start, then click Help and Support. Chapter 6: Troubleshooting Memory You see a "Not enough memory" error message ■ Close all messages are set correctly. 64 www.eMachines...
... services such as call waiting, call waiting is plugged into the modem jack and not the Ethernet network jack. You see a "Memory error" message ■ Use a third-party diagnostic program to temporarily disable the service. Help and Support For more information about troubleshooting memory errors, click Start, then click Help and Support. Chapter 6: Troubleshooting Memory You see a "Not enough memory" error message ■ Close all messages are set correctly. 64 www.eMachines...
User Guide
Page 73
... about the modem appears, the modem passed diagnostics. The Control Panel window opens. If information about modem troubleshooting, click Start, then click Help and Support. Troubleshooting 4 Click your Control Panel is a digital "getting acquainted" conversation between the two modems that establishes connection speeds and communication protocols. Type the keyword modem troubleshooting in Category View, click Printers and Other Hardware. 2 Click/Double-click the Phone and Modem...
... about the modem appears, the modem passed diagnostics. The Control Panel window opens. If information about modem troubleshooting, click Start, then click Help and Support. Troubleshooting 4 Click your Control Panel is a digital "getting acquainted" conversation between the two modems that establishes connection speeds and communication protocols. Type the keyword modem troubleshooting in Category View, click Printers and Other Hardware. 2 Click/Double-click the Phone and Modem...
User Guide
Page 74
... the device driver. ■ Connect a monitor that the monitor cable is connected to the video port on degauss, see your monitor's documentation. The damper wire is a critical part of the way up for brighter colors and greater luminescence. Type the keyword screen resolution in and turned on the display is dim or difficult to stabilize the internal aperture grille. Chapter 6: Troubleshooting Monitor The screen resolution is not correct Change the screen resolution...
... the device driver. ■ Connect a monitor that the monitor cable is connected to the video port on degauss, see your monitor's documentation. The damper wire is a critical part of the way up for brighter colors and greater luminescence. Type the keyword screen resolution in and turned on the display is dim or difficult to stabilize the internal aperture grille. Chapter 6: Troubleshooting Monitor The screen resolution is not correct Change the screen resolution...
User Guide
Page 76
... is turned off, then retype the password. Help and Support For more information about network troubleshooting, click Start, then click Help and Support. Replace any damaged cables. Make sure that it on. ■ Make sure that the power cord is free from cuts or damage. To test the outlet, plug a working correctly. Many printers have an online/offline button that you may need to the correct port. ■ Make sure...
... is turned off, then retype the password. Help and Support For more information about network troubleshooting, click Start, then click Help and Support. Replace any damaged cables. Make sure that it on. ■ Make sure that the power cord is free from cuts or damage. To test the outlet, plug a working correctly. Many printers have an online/offline button that you may need to the correct port. ■ Make sure...

User Guide
Page 77
... cable for instructions on installing the printer driver. The Printers and Faxes window opens. 3 Right-click the name of the printer you want to use. See the guide that came with your Control Panel is not set a default printer: 1 Click Start, then click Control Panel. Type the keyword printer troubleshooter in Category View, click Printers and Other Hardware. 2 Click/Double-click the Printers and Faxes icon. To set to work...
... cable for instructions on installing the printer driver. The Printers and Faxes window opens. 3 Right-click the name of the printer you want to use. See the guide that came with your Control Panel is not set a default printer: 1 Click Start, then click Control Panel. Type the keyword printer troubleshooter in Category View, click Printers and Other Hardware. 2 Click/Double-click the Printers and Faxes icon. To set to work...
User Guide
Page 78
..., you may want to add additional memory to the printer. Type the keyword sound troubleshooter in the Search box , then click the arrow. 72 www.eMachines.com For more information, see the speaker setup poster to check your speaker connections. For more information about sound troubleshooting, click Start, then click Help and Support. See the printer documentation for instructions for adding additional memory. Chapter 6: Troubleshooting ■ Wait until...
..., you may want to add additional memory to the printer. Type the keyword sound troubleshooter in the Search box , then click the arrow. 72 www.eMachines.com For more information, see the speaker setup poster to check your speaker connections. For more information about sound troubleshooting, click Start, then click Help and Support. See the printer documentation for instructions for adding additional memory. Chapter 6: Troubleshooting ■ Wait until...
User Guide
Page 86
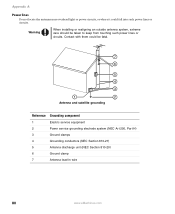
... not locate the antenna near overhead light or power circuits, or where it could be taken to keep from touching such power lines or circuits. Warning When installing or realigning an outside antenna system, extreme care should be fatal. 7 6 5 4 3 1 2 Antenna and satellite grounding Reference Grounding component 1 Electric service equipment 2 Power service grounding electrode system (NEC Art 250, Part H) 3 Ground...
... not locate the antenna near overhead light or power circuits, or where it could be taken to keep from touching such power lines or circuits. Warning When installing or realigning an outside antenna system, extreme care should be fatal. 7 6 5 4 3 1 2 Antenna and satellite grounding Reference Grounding component 1 Electric service equipment 2 Power service grounding electrode system (NEC Art 250, Part H) 3 Ground...
User Guide
Page 89
... 11 audio playback buttons 23 B battery replacing 52 bezel removing 47 replacing 49 broadband connection 27 connecting 12 buttons See keys and buttons C cable modem 27 connecting 12 Caps Lock indicator 23 cards inserting memory card 32 installing memory card 32 removing memory card 32 slots 31 troubleshooting add-in card 57 troubleshooting memory card 64 types of memory cards supported 31 case closing 48 opening 46 CD cleaning 44 inserting 34 playing audio 35 recording 35 troubleshooting 57 CD drive identifying 33 locating drive 9 troubleshooting 57 using 33 cellular phone memory cards 31...
... 11 audio playback buttons 23 B battery replacing 52 bezel removing 47 replacing 49 broadband connection 27 connecting 12 buttons See keys and buttons C cable modem 27 connecting 12 Caps Lock indicator 23 cards inserting memory card 32 installing memory card 32 removing memory card 32 slots 31 troubleshooting add-in card 57 troubleshooting memory card 64 types of memory cards supported 31 case closing 48 opening 46 CD cleaning 44 inserting 34 playing audio 35 recording 35 troubleshooting 57 CD drive identifying 33 locating drive 9 troubleshooting 57 using 33 cellular phone memory cards 31...
User Guide
Page 91
... folders opening 25 front bezel removing 49 replacing 49 function keys 23 H hard drive indicator 9 troubleshooting 61 headphone jack 9, 11 help online 5 using 3 Help and Support 3 searching 4 starting 3 Hibernate mode 9 I i.Link port 9, 12, 28 IEEE 1394 port 9, 12, 28 indicators Caps Lock 23 hard drive 9 Num Lock 23 numeric keypad 23 power 9 Scroll Lock 23 installing battery 52 devices 28 digital camera 28 digital video camera 28 front bezel 47 memory...
... folders opening 25 front bezel removing 49 replacing 49 function keys 23 H hard drive indicator 9 troubleshooting 61 headphone jack 9, 11 help online 5 using 3 Help and Support 3 searching 4 starting 3 Hibernate mode 9 I i.Link port 9, 12, 28 IEEE 1394 port 9, 12, 28 indicators Caps Lock 23 hard drive 9 Num Lock 23 numeric keypad 23 power 9 Scroll Lock 23 installing battery 52 devices 28 digital camera 28 digital video camera 28 front bezel 47 memory...
User Guide
Page 92
... M maintenance cleaning case 41 cleaning component exteriors 41 cleaning computer display 42 cleaning computer screen 42 cleaning keyboard 42 cleaning mouse 42 protecting from viruses 39 memory adding 50 installing 50 replacing 50 troubleshooting 64 memory card reader locating drive 9 memory card types supported 31 using 31 microphone jack 9, 11 Microsoft Certificate of Authenticity 13 model number 13 modem cable 27 connecting 26 DSL 27 jack 12, 26 protecting from power surge 18 troubleshooting 64 monitor cleaning 42 port...
... M maintenance cleaning case 41 cleaning component exteriors 41 cleaning computer display 42 cleaning computer screen 42 cleaning keyboard 42 cleaning mouse 42 protecting from viruses 39 memory adding 50 installing 50 replacing 50 troubleshooting 64 memory card reader locating drive 9 memory card types supported 31 using 31 microphone jack 9, 11 Microsoft Certificate of Authenticity 13 model number 13 modem cable 27 connecting 26 DSL 27 jack 12, 26 protecting from power surge 18 troubleshooting 64 monitor cleaning 42 port...
User Guide
Page 93
... memory cards 31 peripheral devices 28 playing audio CD 35 DVD 35 Plug and Play devices IEEE 1394 support for 28 USB support for 28 pointer 24 moving 25 ports See connections power button 9 connector 11 Hibernate mode 9 indicator 9 source problems 18 Standby/Resume 9 troubleshooting 70 turning off computer 20 turning on computer 19 power button 9 printer default 70 installing 28 parallel port 11 troubleshooting 70 USB port 9, 11 programs closing unresponsive 21 opening 25 PS/2 port keyboard 11 mouse 11 R RAM See memory rebooting...
... memory cards 31 peripheral devices 28 playing audio CD 35 DVD 35 Plug and Play devices IEEE 1394 support for 28 USB support for 28 pointer 24 moving 25 ports See connections power button 9 connector 11 Hibernate mode 9 indicator 9 source problems 18 Standby/Resume 9 troubleshooting 70 turning off computer 20 turning on computer 19 power button 9 printer default 70 installing 28 parallel port 11 troubleshooting 70 USB port 9, 11 programs closing unresponsive 21 opening 25 PS/2 port keyboard 11 mouse 11 R RAM See memory rebooting...
User Guide
Page 94
... panel 60, 68 memory 64 memory card reader 64 modem 64 monitor 68 mouse 69 network 70 passwords 70 power 70 printer 70 safety guidelines 56 screen 60, 68 screen area 68 screen resolution 68 technical support 73 telephone support 73 Web site connection speed 62 turning off computer 9, 20, 21 turning on computer 9, 19 tutoring fee-based 74 U uninterruptible power supply (UPS) 18 updating Norton AntiVirus 39 Windows 38 UPS 18 USB port 9, 11, 28 V video...
... panel 60, 68 memory 64 memory card reader 64 modem 64 monitor 68 mouse 69 network 70 passwords 70 power 70 printer 70 safety guidelines 56 screen 60, 68 screen area 68 screen resolution 68 technical support 73 telephone support 73 Web site connection speed 62 turning off computer 9, 20, 21 turning on computer 9, 19 tutoring fee-based 74 U uninterruptible power supply (UPS) 18 updating Norton AntiVirus 39 Windows 38 UPS 18 USB port 9, 11, 28 V video...


