eMachines T4060 Support and Manuals
Get Help and Manuals for this eMachines item

View All Support Options Below
Free eMachines T4060 manuals!
Problems with eMachines T4060?
Ask a Question
Free eMachines T4060 manuals!
Problems with eMachines T4060?
Ask a Question
Popular eMachines T4060 Manual Pages
User Guide - Page 1

..., rug or other similar surface. Important Safety Instructions
The following instructions pertain to use an extension cord with a 3-wire grounding type plug, a plug having a third (grounding) pin. Objects may fall, causing seriousdamage to replace your computer system's information label. Do not locate this product on the power cord.
To ensure reliableoperation of the grounding...
User Guide - Page 2
... are covered by the operating instructions. Improper adjustment of the following precautions: 1 The power supply cord must be unplugged before the main system unit cover is removed. (Separe le
cordon d'alimentation et puis enleve le couvercle.) 2 Once removed, the cover must be replaced and screwed in position before the power supply cord is damaged or frayed...
User Guide - Page 5
... technical or editorial errors or omissions contained herein; NOTE Depending on the model, your computer's components may vary and look slightly different than those pictured. shall not be liable for incidental or consequential damages resulting from the furnishing, performance, or use of this user's guide is subject to change without notice. eMachines, stylized "e" and figure...
User Guide - Page 7
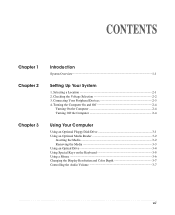
... Display Resolution and Color Depth 3-7 Controlling the Audio Volume 3-7
vii Connecting Your Peripheral Devices 2-3 4. Checking the Voltage Selection 2-2 3. CONTENTS
Chapter 1 Chapter 2
Chapter 3
Introduction
System Overview...1-1
Setting Up Your System
1. Selecting a Location 2-1 2.
User Guide - Page 8

... Instruction B-1 Fuse Warning Instruction B-1 Laser Product ...B-2
viii Solving Common Problems
Power ...A-1 Hard Disk Drive ...A-1 Optical Drive ...A-2 Audio ...A-2 Floppy Disk Drive A-3 Display & Monitor A-3 Keyboard ...A-4 Mouse ...A-4
Appendix B.
Chapter 4
Installing and Removing Drives
Removing the Cover 4-1 Replacing the Cover 4-3 Installing an Expansion Card 4-4 Installing...
User Guide - Page 11

A flat and hard surface. Appropriate power sources. You need one outlet for the computer, one for the monitor, and an ... dry area and protect your disks, damage the computer's circuitry, and prevent proper ventilation. Setting Up Your System 2-1
To prevent static charges, connect all your equipment to support the weight of your system and all of space around the computer so air can erase...
User Guide - Page 14

Press the power button on the computer or to your computer, follow these steps: 1.
In this case, the "Microsoft Windows Startup ...monitor and any other peripheral devices.
2-4 Setting Up Your System
When the Turn Off Computer dialog box is booting, the computer will be booted with Restore CD. Turning the Computer On and Off
Follow the instructions below to turn on the front panel of...
User Guide - Page 15

The procedures in this manual assume that system for instructions on your system. You could lose data. Using Your Computer 3-1
NOTE Never remove ...metal shutter leading into the drive, as OS/2 Warp or UNIX, see the manual that came with that you are using Windows® with already installed on installation and use.
When the disk pops, remove it clicks into the drive until...
User Guide - Page 19
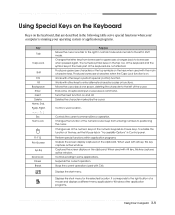
...top row of the keyboard and the symbol keys in the main part of the keyboard are described in the following table serve special functions ....
changes back to Windows other keys to the left of the key, set the Mouse tab in "Accessibility Options" in some applications. Works with alt...to enter alternate character codes or functions. Using Special Keys on the Keyboard
Keys on the keyboard, ...
User Guide - Page 20
... keys on the model, your keyboard can...and release the left mouse button twice. See "mouse, reversing buttons" in this user's guide. When the function is on a function and again to another
location and then release the ...holding down the left -handed.
When using Microsoft® Windows®, you should set the Mouse tab in the upper right corner of the keyboard is enabled, the ...
User Guide - Page 21
... the Start button, point to All Programs, point to Accessories, point to adjust the audio volume level. 3. When the Display Properties window appears, click the Settings tab. 3. Click the OK button.
Changing the Display Resolution and Color Depth
To change the display resolution and color depth, follow these steps: 1. When the...
User Guide - Page 39

... #2 will be copied to your optical drive. 12. NOTE Depending on the model, your
personal information.
To continue the restoration, remove the Restore CD from your...update drivers in the optical drive. After the restoration process is the executable file for installation, use it to restart your computer, follow the displayed messages. Using the Restore CDs 5-3 message appears, replace...
User Guide - Page 41
... DVD-ROM or COMBO drive model.
Using the PowerDVD 6-1 A standard DVD can hold more than twelve times the information of data - For the DVD disc does not automatically start when you
can hold 4.7 gigabytes of a CD on the PowerDVD.
Chapter 1 Dual-layer DVDs can enjoy higher-resolution pictures, more multimedia. And press the play the DVD that supports...
User Guide - Page 43

... disk may be corrupted. Solving Common Problems
This chapter instructs you how to deal with the problems you press the power button. To check to the Windows Help. Then press the power button.
To open Windows Help, click the Start button, and then click Help and Support.)
Solving Common Problems A-1 The problem is firmly plugged into the wall...
User Guide - Page 45

... screen blanking utility installed or your computer isn...Problems A-3 To open Windows Help, click the Start button, and then click Help and Support...video connector of the diskette to the Windows Help.
Click Start, click Control Panel, click Appearance and Themes, and then click Display. Click the OK button. Solution
The brightness and contrast controls aren't set...sure the power cord is ...
eMachines T4060 Reviews
We have not received any reviews for eMachines yet.