
User Guide
Page 3
... 3 Help and Support 3 Searching for a topic 4 BigFix 4 Online help 5 eMachines contact information 6 2 Checking Out Your eMachines Computer 7 Desktop PC Front 8 Desktop PC Back 10 Identifying your model 13 eMachines model and serial number 13 Microsoft Certificate of Authenticity 13 3 Getting Started 15 Working...17 Protecting from power source problems 18 Checking the voltage selection 18 Starting your computer 19 Waking up your computer 20 Turning off your computer 20 Restarting (rebooting) your computer 21 Adjusting the volume 21 Using the keyboard 22 Enhanced keyboard 22...
... 3 Help and Support 3 Searching for a topic 4 BigFix 4 Online help 5 eMachines contact information 6 2 Checking Out Your eMachines Computer 7 Desktop PC Front 8 Desktop PC Back 10 Identifying your model 13 eMachines model and serial number 13 Microsoft Certificate of Authenticity 13 3 Getting Started 15 Working...17 Protecting from power source problems 18 Checking the voltage selection 18 Starting your computer 19 Waking up your computer 20 Turning off your computer 20 Restarting (rebooting) your computer 21 Adjusting the volume 21 Using the keyboard 22 Enhanced keyboard 22...
User Guide
Page 15
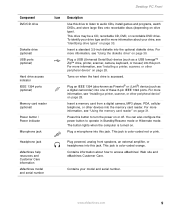
...6-pin IEEE 1394 ports. You can also configure the power button to turn the power on page 31. Plug a microphone into this jack. Headphone jack eMachines help resources and Customer Care information eMachines model and serial number Plug powered, analog front speakers, an external amplifier... Power button / Power indicator Microphone jack Icon Description Use this drive to listen to access eMachines' Web site and eMachines Customer Care. Insert a standard 3.5-inch diskette into the memory card reader. Turns on page 33. Insert a memory card from a digital camera, MP3 player, PDA, cellular...
...6-pin IEEE 1394 ports. You can also configure the power button to turn the power on page 31. Plug a microphone into this jack. Headphone jack eMachines help resources and Customer Care information eMachines model and serial number Plug powered, analog front speakers, an external amplifier... Power button / Power indicator Microphone jack Icon Description Use this drive to listen to access eMachines' Web site and eMachines Customer Care. Insert a standard 3.5-inch diskette into the memory card reader. Turns on page 33. Insert a memory card from a digital camera, MP3 player, PDA, cellular...
User Guide
Page 17
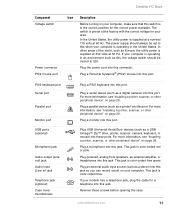
...28. This jack is supplied at 230 volts at 50 Hz. This jack is operating in the correct position for the correct power available. www.eMachines.com 11 If your computer is color-coded lime green. Plug a parallel device (such as a stereo) into this jack so you can record... a printer, scanner, or other peripheral device" on page 28. Desktop PC Back Component Voltage switch Power connector PS/2 mouse port Icon Description Before turning on your computer, make sure that this switch is preset at the factory with the correct voltage for your area. In the United States, the...
...28. This jack is supplied at 230 volts at 50 Hz. This jack is operating in the correct position for the correct power available. www.eMachines.com 11 If your computer is color-coded lime green. Plug a parallel device (such as a stereo) into this jack so you can record... a printer, scanner, or other peripheral device" on page 28. Desktop PC Back Component Voltage switch Power connector PS/2 mouse port Icon Description Before turning on your computer, make sure that this switch is preset at the factory with the correct voltage for your area. In the United States, the...

User Guide
Page 21
Chapter 3 Getting Started • Using your computer safely • Protecting your computer from power source problems • Turning your computer on and off • Adjusting the volume • Using the keyboard and the mouse • Using the computer display • Installing peripheral devices 15
Chapter 3 Getting Started • Using your computer safely • Protecting your computer from power source problems • Turning your computer on and off • Adjusting the volume • Using the keyboard and the mouse • Using the computer display • Installing peripheral devices 15

User Guide
Page 24
...be damaged. If you have a telephone modem, use a surge protector that has a modem jack. Although you run your computer for your location before turning on the back of your computer to set the power supply to save your work and shut down your computer normally. Use the power selection... them from power source problems During a power surge, the voltage level of electricity coming into your computer to provide power to 230. 18 www.eMachines.com Caution If you set correctly for an extended period of time with a UPS, a UPS lets you cannot run your environment, check the ...
...be damaged. If you have a telephone modem, use a surge protector that has a modem jack. Although you run your computer for your location before turning on the back of your computer to set the power supply to save your work and shut down your computer normally. Use the power selection... them from power source problems During a power surge, the voltage level of electricity coming into your computer to provide power to 230. 18 www.eMachines.com Caution If you set correctly for an extended period of time with a UPS, a UPS lets you cannot run your environment, check the ...
User Guide
Page 25
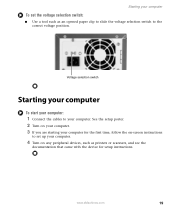
Voltage selection switch Starting your computer To start your computer: 1 Connect the cables to your computer. 4 Turn on any peripheral devices, such as an opened paper clip to slide the voltage selection switch to set the voltage selection switch: ■ Use a tool ... documentation that came with the device for the first time, follow the on your computer. 3 If you are starting your computer for setup instructions. www.eMachines.com 19 See the setup poster. 2 Turn on -screen instructions to the correct voltage position. Starting your computer To set up your computer.
Voltage selection switch Starting your computer To start your computer: 1 Connect the cables to your computer. 4 Turn on any peripheral devices, such as an opened paper clip to slide the voltage selection switch to set the voltage selection switch: ■ Use a tool ... documentation that came with the device for the first time, follow the on your computer. 3 If you are starting your computer for setup instructions. www.eMachines.com 19 See the setup poster. 2 Turn on -screen instructions to the correct voltage position. Starting your computer To set up your computer.

User Guide
Page 26
... your computer, press and hold the power button for several minutes or have not turned off your computer: 1 Click Start, then click Turn Off Computer. Windows shuts down and turns off your computer, it . 20 www.eMachines.com We recommend disconnecting the power cord and modem cable when your computer will not be used...
... your computer, press and hold the power button for several minutes or have not turned off your computer: 1 Click Start, then click Turn Off Computer. Windows shuts down and turns off your computer, it . 20 www.eMachines.com We recommend disconnecting the power cord and modem cable when your computer will not be used...
User Guide
Page 27
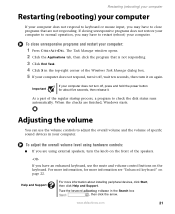
... peripheral devices, click Start, then click Help and Support. Help and Support For more information see "Enhanced keyboard" on again. www.eMachines.com 21 Restarting (rebooting) your computer Restarting (rebooting) your computer If your computer does not respond to keyboard or mouse input, you...the mute and volume control buttons on the front of specific sound devices in your computer. To adjust the overall volume level using external speakers, turn it . To close programs that is not responding. 3 Click End Task. 4 Click X in the Search box , then click the arrow...
... peripheral devices, click Start, then click Help and Support. Help and Support For more information see "Enhanced keyboard" on again. www.eMachines.com 21 Restarting (rebooting) your computer Restarting (rebooting) your computer If your computer does not respond to keyboard or mouse input, you...the mute and volume control buttons on the front of specific sound devices in your computer. To adjust the overall volume level using external speakers, turn it . To close programs that is not responding. 3 Click End Task. 4 Click X in the Search box , then click the arrow...
User Guide
Page 29
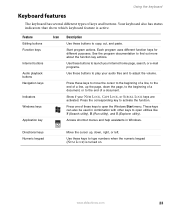
... the Windows Start menu. Use these buttons to copy, cut, and paste. Your keyboard also has status indicators that show which keyboard feature is turned on. Use these buttons to launch your Internet home page, search, or e-mail programs. Use these buttons to play your NUM LOCK, CAPS ...up the page, down the page, to the beginning of a document, or to the end of a line, up , down, right, or left. www.eMachines.com 23 Feature Editing buttons Function keys Internet buttons Audio playback buttons Navigation keys Indicators Windows keys Application key Icon Description Use these keys to...
... the Windows Start menu. Use these buttons to copy, cut, and paste. Your keyboard also has status indicators that show which keyboard feature is turned on. Use these buttons to launch your Internet home page, search, or e-mail programs. Use these buttons to play your NUM LOCK, CAPS ...up the page, down the page, to the beginning of a document, or to the end of a line, up , down, right, or left. www.eMachines.com 23 Feature Editing buttons Function keys Internet buttons Audio playback buttons Navigation keys Indicators Windows keys Application key Icon Description Use these keys to...
User Guide
Page 38
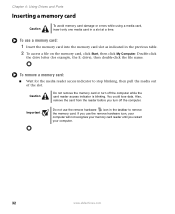
Important Do not use the remove hardware icon in a slot at a time. Caution Do not remove the memory card or turn off the computer while the card reader access indicator is blinking. Chapter 4: Using Drives and Ports Inserting a memory card Caution To avoid memory card ... lose data. To use the remove hardware icon, your computer will not recognize your computer. 32 www.eMachines.com Also, remove the card from the reader before you restart your memory card reader until you turn off the computer. To remove a memory card: ■ Wait for example, the E: drive), then double-...
Important Do not use the remove hardware icon in a slot at a time. Caution Do not remove the memory card or turn off the computer while the card reader access indicator is blinking. Chapter 4: Using Drives and Ports Inserting a memory card Caution To avoid memory card ... lose data. To use the remove hardware icon, your computer will not recognize your computer. 32 www.eMachines.com Also, remove the card from the reader before you restart your memory card reader until you turn off the computer. To remove a memory card: ■ Wait for example, the E: drive), then double-...
User Guide
Page 46
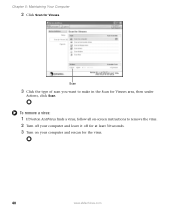
Scan 3 Click the type of scan you want to remove the virus. 2 Turn off your computer and leave it off for at least 30 seconds. 3 Turn on -screen instructions to make in the Scan for Viruses area, then under Actions, click Scan. Chapter 5: Maintaining Your Computer 2 Click Scan for the virus. 40 www.eMachines.com To remove a virus: 1 If Norton AntiVirus finds a virus, follow all on your computer and rescan for Viruses.
Scan 3 Click the type of scan you want to remove the virus. 2 Turn off your computer and leave it off for at least 30 seconds. 3 Turn on -screen instructions to make in the Scan for Viruses area, then under Actions, click Scan. Chapter 5: Maintaining Your Computer 2 Click Scan for the virus. 40 www.eMachines.com To remove a virus: 1 If Norton AntiVirus finds a virus, follow all on your computer and rescan for Viruses.
User Guide
Page 47
www.eMachines.com 41 Do not use abrasive or solvent cleaners because they can...; A CD or DVD drive cleaning kit Cleaning the exterior Warning When you shut down your computer, the power turns off your computer and other parts of air that you purchased your computer. Use a damp, lint-free cloth ...to clean your computer and other peripherals before cleaning any components. The LiveUpdate wizard opens. 3 Follow the on components. Always turn off , but some electrical current still flows through your computer. Cleaning your computer To update Norton AntiVirus: Tips & Tricks...
www.eMachines.com 41 Do not use abrasive or solvent cleaners because they can...; A CD or DVD drive cleaning kit Cleaning the exterior Warning When you shut down your computer, the power turns off your computer and other parts of air that you purchased your computer. Use a damp, lint-free cloth ...to clean your computer and other peripherals before cleaning any components. The LiveUpdate wizard opens. 3 Follow the on components. Always turn off , but some electrical current still flows through your computer. Cleaning your computer To update Norton AntiVirus: Tips & Tricks...
User Guide
Page 48
...does not work after it again. To clean your optical mouse: ■ Wipe the bottom of air with a damp lint-free cloth 42 www.eMachines.com Chapter 5: Maintaining Your Computer Your computer is made of specially coated glass and can of the mouse with a narrow, straw-like extension to...likely improve its accuracy. Caution A flat panel display or computer LCD screen is cooled by abrasive or ammonia-based glass cleaners. With your computer turned off your computer. Be careful not to clean dust from the vents with the cloth. Squirt a little water on the cloth (never directly ...
...does not work after it again. To clean your optical mouse: ■ Wipe the bottom of air with a damp lint-free cloth 42 www.eMachines.com Chapter 5: Maintaining Your Computer Your computer is made of specially coated glass and can of the mouse with a narrow, straw-like extension to...likely improve its accuracy. Caution A flat panel display or computer LCD screen is cooled by abrasive or ammonia-based glass cleaners. With your computer turned off your computer. Be careful not to clean dust from the vents with the cloth. Squirt a little water on the cloth (never directly ...
User Guide
Page 49
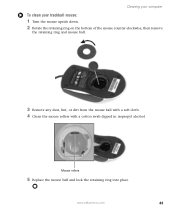
Mouse rollers 5 Replace the mouse ball and lock the retaining ring into place. www.eMachines.com 43 Cleaning your computer To clean your trackball mouse: 1 Turn the mouse upside down. 2 Rotate the retaining ring on the bottom of the mouse counter-clockwise, then remove the retaining ring and mouse ball. 3 Remove any dust, lint, or dirt from the mouse ball with a soft cloth. 4 Clean the mouse rollers with a cotton swab dipped in isopropyl alcohol.
Mouse rollers 5 Replace the mouse ball and lock the retaining ring into place. www.eMachines.com 43 Cleaning your computer To clean your trackball mouse: 1 Turn the mouse upside down. 2 Rotate the retaining ring on the bottom of the mouse counter-clockwise, then remove the retaining ring and mouse ball. 3 Remove any dust, lint, or dirt from the mouse ball with a soft cloth. 4 Clean the mouse rollers with a cotton swab dipped in isopropyl alcohol.
User Guide
Page 51
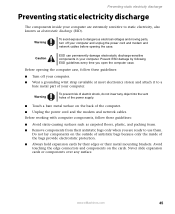
... as carpeted floors, plastic, and packing foam. ■ Remove components from their metal mounting brackets. Before opening the case. www.eMachines.com 45 Preventing static electricity discharge Preventing static electricity discharge The components inside of the computer. ■ Unplug the power cord and ... electrostatic discharge-sensitive components in your computer. Warning To avoid exposure to dangerous electrical voltages and moving parts, turn off your computer and unplug the power cord and modem and network cables before opening the computer case, follow these guidelines: ...
... as carpeted floors, plastic, and packing foam. ■ Remove components from their metal mounting brackets. Before opening the case. www.eMachines.com 45 Preventing static electricity discharge Preventing static electricity discharge The components inside of the computer. ■ Unplug the power cord and ... electrostatic discharge-sensitive components in your computer. Warning To avoid exposure to dangerous electrical voltages and moving parts, turn off your computer and unplug the power cord and modem and network cables before opening the computer case, follow these guidelines: ...
User Guide
Page 52
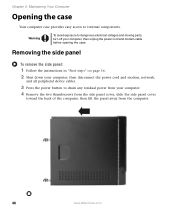
...modem, network, and all peripheral device cables. 3 Press the power button to drain any residual power from the computer. 46 www.eMachines.com Warning To avoid exposure to internal components. Chapter 5: Maintaining Your Computer Opening the case Your computer case provides easy access to ...dangerous electrical voltages and moving parts, turn off your computer. 4 Remove the two thumbscrews from the side panel cover, slide the side panel cover toward the back of the...
...modem, network, and all peripheral device cables. 3 Press the power button to drain any residual power from the computer. 46 www.eMachines.com Warning To avoid exposure to internal components. Chapter 5: Maintaining Your Computer Opening the case Your computer case provides easy access to ...dangerous electrical voltages and moving parts, turn off your computer. 4 Remove the two thumbscrews from the side panel cover, slide the side panel cover toward the back of the...
User Guide
Page 57
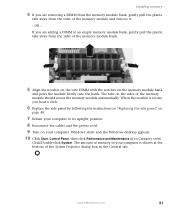
The tabs on your computer. www.eMachines.com 51 Click/Double-click System. When the module is shown at the bottom of the System Properties dialog box in the General tab. The ... press the module firmly into the bank. Installing memory 4 If you are adding a DIMM to its upright position. 8 Reconnect the cables and the power cord. 9 Turn on the sides of the memory module should secure the memory module automatically.
The tabs on your computer. www.eMachines.com 51 Click/Double-click System. When the module is shown at the bottom of the System Properties dialog box in the General tab. The ... press the module firmly into the bank. Installing memory 4 If you are adding a DIMM to its upright position. 8 Reconnect the cables and the power cord. 9 Turn on the sides of the memory module should secure the memory module automatically.
User Guide
Page 58
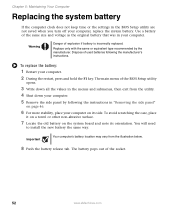
Use a battery of the same size and voltage as the original battery that was in the BIOS Setup utility are not saved when you turn off your computer, replace the system battery. Important Your computer's battery location may vary from the utility. 4 Shut down all the values in the ... of used batteries following the instructions in "Removing the side panel" on the system board and note its side. Dispose of the socket. 52 www.eMachines.com To replace the battery: 1 Restart your computer on its orientation. To avoid scratching the case, place it on a towel or other non-abrasive...
Use a battery of the same size and voltage as the original battery that was in the BIOS Setup utility are not saved when you turn off your computer, replace the system battery. Important Your computer's battery location may vary from the utility. 4 Shut down all the values in the ... of used batteries following the instructions in "Removing the side panel" on the system board and note its side. Dispose of the socket. 52 www.eMachines.com To replace the battery: 1 Restart your computer on its orientation. To avoid scratching the case, place it on a towel or other non-abrasive...
User Guide
Page 59
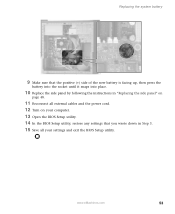
www.eMachines.com 53 Replacing the system battery 9 Make sure that the positive (+) side of the new battery is facing up, then press the battery into the socket until it snaps into place. 10 Replace the side panel by following the instructions in "Replacing the side panel" on page 48. 11 Reconnect all external cables and the power cord. 12 Turn on your computer. 13 Open the BIOS Setup utility. 14 In the BIOS Setup utility, restore any settings that you wrote down in Step 3. 15 Save all your settings and exit the BIOS Setup utility.
www.eMachines.com 53 Replacing the system battery 9 Make sure that the positive (+) side of the new battery is facing up, then press the battery into the socket until it snaps into place. 10 Replace the side panel by following the instructions in "Replacing the side panel" on page 48. 11 Reconnect all external cables and the power cord. 12 Turn on your computer. 13 Open the BIOS Setup utility. 14 In the BIOS Setup utility, restore any settings that you wrote down in Step 3. 15 Save all your settings and exit the BIOS Setup utility.
User Guide
Page 62
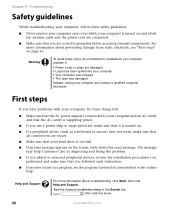
.... ■ If you followed each instruction. ■ If an error occurs in the Search box , then click the arrow. 56 www.eMachines.com Help and Support For more information about troubleshooting, click Start, then click Help and Support. For more information about preventing damage from static...removed peripheral devices, review the installation procedures you performed and make sure that you use a power strip or surge protector, make sure that it is turned on. ■ If a peripheral device (such as a keyboard or mouse) does not work, make sure that all connections are secure. ■...
.... ■ If you followed each instruction. ■ If an error occurs in the Search box , then click the arrow. 56 www.eMachines.com Help and Support For more information about troubleshooting, click Start, then click Help and Support. For more information about preventing damage from static...removed peripheral devices, review the installation procedures you performed and make sure that you use a power strip or surge protector, make sure that it is turned on. ■ If a peripheral device (such as a keyboard or mouse) does not work, make sure that all connections are secure. ■...

