
User Guide
Page 58
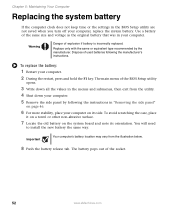
... computer's battery location may vary from the utility. 4 Shut down your computer. 5 Remove the side panel by the manufacturer. Use a battery of the BIOS Setup utility opens. 3 Write down all the values in "Removing the side panel" on page 46. 6 For more stability, place your computer. 2 ...system battery If the computer clock does not keep time or the settings in your computer. Warning Danger of the socket. 52 www.eMachines.com Replace only with the same or equivalent type recommended by following the manufacturer's instructions. The main menu of the same size ...
... computer's battery location may vary from the utility. 4 Shut down your computer. 5 Remove the side panel by the manufacturer. Use a battery of the BIOS Setup utility opens. 3 Write down all the values in "Removing the side panel" on page 46. 6 For more stability, place your computer. 2 ...system battery If the computer clock does not keep time or the settings in your computer. Warning Danger of the socket. 52 www.eMachines.com Replace only with the same or equivalent type recommended by following the manufacturer's instructions. The main menu of the same size ...
User Guide
Page 59
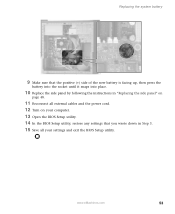
Replacing the system battery 9 Make sure that the positive (+) side of the new battery is facing up, then press the battery into the socket until it snaps into place. 10 Replace the side panel by following the instructions in "Replacing the side panel" on page 48. 11 Reconnect all external cables and the power cord. 12 Turn on your computer. 13 Open the BIOS Setup utility. 14 In the BIOS Setup utility, restore any settings that you wrote down in Step 3. 15 Save all your settings and exit the BIOS Setup utility. www.eMachines.com 53
Replacing the system battery 9 Make sure that the positive (+) side of the new battery is facing up, then press the battery into the socket until it snaps into place. 10 Replace the side panel by following the instructions in "Replacing the side panel" on page 48. 11 Reconnect all external cables and the power cord. 12 Turn on your computer. 13 Open the BIOS Setup utility. 14 In the BIOS Setup utility, restore any settings that you wrote down in Step 3. 15 Save all your settings and exit the BIOS Setup utility. www.eMachines.com 53
NG3 Hardware Reference
Page 127
... when you turn on the back of your computer. The second step in the My Documents folder. 120 You have to return your computer's BIOS Setup utility. Use a password that you can remember but that you use a password you can buy a cable lock at most electronics stores ... Kensington lock slot, see your computer. For the location of your hardware reference. You can remember. CHAPTER 10: Protecting Your Computer www.emachines.com Hardware security Although you may be hard for someone else to each account so only the account owner can assign a password to guess.
... when you turn on the back of your computer. The second step in the My Documents folder. 120 You have to return your computer's BIOS Setup utility. Use a password that you can remember but that you use a password you can buy a cable lock at most electronics stores ... Kensington lock slot, see your computer. For the location of your hardware reference. You can remember. CHAPTER 10: Protecting Your Computer www.emachines.com Hardware security Although you may be hard for someone else to each account so only the account owner can assign a password to guess.
NG3 Hardware Reference
Page 166
...not saved when you turn off your computer. You will need to its upright position. 8 Turn on your computer, replace the system battery. www.emachines.com Replacing the system battery 6 Replace the side panel by following the instructions in "Replacing the side panel" on page 157. 7 Return your ... type recommended by the manufacturer. Replacing the system battery Warning There is a danger of explosion if the battery is shown at the bottom of the BIOS Setup utility opens. 3 Write down all the values in the menus and submenus, then exit from the utility. 4 Shut down your computer. 5...
...not saved when you turn off your computer. You will need to its upright position. 8 Turn on your computer, replace the system battery. www.emachines.com Replacing the system battery 6 Replace the side panel by following the instructions in "Replacing the side panel" on page 157. 7 Return your ... type recommended by the manufacturer. Replacing the system battery Warning There is a danger of explosion if the battery is shown at the bottom of the BIOS Setup utility opens. 3 Write down all the values in the menus and submenus, then exit from the utility. 4 Shut down your computer. 5...
NG3 Hardware Reference
Page 167
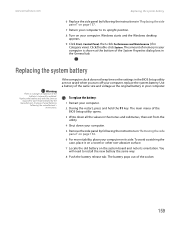
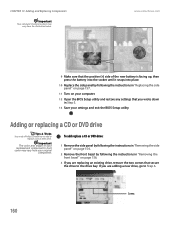
www.emachines.com 9 Make sure that secure the drive to the drive bay. Screws 160 Important The color...panel by following the instructions in "Replacing the side panel" on page 157. 11 Turn on your computer. 12 Open the BIOS Setup utility and restore any settings that you wrote down in "Removing the front bezel" on page 156. 3 If you ...2 Remove the front bezel by following the instructions in Step 3. 13 Save your settings and exit the BIOS Setup utility. CHAPTER 13: Adding and Replacing Components Important Your computer's battery location may vary from the illustration below.
www.emachines.com 9 Make sure that secure the drive to the drive bay. Screws 160 Important The color...panel by following the instructions in "Replacing the side panel" on page 157. 11 Turn on your computer. 12 Open the BIOS Setup utility and restore any settings that you wrote down in "Removing the front bezel" on page 156. 3 If you ...2 Remove the front bezel by following the instructions in Step 3. 13 Save your settings and exit the BIOS Setup utility. CHAPTER 13: Adding and Replacing Components Important Your computer's battery location may vary from the illustration below.
NG3 Hardware Reference
Page 184
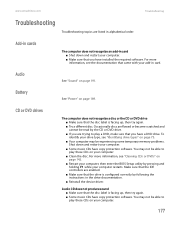
...■ Clean the disc. For more information, see "Identifying drive types" on page 142. ■ Restart your computer, then enter the BIOS Setup utility by the CD or DVD drive. ■ If you have copy protection software. To identify your drive type, see the documentation...that came with your add-in card ■ Shut down and restart your computer. ■ Some music CDs have a DVD drive. www.emachines.com Troubleshooting Troubleshooting topics are listed in the drive documentation. ■ Reinstall the device driver. You may not be experiencing some temporary memory ...
...■ Clean the disc. For more information, see "Identifying drive types" on page 142. ■ Restart your computer, then enter the BIOS Setup utility by the CD or DVD drive. ■ If you have copy protection software. To identify your drive type, see the documentation...that came with your add-in card ■ Shut down and restart your computer. ■ Some music CDs have a DVD drive. www.emachines.com Troubleshooting Troubleshooting topics are listed in the drive documentation. ■ Reinstall the device driver. You may not be experiencing some temporary memory ...


