

User Guide
Page 8
... Peripheral Bay 4-9 Chapter 5 Using the Restore CDs Restoring Your Original Software 5-1 Chapter 6 Using the PowerDVD About DVD ...6-1 Playing the PowerDVD 6-1 How to Run the PowerDVD 6-1 Buttons of the PowerDVD 6-2 Appendix A. Solving Common Problems Power ...A-1 Hard Disk Drive ...A-1 Optical Drive ...A-2 Audio ...A-2 Floppy Disk Drive A-3 Display & Monitor A-3 Keyboard ...A-4 Mouse ...A-4 Appendix B.
... Peripheral Bay 4-9 Chapter 5 Using the Restore CDs Restoring Your Original Software 5-1 Chapter 6 Using the PowerDVD About DVD ...6-1 Playing the PowerDVD 6-1 How to Run the PowerDVD 6-1 Buttons of the PowerDVD 6-2 Appendix A. Solving Common Problems Power ...A-1 Hard Disk Drive ...A-1 Optical Drive ...A-2 Audio ...A-2 Floppy Disk Drive A-3 Display & Monitor A-3 Keyboard ...A-4 Mouse ...A-4 Appendix B.

User Guide
Page 9
Introduction System Overview Optical drive Optical drive (optional) USB connector (optional) Power button Emergency eject hole Load/Eject button Floppy disk drive(optional) Media reader slots(optional) Power indicator Hard disk drive access indicator IEEE 1394 connectors (optional) USB 2.0 connectors (optional) Headphone jack Microphone jack USB 2.0 connectors (optional) NOTE Chapter 1 Your optical drives may differ from the illustrations described in this user's guide. Introduction 1-1
Introduction System Overview Optical drive Optical drive (optional) USB connector (optional) Power button Emergency eject hole Load/Eject button Floppy disk drive(optional) Media reader slots(optional) Power indicator Hard disk drive access indicator IEEE 1394 connectors (optional) USB 2.0 connectors (optional) Headphone jack Microphone jack USB 2.0 connectors (optional) NOTE Chapter 1 Your optical drives may differ from the illustrations described in this user's guide. Introduction 1-1

User Guide
Page 14
... the system. 4. The system will appear. Turn off . Turning On the Computer To turn off your computer, save your computer, follow these steps: 1. Press the power button on your information and close all application programs you use. 2. Turning Off the Computer To turn on the front panel of your computer, follow these...
... the system. 4. The system will appear. Turn off . Turning On the Computer To turn off your computer, save your computer, follow these steps: 1. Press the power button on your information and close all application programs you use. 2. Turning Off the Computer To turn on the front panel of your computer, follow these...
User Guide
Page 42
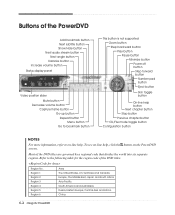
... stream button Next angle button Karaoke button Increase volume button Status display panel Video position slider Mute button Decrease volume button Capture frame button Go-up button Repeat button Menu button Go to bookmark button This button is not supported Zoom button Step backward button Play button Pause button Minimize button Power off button Step forward button Number pad button Eject button Skin toggle button On-line help button Next chapter button Stop button Previous chapter button...
... stream button Next angle button Karaoke button Increase volume button Status display panel Video position slider Mute button Decrease volume button Capture frame button Go-up button Repeat button Menu button Go to bookmark button This button is not supported Zoom button Step backward button Play button Pause button Minimize button Power off button Step forward button Number pad button Eject button Skin toggle button On-line help button Next chapter button Stop button Previous chapter button...

User Guide
Page 43
... when using your hard disk may be fragmented. Power Cause My computer doesn't work Chapter 1 Solution Computer is not properly connected to turn on your computer. To turn off your hard disk may be corrupted. Then press the power button. When the computer turned down by the solution.... Read it will not operate if you press the power button. If it is firmly plugged into the wall outlet and into the wall outlet. ...
... when using your hard disk may be fragmented. Power Cause My computer doesn't work Chapter 1 Solution Computer is not properly connected to turn on your computer. To turn off your hard disk may be corrupted. Then press the power button. When the computer turned down by the solution.... Read it will not operate if you press the power button. If it is firmly plugged into the wall outlet and into the wall outlet. ...

User Guide
Page 45
...connector is properly and securely connected to the video connector of the diskette to cover the hole. To open Windows Help, click the Start button, and then click Help and Support.) Diskette is firmly plugged into the wall outlet and into the monitor. Format the diskette. (Refer ... Windows. You have a screen blanking utility installed or your mouse. Click the OK button. To open Windows Help, click the Start button, and then click Help and Support.) Diskette is damaged. Make sure the power cord is write-protected. To change the display resolution or color depth, use another...
...connector is properly and securely connected to the video connector of the diskette to cover the hole. To open Windows Help, click the Start button, and then click Help and Support.) Diskette is firmly plugged into the wall outlet and into the monitor. Format the diskette. (Refer ... Windows. You have a screen blanking utility installed or your mouse. Click the OK button. To open Windows Help, click the Start button, and then click Help and Support.) Diskette is damaged. Make sure the power cord is write-protected. To change the display resolution or color depth, use another...

