
User Guide
Page 4
... your computer 41 Cleaning the exterior 41 Cleaning the keyboard 42 Cleaning the computer display 42 Cleaning the mouse 42 Cleaning CDs or DVDs 44 Restoring your system 44 Preventing static electricity discharge 45 Opening the case 46 Removing the side panel 46 Removing the front bezel 47 Closing the case... DVD drives 57 Computer 59 Diskette drive 59 DVD drives 60 File management 60 Hard drive 61 Internet 62 Keyboard 63 Memory 64 ii www.eMachines.com
... your computer 41 Cleaning the exterior 41 Cleaning the keyboard 42 Cleaning the computer display 42 Cleaning the mouse 42 Cleaning CDs or DVDs 44 Restoring your system 44 Preventing static electricity discharge 45 Opening the case 46 Removing the side panel 46 Removing the front bezel 47 Closing the case... DVD drives 57 Computer 59 Diskette drive 59 DVD drives 60 File management 60 Hard drive 61 Internet 62 Keyboard 63 Memory 64 ii www.eMachines.com
User Guide
Page 27
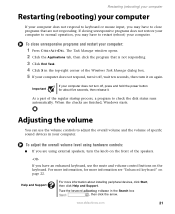
...speakers. -OR- The Task Manager window opens. 2 Click the Applications tab, then click the program that are finished, Windows starts. www.eMachines.com 21 Adjusting the volume You can use the mute and volume control buttons on page 22. If you may have an enhanced keyboard, ... volume and the volume of the regular startup process, a program to check the disk status runs automatically. If closing unresponsive programs does not restore your computer to normal operation, you have to restart (reboot) your computer. As a part of specific sound devices in the Search box ...
...speakers. -OR- The Task Manager window opens. 2 Click the Applications tab, then click the program that are finished, Windows starts. www.eMachines.com 21 Adjusting the volume You can use the mute and volume control buttons on page 22. If you may have an enhanced keyboard, ... volume and the volume of the regular startup process, a program to check the disk status runs automatically. If closing unresponsive programs does not restore your computer to normal operation, you have to restart (reboot) your computer. As a part of specific sound devices in the Search box ...
User Guide
Page 43
Chapter 5 Maintaining Your Computer • Caring for your computer • Updating Windows • Protecting your computer from viruses • Cleaning your computer • Restoring your system • Opening the computer case • Adding memory and replacing the battery 37
Chapter 5 Maintaining Your Computer • Caring for your computer • Updating Windows • Protecting your computer from viruses • Cleaning your computer • Restoring your system • Opening the computer case • Adding memory and replacing the battery 37
User Guide
Page 50
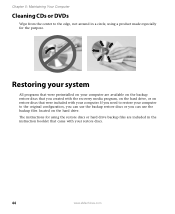
... All programs that were preinstalled on your computer are included in a circle, using the restore discs or hard drive backup files are available on the backup restore discs that you can use the backup restore discs or you created with the recovery media program, on the hard drive, or on ...the hard drive. The instructions for using a product made especially for the purpose. If you need to restore your computer to the edge, not around in the instruction booklet that came with your computer. Chapter 5: Maintaining Your Computer Cleaning CDs or DVDs ...
... All programs that were preinstalled on your computer are included in a circle, using the restore discs or hard drive backup files are available on the backup restore discs that you can use the backup restore discs or you created with the recovery media program, on the hard drive, or on ...the hard drive. The instructions for using a product made especially for the purpose. If you need to restore your computer to the edge, not around in the instruction booklet that came with your computer. Chapter 5: Maintaining Your Computer Cleaning CDs or DVDs ...
User Guide
Page 59
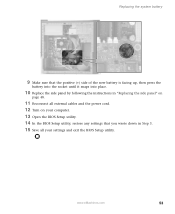
Replacing the system battery 9 Make sure that the positive (+) side of the new battery is facing up, then press the battery into the socket until it snaps into place. 10 Replace the side panel by following the instructions in "Replacing the side panel" on page 48. 11 Reconnect all external cables and the power cord. 12 Turn on your computer. 13 Open the BIOS Setup utility. 14 In the BIOS Setup utility, restore any settings that you wrote down in Step 3. 15 Save all your settings and exit the BIOS Setup utility. www.eMachines.com 53
Replacing the system battery 9 Make sure that the positive (+) side of the new battery is facing up, then press the battery into the socket until it snaps into place. 10 Replace the side panel by following the instructions in "Replacing the side panel" on page 48. 11 Reconnect all external cables and the power cord. 12 Turn on your computer. 13 Open the BIOS Setup utility. 14 In the BIOS Setup utility, restore any settings that you wrote down in Step 3. 15 Save all your settings and exit the BIOS Setup utility. www.eMachines.com 53
User Guide
Page 66
..., then click Help and Support. DVD drives See "CD or DVD drives" on , try to restore, then click Restore. Type the keyword System Restore in the Search box , then click the arrow. 60 www.eMachines.com Chapter 6: Troubleshooting You see a "Non-system disk" or "Disk error" error message ■...; Eject the diskette from the diskette drive, then press ENTER. ■ Make sure that the diskette you are using is restored to the place where it was...
..., then click Help and Support. DVD drives See "CD or DVD drives" on , try to restore, then click Restore. Type the keyword System Restore in the Search box , then click the arrow. 60 www.eMachines.com Chapter 6: Troubleshooting You see a "Non-system disk" or "Disk error" error message ■...; Eject the diskette from the diskette drive, then press ENTER. ■ Make sure that the diskette you are using is restored to the place where it was...


