

User Guide
Page 1
... product. 4 Slots and openings in a fire or electrical shock. Important Safety Instructions The following instructions pertain to use an extension cord with a 3-wire grounding type plug, a plug having a third (grounding) pin. Don't use this computer to a power outlet that the total of all products plugged into it from the main electrical power outlet before cleaning. This product should not be connected to the AC power source...
... product. 4 Slots and openings in a fire or electrical shock. Important Safety Instructions The following instructions pertain to use an extension cord with a 3-wire grounding type plug, a plug having a third (grounding) pin. Don't use this computer to a power outlet that the total of all products plugged into it from the main electrical power outlet before cleaning. This product should not be connected to the AC power source...
User Guide
Page 7
Selecting a Location 2-1 2. Connecting Your Peripheral Devices 2-3 4. Turning the Computer On and Off 2-4 Turning On the Computer 2-4 Turning Off the Computer 2-4 Using Your Computer Using an Optional Floppy Disk Drive 3-1 Using an Optional Media Reader 3-2 Inserting the Media 3-2 Removing the Media 3-3 Using an Optical Drive 3-4 Using Special Keys on the Keyboard 3-5 Using a Mouse ...3-6 Changing the Display Resolution and Color Depth 3-7 Controlling the Audio Volume 3-7 vii Checking the Voltage Selection 2-2 3. CONTENTS Chapter 1 Chapter 2 Chapter 3 Introduction ...
Selecting a Location 2-1 2. Connecting Your Peripheral Devices 2-3 4. Turning the Computer On and Off 2-4 Turning On the Computer 2-4 Turning Off the Computer 2-4 Using Your Computer Using an Optional Floppy Disk Drive 3-1 Using an Optional Media Reader 3-2 Inserting the Media 3-2 Removing the Media 3-3 Using an Optical Drive 3-4 Using Special Keys on the Keyboard 3-5 Using a Mouse ...3-6 Changing the Display Resolution and Color Depth 3-7 Controlling the Audio Volume 3-7 vii Checking the Voltage Selection 2-2 3. CONTENTS Chapter 1 Chapter 2 Chapter 3 Introduction ...

User Guide
Page 8
... Warning Instruction B-1 Laser Product ...B-2 viii Solving Common Problems Power ...A-1 Hard Disk Drive ...A-1 Optical Drive ...A-2 Audio ...A-2 Floppy Disk Drive A-3 Display & Monitor A-3 Keyboard ...A-4 Mouse ...A-4 Appendix B. Chapter 4 Installing and Removing Drives Removing the Cover 4-1 Replacing the Cover 4-3 Installing an Expansion Card 4-4 Installing an Additional Hard Disk Drive 4-6 Installing the 5.25-inch Device in the Peripheral Bay 4-9 Chapter 5 Using the Restore CDs Restoring Your Original Software 5-1 Chapter 6 Using the PowerDVD About DVD ...6-1 Playing...
... Warning Instruction B-1 Laser Product ...B-2 viii Solving Common Problems Power ...A-1 Hard Disk Drive ...A-1 Optical Drive ...A-2 Audio ...A-2 Floppy Disk Drive A-3 Display & Monitor A-3 Keyboard ...A-4 Mouse ...A-4 Appendix B. Chapter 4 Installing and Removing Drives Removing the Cover 4-1 Replacing the Cover 4-3 Installing an Expansion Card 4-4 Installing an Additional Hard Disk Drive 4-6 Installing the 5.25-inch Device in the Peripheral Bay 4-9 Chapter 5 Using the Restore CDs Restoring Your Original Software 5-1 Chapter 6 Using the PowerDVD About DVD ...6-1 Playing...

User Guide
Page 11
... and protect your system. You need one outlet for the computer, one for the monitor, and an additional outlet for a printer and any other peripheral devices. Setting Up Your System 2-1 A flat and hard surface. Leave several inches of ...set up and turn on your disks, damage the computer's circuitry, and prevent proper ventilation. Just follow the steps in temperature, humidity, dust, and smoke. Selecting a Location Before you set up your computer, it is important to choose a safe and convenient location that provides the following: A large, sturdy desk or table strong enough to support...
... and protect your system. You need one outlet for the computer, one for the monitor, and an additional outlet for a printer and any other peripheral devices. Setting Up Your System 2-1 A flat and hard surface. Leave several inches of ...set up and turn on your disks, damage the computer's circuitry, and prevent proper ventilation. Just follow the steps in temperature, humidity, dust, and smoke. Selecting a Location Before you set up your computer, it is important to choose a safe and convenient location that provides the following: A large, sturdy desk or table strong enough to support...

User Guide
Page 14
... booted with Restore CD. 4. Turn on your computer, follow these steps: 1. In this case, the "Microsoft Windows Startup Menu" menu will load Microsoft ® Windows ® . Click the Start button, and then click Turn Off Computer. 3. Press the power button on the computer or to shut down the system. 4. The system will appear. NOTE If the Restore CD is in the optical drive (D:) while your computer is displayed...
... booted with Restore CD. 4. Turn on your computer, follow these steps: 1. In this case, the "Microsoft Windows Startup Menu" menu will load Microsoft ® Windows ® . Click the Start button, and then click Turn Off Computer. 3. Press the power button on the computer or to shut down the system. 4. The system will appear. NOTE If the Restore CD is in the optical drive (D:) while your computer is displayed...
User Guide
Page 16
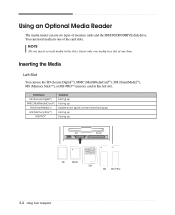
... up) Facing up Facing up SD MMC SM MS MS-PRO 3-2 Using Your Computer Insert only one media in one time. You can insert media in a slot at one of memory cards and the IBM MICRODRIVE disk drive. Using an Optional Media Reader The media reader can use six types of the card slots. Inserting the Media Left Slot You can use the SD (Secure DigitalTM), MMC (MultiMediaCardTM), SM (SmartMediaTM), MS...
... up) Facing up Facing up SD MMC SM MS MS-PRO 3-2 Using Your Computer Insert only one media in one time. You can insert media in a slot at one of memory cards and the IBM MICRODRIVE disk drive. Using an Optional Media Reader The media reader can use six types of the card slots. Inserting the Media Left Slot You can use the SD (Secure DigitalTM), MMC (MultiMediaCardTM), SM (SmartMediaTM), MS...
User Guide
Page 17
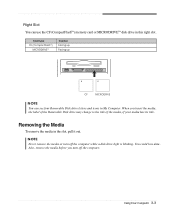
Card type CF (CompactFlashTM) MICRODRIVETM Insertion Facing up Facing up CF MICRODRIVE NOTE You can use the CF (CompactFlashTM) memory card or MICRODRIVETM disk drive in My Computer. You could lose data. Right Slot You can see four Removable Disk drive letters and icons in this right slot. Removing the Media To remove the media in the slot, pull it out. Using Your Computer 3-3 Also, remove the media before you insert...
Card type CF (CompactFlashTM) MICRODRIVETM Insertion Facing up Facing up CF MICRODRIVE NOTE You can use the CF (CompactFlashTM) memory card or MICRODRIVETM disk drive in My Computer. You could lose data. Right Slot You can see four Removable Disk drive letters and icons in this right slot. Removing the Media To remove the media in the slot, pull it out. Using Your Computer 3-3 Also, remove the media before you insert...
User Guide
Page 18
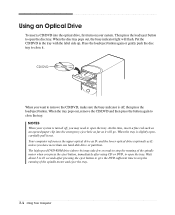
.../eject button. The high speed DVD-ROM drive (above 6x) may need to open the tray. Press the load/eject button again or gently push the disc tray to stop the running of the spindle motor and eject the tray. 3-4 Using Your Computer Your computer references the upper optical drive as D: and the lower optical drive (optional) as it . When the tray pops out, remove the CD/DVD...
.../eject button. The high speed DVD-ROM drive (above 6x) may need to open the tray. Press the load/eject button again or gently push the disc tray to stop the running of the spindle motor and eject the tray. 3-4 Using Your Computer Your computer references the upper optical drive as D: and the lower optical drive (optional) as it . When the tray pops out, remove the CD/DVD...
User Guide
Page 19
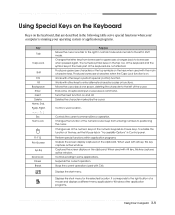
...; Turns the insert function on the numeric keypad as mouse keys. Controls scrolling in Control panel. Moves the cursor back one tab to positioning the cursor. To enable the function of a mouse and displays a different menu applicable to enter alternate character codes or functions. When used with the main character keys. Suspends the current operation. Stops the current operation (used with Alt key, this key captures active window. Control cursor location. It...
...; Turns the insert function on the numeric keypad as mouse keys. Controls scrolling in Control panel. Moves the cursor back one tab to positioning the cursor. To enable the function of a mouse and displays a different menu applicable to enter alternate character codes or functions. When used with the main character keys. Suspends the current operation. Stops the current operation (used with Alt key, this key captures active window. Control cursor location. It...
User Guide
Page 20
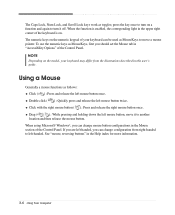
... Control Panel. When the function is enabled, the corresponding light in this user's guide. The numeric keys on the model, your keyboard can be used as toggles; Double click ( ) : Quickly press and release the left -handed, you should set the Mouse tab in the Help index for more information. 3-6 Using Your Computer press the key once to turn it to another location and then release the mouse button...
... Control Panel. When the function is enabled, the corresponding light in this user's guide. The numeric keys on the model, your keyboard can be used as toggles; Double click ( ) : Quickly press and release the left -handed, you should set the Mouse tab in the Help index for more information. 3-6 Using Your Computer press the key once to turn it to another location and then release the mouse button...

User Guide
Page 23
... links, networks, or modems before performing any cables connected to remove the cover of the procedures described in your system to access its power source and from the back panel. Installing and Removing Drives This chapter describes how to install or remove system cover, optional drives, and optional cards in this chapter. NOTE Turn off the computer and peripheral devices including the monitor and printer. Removing the Cover You need to the computer. Turn off...
... links, networks, or modems before performing any cables connected to remove the cover of the procedures described in your system to access its power source and from the back panel. Installing and Removing Drives This chapter describes how to install or remove system cover, optional drives, and optional cards in this chapter. NOTE Turn off the computer and peripheral devices including the monitor and printer. Removing the Cover You need to the computer. Turn off...

User Guide
Page 30
Connect the power and hard disk drive cable to the instructions in "Replacing the Cover" in this chapter. 4-8 Installing and Removing Drives Replace the system cover according to your hard disk drive. (If you removed the hard disk drive cable from the motherboard, replace it with the retaining screw, as shown below. 8. Slide the HDD bracket into the chassis and secure it .) 9. 7.
Connect the power and hard disk drive cable to the instructions in "Replacing the Cover" in this chapter. 4-8 Installing and Removing Drives Replace the system cover according to your hard disk drive. (If you removed the hard disk drive cable from the motherboard, replace it with the retaining screw, as shown below. 8. Slide the HDD bracket into the chassis and secure it .) 9. 7.

User Guide
Page 33
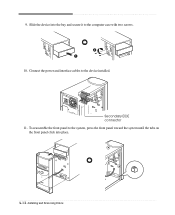
... 5.25-inch bay, you can use the spare connector of your computer. 6. NOTES Like a hard disk drive, most optional devices have jumpers that connected to CS (Cable Select). To install an additional device in the empty bay below the optical drive, you can use the secondary E-IDE drive connector. Remove the faceplate cover from the chassis using your system recognizes the device according to location of the front panel using a tool such as a screwdriver...
... 5.25-inch bay, you can use the spare connector of your computer. 6. NOTES Like a hard disk drive, most optional devices have jumpers that connected to CS (Cable Select). To install an additional device in the empty bay below the optical drive, you can use the secondary E-IDE drive connector. Remove the faceplate cover from the chassis using your system recognizes the device according to location of the front panel using a tool such as a screwdriver...
User Guide
Page 34
Secondary EIDE connector 11. To reassemble the front panel to the system, press the front panel toward the system until the tabs on the front panel click into the bay and secure it to the device installed. Slide the device into place. 4-12 Installing and Removing Drives 9. Connect the power and interface cables to the computer case with two screws. 10.
Secondary EIDE connector 11. To reassemble the front panel to the system, press the front panel toward the system until the tabs on the front panel click into the bay and secure it to the device installed. Slide the device into place. 4-12 Installing and Removing Drives 9. Connect the power and interface cables to the computer case with two screws. 10.
User Guide
Page 37
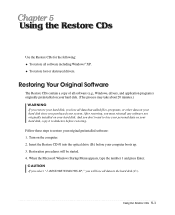
... started. 4. When the Microsoft Windows Startup Menu appears, type the number 1 and press Enter. Using the Restore CDs 5-1 After restoring, you select "1. Restoring Your Original Software The Restore CDs contain a copy of all software (e.g., Windows, drivers, and application programs) originally preinstalled on the computer. 2. Turn on your hard disk. (This process may take about 20 minutes.) WARNING Chapter 1 If you restore your original preinstalled software: 1. Insert the Restore CD #1 into the optical drive (D:) before restoring...
... started. 4. When the Microsoft Windows Startup Menu appears, type the number 1 and press Enter. Using the Restore CDs 5-1 After restoring, you select "1. Restoring Your Original Software The Restore CDs contain a copy of all software (e.g., Windows, drivers, and application programs) originally preinstalled on the computer. 2. Turn on your hard disk. (This process may take about 20 minutes.) WARNING Chapter 1 If you restore your original preinstalled software: 1. Insert the Restore CD #1 into the optical drive (D:) before restoring...

User Guide
Page 39
In this case, the "Microsoft Windows Startup Menu" menu will start. Enter your system has two or three Restore CDs. 11. You can update drivers in the Device Manager window if there is booting, the computer will be booted with #3 (if there is completed, remove the Restore CD from your system are in the Restore CD #2 will be copied to restart your computer is no executable installation file. When the...
In this case, the "Microsoft Windows Startup Menu" menu will start. Enter your system has two or three Restore CDs. 11. You can update drivers in the Device Manager window if there is booting, the computer will be booted with #3 (if there is completed, remove the Restore CD from your system are in the Restore CD #2 will be copied to restart your computer is no executable installation file. When the...

User Guide
Page 43
... not working , use other device (such as a lamp) into the computer. If it before calling a technician if a problem occurs. To open Windows Help, click the Start button, and then click Help and Support.) Solving Common Problems A-1 Make sure the power cord is listed first, followed by running Disk Defragmenter. (For more information, refer to the Windows Help. Check for complete discharge and re-plug the power cord. To open Windows...
... not working , use other device (such as a lamp) into the computer. If it before calling a technician if a problem occurs. To open Windows Help, click the Start button, and then click Help and Support.) Solving Common Problems A-1 Make sure the power cord is listed first, followed by running Disk Defragmenter. (For more information, refer to the Windows Help. Check for complete discharge and re-plug the power cord. To open Windows...
User Guide
Page 44
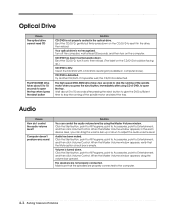
... it operates well, the CD/DVD is defected. Click the Start button, point to All Programs, point to Accessories, point to Entertainment, and then click Volume Control. When the Master Volume window appears, verify that the speakers are not properly connected. When the Master Volume window appears, drag the volume bar upward. Try another CD/DVD. The high speed DVD-ROM drive takes few...
... it operates well, the CD/DVD is defected. Click the Start button, point to All Programs, point to Accessories, point to Entertainment, and then click Volume Control. When the Master Volume window appears, verify that the speakers are not properly connected. When the Master Volume window appears, drag the volume bar upward. Try another CD/DVD. The high speed DVD-ROM drive takes few...

User Guide
Page 45
.... 3. Solving Common Problems A-3 Remove the write-protection or use the Display Properties window. Format the diskette. (Refer to the Windows Help. You have a screen blanking utility installed or your computer. Click Start, click Control Panel, click Appearance and Themes, and then click Display. The cable connecting the monitor to cover the hole. Remove the diskette and reinsert it. Use another diskette that the monitor connector is unformatted. Press any key or move...
.... 3. Solving Common Problems A-3 Remove the write-protection or use the Display Properties window. Format the diskette. (Refer to the Windows Help. You have a screen blanking utility installed or your computer. Click Start, click Control Panel, click Appearance and Themes, and then click Display. The cable connecting the monitor to cover the hole. Remove the diskette and reinsert it. Use another diskette that the monitor connector is unformatted. Press any key or move...
User Guide
Page 46
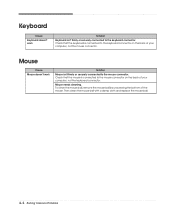
Keyboard Cause Keyboard doesn't work Solution Mouse isn't firmly or securely connected to the mouse connector. A-4 Solving Common Problems Mouse Cause Mouse doesn't work Solution Keyboard isn't firmly or securely connected to the keyboard connector. To clean the mouse ball, remove the mouse ball by unscrewing the bottom of your computer, not the keyboard connector. Check that the mouse is connected to the mouse connector on the back of the mouse. Then clean the mouse ball with...
Keyboard Cause Keyboard doesn't work Solution Mouse isn't firmly or securely connected to the mouse connector. A-4 Solving Common Problems Mouse Cause Mouse doesn't work Solution Keyboard isn't firmly or securely connected to the keyboard connector. To clean the mouse ball, remove the mouse ball by unscrewing the bottom of your computer, not the keyboard connector. Check that the mouse is connected to the mouse connector on the back of the mouse. Then clean the mouse ball with...


