Get support for eMachines T2862

eMachines T2862 Support Question

eMachines T2862 Support Question

Find answers below for this question about eMachines T2862.
Need a eMachines T2862 manual? We have 2 online manuals for this item!
Question posted by burt59 on April 8th, 2023

How Do You Remove The Cpu Fan???

I lifted the two levers on the fan, but I cannot lift the fan out. Please help an old man get his fan out.

Current Answers

Answer #1: Posted by SonuKumar on April 8th, 2023 4:44 PM
This answer was accepted by the poster of the original question.
SonuKumar

Member since:
May 9th, 2021

Points: 16,604,800
1,100
points
https://www.computerhope.com/issues/ch001340.htm

To remove the CPU fan on an eMachines T2862 desktop computer, you'll need to follow these steps:

Shut down your computer and unplug it from the power source.

Open the computer case by removing the screws or clips that hold the side panel in place.

Locate the CPU fan, which is attached to the heatsink that covers the CPU.

Disconnect the power cable that runs from the fan to the motherboard. You may need to gently pull up on the plastic tab that holds the cable in place to release it.

Look for the clips or screws that hold the fan in place. Depending on the fan model, there may be two or four of these fasteners.

Remove the clips or screws, and gently lift the fan off the heatsink.

Clean the heatsink and fan thoroughly with compressed air or a soft brush to remove any dust or debris.

To reattach the fan, simply reverse the steps above. Be sure to connect the power cable to the motherboard and secure the clips or screws tightly to prevent the fan from coming loose. Finally, replace the side panel and secure it with screws or clips.


Please respond to my effort to provide you with the best possible solution by using the "Acceptable Solution" and/or the "Helpful" buttons when the answer has proven to be helpful.

Regards,
Sonu
Your search handyman for all e-support needs!!

Answer #2: Posted by Odin on April 8th, 2023 1:16 PM
Odin

Member since:
April 10th, 2010

Points: 41,236,700
100
points
Sorry for your problems. Perhaps https://tinyurl.com/29dzs374 will help.


Hope this is useful. Please don't forget to click the Accept This Answer button if you do accept it. My aim is to provide reliable helpful answers, not just a lot of them. See https://www.helpowl.com/profile/Odin.

Related eMachines T2862 Manual Pages

User Guide - Page 2

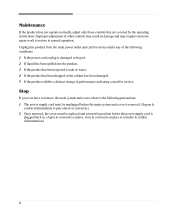
...only those controls that are covered by the operating instructions. Stop If you ever have to remove the main system unit cover, observe the following conditions: 1 If the power cord or... cord must be unplugged before the main system unit cover is removed. (Separe le cordon d'alimentation et puis enleve le couvercle.) 2 Once removed, the cover must be replaced and screwed in position before the...
User Guide - Page 7

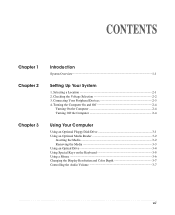
... 2-4 Turning On the Computer 2-4 Turning Off the Computer 2-4 Using Your Computer Using an Optional Floppy Disk Drive 3-1 Using an Optional Media Reader 3-2 Inserting the Media 3-2 Removing the Media 3-3 Using an Optical Drive 3-4 Using Special Keys on the Keyboard 3-5 Using a Mouse ...3-6 Changing the Display Resolution and Color Depth 3-7 Controlling the Audio Volume...
User Guide - Page 8

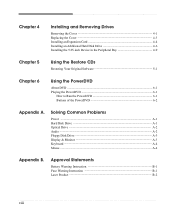
Solving Common Problems Power ...A-1 Hard Disk Drive ...A-1 Optical Drive ...A-2 Audio ...A-2 Floppy Disk Drive A-3 Display & Monitor A-3 Keyboard ...A-4 Mouse ...A-4 Appendix B. Chapter 4 Installing and Removing Drives Removing the Cover 4-1 Replacing the Cover 4-3 Installing an Expansion Card 4-4 Installing an Additional Hard Disk Drive 4-6 Installing the 5.25-inch Device in the ...
User Guide - Page 14

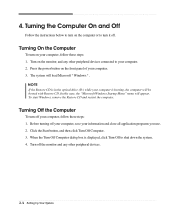
... Press the power button on your computer. 3. In this case, the "Microsoft Windows Startup Menu" menu will load Microsoft ® Windows ® . To start Windows, remove the Restore CD and restart the computer. Turn off .
User Guide - Page 15

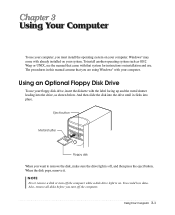
... in this manual assume that system for instructions on your floppy disk drive, insert the diskette with already installed on . You could lose data. Also, remove all disks before you turn off the computer while a disk drive light is off the computer. Using an Optional Floppy Disk Drive To use . When...
User Guide - Page 17

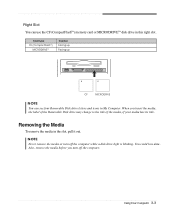
... media or turn off the computer while a disk drive light is blinking. Also, remove the media before you insert the media, the label of the Removable Disk drive may change to the title of the media, if your media has its title. Card type CF... slot. When you turn off the computer. You could lose data. Right Slot You can see four Removable Disk drive letters and icons in My Computer.
User Guide - Page 18

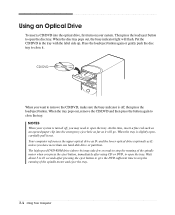
...CD or DVD, to close it will flash. The high speed DVD-ROM drive (above 6x) may need to remove the CD/DVD, make sure the busy indicator is off , you may take few seconds to stop the running ...to open the tray. Then press the load/eject button to close the tray. When the tray pops out, remove the CD/DVD and then press the button again to open the disc tray. Wait about 5 to 10 ...
User Guide - Page 23

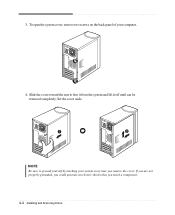
... computer and peripheral devices including the monitor and printer. Turn off the computer. Installing and Removing Drives 4-1 Then disconnect any of the procedures described in your system to the computer. Removing the Cover You need to remove the cover of all, disconnect the power cable from the electrical outlet and from any telecommunications...
User Guide - Page 24

... you are not properly grounded, you could generate an electric shock when you remove the cover. NOTE Be sure to free it from the system and lift it off until can be removed completely. To open the system cover, remove two screws on the back panel of your system every time you touch a component...
User Guide - Page 25

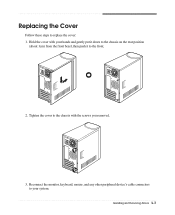
... gently put it down to the chassis on the rear position (about 1cm) from the front bezel, then push it to the front. 2. Installing and Removing Drives 4-3 Replacing the Cover Follow these steps to the chassis with your system. Tighten the cover to replace the cover: 1.
User Guide - Page 26

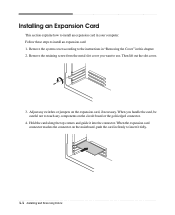
... cover according to the instructions in "Removing the Cover" in your computer. When you want to use. When the expansion card ... the card along the top corners and guide it fully. 4-4 Installing and Removing Drives Then lift out the slot cover. 3. Follow these steps to install an expansion card: 1. Remove the retaining screw from the metal slot cover you handle the card, be careful...
User Guide - Page 27

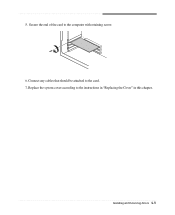
Installing and Removing Drives 4-5 Secure the end of the card to the instructions in "Replacing the Cover" in this chapter. 5. Replace the system cover according to the computer with retaining screw. 6. Connect any cables that should be attached to the card. 7.
User Guide - Page 28

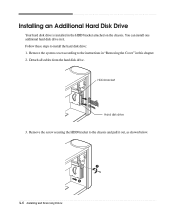
... the chassis and pull it . Installing an Additional Hard Disk Drive Your hard disk drive is installed in it out, as shown below. 4-6 Installing and Removing Drives You can install one additional hard disk drive in the HDD bracket attached on the chassis. HDD bracket Hard disk drive 3. Detach all cables...
User Guide - Page 29

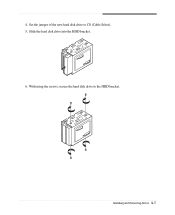
4. Installing and Removing Drives 4-7 Set the jumper of the new hard disk drive to the HDD bracket. With using the screws, secure the hard disk drive to CS (Cable Select). 5. Slide the hard disk drive into the HDD bracket. 6.
User Guide - Page 30

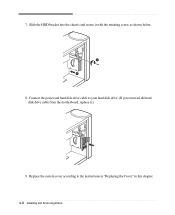
Connect the power and hard disk drive cable to the instructions in "Replacing the Cover" in this chapter. 4-8 Installing and Removing Drives Slide the HDD bracket into the chassis and secure it .) 9. Replace the system cover according to your hard disk drive. (If you removed the hard disk drive cable from the motherboard, replace it with the retaining screw, as shown below. 8. 7.
User Guide - Page 31

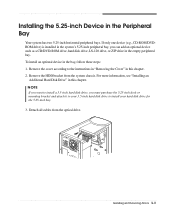
...these steps: 1. To install an optional device in the Peripheral Bay Your system has two 5.25-inch horizontal peripheral bays. Remove the HDD bracket from the optical drive. NOTE If you want to install a 3.5-inch hard disk drive, you can add ...or mounting bracket and attach it to your 3.5-inch hard disk drive to the instructions in "Removing the Cover" in this chapter. 2. Installing and...
User Guide - Page 32

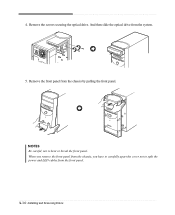
..., you have to carefully apart the cover not to bent or break the front panel. Remove the front panel from the front panel. 4-10 Installing and Removing Drives And then slide the optical drive from the system. 5. 4. Remove the screws securing the optical drive. NOTES Be careful, not to split the power and...
User Guide - Page 33

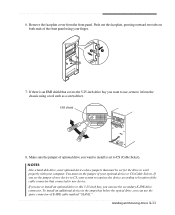
... you can use the spare connector of optional drive you want to new device. Installing and Removing Drives 4-11 EMI shield 8. If you want to install is an EMI shield that must ...devices have jumpers that covers the 5.25-inch drive bay you set to CS (Cable Select). Remove the faceplate cover from the chassis using your system recognizes the device according to location of the ...
User Guide - Page 35

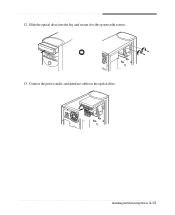
Connect the power, audio, and interface cables to the system with screws. 13. Installing and Removing Drives 4-13 Slide the optical drive into the bay and secure it to the optical drive. 12.
User Guide - Page 45

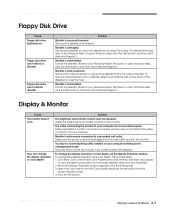
... contrast controls aren't set properly Adjust the brightness and contrast controls on the empty desktop area and click Properties. 2. Make sure that is not properly connected to a ...of your computer entered power management mode. Remove the diskette and reinsert it. Format the diskette. (Refer to your Windows Help in Windows. To remove write-protection from the Screen resolution area....

Similar Questions

El1300g Will Not Boot
Our EL1300G has run faultlessly, albeit until yesterday...This e-machine has not been turned on for ...
(Posted by harrisonsteelepartners 5 years ago)
I Need A Fan For This Computer.
Lead Me To The Best Prices Now Please!i Do Not Like This Offset Fanthat Is In My Emachines Computer ...
(Posted by aliziojr 7 years ago)
Missing Volume Icon
I Have Window Xp And I Put The Emachine T2862 And The Volume Icon Did'nt Pop Up On Tab And I Searche...
(Posted by coldhearted1013 9 years ago)
Ask a New Question
Use the box below to post a new question about this eMachines product .
Points & Prizes
  • You can earn points for nearly everything you do on HelpOwl.com
  • You can trade in those points for gift cards at leading retailers such as Amazon.com and Walmart
  • It's that simple!
See How it Works
Create a Free Account

eMachines Manuals

Find free eMachines T2862 manuals and user guides available at ManualOwl.com. Try out our unique manual viewer allowing you to interact with manuals from directly within your browser!

eMachines Reviews

View thousands of eMachines user reviews and customer ratings available at ReviewOwl.com.

Contact Information

Complete eMachines customer service contact information including steps to reach representatives, hours of operation, customer support links and more from ContactHelp.com.

Scoreboard Ratings

See detailed eMachines customer service rankings, employee comments and much more from our sister site.