eMachines T2672 Support and Manuals
Get Help and Manuals for this eMachines item

View All Support Options Below
Free eMachines T2672 manuals!
Problems with eMachines T2672?
Ask a Question
Free eMachines T2672 manuals!
Problems with eMachines T2672?
Ask a Question
Most Recent eMachines T2672 Questions

Looking For Picture Of Power 'on' Pin Layout For T2672 E-machine Motherboard?
(Posted by jrski 12 years ago)
Popular eMachines T2672 Manual Pages
User Guide - Page 2
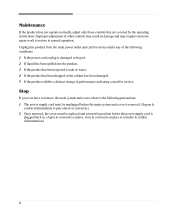
... are covered by the operating instructions. Improper adjustment of the following precautions: 1 The power supply cord must be unplugged before the main system unit cover is removed. (Separe le
cordon d'alimentation et puis enleve le couvercle.) 2 Once removed, the cover must be replaced and screwed in position before the power supply cord is damaged or frayed...
User Guide - Page 5
... their respective owners. ©2003 eMachines, Inc. nor for technical or editorial errors or omissions contained herein; All rights reserved. v All other countries. NOTE Depending on the model, your computer's components may vary and look slightly different than those pictured. eMachines, stylized "e" and figure logo are trademarks of this user's guide is subject to change without...
User Guide - Page 8

...4-4 Installing an Additional Hard Disk Drive 4-6 Installing the 5.25-inch Device in the Peripheral Bay 4-9
Chapter 5
Using the Restore CDs
Restoring Your Original Software 5-1
Chapter 6
Using the PowerDVD
About DVD ...6-1 Playing the PowerDVD 6-1
How to Run the PowerDVD 6-1 Buttons of the PowerDVD 6-2
Appendix A. Solving Common Problems
Power ...A-1 Hard Disk Drive ...A-1 Optical Drive...
User Guide - Page 9

...
(optional) Power button
Emergency eject hole Load/Eject button Floppy disk drive(optional)
Media reader slots(optional) Power indicator Hard disk drive access indicator
IEEE 1394 connectors (optional)
USB 2.0 connectors (optional)
Headphone jack
Microphone jack USB 2.0 connectors (optional)
NOTE
Chapter 1 Your optical drives may differ from the illustrations described in this user's guide.
User Guide - Page 11

... turn on your disks, damage the computer's circuitry, and prevent proper ventilation. A flat and hard surface. Good air circulation. Leave several inches of your system and all your equipment to support the weight of space around the computer so air can erase data on /off your system. Selecting a Location
Before you set up your computer...
User Guide - Page 12
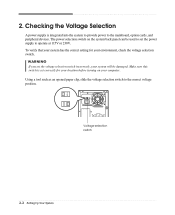
... cards, and peripheral devices. 2.
The power selection switch on your environment, check the voltage selection switch. Using a tool such as an opened paper clip, slide the voltage selection switch to operate at 115V or 230V. Checking the Voltage Selection
A power supply is set the voltage selection switch incorrectly, your location before turning on the system...
User Guide - Page 14

.... 2. To start Windows, remove the Restore CD and restart the computer. NOTE If the Restore CD is in the optical drive (D:) while your computer. 3.
Turning Off the Computer
To turn on the front panel of your computer is displayed, click Turn Off to turn off . 4. Turning the Computer On and Off
Follow the instructions below to shut...
User Guide - Page 15

... with already installed on installation and use. Windows® may come with the label facing up and the metal shutter leading into the drive until it . Also, remove all disks before you turn off the computer while a disk drive light is off the computer.
You could lose data. The procedures in this manual assume that system for instructions on...
User Guide - Page 19
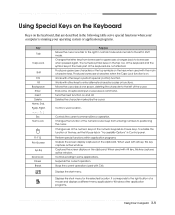
...Tab
Caps Lock
Shift Ctrl Alt Backspace Enter Insert Delete Home, End, PgUp, PgDn
, , Esc Num Lock
...cursor back one tab to the left in the main part of the keyboard are not affected. Captures the screen ...codes or functions. When used with Ctrl). Displays the short menu for the selected location. It corresponds to the right button of a mouse and displays a different menu applicable to Windows...
User Guide - Page 20
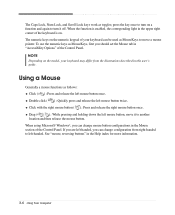
... is on the model, your keyboard can... keyboard is enabled, the corresponding light in this user's guide. press the key once to turn it to another
location and then release the mouse button.
Drag (...as MouseKeys, first you can be used as toggles;
When using Microsoft® Windows®, you should set the Mouse tab in the Help index for more information.
3-6 Using Your ...
User Guide - Page 37
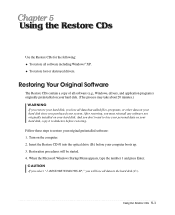
... destroyed drivers. After restoring, you purchased your
hard disk since you must reinstall any software not originally installed on the computer. 2. When the Microsoft Windows Startup Menu appears, type the number 1 and press Enter. Using the Restore CDs
Use the Restore CDs for the following: To restore all data in the hard disk (C:).
Insert the Restore CD #1 into the optical drive...
User Guide - Page 38
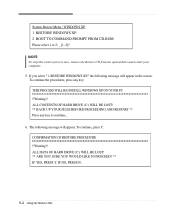
... the Restore CD from the optical drive and restart your computer.
5.
IF NO, PRESS N.
5-2 Using the Restore CDs To continue the procedures, press any key to continue...
6. The following message will appear.
ALL DATA OF HARD DRIVE (C:) WILL BE LOST! ** ARE YOU SURE YOU WOULD LIKE TO PROCEED? ** IF YES, PRESS Y. THIS PROCESS WILL RE-INSTALL WINDOWS XP ON YOUR...
User Guide - Page 39

.... You can update drivers in the Device Manager window if there is completed, remove the Restore CD from your computer, follow the displayed messages. If there is the executable file for using the Restore CDs. 7. The restoration process will appear. message appears, replace the Restore
CD #1 with Microsoft for installation, use it to continue..." NOTE Depending on the model, your...
User Guide - Page 43

... your hard disk may be fragmented. Make sure the power cord is not working , use other device (such as a lamp) into the computer. Wall outlet is firmly plugged into the wall outlet and into the wall outlet. To open Windows Help, click the Start button, and then click Help and Support.)
Solving Common Problems A-1 Solving Common Problems...
User Guide - Page 45

...'t set properly Adjust the brightness and contrast controls on the empty desktop area and click Properties. 2. Make sure that is incorrectly inserted.
You have a screen blanking utility installed or your Windows Help in Windows.
Format the diskette. (Refer to a diskette
Floppy disk drive can't read the diskette
Solution
Diskette is not write-protected. Make sure the power...
eMachines T2672 Reviews
We have not received any reviews for eMachines yet.