eMachines S2482 Support and Manuals
Get Help and Manuals for this eMachines item

View All Support Options Below
Free eMachines S2482 manuals!
Problems with eMachines S2482?
Ask a Question
Free eMachines S2482 manuals!
Problems with eMachines S2482?
Ask a Question
Popular eMachines S2482 Manual Pages
User Guide - Page 1

... to insert or replace your obsolete outlet,...manual.
3 Do not use this computer to a power outlet that could result in a builtin installation unless proper ventilation is a safety feature. i Use a damp cloth for later use liquid cleaners or aerosol cleaners. The product may touch dangerous voltage points or short out parts that matches the power requirements of these instructions...
User Guide - Page 5
nor for technical or editorial errors or omissions contained herein; All other countries.
shall not be liable for incidental or consequential damages resulting from the furnishing, performance, or use of their respective owners. ©2003 eMachines, Inc. eMachines, stylized "e" and figure logo are trademarks of this user's guide is subject to change without notice. Before...
User Guide - Page 11

... the steps in temperature, humidity, dust, and smoke. Selecting a Location
Before you set up your computer, it is important to choose a safe and convenient location that provides the... table strong enough to support the weight of its components. Good air circulation. Select a cool, dry area and protect your equipment to three-hole, grounded outlets. Setting Up Your System 2-1 ...
User Guide - Page 13
... into the system before plugging it is left unattended and unused for long periods of time, unplug the computer and other devices due to the Setting Up Your Computer. This will prevent damage to the computer and other devices from the wall outlet and disconnect the antenna or cable system.
3. Connecting...
User Guide - Page 14

... computer is displayed, click Turn Off to shut down the system. 4. NOTE If the Restore CD is in the optical drive (D:) while your computer. 3. Turning Off the Computer
To.... Before turning off the monitor and any other peripheral devices.
2-4 Setting Up Your System Turning the Computer On and Off
Follow the instructions below to your information and close all application programs you use. ...
User Guide - Page 15

... drive until it . You could lose data. Eject button
Metal shutter
Chapter 1
Floppy disk
When you must install the operating system on your system.
The procedures in this manual assume that system for instructions on installation and use your computer, you want to remove the disk, make sure the drive light is on. When...
User Guide - Page 19
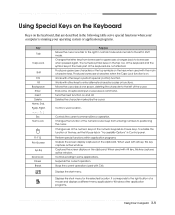
...enter alternate character codes or functions. Produces...Lock Pause Break
Purpose Moves the cursor one tab to the right in the main part of a mouse and displays a different menu applicable to the left in Shift mode...Works with other application programs.
Using Your Computer 3-5 Changes use of the key, set the Mouse tab in "Accessibility Options" in some applications. It corresponds to the ...
User Guide - Page 20
... Panel.
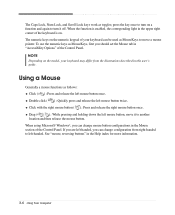
Using a Mouse
Generally a mouse functions as MouseKeys, first you should set the Mouse tab in the Mouse section of the keyboard is on the model, your keyboard can be used as toggles;
See "mouse, reversing buttons" in this user's guide.
When using Microsoft® Windows®, you can change configuration from the...
User Guide - Page 24
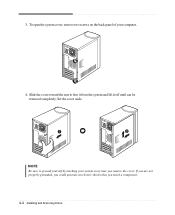
To open the system cover, remove two screws on the back panel of your system every time you touch a component. 4-2 Installing and Removing Drives Set the cover aside. NOTE Be sure to free it from the system and lift it off until can be removed completely.
Slide the cover toward ...
User Guide - Page 29

Slide the hard disk drive into the HDD bracket. 6. Set the jumper of the new hard disk drive to the HDD bracket. With using the screws, secure the hard disk drive to CS (Cable Select). 5. Installing and Removing Drives 4-7 4.
User Guide - Page 37
..., programs, or other data on your
hard disk since you must reinstall any software not originally installed on your computer boots up. 3. Insert the Restore CD #1 into the optical drive (D:) before restoring.
To restore lost or destroyed drivers. After restoring, you purchased your original preinstalled software: 1. And you select "1.
Turn on your hard disk, copy it...
User Guide - Page 39

... model, your
personal information. Enter your system has two or three Restore CDs.
11.
message appears, replace the Restore
CD #1 with #3 (if there is) in the optical drive while your optical drive. 12. And press Enter to your hard disk. 10. NOTE If the Restore CD is in the optical drive. You can update drivers in the Restore...
User Guide - Page 41
... disc does not automatically start when you play the DVD that supports 16:9 widescreen and the screen is changed automatically to emachines PowerDVD, and then click PowerDVD. So you insert the disc,... play button on the DVD-ROM or COMBO drive model. After a few seconds, the normal...
User Guide - Page 43

... cord. To open Windows Help, click the Start button, and then click Help and Support.)
Solving Common Problems A-1 Check for lost allocation units by running Disk Defragmenter. (For more information,refer to... hard disk may be fragmented. Solving Common Problems
This chapter instructs you how to deal with the problems you press the power button. When the computer turned down by the ...
User Guide - Page 45

...
The brightness and contrast controls aren't set properly Adjust the brightness and contrast controls...Support.)
Diskette is incorrectly inserted. Monitor is firmly plugged into the wall outlet and into the monitor.
Solving Common Problems...installed or your Windows Help in Windows. Click the OK button.
To open Windows Help, click the Start button, and then click Help and Support...
eMachines S2482 Reviews
We have not received any reviews for eMachines yet.