
User Guide
Page 3
... PC Back 10 Identifying your model 13 eMachines model and serial number 13 Microsoft Certificate of Authenticity 13 3 Getting Started 15 Working safely 16 Reducing eye strain 16 Setting up your computer desk and chair 16 Setting up your computer and computer accessories 17 Sitting at your computer 17 Avoiding discomfort and injury from repetitive...
... PC Back 10 Identifying your model 13 eMachines model and serial number 13 Microsoft Certificate of Authenticity 13 3 Getting Started 15 Working safely 16 Reducing eye strain 16 Setting up your computer desk and chair 16 Setting up your computer and computer accessories 17 Sitting at your computer 17 Avoiding discomfort and injury from repetitive...
User Guide
Page 4
...Playing a DVD 35 Creating CDs or DVDs 35 5 Maintaining Your Computer 37 Caring for your computer 38 Updating Windows 38 Protecting your computer from viruses 39 Cleaning your computer 41 Cleaning the exterior 41 Cleaning the keyboard 42 Cleaning the computer display 42 Cleaning the mouse 42 Cleaning CDs or DVDs 44 ...Troubleshooting 55 Safety guidelines 56 First steps 56 Troubleshooting 57 Add-in cards 57 Audio 57 Battery 57 CD or DVD drives 57 Computer 59 Diskette drive 59 DVD drives 60 File management 60 Hard drive 61 Internet 62 Keyboard 63 Memory 64 ii www...
...Playing a DVD 35 Creating CDs or DVDs 35 5 Maintaining Your Computer 37 Caring for your computer 38 Updating Windows 38 Protecting your computer from viruses 39 Cleaning your computer 41 Cleaning the exterior 41 Cleaning the keyboard 42 Cleaning the computer display 42 Cleaning the mouse 42 Cleaning CDs or DVDs 44 ...Troubleshooting 55 Safety guidelines 56 First steps 56 Troubleshooting 57 Add-in cards 57 Audio 57 Battery 57 CD or DVD drives 57 Computer 59 Diskette drive 59 DVD drives 60 File management 60 Hard drive 61 Internet 62 Keyboard 63 Memory 64 ii www...

User Guide
Page 8
...tests to high-quality, brand-name components at eMachines. 2 www.eMachines.com eMachines stands behind our value proposition to familiarize yourself with fast, considerate service. Thanks again, from your new eMachines computer for purchasing our computer! You have highlighted some basic care and ...safety information to help you keep your new computer. We are provided with the outstanding quality, reliability, and performance...
...tests to high-quality, brand-name components at eMachines. 2 www.eMachines.com eMachines stands behind our value proposition to familiarize yourself with fast, considerate service. Thanks again, from your new eMachines computer for purchasing our computer! You have highlighted some basic care and ...safety information to help you keep your new computer. We are provided with the outstanding quality, reliability, and performance...
User Guide
Page 9
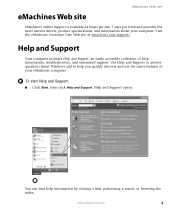
eMachines Web site eMachines Web site eMachines' online support is available 24 hours per day, 7 days per week and provides the most current drivers, product specifications, and information about Windows ...click Help and Support. Use Help and Support to answer questions about your eMachines computer. Visit the eMachines Customer Care Web site at emachines.com/support/. www.eMachines.com 3 Help and Support Your computer includes Help and Support, an easily accessible collection of your computer. Help and Support opens. You can find help information, troubleshooters, and...
eMachines Web site eMachines Web site eMachines' online support is available 24 hours per day, 7 days per week and provides the most current drivers, product specifications, and information about Windows ...click Help and Support. Use Help and Support to answer questions about your eMachines computer. Visit the eMachines Customer Care Web site at emachines.com/support/. www.eMachines.com 3 Help and Support Your computer includes Help and Support, an easily accessible collection of your computer. Help and Support opens. You can find help information, troubleshooters, and...
User Guide
Page 10
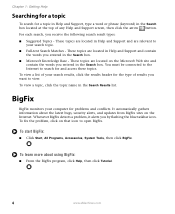
...are located on the Microsoft Web site and contain the words you entered in Help and Support and contain the words you want to your computer for problems and conflicts. You must be connected to the Internet to open BigFix. To start BigFix: ■ Click Start, All Programs...■ Microsoft Knowledge Base - It automatically gathers information about using BigFix: ■ From the BigFix program, click Help, then click Tutorial. 4 www.eMachines.com To learn more about the latest bugs, security alerts, and updates from BigFix sites on that icon to search for and access these topics...
...are located on the Microsoft Web site and contain the words you entered in Help and Support and contain the words you want to your computer for problems and conflicts. You must be connected to the Internet to open BigFix. To start BigFix: ■ Click Start, All Programs...■ Microsoft Knowledge Base - It automatically gathers information about using BigFix: ■ From the BigFix program, click Help, then click Tutorial. 4 www.eMachines.com To learn more about the latest bugs, security alerts, and updates from BigFix sites on that icon to search for and access these topics...
User Guide
Page 12
Chapter 1: Getting Help eMachines contact information To help you locate eMachines contact information, you can find the eMachines Web site, Online Support, and technical support contact information on the label located on the front of your computer case. 6 www.eMachines.com
Chapter 1: Getting Help eMachines contact information To help you locate eMachines contact information, you can find the eMachines Web site, Online Support, and technical support contact information on the label located on the front of your computer case. 6 www.eMachines.com

User Guide
Page 13
Chapter 2 Checking Out Your eMachines Computer • Identifying features • Locating your computer model and serial number • Locating the Microsoft Certificate of Authenticity • Locating the specifications for your computer • Purchasing accessories 7
Chapter 2 Checking Out Your eMachines Computer • Identifying features • Locating your computer model and serial number • Locating the Microsoft Certificate of Authenticity • Locating the specifications for your computer • Purchasing accessories 7
User Guide
Page 14
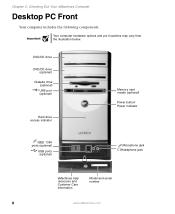
DVD/CD drive DVD/CD drive (optional) Diskette drive (optional) USB port (optional) Hard drive access indicator Memory card reader (optional) Power button/ Power indicator IEEE 1394 ports (optional) USB ports (optional) Microphone jack Headphone jack Model: S/No: eMachines help resources and Customer Care information Model and serial number 8 www.eMachines.com Important Your computer hardware options and port locations may vary from the illustration below. Chapter 2: Checking Out Your eMachines Computer Desktop PC Front Your computer includes the following components.
DVD/CD drive DVD/CD drive (optional) Diskette drive (optional) USB port (optional) Hard drive access indicator Memory card reader (optional) Power button/ Power indicator IEEE 1394 ports (optional) USB ports (optional) Microphone jack Headphone jack Model: S/No: eMachines help resources and Customer Care information Model and serial number 8 www.eMachines.com Important Your computer hardware options and port locations may vary from the illustration below. Chapter 2: Checking Out Your eMachines Computer Desktop PC Front Your computer includes the following components.
User Guide
Page 15
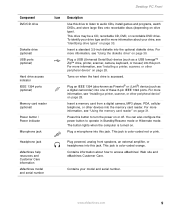
...external amplifier, or headphones into this jack. Insert a standard 3.5-inch diskette into this jack. This jack is color-coded red or pink. www.eMachines.com 9 Insert a memory card from a digital camera, MP3 player, PDA, cellular telephone, or other peripheral device" on page 31. Press... 6-pin IEEE 1394 ports. For more information, see "Using the memory card reader" on page 28. The button lights when the computer is accessed. Plug a microphone into the optional diskette drive. Contains information about your model and serial number. Contains your drive, see ...
...external amplifier, or headphones into this jack. Insert a standard 3.5-inch diskette into this jack. This jack is color-coded red or pink. www.eMachines.com 9 Insert a memory card from a digital camera, MP3 player, PDA, cellular telephone, or other peripheral device" on page 31. Press... 6-pin IEEE 1394 ports. For more information, see "Using the memory card reader" on page 28. The button lights when the computer is accessed. Plug a microphone into the optional diskette drive. Contains information about your model and serial number. Contains your drive, see ...
User Guide
Page 16
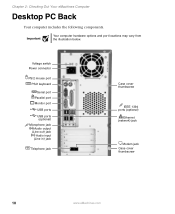
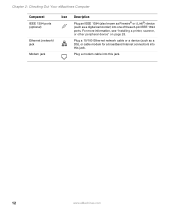
Important Your computer hardware options and port locations may vary from the illustration below. Voltage switch Power connector PS/2 mouse port PS/2 keyboard Serial port Parallel port Monitor port USB ports USB ports (optional) Microphone jack Audio output (Line out) jack Audio input (Line in) jack Telephone jack Case cover thumbscrew IEEE 1394 ports (optional) Ethernet (network) jack Modem jack Case cover thumbscrew 10 www.eMachines.com Chapter 2: Checking Out Your eMachines Computer Desktop PC Back Your computer includes the following components.
Important Your computer hardware options and port locations may vary from the illustration below. Voltage switch Power connector PS/2 mouse port PS/2 keyboard Serial port Parallel port Monitor port USB ports USB ports (optional) Microphone jack Audio output (Line out) jack Audio input (Line in) jack Telephone jack Case cover thumbscrew IEEE 1394 ports (optional) Ethernet (network) jack Modem jack Case cover thumbscrew 10 www.eMachines.com Chapter 2: Checking Out Your eMachines Computer Desktop PC Back Your computer includes the following components.
User Guide
Page 17
... device (such as a printer) into this port. Plug a microphone into this port. This jack is color-coded red or pink. www.eMachines.com 11 Plug a parallel device (such as a digital camera) into these screws before opening the case. This jack is operating in the correct..., scanner, or other peripheral device" on page 28. For more information, see "Installing a printer, scanner, or other peripheral device" on your computer. Remove these ports. Plug the power cord into this when your area. Plug an external audio input source (such as a USB Iomega™ ...
... device (such as a printer) into this port. Plug a microphone into this port. This jack is color-coded red or pink. www.eMachines.com 11 Plug a parallel device (such as a digital camera) into these screws before opening the case. This jack is operating in the correct..., scanner, or other peripheral device" on page 28. For more information, see "Installing a printer, scanner, or other peripheral device" on your computer. Remove these ports. Plug the power cord into this when your area. Plug an external audio input source (such as a USB Iomega™ ...
User Guide
Page 18
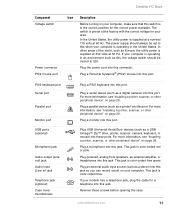
Plug a modem cable into this jack. 12 www.eMachines.com For more information, see "Installing a printer, scanner, or other peripheral device" on page 28. Plug a 10/100 Ethernet network cable or a device (such as a digital camcorder) into one of these 6-pin IEEE 1394 ports. Chapter 2: Checking Out Your eMachines Computer Component IEEE 1394 ports (optional) Ethernet (network) jack Modem jack Icon Description Plug an IEEE 1394 (also known as Firewire® or i.Link®) device (such as a DSL or cable modem for a broadband Internet connection) into this jack.
Plug a modem cable into this jack. 12 www.eMachines.com For more information, see "Installing a printer, scanner, or other peripheral device" on page 28. Plug a 10/100 Ethernet network cable or a device (such as a digital camcorder) into one of these 6-pin IEEE 1394 ports. Chapter 2: Checking Out Your eMachines Computer Component IEEE 1394 ports (optional) Ethernet (network) jack Modem jack Icon Description Plug an IEEE 1394 (also known as Firewire® or i.Link®) device (such as a DSL or cable modem for a broadband Internet connection) into this jack.
User Guide
Page 19
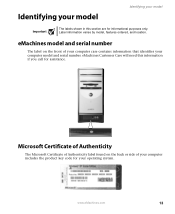
...found on the front of your computer includes the product key code for informational purposes only. www.eMachines.com 13 Identifying your model Identifying your model Important The labels shown in this information if you call for assistance. eMachines model and serial number The ...label on the back or side of your computer case contains information that identifies your operating system. eMachines Customer Care will need this section are for your computer model and serial number. Label information ...
...found on the front of your computer includes the product key code for informational purposes only. www.eMachines.com 13 Identifying your model Identifying your model Important The labels shown in this information if you call for assistance. eMachines model and serial number The ...label on the back or side of your computer case contains information that identifies your operating system. eMachines Customer Care will need this section are for your computer model and serial number. Label information ...

User Guide
Page 20
Chapter 2: Checking Out Your eMachines Computer 14 www.eMachines.com
Chapter 2: Checking Out Your eMachines Computer 14 www.eMachines.com

User Guide
Page 21
Chapter 3 Getting Started • Using your computer safely • Protecting your computer from power source problems • Turning your computer on and off • Adjusting the volume • Using the keyboard and the mouse • Using the computer display • Installing peripheral devices 15
Chapter 3 Getting Started • Using your computer safely • Protecting your computer from power source problems • Turning your computer on and off • Adjusting the volume • Using the keyboard and the mouse • Using the computer display • Installing peripheral devices 15
User Guide
Page 22
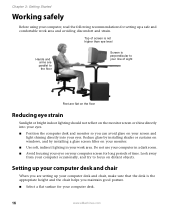
... Reduce glare by installing shades or curtains on windows, and by installing a glare screen filter on your computer screen for your computer desk. 16 www.eMachines.com Look away from your computer occasionally, and try to your line of time. Top of screen is perpendicular to focus on your screen... and light shining directly into your eyes. Setting up your computer desk and chair When you can avoid ...
... Reduce glare by installing shades or curtains on windows, and by installing a glare screen filter on your computer screen for your computer desk. 16 www.eMachines.com Look away from your computer occasionally, and try to your line of time. Top of screen is perpendicular to focus on your screen... and light shining directly into your eyes. Setting up your computer desk and chair When you can avoid ...
User Guide
Page 23
...work day, and schedule a variety of tasks. Working safely ■ Adjust the height of the computer desk so your hands and arms are positioned parallel to break up the monitor so the top ...chair so it supports the lower curve of sight. ■ Place your spine. www.eMachines.com 17 Setting up your computer and computer accessories ■ Set up the work . ■ Take breaks to provide extra ...back support. If the desk is not adjustable or is at your computer ■ Avoid bending, arching, or angling your shoulders relax while you type. ■ Do not...
...work day, and schedule a variety of tasks. Working safely ■ Adjust the height of the computer desk so your hands and arms are positioned parallel to break up the monitor so the top ...chair so it supports the lower curve of sight. ■ Place your spine. www.eMachines.com 17 Setting up your computer and computer accessories ■ Set up the work . ■ Take breaks to provide extra ...back support. If the desk is not adjustable or is at your computer ■ Avoid bending, arching, or angling your shoulders relax while you type. ■ Do not...

User Guide
Page 24
...Warning High voltages can increase to 230. 18 www.eMachines.com Checking the voltage selection A power supply is typically set correctly for your location before turning on the back of electricity coming into your computer to provide power to set the voltage selection switch ...protector, which absorbs voltage surges and prevents them from power source problems During a power surge, the voltage level of your computer can enter your computer through both the surge protector and the modem. During an electrical storm, unplug both the power cord and the modem connection...
...Warning High voltages can increase to 230. 18 www.eMachines.com Checking the voltage selection A power supply is typically set correctly for your location before turning on the back of electricity coming into your computer to provide power to set the voltage selection switch ...protector, which absorbs voltage surges and prevents them from power source problems During a power surge, the voltage level of your computer can enter your computer through both the surge protector and the modem. During an electrical storm, unplug both the power cord and the modem connection...
User Guide
Page 25
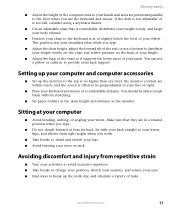
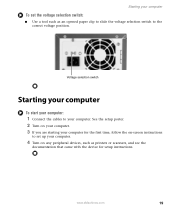
See the setup poster. 2 Turn on your computer. 3 If you are starting your computer for setup instructions. www.eMachines.com 19 Voltage selection switch Starting your computer To start your computer: 1 Connect the cables to the correct voltage position. Starting your computer To set up your computer. 4 Turn on -screen instructions to set the voltage selection switch: ■... device for the first time, follow the on any peripheral devices, such as an opened paper clip to slide the voltage selection switch to your computer.
See the setup poster. 2 Turn on your computer. 3 If you are starting your computer for setup instructions. www.eMachines.com 19 Voltage selection switch Starting your computer To start your computer: 1 Connect the cables to the correct voltage position. Starting your computer To set up your computer. 4 Turn on -screen instructions to set the voltage selection switch: ■... device for the first time, follow the on any peripheral devices, such as an opened paper clip to slide the voltage selection switch to your computer.

User Guide
Page 26
...wall outlets. If your computer is in Windows to turn off your computer, it may enter a power-saving mode called Standby. In order to "wake" it . 20 www.eMachines.com Turning off your computer: 1 Click Start, then click Turn Off Computer. To turn off your computer Warning When you cannot... use the Turn Off Computer option in Standby mode, move the mouse or press the power button ...
...wall outlets. If your computer is in Windows to turn off your computer, it may enter a power-saving mode called Standby. In order to "wake" it . 20 www.eMachines.com Turning off your computer: 1 Click Start, then click Turn Off Computer. To turn off your computer Warning When you cannot... use the Turn Off Computer option in Standby mode, move the mouse or press the power button ...


