

User Guide
Page 3
... PC Back 10 Identifying your model 13 eMachines model and serial number 13 Microsoft Certificate of Authenticity 13 3 Getting Started 15 Working safely 16 Reducing eye strain 16 Setting up your computer desk and chair 16 Setting up your computer and computer accessories 17 Sitting at your computer 17 Avoiding discomfort and injury from repetitive...
... PC Back 10 Identifying your model 13 eMachines model and serial number 13 Microsoft Certificate of Authenticity 13 3 Getting Started 15 Working safely 16 Reducing eye strain 16 Setting up your computer desk and chair 16 Setting up your computer and computer accessories 17 Sitting at your computer 17 Avoiding discomfort and injury from repetitive...
User Guide
Page 4
...Playing a DVD 35 Creating CDs or DVDs 35 5 Maintaining Your Computer 37 Caring for your computer 38 Updating Windows 38 Protecting your computer from viruses 39 Cleaning your computer 41 Cleaning the exterior 41 Cleaning the keyboard 42 Cleaning the computer display 42 Cleaning the mouse 42 Cleaning CDs or DVDs 44 ...Troubleshooting 55 Safety guidelines 56 First steps 56 Troubleshooting 57 Add-in cards 57 Audio 57 Battery 57 CD or DVD drives 57 Computer 59 Diskette drive 59 DVD drives 60 File management 60 Hard drive 61 Internet 62 Keyboard 63 Memory 64 ii www...
...Playing a DVD 35 Creating CDs or DVDs 35 5 Maintaining Your Computer 37 Caring for your computer 38 Updating Windows 38 Protecting your computer from viruses 39 Cleaning your computer 41 Cleaning the exterior 41 Cleaning the keyboard 42 Cleaning the computer display 42 Cleaning the mouse 42 Cleaning CDs or DVDs 44 ...Troubleshooting 55 Safety guidelines 56 First steps 56 Troubleshooting 57 Add-in cards 57 Audio 57 Battery 57 CD or DVD drives 57 Computer 59 Diskette drive 59 DVD drives 60 File management 60 Hard drive 61 Internet 62 Keyboard 63 Memory 64 ii www...

User Guide
Page 8
... the outstanding quality, reliability, and performance of -class service and support in good operating condition. Thanks again, from your new eMachines computer for purchasing our computer! We have made an excellent decision choosing eMachines. Chapter 1: Getting Help Thank you with fast, considerate service. You have highlighted some basic care and safety information to familiarize...
... the outstanding quality, reliability, and performance of -class service and support in good operating condition. Thanks again, from your new eMachines computer for purchasing our computer! We have made an excellent decision choosing eMachines. Chapter 1: Getting Help Thank you with fast, considerate service. You have highlighted some basic care and safety information to familiarize...

User Guide
Page 9
... you quickly discover and use the many features of your computer. www.eMachines.com 3 To start Help and Support: ■ Click Start, then click Help and Support. Use Help and Support to help information, troubleshooters, and automated support. eMachines Web site eMachines Web site eMachines' online support is available 24 hours per day, 7 days per...
... you quickly discover and use the many features of your computer. www.eMachines.com 3 To start Help and Support: ■ Click Start, then click Help and Support. Use Help and Support to help information, troubleshooters, and automated support. eMachines Web site eMachines Web site eMachines' online support is available 24 hours per day, 7 days per...

User Guide
Page 10
... header for and access these topics. To learn more about the latest bugs, security alerts, and updates from BigFix sites on that icon to your computer for a topic in Help and Support, type a word or phrase (keyword) in the Search box located at the top of results you entered in Help... fix the problem, click on the Internet. It automatically gathers information about using BigFix: ■ From the BigFix program, click Help, then click Tutorial. 4 www.eMachines.com
... header for and access these topics. To learn more about the latest bugs, security alerts, and updates from BigFix sites on that icon to your computer for a topic in Help and Support, type a word or phrase (keyword) in the Search box located at the top of results you entered in Help... fix the problem, click on the Internet. It automatically gathers information about using BigFix: ■ From the BigFix program, click Help, then click Tutorial. 4 www.eMachines.com
User Guide
Page 12
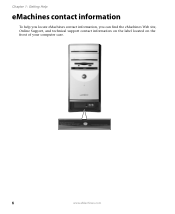
Chapter 1: Getting Help eMachines contact information To help you locate eMachines contact information, you can find the eMachines Web site, Online Support, and technical support contact information on the label located on the front of your computer case. 6 www.eMachines.com
Chapter 1: Getting Help eMachines contact information To help you locate eMachines contact information, you can find the eMachines Web site, Online Support, and technical support contact information on the label located on the front of your computer case. 6 www.eMachines.com

User Guide
Page 13
Chapter 2 Checking Out Your eMachines Computer • Identifying features • Locating your computer model and serial number • Locating the Microsoft Certificate of Authenticity • Locating the specifications for your computer • Purchasing accessories 7
Chapter 2 Checking Out Your eMachines Computer • Identifying features • Locating your computer model and serial number • Locating the Microsoft Certificate of Authenticity • Locating the specifications for your computer • Purchasing accessories 7
User Guide
Page 14
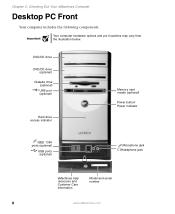
DVD/CD drive DVD/CD drive (optional) Diskette drive (optional) USB port (optional) Hard drive access indicator Memory card reader (optional) Power button/ Power indicator IEEE 1394 ports (optional) USB ports (optional) Microphone jack Headphone jack Model: S/No: eMachines help resources and Customer Care information Model and serial number 8 www.eMachines.com Chapter 2: Checking Out Your eMachines Computer Desktop PC Front Your computer includes the following components. Important Your computer hardware options and port locations may vary from the illustration below.
DVD/CD drive DVD/CD drive (optional) Diskette drive (optional) USB port (optional) Hard drive access indicator Memory card reader (optional) Power button/ Power indicator IEEE 1394 ports (optional) USB ports (optional) Microphone jack Headphone jack Model: S/No: eMachines help resources and Customer Care information Model and serial number 8 www.eMachines.com Chapter 2: Checking Out Your eMachines Computer Desktop PC Front Your computer includes the following components. Important Your computer hardware options and port locations may vary from the illustration below.
User Guide
Page 15
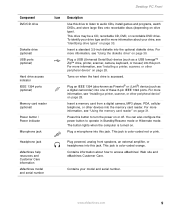
... eMachines model and serial number Plug powered, analog front speakers, an external amplifier, or headphones into the memory card reader. Contains your drive, see "Using the diskette drive" on page 30. Turns on when the hard drive is turned on. The button lights when the computer is...a CD, recordable CD, DVD, or recordable DVD drive. To identify your drive type and for more information about how to access eMachines' Web site and eMachines Customer Care. Insert a standard 3.5-inch diskette into this port. Press this drive to listen to operate in Standby/Resume mode or ...
... eMachines model and serial number Plug powered, analog front speakers, an external amplifier, or headphones into the memory card reader. Contains your drive, see "Using the diskette drive" on page 30. Turns on when the hard drive is turned on. The button lights when the computer is...a CD, recordable CD, DVD, or recordable DVD drive. To identify your drive type and for more information about how to access eMachines' Web site and eMachines Customer Care. Insert a standard 3.5-inch diskette into this port. Press this drive to listen to operate in Standby/Resume mode or ...
User Guide
Page 16
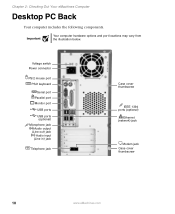
Voltage switch Power connector PS/2 mouse port PS/2 keyboard Serial port Parallel port Monitor port USB ports USB ports (optional) Microphone jack Audio output (Line out) jack Audio input (Line in) jack Telephone jack Case cover thumbscrew IEEE 1394 ports (optional) Ethernet (network) jack Modem jack Case cover thumbscrew 10 www.eMachines.com Important Your computer hardware options and port locations may vary from the illustration below. Chapter 2: Checking Out Your eMachines Computer Desktop PC Back Your computer includes the following components.
Voltage switch Power connector PS/2 mouse port PS/2 keyboard Serial port Parallel port Monitor port USB ports USB ports (optional) Microphone jack Audio output (Line out) jack Audio input (Line in) jack Telephone jack Case cover thumbscrew IEEE 1394 ports (optional) Ethernet (network) jack Modem jack Case cover thumbscrew 10 www.eMachines.com Important Your computer hardware options and port locations may vary from the illustration below. Chapter 2: Checking Out Your eMachines Computer Desktop PC Back Your computer includes the following components.
User Guide
Page 17
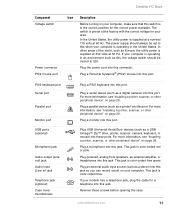
... blue. This jack is color-coded lime green. Desktop PC Back Component Voltage switch Power connector PS/2 mouse port Icon Description Before turning on your computer, make sure that this jack. The switch is supplied at 230 volts at the factory with the correct voltage for a telephone into this jack so... Hz. Plug an external audio input source (such as a digital camera) into this port. If your modem has a telephone jack, plug the cable for your computer. Remove these ports. www.eMachines.com 11
... blue. This jack is color-coded lime green. Desktop PC Back Component Voltage switch Power connector PS/2 mouse port Icon Description Before turning on your computer, make sure that this jack. The switch is supplied at 230 volts at the factory with the correct voltage for a telephone into this jack so... Hz. Plug an external audio input source (such as a digital camera) into this port. If your modem has a telephone jack, plug the cable for your computer. Remove these ports. www.eMachines.com 11
User Guide
Page 18
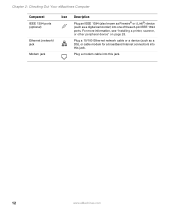
Plug a modem cable into this jack. Plug a 10/100 Ethernet network cable or a device (such as a digital camcorder) into one of these 6-pin IEEE 1394 ports. For more information, see "Installing a printer, scanner, or other peripheral device" on page 28. Chapter 2: Checking Out Your eMachines Computer Component IEEE 1394 ports (optional) Ethernet (network) jack Modem jack Icon Description Plug an IEEE 1394 (also known as Firewire® or i.Link®) device (such as a DSL or cable modem for a broadband Internet connection) into this jack. 12 www.eMachines.com
Plug a modem cable into this jack. Plug a 10/100 Ethernet network cable or a device (such as a digital camcorder) into one of these 6-pin IEEE 1394 ports. For more information, see "Installing a printer, scanner, or other peripheral device" on page 28. Chapter 2: Checking Out Your eMachines Computer Component IEEE 1394 ports (optional) Ethernet (network) jack Modem jack Icon Description Plug an IEEE 1394 (also known as Firewire® or i.Link®) device (such as a DSL or cable modem for a broadband Internet connection) into this jack. 12 www.eMachines.com
User Guide
Page 19
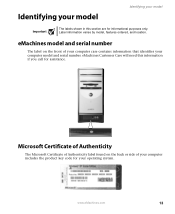
... Certificate of Authenticity label found on the front of your computer includes the product key code for assistance. eMachines model and serial number The label on the back or side of your computer case contains information that identifies your computer model and serial number. eMachines Customer Care will need this section are for informational purposes...
... Certificate of Authenticity label found on the front of your computer includes the product key code for assistance. eMachines model and serial number The label on the back or side of your computer case contains information that identifies your computer model and serial number. eMachines Customer Care will need this section are for informational purposes...

User Guide
Page 20
Chapter 2: Checking Out Your eMachines Computer 14 www.eMachines.com
Chapter 2: Checking Out Your eMachines Computer 14 www.eMachines.com

User Guide
Page 21
Chapter 3 Getting Started • Using your computer safely • Protecting your computer from power source problems • Turning your computer on and off • Adjusting the volume • Using the keyboard and the mouse • Using the computer display • Installing peripheral devices 15
Chapter 3 Getting Started • Using your computer safely • Protecting your computer from power source problems • Turning your computer on and off • Adjusting the volume • Using the keyboard and the mouse • Using the computer display • Installing peripheral devices 15
User Guide
Page 22
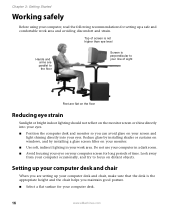
... your eyes on distant objects. Do not use your computer in your computer occasionally, and try to the floor Screen is the ...computer desk and monitor so you maintain good posture. ■ Select a flat surface for your eyes. Setting up your computer desk and chair When you are setting up your computer... desk and chair, make sure that the desk is perpendicular to your line of sight Feet are parallel to focus on your computer...Getting Started Working safely Before using your computer screen for long periods of time. ...
... your eyes on distant objects. Do not use your computer in your computer occasionally, and try to the floor Screen is the ...computer desk and monitor so you maintain good posture. ■ Select a flat surface for your eyes. Setting up your computer desk and chair When you are setting up your computer... desk and chair, make sure that the desk is perpendicular to your line of sight Feet are parallel to focus on your computer...Getting Started Working safely Before using your computer screen for long periods of time. ...
User Guide
Page 23
...adjust the forward tilt of the seat, or use the keyboard and mouse. Setting up your computer and computer accessories ■ Set up the work . ■ Take breaks to break up the monitor ... distance. You should be perpendicular to reach them without stretching. ■ Set paper holders at your computer ■ Avoid bending, arching, or angling your wrists. Make sure that is comfortable, distributes your weight...; Place your keyboard and mouse at or slightly below the level of your elbow. www.eMachines.com 17 Sit with your back straight so your knees, hips, and elbows form right angles...
...adjust the forward tilt of the seat, or use the keyboard and mouse. Setting up your computer and computer accessories ■ Set up the work . ■ Take breaks to break up the monitor ... distance. You should be perpendicular to reach them without stretching. ■ Set paper holders at your computer ■ Avoid bending, arching, or angling your wrists. Make sure that is comfortable, distributes your weight...; Place your keyboard and mouse at or slightly below the level of your elbow. www.eMachines.com 17 Sit with your back straight so your knees, hips, and elbows form right angles...

User Guide
Page 24
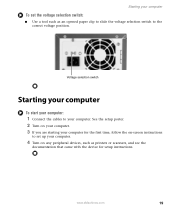
...environment, check the voltage selection switch. In other areas of your computer to set the power supply to 230. 18 www.eMachines.com Protect your computer and peripheral devices by using a surge protector. Protect your computer during a power failure. During an electrical storm, unplug both ...has an antenna/cable TV jack. If you have a telephone modem, use a surge protector that has a modem jack. If your computer is operating in cards, and peripheral devices. Chapter 3: Getting Started Protecting from reaching your location is typically set at the factory. Use ...
...environment, check the voltage selection switch. In other areas of your computer to set the power supply to 230. 18 www.eMachines.com Protect your computer and peripheral devices by using a surge protector. Protect your computer during a power failure. During an electrical storm, unplug both ...has an antenna/cable TV jack. If you have a telephone modem, use a surge protector that has a modem jack. If your computer is operating in cards, and peripheral devices. Chapter 3: Getting Started Protecting from reaching your location is typically set at the factory. Use ...
User Guide
Page 25
... see the documentation that came with the device for setup instructions. www.eMachines.com 19 See the setup poster. 2 Turn on your computer. 3 If you are starting your computer. Voltage selection switch Starting your computer To start your computer: 1 Connect the cables to your computer for the first time, follow the on-screen instructions to the...
... see the documentation that came with the device for setup instructions. www.eMachines.com 19 See the setup poster. 2 Turn on your computer. 3 If you are starting your computer. Voltage selection switch Starting your computer To start your computer: 1 Connect the cables to your computer for the first time, follow the on-screen instructions to the...

User Guide
Page 26
... may enter a power-saving mode called Standby. Windows shuts down and turns off your computer, it . 20 www.eMachines.com The Turn Off Computer dialog box opens. 2 Click Turn Off. Chapter 3: Getting Started Waking up . To turn off your computer, unplug the power cord and modem cable from the wall outlets. Important If for...
... may enter a power-saving mode called Standby. Windows shuts down and turns off your computer, it . 20 www.eMachines.com The Turn Off Computer dialog box opens. 2 Click Turn Off. Chapter 3: Getting Started Waking up . To turn off your computer, unplug the power cord and modem cable from the wall outlets. Important If for...


