Service Guide
Page 39
Chapter 2 29 NOTE: Do not install memory-related drivers (XMS, EMS, DPMI) when you use the Flash utility. If the battery pack does not contain enough power to run the Flash utility. Copy the ...
Chapter 2 29 NOTE: Do not install memory-related drivers (XMS, EMS, DPMI) when you use the Flash utility. If the battery pack does not contain enough power to run the Flash utility. Copy the ...
Service Guide
Page 84
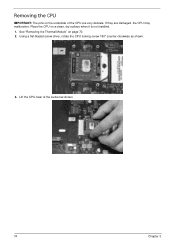
See "Removing the Thermal Module" on a clean, dry surface when it is not installed. 1. Using a flat-bladed screw driver, rotate the CPU locking screw 180° counter-clockwise as shown. 74 Chapter 3 Lift the CPU clear of the CPU are damaged, the CPU may malfunction. If they are very delicate. Removing the CPU IMPORTANT: The pins on the underside of the socket as shown. 3. Place the CPU on page 70. 2.
See "Removing the Thermal Module" on a clean, dry surface when it is not installed. 1. Using a flat-bladed screw driver, rotate the CPU locking screw 180° counter-clockwise as shown. 74 Chapter 3 Lift the CPU clear of the CPU are damaged, the CPU may malfunction. If they are very delicate. Removing the CPU IMPORTANT: The pins on the underside of the socket as shown. 3. Place the CPU on page 70. 2.
Service Guide
Page 103
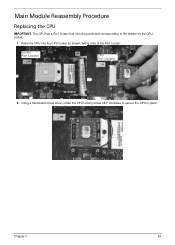
Place the CPU into the CPU socket as shown, taking note of the Pin1 locator. Socket Pin1 Locator CPU Pin1 Locator 2. Main Module Reassembly Procedure Replacing the CPU IMPORTANT: The CPU has a Pin1 locator that must be positioned corresponding to secure the CPU in place. Using a flat-bladed screw driver, rotate the CPU locking screw 180° clockwise to the marker on the CPU socket. 1. Chapter 3 93
Place the CPU into the CPU socket as shown, taking note of the Pin1 locator. Socket Pin1 Locator CPU Pin1 Locator 2. Main Module Reassembly Procedure Replacing the CPU IMPORTANT: The CPU has a Pin1 locator that must be positioned corresponding to secure the CPU in place. Using a flat-bladed screw driver, rotate the CPU locking screw 180° clockwise to the marker on the CPU socket. 1. Chapter 3 93
Service Guide
Page 130
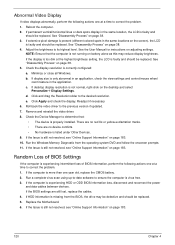
...same locations on page 38. 3. Check the display resolution is more than one year old, replace the CMOS battery. 2. Remove and reinstall the video driver. 8. If the Issue is still not resolved, see "Online Support Information" on the desktop and select Personalize´ Display Settings. Run the Windows ... at a time to correct the problem. 1. Minimize or close all Windows. If desktop display resolution is virus free. 3. Roll back the video driver to ensure the computer is not normal, right-click on page 183. 10. If the display is too dim at the highest brightness setting, the...
...same locations on page 38. 3. Check the display resolution is more than one year old, replace the CMOS battery. 2. Remove and reinstall the video driver. 8. If the Issue is still not resolved, see "Online Support Information" on the desktop and select Personalize´ Display Settings. Run the Windows ... at a time to correct the problem. 1. Minimize or close all Windows. If desktop display resolution is virus free. 3. Roll back the video driver to ensure the computer is not normal, right-click on page 183. 10. If the display is too dim at the highest brightness setting, the...
Service Guide
Page 133
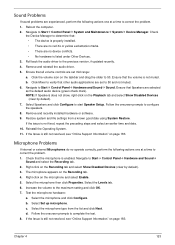
...onscreen prompts to Start´ Control Panel´ System and Maintenance´ System´ Device Manager. b. d. Remove and reinstall the audio driver. 5. Select the microphone and click Configure. Select the microphone type from a known good date using System Restore. Chapter 4 123 b. If ...Click Mixer to verify that the microphone is still not resolved, see "Online Support Information" on page 183. Roll back the audio driver to complete the test. 8. Right-click on the microphone and select Enable. 5. Follow the onscreen prompts to the previous version,...
...onscreen prompts to Start´ Control Panel´ System and Maintenance´ System´ Device Manager. b. d. Remove and reinstall the audio driver. 5. Select the microphone and click Configure. Select the microphone type from a known good date using System Restore. Chapter 4 123 b. If ...Click Mixer to verify that the microphone is still not resolved, see "Online Support Information" on page 183. Roll back the audio driver to complete the test. 8. Right-click on the microphone and select Enable. 5. Follow the onscreen prompts to the previous version,...
Service Guide
Page 134
... the following actions one at a time to locate and resolve issues with the computer. Click Next. The System Recovery Options screen displays. NOTE: Click Load Drivers if controller drives are correct and that CD/DVD drive is virus free. 3. Select Startup Repair. Startup Repair attempts to correct the problem. 1. i. For more...
... the following actions one at a time to locate and resolve issues with the computer. Click Next. The System Recovery Options screen displays. NOTE: Click Load Drivers if controller drives are correct and that CD/DVD drive is virus free. 3. Select Startup Repair. Startup Repair attempts to correct the problem. 1. i. For more...
Service Guide
Page 136
If a device displays a down arrow, right-click on the device and uninstall and reinstall the driver. b. Check that the media is correctly seated in the drive tray and that there are no yellow exclamation marks against the items in lDE ATA/... mark, right-click on the device and click Enable. If a device has an exclamation mark, right-click on the device and uninstall and reinstall the driver. Ensure that system resources are no yellow exclamation marks against the items in DVD/CD-ROM drives. Discs Do Not Burn Properly If discs can...
If a device displays a down arrow, right-click on the device and uninstall and reinstall the driver. b. Check that the media is correctly seated in the drive tray and that there are no yellow exclamation marks against the items in lDE ATA/... mark, right-click on the device and click Enable. If a device has an exclamation mark, right-click on the device and uninstall and reinstall the driver. Ensure that system resources are no yellow exclamation marks against the items in DVD/CD-ROM drives. Discs Do Not Burn Properly If discs can...
Service Guide
Page 139
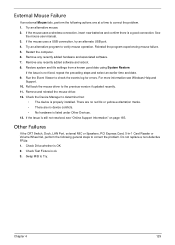
Restart the computer. 6. Run the Event Viewer to the previous version if updated recently. 11. Roll back the mouse driver to check the events log for errors. Check Test Fixture is still not resolved, see Windows Help and Support. 10. See the mouse user manual. 3. ... uses a wireless connection, insert new batteries and confirm there is OK. 2. If the issue is listed under Other Devices. 13. Remove and reinstall the mouse driver. 12. There are no red Xs or yellow exclamation marks. • There are no device conflicts. • No hardware is not fixed, repeat the preceding...
Restart the computer. 6. Run the Event Viewer to the previous version if updated recently. 11. Roll back the mouse driver to check the events log for errors. Check Test Fixture is still not resolved, see Windows Help and Support. 10. See the mouse user manual. 3. ... uses a wireless connection, insert new batteries and confirm there is OK. 2. If the issue is listed under Other Devices. 13. Remove and reinstall the mouse driver. 12. There are no red Xs or yellow exclamation marks. • There are no device conflicts. • No hardware is not fixed, repeat the preceding...
Service Guide
Page 142
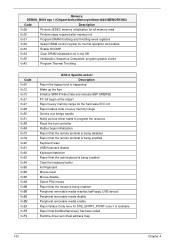
... Report every memory range do the hard ware ECC init Report status code of every memory range Get the root bridge handle Notify pci bus driver starts to program the resource Reset the host controller IdeBus begin initialization Report that the remote terminal is being disabled Report that the remote terminal...) Peripheral removable media disable Peripheral removable media enable Report Status Code here for DXE_ENTRY_POINT once it is available Report that ExitBootServices() has been called Runtime driver set virtual address map 132 Chapter 4
... Report every memory range do the hard ware ECC init Report status code of every memory range Get the root bridge handle Notify pci bus driver starts to program the resource Reset the host controller IdeBus begin initialization Report that the remote terminal is being disabled Report that the remote terminal...) Peripheral removable media disable Peripheral removable media enable Report Status Code here for DXE_ENTRY_POINT once it is available Report that ExitBootServices() has been called Runtime driver set virtual address map 132 Chapter 4
Service Guide
Page 144
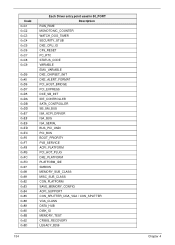
... 0xE7 0xE8 0xE9 0xED 0xEC 0xF6 0xF7 0xF8 0xFB 0xFC 0xFD 0x97 0x98 0x99 0x82 0x83 0x84 0x85 0x88 0x89 0x60 0x8B 0x62 0x8D Each Driver entry point used in 80_PORT Description RUN_RIME MONOTONIC_COUNTER WATCH_DOG_TIMER SECURITY_STUB DXE_CPU_IO CF9_RESET PC_RTC STATUS_CODE VARIABLE EMU_VARIABLE DXE_CHIPSET_INIT DXE_ALERT_FORMAT PCI_HOST_BRIDGE PCI_EXPRESS DXE_SB_INIT IDE_CONTROLLER SATA_CONTROLLER SB_SM_BUS ISA_ACPI_DRIVER...
... 0xE7 0xE8 0xE9 0xED 0xEC 0xF6 0xF7 0xF8 0xFB 0xFC 0xFD 0x97 0x98 0x99 0x82 0x83 0x84 0x85 0x88 0x89 0x60 0x8B 0x62 0x8D Each Driver entry point used in 80_PORT Description RUN_RIME MONOTONIC_COUNTER WATCH_DOG_TIMER SECURITY_STUB DXE_CPU_IO CF9_RESET PC_RTC STATUS_CODE VARIABLE EMU_VARIABLE DXE_CHIPSET_INIT DXE_ALERT_FORMAT PCI_HOST_BRIDGE PCI_EXPRESS DXE_SB_INIT IDE_CONTROLLER SATA_CONTROLLER SB_SM_BUS ISA_ACPI_DRIVER...
Service Guide
Page 145
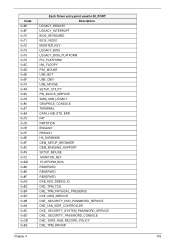
... 0x8A 0x7C 0x7D 0x7E 0x7F 0x9E 0x9F 0x8C 0xF9 0x72 0xBD 0x8D 0x8E 0x8F 0xA0 0xB3 0xB4 0xB7 0x9B 0xA9 0x9C 0x9D 0xCB 0xB5 Each Driver entry point used in 80_PORT Description LEGACY_REGION LEGACY_INTERRUPT BIOS_KEYBOARD BIOS_VEDIO MONITER_KEY LEGACY_BIOS LEGACY_BIOS_PLATFORM PCI_PLATFORM ISA_FLOOPY PS2_MOUSE USB_BOT USB_CBI0 USB_MOUSE SETUP_UTILITY FW_BLOCK_SERVICE SMM_USB_LEGACY GRAPHICS_CONSOLE TERMINAL DATA_HUB_STD_ERR...
... 0x8A 0x7C 0x7D 0x7E 0x7F 0x9E 0x9F 0x8C 0xF9 0x72 0xBD 0x8D 0x8E 0x8F 0xA0 0xB3 0xB4 0xB7 0x9B 0xA9 0x9C 0x9D 0xCB 0xB5 Each Driver entry point used in 80_PORT Description LEGACY_REGION LEGACY_INTERRUPT BIOS_KEYBOARD BIOS_VEDIO MONITER_KEY LEGACY_BIOS LEGACY_BIOS_PLATFORM PCI_PLATFORM ISA_FLOOPY PS2_MOUSE USB_BOT USB_CBI0 USB_MOUSE SETUP_UTILITY FW_BLOCK_SERVICE SMM_USB_LEGACY GRAPHICS_CONSOLE TERMINAL DATA_HUB_STD_ERR...
Service Guide
Page 146
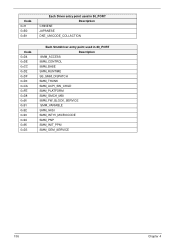
Code 0x11 0xB0 0xB1 Each Driver entry point used in 80_PORT Description CHINESE JAPANESE DXE_UNICODE_COLLACTION Code 0xD4 0xDE 0xCC 0xD2 0xDF 0xD0 0xCA 0xFE 0xD8 0x90 0x91 0x92 0x93 0x94 0x95 0xD3 Each SmmDriver entry point used in 80_PORT Description SMM_ACCESS SMM_CONTROL SMM_BASE SMM_RUNTIME SB_SMM_DISPATCH SMM_THUNK SMM_ACPI_SW_CHILD SMM_PLATFORM SMM_GMCH_MBI SMM_FW_BLOCK_SERVICE SMM_VARIABLE SMM_IHISI SMM_INT15_MICROCODE SMM_PNP SMM_INIT_PPM SMM_OEM_SERVICE 136 Chapter 4
Code 0x11 0xB0 0xB1 Each Driver entry point used in 80_PORT Description CHINESE JAPANESE DXE_UNICODE_COLLACTION Code 0xD4 0xDE 0xCC 0xD2 0xDF 0xD0 0xCA 0xFE 0xD8 0x90 0x91 0x92 0x93 0x94 0x95 0xD3 Each SmmDriver entry point used in 80_PORT Description SMM_ACCESS SMM_CONTROL SMM_BASE SMM_RUNTIME SB_SMM_DISPATCH SMM_THUNK SMM_ACPI_SW_CHILD SMM_PLATFORM SMM_GMCH_MBI SMM_FW_BLOCK_SERVICE SMM_VARIABLE SMM_IHISI SMM_INT15_MICROCODE SMM_PNP SMM_INIT_PPM SMM_OEM_SERVICE 136 Chapter 4


