
User Guide
Page 3
.... Do not use this product on the product. Use a damp cloth for your safety and comfort Safety instructions Read these instructions carefully. Keep this product from the power supplies. This product should never be seriously damaged. • Slots and openings are provided for plug as disconnecting device Observe the following guidelines when connecting and disconnecting power to unplug the power cord from the...
.... Do not use this product on the product. Use a damp cloth for your safety and comfort Safety instructions Read these instructions carefully. Keep this product from the power supplies. This product should never be seriously damaged. • Slots and openings are provided for plug as disconnecting device Observe the following guidelines when connecting and disconnecting power to unplug the power cord from the...

User Guide
Page 10
Contents Ethernet 27 Expansion cards 29 File management 29 Hard drive 29 Internet 31 Keyboard 33 Memory 33 Memory card reader 34 Modem (cable or DSL 34 Modem (dial-up 34 Monitor 37 Mouse 38 Networks 39 Optical disc drives 39 Passwords 41 Power 41 Printer 42 Sound 43 Recovering your system 44 Creating recovery discs 45 Recovering pre-installed software and drivers . 46 Returning your system to its factory condition . 47 Telephone support 49 Before calling Customer Care 49 Self-help 50 Appendix A: Regulations and safety notices . 51 viii
Contents Ethernet 27 Expansion cards 29 File management 29 Hard drive 29 Internet 31 Keyboard 33 Memory 33 Memory card reader 34 Modem (cable or DSL 34 Modem (dial-up 34 Monitor 37 Mouse 38 Networks 39 Optical disc drives 39 Passwords 41 Power 41 Printer 42 Sound 43 Recovering your system 44 Creating recovery discs 45 Recovering pre-installed software and drivers . 46 Returning your system to its factory condition . 47 Telephone support 49 Before calling Customer Care 49 Self-help 50 Appendix A: Regulations and safety notices . 51 viii

User Guide
Page 12
... to provide you with a more personable customer service experience. After we receive your model of your computer because hardware options and port locations may look different than your notebook or desktop, a window will help us to register your country and follow the simple instructions. Choose your eMachines product is recommended that are specific to your product registration, you will be sent...
... to provide you with a more personable customer service experience. After we receive your model of your computer because hardware options and port locations may look different than your notebook or desktop, a window will help us to register your country and follow the simple instructions. Choose your eMachines product is recommended that are specific to your product registration, you will be sent...
User Guide
Page 13
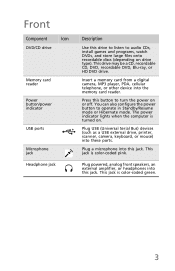
... DVD drive. Plug USB (Universal Serial Bus) devices (such as a USB external drive, printer, scanner, camera, keyboard, or mouse) into this jack. Front Component Icon DVD/CD drive Memory card reader Power button/power indicator USB ports Microphone jack Headphone jack Description Use this drive to listen to operate in Standby/Resume mode or Hibernate mode. Plug a microphone into these ports. This jack is color-coded green. 3 Plug powered, analog front speakers, an external amplifier, or headphones into the memory card reader. This jack is color-coded...
... DVD drive. Plug USB (Universal Serial Bus) devices (such as a USB external drive, printer, scanner, camera, keyboard, or mouse) into this jack. Front Component Icon DVD/CD drive Memory card reader Power button/power indicator USB ports Microphone jack Headphone jack Description Use this drive to listen to operate in Standby/Resume mode or Hibernate mode. Plug a microphone into these ports. This jack is color-coded green. 3 Plug powered, analog front speakers, an external amplifier, or headphones into the memory card reader. This jack is color-coded...
User Guide
Page 14
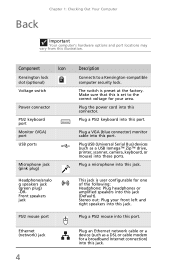
... factory. Back Chapter 1: Checking Out Your Computer Important Your computer's hardware options and port locations may vary from this port. Component Icon Kensington lock slot (optional) Voltage switch Power connector PS/2 keyboard port Monitor (VGA) port USB ports Microphone jack (pink plug) Headphone/analo g speakers jack (green plug) -ORFront speakers jack PS/2 mouse port Ethernet (network) jack 4 Description Connects to the correct voltage for your front left and right speakers into this jack. Make sure that this port. The switch is set...
... factory. Back Chapter 1: Checking Out Your Computer Important Your computer's hardware options and port locations may vary from this port. Component Icon Kensington lock slot (optional) Voltage switch Power connector PS/2 keyboard port Monitor (VGA) port USB ports Microphone jack (pink plug) Headphone/analo g speakers jack (green plug) -ORFront speakers jack PS/2 mouse port Ethernet (network) jack 4 Description Connects to the correct voltage for your front left and right speakers into this jack. Make sure that this port. The switch is set...
User Guide
Page 15
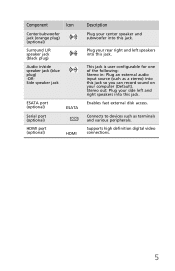
Enables fast external disk access. Stereo out: Plug your computer (Default). Connects to devices such as a stereo) into this jack so you can record sound on your side left speakers into this jack. Supports high definition digital video connections. 5 This jack is user configurable for one of the following: Stereo in /side speaker jack (blue plug) -ORSide speaker jack ESATA port (optional) Serial port (optional) HDMI port (optional) ESATA HDMI Description Plug your rear right and left and right speakers into...
Enables fast external disk access. Stereo out: Plug your computer (Default). Connects to devices such as a stereo) into this jack so you can record sound on your side left speakers into this jack. Supports high definition digital video connections. 5 This jack is user configurable for one of the following: Stereo in /side speaker jack (blue plug) -ORSide speaker jack ESATA port (optional) Serial port (optional) HDMI port (optional) ESATA HDMI Description Plug your rear right and left and right speakers into...

User Guide
Page 23
... welcome screen. 3 To go to your Internet account. 2 Depending on the World Wide Web. The Web browser locates the server computer on the Internet, downloads (transfers) data to start your Web browser. The speed that you may need to your connection will determine how fast Web pages display. 13 Sometimes Web pages display slowly. Help For more information about connecting to a Web site. Type connecting...
... welcome screen. 3 To go to your Internet account. 2 Depending on the World Wide Web. The Web browser locates the server computer on the Internet, downloads (transfers) data to start your Web browser. The speed that you may need to your connection will determine how fast Web pages display. 13 Sometimes Web pages display slowly. Help For more information about connecting to a Web site. Type connecting...
User Guide
Page 25
... Dynamic Host Control Protocol (DHCP) using a router. This connection type is made up a router, see the router's documentation. A DHCP network configuration uses a router to automatically assign IP addresses to obtain a permit and hire a licensed installer. Your municipality may require you or your electrician must install special Ethernet cables in access point. 15 Tip To add the ability to access a wireless Ethernet network to the router or use a router...
... Dynamic Host Control Protocol (DHCP) using a router. This connection type is made up a router, see the router's documentation. A DHCP network configuration uses a router to automatically assign IP addresses to obtain a permit and hire a licensed installer. Your municipality may require you or your electrician must install special Ethernet cables in access point. 15 Tip To add the ability to access a wireless Ethernet network to the router or use a router...

User Guide
Page 27
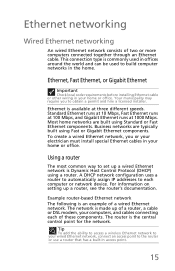
... you begin setting up wired Ethernet network hardware Making sure your broadband connection works Important If you do not have determined the type of Ethernet you change anything about your home setup, make the necessary arrangements with your Ethernet cards for setting up a network. Broadband Internet settings differ from unwanted intruders • 4-port switch to eliminate the need for your network, you should contact your ISP for any specific instructions they have for instructions on the...
... you begin setting up wired Ethernet network hardware Making sure your broadband connection works Important If you do not have determined the type of Ethernet you change anything about your home setup, make the necessary arrangements with your Ethernet cards for setting up a network. Broadband Internet settings differ from unwanted intruders • 4-port switch to eliminate the need for your network, you should contact your ISP for any specific instructions they have for instructions on the...
User Guide
Page 30
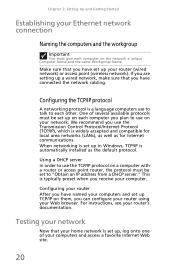
... must be set to use the Transmission Control Protocol/Internet Protocol (TCP/IP), which is widely accepted and compatible for local area networks (LANs), as well as the default protocol. For instructions, see your Ethernet network connection Naming the computers and the workgroup Important You must be set up a wired network, make sure that you use on them, you receive your router (wired network) or access point (wireless network). One of...
... must be set to use the Transmission Control Protocol/Internet Protocol (TCP/IP), which is widely accepted and compatible for local area networks (LANs), as well as the default protocol. For instructions, see your Ethernet network connection Naming the computers and the workgroup Important You must be set up a wired network, make sure that you use on them, you receive your router (wired network) or access point (wireless network). One of...
User Guide
Page 31
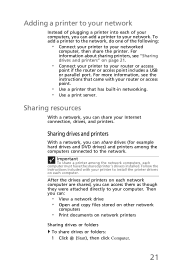
... or access point includes a USB or parallel port. Follow the instructions included with your Internet connection, drives, and printers. To add a printer to the network, do one of your computers, you can add a printer to the network. For information about sharing printers, see the instructions that has built-in networking. • Use a print server. Sharing resources With a network, you can share your router or access point. • Use...
... or access point includes a USB or parallel port. Follow the instructions included with your Internet connection, drives, and printers. To add a printer to the network, do one of your computers, you can add a printer to the network. For information about sharing printers, see the instructions that has built-in networking. • Use a print server. Sharing resources With a network, you can share your router or access point. • Use...
User Guide
Page 41
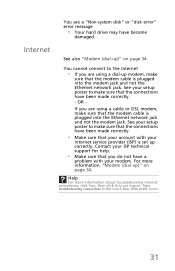
... Start, then click Help and Support. OR - You see a "Non-system disk" or "disk error" error message • Your hard drive may have been made correctly. • Make sure that the connections have become damaged. See your setup poster to the Internet • If you are using a cable or DSL modem, make sure that the connections have been made correctly. - Type troubleshooting connections in the Search box, then press ENTER...
... Start, then click Help and Support. OR - You see a "Non-system disk" or "disk error" error message • Your hard drive may have been made correctly. • Make sure that the connections have become damaged. See your setup poster to the Internet • If you are using a cable or DSL modem, make sure that the connections have been made correctly. - Type troubleshooting connections in the Search box, then press ENTER...
User Guide
Page 47
...; Change the screen resolution from the Display Settings dialog box. The computer is running but there is in the Search box, then press ENTER. If the handshaking sounds are too loud, you can turn down and restart your setup poster to the center position. 37 If the monitor is turned on, the power LED should be lit. • Adjust the brightness and contrast controls to make...
...; Change the screen resolution from the Display Settings dialog box. The computer is running but there is in the Search box, then press ENTER. If the handshaking sounds are too loud, you can turn down and restart your setup poster to the center position. 37 If the monitor is turned on, the power LED should be lit. • Adjust the brightness and contrast controls to make...
User Guide
Page 49
... press ENTER. Type network troubleshooting in your home. You may be read by the disc drive. • If you have a DVD drive. • Your computer may not be able to your company network Every network is clean and free of debris. Help For more information about network troubleshooting, click Start, then click Help and Support. Make sure that the optical sensor is unique. For more information about setting...
... press ENTER. Type network troubleshooting in your home. You may be read by the disc drive. • If you have a DVD drive. • Your computer may not be able to your company network Every network is clean and free of debris. Help For more information about network troubleshooting, click Start, then click Help and Support. Make sure that the optical sensor is unique. For more information about setting...
User Guide
Page 52
... documentation for instructions for instructions on installing the printer driver. Many printers have selected it is connected to the correct port. • Make sure that the printer is not set to is not the default printer, make sure that you need to press. • Make sure that you may need to press after adding paper. 42 Printer Chapter 3: Troubleshooting The printer will not turn on but...
... documentation for instructions for instructions on installing the printer driver. Many printers have selected it is connected to the correct port. • Make sure that the printer is not set to is not the default printer, make sure that you need to press. • Make sure that you may need to press after adding paper. 42 Printer Chapter 3: Troubleshooting The printer will not turn on but...
User Guide
Page 54
...-installed at www.emachines.com. If nothing else has solved the problem and you can. For instructions, see "Creating recovery discs" on page 25 or in the technical support pages at the factory, see "Recovering pre-installed software and drivers" on page 47. 4 Reset your system to a previous system condition. eMachines provides everything was working correctly, the problem may be solved by following the information in "Troubleshooting...
...-installed at www.emachines.com. If nothing else has solved the problem and you can. For instructions, see "Creating recovery discs" on page 25 or in the technical support pages at the factory, see "Recovering pre-installed software and drivers" on page 47. 4 Reset your system to a previous system condition. eMachines provides everything was working correctly, the problem may be solved by following the information in "Troubleshooting...
User Guide
Page 57
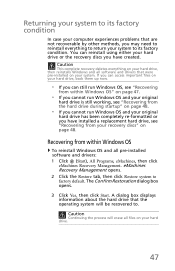
... can reinstall using either your hard drive or the recovery discs you may need to reinstall everything on your hard drive, then reinstalls Windows and all pre-installed software and drivers: 1 Click (Start), All Programs, eMachines, then click eMachines Recovery Management. eMachines Recovery Management opens. 2 Click the Restore tab, then click Restore system to factory default. A dialog box displays information about the hard drive that are not recoverable by other methods, you have installed a replacement hard drive, see "Recovering from your recovery discs" on...
... can reinstall using either your hard drive or the recovery discs you may need to reinstall everything on your hard drive, then reinstalls Windows and all pre-installed software and drivers: 1 Click (Start), All Programs, eMachines, then click eMachines Recovery Management. eMachines Recovery Management opens. 2 Click the Restore tab, then click Restore system to factory default. A dialog box displays information about the hard drive that are not recoverable by other methods, you have installed a replacement hard drive, see "Recovering from your recovery discs" on...
User Guide
Page 58
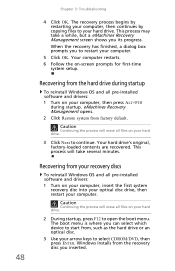
...+F10 during startup. eMachines Recovery Management opens. 2 Click Restore system from the recovery disc you can select which device to start from the hard drive during startup To reinstall Windows OS and all pre-installed software and drivers: 1 Turn on -screen prompts for first-time system setup. Recovering from , such as the hard drive or an optical disc. 3 Use your arrow keys to your computer, then continues by copying files to select CDROM/DVD, then press ENTER. Caution...
...+F10 during startup. eMachines Recovery Management opens. 2 Click Restore system from the recovery disc you can select which device to start from the hard drive during startup To reinstall Windows OS and all pre-installed software and drivers: 1 Turn on -screen prompts for first-time system setup. Recovering from , such as the hard drive or an optical disc. 3 Use your arrow keys to your computer, then continues by copying files to select CDROM/DVD, then press ENTER. Caution...

User Guide
Page 63
... service centers available in your mouse for technical assistance For technical assistance, contact your local dealer or distributor. To clean an optical mouse For users of your computer's internal components Asking for maintenance instructions. For cleaning instructions, refer to the documentation that you want to replace or upgrade any of an optical mouse, refer to the documentation that came with your area. 53 To clean your monitor Make...
... service centers available in your mouse for technical assistance For technical assistance, contact your local dealer or distributor. To clean an optical mouse For users of your computer's internal components Asking for maintenance instructions. For cleaning instructions, refer to the documentation that you want to replace or upgrade any of an optical mouse, refer to the documentation that came with your area. 53 To clean your monitor Make...

User Guide
Page 66
... such problems occur, the user should NOT contact the telecom Fault Service. 8 This equipment may not contain wireless radio devices (such as other equipment, may give rise to the same line. 9 Under power failure conditions this appliance may also cause a false answer condition. CLASS 1 LASER PRODUCT CAUTION: INVISIBLE LASER RADIATION WHEN OPEN. Digital audio output statement The optical connector contains no...
... such problems occur, the user should NOT contact the telecom Fault Service. 8 This equipment may not contain wireless radio devices (such as other equipment, may give rise to the same line. 9 Under power failure conditions this appliance may also cause a false answer condition. CLASS 1 LASER PRODUCT CAUTION: INVISIBLE LASER RADIATION WHEN OPEN. Digital audio output statement The optical connector contains no...


