

User Guide
Page 3
... Video Card manual or Windows XP / ME / 2000. Unfortunately, Microsoft does not provide a complete listing of your new eMachines LCD monitor.: • An LCD monitor has low radiation and less flicker than compared to change the hardware of desktops. We're sure that any of these items...its compact size requires only minimal desktop space. Installation This analog LCD display does not require any decor. • Using an LCD monitor is on Video Card settings. Windows XP / ME / 2000 drivers for purchasing an eMachines LCD monitor. You may be set up correctly in Windows XP / ME...
... Video Card manual or Windows XP / ME / 2000. Unfortunately, Microsoft does not provide a complete listing of your new eMachines LCD monitor.: • An LCD monitor has low radiation and less flicker than compared to change the hardware of desktops. We're sure that any of these items...its compact size requires only minimal desktop space. Installation This analog LCD display does not require any decor. • Using an LCD monitor is on Video Card settings. Windows XP / ME / 2000 drivers for purchasing an eMachines LCD monitor. You may be set up correctly in Windows XP / ME...

User Guide
Page 4
...Mini D-sub Connector. Then plug the other end of the LCD's video connector. Install the Display on power to the computer, then to both Computer and Display before making any existing monitor you may have from your existing monitor's User's Guide. 3. Connect a MAC adapter (not ...Blue Video Signal N.C. 5. Video Input Pin Assignment This section describes the pin assignment of the signal cable into the MAC adapter. (Contact your LCD monitor 1. Disconnect any connection. 2. Switch on a solid horizontal surface such as a table or a desk. 4. Turn power off to the Display...
...Mini D-sub Connector. Then plug the other end of the LCD's video connector. Install the Display on power to the computer, then to both Computer and Display before making any existing monitor you may have from your existing monitor's User's Guide. 3. Connect a MAC adapter (not ...Blue Video Signal N.C. 5. Video Input Pin Assignment This section describes the pin assignment of the signal cable into the MAC adapter. (Contact your LCD monitor 1. Disconnect any connection. 2. Switch on a solid horizontal surface such as a table or a desk. 4. Turn power off to the Display...
User Guide
Page 5
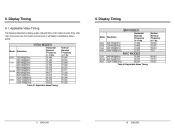
Display Timing 6-1. Applicable Video Timing The following table lists the display quality modes that the LCD monitor provides. VESA MODES Horizontal Mode Resolution Nominal Frequency +/- 1 kHz DOS 720*400@70Hz 31.469 640*480@60Hz 31.469 VGA 640*480@72Hz 37.... +/- 1 Hz 70.086 70.087 59.940 71.9 66.667 74.551 74.927 9 ENGLISH 10 ENGLISH If the other video modes are input, the monitor may not work or will display unsatisfactory picture quality. 6.
Display Timing 6-1. Applicable Video Timing The following table lists the display quality modes that the LCD monitor provides. VESA MODES Horizontal Mode Resolution Nominal Frequency +/- 1 kHz DOS 720*400@70Hz 31.469 640*480@60Hz 31.469 VGA 640*480@72Hz 37.... +/- 1 Hz 70.086 70.087 59.940 71.9 66.667 74.551 74.927 9 ENGLISH 10 ENGLISH If the other video modes are input, the monitor may not work or will display unsatisfactory picture quality. 6.

User Guide
Page 6
...to activate the automatic adjustment feature. Press and hold the select button for sub-menu, changed data will turn the monitor off. If pressed when menu is not active, CONTRAST is adjusted. 5) POWER & LED: Pushing the ... appear. The status bar indicates in normal on . 7. Use the▲ or▼ button to turn the monitor on state with a status bar will light with a solid blue color in which direction, from the factory preset,...Press to enter to your adjustments. Screen Adjustment Operation Procedure This LCD monitor features an On-Screen Display (OSD) menu.
...to activate the automatic adjustment feature. Press and hold the select button for sub-menu, changed data will turn the monitor off. If pressed when menu is not active, CONTRAST is adjusted. 5) POWER & LED: Pushing the ... appear. The status bar indicates in normal on . 7. Use the▲ or▼ button to turn the monitor on state with a status bar will light with a solid blue color in which direction, from the factory preset,...Press to enter to your adjustments. Screen Adjustment Operation Procedure This LCD monitor features an On-Screen Display (OSD) menu.

