

Quick Start Guide
Page 2
You should have been given most of the following information. The P-320W makes it easy to do: 1 Hardware Connections 2 Accessing the Web Configurator 3 Internet Access Setup 3 Table 1 Internet Account Information Your device's WAN IP Address (if given DNS Server IP Address (if given): Primary ...Domain Name ¦PPPoE (PPPoE) Service Name User Name Password See your User's Guide for background information on all features. ENGLISH Overview The P-320W is a broadband router with a built-in four-port 10/100 Mbps switch. The follow lists what you need to set up and have...
You should have been given most of the following information. The P-320W makes it easy to do: 1 Hardware Connections 2 Accessing the Web Configurator 3 Internet Access Setup 3 Table 1 Internet Account Information Your device's WAN IP Address (if given DNS Server IP Address (if given): Primary ...Domain Name ¦PPPoE (PPPoE) Service Name User Name Password See your User's Guide for background information on all features. ENGLISH Overview The P-320W is a broadband router with a built-in four-port 10/100 Mbps switch. The follow lists what you need to set up and have...
Quick Start Guide
Page 4
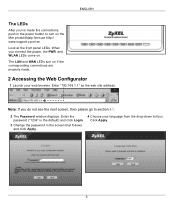
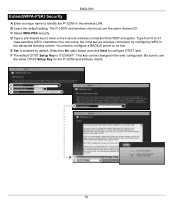
Look at the front panel LEDs. The LAN and WAN LEDs turn on the Mer produkthjalp finns pa http:// www.support.zyxel.se. Enter "192.168.1.1" as the web site address. Click Apply. 5 When you do not see the next screen, then please go to turn on . ... click Login. 3 Change the password in the power button to section 4.1. 2 The Password window displays. ENGLISH The LEDs After you've made . 2 Accessing the Web Configurator 1 Launch your language from the drop-down list box. Note: If you connect the power, the PWR and WLAN LEDs come on if the corresponding...
Look at the front panel LEDs. The LAN and WAN LEDs turn on the Mer produkthjalp finns pa http:// www.support.zyxel.se. Enter "192.168.1.1" as the web site address. Click Apply. 5 When you do not see the next screen, then please go to turn on . ... click Login. 3 Change the password in the power button to section 4.1. 2 The Password window displays. ENGLISH The LEDs After you've made . 2 Accessing the Web Configurator 1 Launch your language from the drop-down list box. Note: If you connect the power, the PWR and WLAN LEDs come on if the corresponding...
Quick Start Guide
Page 6
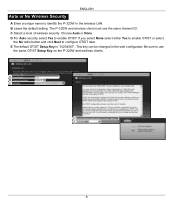
...The wireless client must use the same key. • None: Have no wireless LAN security configured. If you do not enable any wireless security on the Mer produkthjalp finns pa http:// www.support.zyxel.se: • Auto security: Uses WPA-PSK security with an automatically generated Pre-Shared ...Key. Note: The wireless clients and P-320W must also support OTIST and have OTIST enabled. 7 OTIST • OTIST (...
...The wireless client must use the same key. • None: Have no wireless LAN security configured. If you do not enable any wireless security on the Mer produkthjalp finns pa http:// www.support.zyxel.se: • Auto security: Uses WPA-PSK security with an automatically generated Pre-Shared ...Key. Note: The wireless clients and P-320W must also support OTIST and have OTIST enabled. 7 OTIST • OTIST (...
Quick Start Guide
Page 7
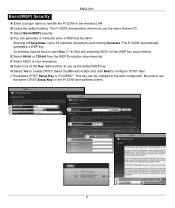
... A Enter a unique name to identify the P-320W in the web configurator. The P-320W and wireless client must use the same OTIST Setup Key on the P-320W and wireless clients. E The default OTIST Setup Key is "01234567". C Select a level of wireless security. D For Auto security select Yes to configure OTIST later. If you select None select...
... A Enter a unique name to identify the P-320W in the web configurator. The P-320W and wireless client must use the same OTIST Setup Key on the P-320W and wireless clients. E The default OTIST Setup Key is "01234567". C Select a level of wireless security. D For Auto security select Yes to configure OTIST later. If you select None select...
Quick Start Guide
Page 8
... use the same channel ID. D You can be changed in each Key (1~4) field and selecting ASCII or Hex WEP key input method. The P-320W automatically generates a WEP key. Select the No radio button and click Next to 32 printable characters) and clicking Generate. F Select ASCII or Hex characters.... H Select Yes to use as the default WEP key. I The default OTIST Setup Key is "01234567". Or entering manual keys in the web configurator. B Leave the default setting. C Select Basic(WEP) security. ENGLISH Basic(WEP) Security A Enter a unique name to use the same OTIST Setup Key...
... use the same channel ID. D You can be changed in each Key (1~4) field and selecting ASCII or Hex WEP key input method. The P-320W automatically generates a WEP key. Select the No radio button and click Next to 32 printable characters) and clicking Generate. F Select ASCII or Hex characters.... H Select Yes to use as the default WEP key. I The default OTIST Setup Key is "01234567". Or entering manual keys in the web configurator. B Leave the default setting. C Select Basic(WEP) security. ENGLISH Basic(WEP) Security A Enter a unique name to use the same OTIST Setup Key...
Quick Start Guide
Page 9
...The default OTIST Setup Key is enabled by configuring WPA in the wireless LAN. B Leave the default setting. E Yes is "01234567". You need to configure a RADIUS server to do this. Be sure to use the same channel ID. The P-320W and wireless client must use the same OTIST... Setup Key on the P-320W and wireless clients. A B C D D E 10 ENGLISH Extend(WPA-PSK) ...
...The default OTIST Setup Key is enabled by configuring WPA in the wireless LAN. B Leave the default setting. E Yes is "01234567". You need to configure a RADIUS server to do this. Be sure to use the same channel ID. The P-320W and wireless client must use the same OTIST... Setup Key on the P-320W and wireless clients. A B C D D E 10 ENGLISH Extend(WPA-PSK) ...

Quick Start Guide
Page 16
...1234, LAN IP address 192.168.1.1 etc.). Viewing Your Product's Certifications 1 Go to www.zyxel.com. 2 Select your product from the drop-down list box on again), then release it. It returns the P-320W to close the Internet Protocol (TCP/IP) Properties window. 8 Click Close (OK in the .... ENGLISH PROBLEM CORRECTIVE ACTION Cannot access the P-320W Use Internet Explorer 6.0 and later or Netscape Navigator 7.0 and later with your User's Guide for detailed IP address configuration for about 10 seconds (the WAN light turns off and then on the ZyXEL home page to go to view from my ...
...1234, LAN IP address 192.168.1.1 etc.). Viewing Your Product's Certifications 1 Go to www.zyxel.com. 2 Select your product from the drop-down list box on again), then release it. It returns the P-320W to close the Internet Protocol (TCP/IP) Properties window. 8 Click Close (OK in the .... ENGLISH PROBLEM CORRECTIVE ACTION Cannot access the P-320W Use Internet Explorer 6.0 and later or Netscape Navigator 7.0 and later with your User's Guide for detailed IP address configuration for about 10 seconds (the WAN light turns off and then on the ZyXEL home page to go to view from my ...
User Guide
Page 11
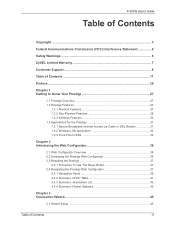
P-320W User's Guide Table of Contents Copyright ...3 Federal Communications Commission (FCC) Interference Statement 4 Safety Warnings ...6 ZyXEL Limited Warranty 7 Customer Support...8 Table of Contents 11 Preface ...25 Chapter 1 Getting to Know Your Prestige 27 1.1 Prestige...Cable or DSL Modem 31 1.3.2 Wireless LAN Application 32 1.3.3 Front Panel LEDs 32 Chapter 2 Introducing the Web Configurator 35 2.1 Web Configurator Overview 35 2.2 Accessing the Prestige Web Configurator 35 2.3 Resetting the Prestige 37 2.3.1 Procedure To Use The Reset Button 37 2.4 Navigating the Prestige Web...
P-320W User's Guide Table of Contents Copyright ...3 Federal Communications Commission (FCC) Interference Statement 4 Safety Warnings ...6 ZyXEL Limited Warranty 7 Customer Support...8 Table of Contents 11 Preface ...25 Chapter 1 Getting to Know Your Prestige 27 1.1 Prestige...Cable or DSL Modem 31 1.3.2 Wireless LAN Application 32 1.3.3 Front Panel LEDs 32 Chapter 2 Introducing the Web Configurator 35 2.1 Web Configurator Overview 35 2.2 Accessing the Prestige Web Configurator 35 2.3 Resetting the Prestige 37 2.3.1 Procedure To Use The Reset Button 37 2.4 Navigating the Prestige Web...

User Guide
Page 12
P-320W User's Guide 3.2 Connection Wizard: STEP 1: System Information 46 3.2.1 System Name 46 3.2.2 Domain Name 46 3.3 Connection Wizard: STEP 2: Wireless LAN 47 3.3.1 Basic(WEP) Security 49 3.3.2 Extend(WPA-PSK) Security 50 3.3.3 OTIST ...51 3.4 Connection Wizard: STEP 3: Internet Configuration... Overview 61 4.2.1 Encryption 61 4.2.2 Authentication 61 4.2.3 Restricted Access 62 4.2.4 Hide Prestige Identity 62 4.2.5 Using OTIST 62 4.3 Configuring Wireless LAN on the Prestige 62 4.4 General Wireless LAN Screen 63 4.4.1 No Security 64 4.4.2 WEP Encryption 65 4.4.3 Introduction ...
P-320W User's Guide 3.2 Connection Wizard: STEP 1: System Information 46 3.2.1 System Name 46 3.2.2 Domain Name 46 3.3 Connection Wizard: STEP 2: Wireless LAN 47 3.3.1 Basic(WEP) Security 49 3.3.2 Extend(WPA-PSK) Security 50 3.3.3 OTIST ...51 3.4 Connection Wizard: STEP 3: Internet Configuration... Overview 61 4.2.1 Encryption 61 4.2.2 Authentication 61 4.2.3 Restricted Access 62 4.2.4 Hide Prestige Identity 62 4.2.5 Using OTIST 62 4.3 Configuring Wireless LAN on the Prestige 62 4.4 General Wireless LAN Screen 63 4.4.1 No Security 64 4.4.2 WEP Encryption 65 4.4.3 Introduction ...

User Guide
Page 14
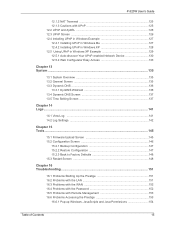
P-320W User's Guide 8.1.7 Configuring Servers Behind SUA (Example 103 8.2 General NAT Screen 103 8.3 Port Forwarding Screen 104 8.3.1 Rule Setup Screen 105 8.4 Trigger Port Forwarding 106 8.4.1 Trigger Port Forwarding Example ...
P-320W User's Guide 8.1.7 Configuring Servers Behind SUA (Example 103 8.2 General NAT Screen 103 8.3 Port Forwarding Screen 104 8.3.1 Rule Setup Screen 105 8.4 Trigger Port Forwarding 106 8.4.1 Trigger Port Forwarding Example ...
User Guide
Page 15
P-320W User's Guide 12.1.2 NAT Traversal 125 12.1.3 Cautions with UPnP 125 12.2 UPnP and ZyXEL 126 12.3 UPnP Screen 126 12.4 Installing UPnP in Windows Example 127 12.4.1 Installing UPnP in Windows Me 127 12.4.2 Installing UPnP in Windows XP ...128 12.5 Using UPnP in Windows XP Example 129 12.5.1 Auto-discover Your UPnP-enabled Network Device 130 12.5.2 Web Configurator Easy Access 133...
P-320W User's Guide 12.1.2 NAT Traversal 125 12.1.3 Cautions with UPnP 125 12.2 UPnP and ZyXEL 126 12.3 UPnP Screen 126 12.4 Installing UPnP in Windows Example 127 12.4.1 Installing UPnP in Windows Me 127 12.4.2 Installing UPnP in Windows XP ...128 12.5 Using UPnP in Windows XP Example 129 12.5.1 Auto-discover Your UPnP-enabled Network Device 130 12.5.2 Web Configurator Easy Access 133...
User Guide
Page 17
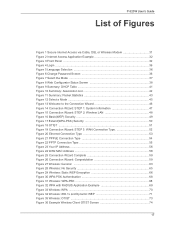
P-320W User's Guide List of Figures Figure 1 Secure Internet Access via Cable, DSL or Wireless Modem 31 Figure 2 Internet Access Application Example 32 Figure 3 Front Panel ...32 Figure 4 Login ...36 Figure 5 Language Selection 36 Figure 6 Change Password Screen 36 Figure 7 Select the Mode ...37 Figure 8 Web Configurator Status Screen 38 Figure 9 Summary: DHCP...
P-320W User's Guide List of Figures Figure 1 Secure Internet Access via Cable, DSL or Wireless Modem 31 Figure 2 Internet Access Application Example 32 Figure 3 Front Panel ...32 Figure 4 Login ...36 Figure 5 Language Selection 36 Figure 6 Change Password Screen 36 Figure 7 Select the Mode ...37 Figure 8 Web Configurator Status Screen 38 Figure 9 Summary: DHCP...
User Guide
Page 18
P-320W User's Guide Figure 37 Security Key ...75 Figure 38 OTIST in Progress (AP 75 Figure 39 OTIST in Progress (Client 75 Figure 40 No AP ... 67 WWW Remote Management 120 Figure 68 SNMP Management Model 121 Figure 69 SNMP Remote Management 123 Figure 70 Security Remote Management 124 Figure 71 Configuring UPnP 126 Figure 72 Add/Remove Programs: Windows Setup: Communication 127 Figure 73 Add/Remove Programs: Windows Setup: Communication: Components .......... 128 Figure 74 Network Connections...
P-320W User's Guide Figure 37 Security Key ...75 Figure 38 OTIST in Progress (AP 75 Figure 39 OTIST in Progress (Client 75 Figure 40 No AP ... 67 WWW Remote Management 120 Figure 68 SNMP Management Model 121 Figure 69 SNMP Remote Management 123 Figure 70 Security Remote Management 124 Figure 71 Configuring UPnP 126 Figure 72 Add/Remove Programs: Windows Setup: Communication 127 Figure 73 Add/Remove Programs: Windows Setup: Communication: Components .......... 128 Figure 74 Network Connections...

User Guide
Page 19
Java Scripting 159 Figure 106 Security Settings - P-320W User's Guide Figure 80 Internet Connection Properties: Advanced Settings: Add 132 Figure 81 System Tray Icon 132 Figure 82 Internet Connection Status 132 Figure 83 ... Figure 107 Java (Sun) ...160 Figure 108 Internet Options Security 161 Figure 109 Security Setting ActiveX Controls 162 Figure 110 WIndows 95/98/Me: Network: Configuration 174 Figure 111 Windows 95/98/Me: TCP/IP Properties: IP Address 175 Figure 112 Windows 95/98/Me: TCP/IP Properties: DNS...
Java Scripting 159 Figure 106 Security Settings - P-320W User's Guide Figure 80 Internet Connection Properties: Advanced Settings: Add 132 Figure 81 System Tray Icon 132 Figure 82 Internet Connection Status 132 Figure 83 ... Figure 107 Java (Sun) ...160 Figure 108 Internet Options Security 161 Figure 109 Security Setting ActiveX Controls 162 Figure 110 WIndows 95/98/Me: Network: Configuration 174 Figure 111 Windows 95/98/Me: TCP/IP Properties: IP Address 175 Figure 112 Windows 95/98/Me: TCP/IP Properties: DNS...
User Guide
Page 20
P-320W User's Guide Figure 123 Macintosh OS X: Network 184 Figure 124 Red Hat 9.0: KDE: Network Configuration: Devices 185 Figure 125 Red Hat 9.0: KDE: Ethernet Device: General 185 Figure 126 Red Hat 9.0: KDE: Network Configuration: DNS 186 Figure 127 Red Hat 9.0: KDE: Network Configuration: Activate 186 Figure 128...9.0: Restart Ethernet Card 188 Figure 132 Red Hat 9.0: Checking TCP/IP Properties 188 Figure 133 Single-Computer per Router Hardware Configuration 190 Figure 134 ZyWALL as a PPPoE Client 190 Figure 135 Transport PPP frames over Ethernet 191 Figure 136 PPTP Protocol Overview...
P-320W User's Guide Figure 123 Macintosh OS X: Network 184 Figure 124 Red Hat 9.0: KDE: Network Configuration: Devices 185 Figure 125 Red Hat 9.0: KDE: Ethernet Device: General 185 Figure 126 Red Hat 9.0: KDE: Network Configuration: DNS 186 Figure 127 Red Hat 9.0: KDE: Network Configuration: Activate 186 Figure 128...9.0: Restart Ethernet Card 188 Figure 132 Red Hat 9.0: Checking TCP/IP Properties 188 Figure 133 Single-Computer per Router Hardware Configuration 190 Figure 134 ZyWALL as a PPPoE Client 190 Figure 135 Transport PPP frames over Ethernet 191 Figure 136 PPTP Protocol Overview...
User Guide
Page 21
P-320W User's Guide List of Tables Table 1 Front Panel LEDs 32 Table 2 Status Screen Icon Key 38 Table 3 Web Configurator Status Screen 38 Table 4 Screens Summary 39 Table 5 Summary: DHCP Table 41 Table 6 Summary: Wireless Association List 42 Table 7 Summary: Packet Statistics 43 Table 8 Connection ...
P-320W User's Guide List of Tables Table 1 Front Panel LEDs 32 Table 2 Status Screen Icon Key 38 Table 3 Web Configurator Status Screen 38 Table 4 Screens Summary 39 Table 5 Summary: DHCP Table 41 Table 6 Summary: Wireless Association List 42 Table 7 Summary: Packet Statistics 43 Table 8 Connection ...

User Guide
Page 22
P-320W User's Guide Table 37 General ...96 Table 38 Static DHCP ...97 Table 39 Client List ...120 Table 52 SNMP Traps ...122 Table 53 SNMP Remote Management 123 Table 54 Security Remote Management 124 Table 55 Configuring UPnP 126 Table 56 System General 136 Table 57 Dynamic DNS ...137 Table 58 Time Setting ...138 Table 59 View... Log ...142 Table 60 Log Settings ...143 Table 61 Maintenance Firmware Upload 145 Table 62 Maintenance: Restore Configuration 147 Table 63 Troubleshooting Starting Up Your Prestige 151 Table 64 Troubleshooting the LAN 151 Table 65 Troubleshooting the WAN 152...
P-320W User's Guide Table 37 General ...96 Table 38 Static DHCP ...97 Table 39 Client List ...120 Table 52 SNMP Traps ...122 Table 53 SNMP Remote Management 123 Table 54 Security Remote Management 124 Table 55 Configuring UPnP 126 Table 56 System General 136 Table 57 Dynamic DNS ...137 Table 58 Time Setting ...138 Table 59 View... Log ...142 Table 60 Log Settings ...143 Table 61 Maintenance Firmware Upload 145 Table 62 Maintenance: Restore Configuration 147 Table 63 Troubleshooting Starting Up Your Prestige 151 Table 64 Troubleshooting the LAN 151 Table 65 Troubleshooting the WAN 152...

User Guide
Page 25
... 25 "Select" or "Choose" means for an online glossary of the P-320W, 802.11g Wireless Firewall Router. P-320W User's Guide Preface Congratulations on getting started. • Web Configurator Online Help Embedded web help for descriptions of firmware upgrades and information at www.zyxel.com for global products, or at www.us help you get...
... 25 "Select" or "Choose" means for an online glossary of the P-320W, 802.11g Wireless Firewall Router. P-320W User's Guide Preface Congratulations on getting started. • Web Configurator Online Help Embedded web help for descriptions of firmware upgrades and information at www.zyxel.com for global products, or at www.us help you get...

User Guide
Page 27
...and router makes your Ethernet network. You can add up to four computers to the Prestige without manual intervention. The embedded web configurator is the ideal secure wireless firewall router for 802.11g Wireless LAN connectivity. Chapter 1 Getting to either half-duplex or full...-duplex mode depending on your Prestige a cost-effective and viable network solution. P-320W User's Guide CHAPTER 1 Getting to Know Your Prestige This chapter introduces the main features and applications of the Prestige. 1.1 Prestige Overview...
...and router makes your Ethernet network. You can add up to four computers to the Prestige without manual intervention. The embedded web configurator is the ideal secure wireless firewall router for 802.11g Wireless LAN connectivity. Chapter 1 Getting to either half-duplex or full...-duplex mode depending on your Prestige a cost-effective and viable network solution. P-320W User's Guide CHAPTER 1 Getting to Know Your Prestige This chapter introduces the main features and applications of the Prestige. 1.1 Prestige Overview...
User Guide
Page 29
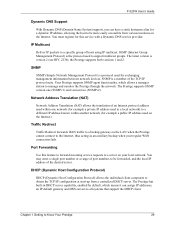
... regular WAN connection fails. DHCP (Dynamic Host Configuration Protocol) DHCP (Dynamic Host Configuration Protocol) allows the individual client computers to obtain the TCP/IP configuration at start-up from various locations on the ...Internet). Chapter 1 Getting to be forwarded, and the local IP address of an Internet protocol address used on the Internet. the Prestige supports both versions 1 and 2. Network Address Translation (NAT) Network Address Translation (NAT) allows the translation of the desired server. P-320W...
... regular WAN connection fails. DHCP (Dynamic Host Configuration Protocol) DHCP (Dynamic Host Configuration Protocol) allows the individual client computers to obtain the TCP/IP configuration at start-up from various locations on the ...Internet). Chapter 1 Getting to be forwarded, and the local IP address of an Internet protocol address used on the Internet. the Prestige supports both versions 1 and 2. Network Address Translation (NAT) Network Address Translation (NAT) allows the translation of the desired server. P-320W...


