
User Guide
Page 37
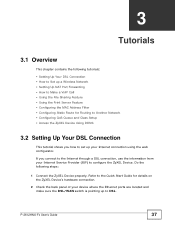
... up to DSL. P-2612HNU-Fx User's Guide 37 CHAPTER 3 Tutorials 3.1 Overview This chapter contains the following steps: 1 Connect the ZyXEL Device properly. Refer to the Quick Start Guide for Routing to Another Network • Configuring QoS Queue and Class Setup • Access the ZyXEL Device Using DDNS 3.2 ... Feature • Using the Print Server Feature • Configuring the MAC Address Filter • Configuring Static Route for details on the ZyXEL Device's hardware connection. 2 Check the back panel of your device where the Ethernet ports are located and make sure the DSL/WAN ...
... up to DSL. P-2612HNU-Fx User's Guide 37 CHAPTER 3 Tutorials 3.1 Overview This chapter contains the following steps: 1 Connect the ZyXEL Device properly. Refer to the Quick Start Guide for Routing to Another Network • Configuring QoS Queue and Class Setup • Access the ZyXEL Device Using DDNS 3.2 ... Feature • Using the Print Server Feature • Configuring the MAC Address Filter • Configuring Static Route for details on the ZyXEL Device's hardware connection. 2 Check the back panel of your device where the Ethernet ports are located and make sure the DSL/WAN ...
User Guide
Page 38
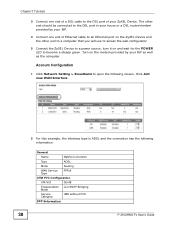
... the following screen. The other end to a computer that you will use to access the web configurator. 5 Connect the ZyXEL Device to a power source, turn it on and wait for the POWER LED to the DSL port in your house or... a DSL router/modem provided by your ZyXEL Device. Account Configuration 1 Click Network Setting > Broadband to the DSL port of a DSL cable to open the following information. ...36/48 Encapsulation LLC/SNAP-Bridging Mode Service Category UBR without PCR PPP Information 38 P-2612HNU-Fx User's Guide
... the following screen. The other end to a computer that you will use to access the web configurator. 5 Connect the ZyXEL Device to a power source, turn it on and wait for the POWER LED to the DSL port in your house or... a DSL router/modem provided by your ZyXEL Device. Account Configuration 1 Click Network Setting > Broadband to the DSL port of a DSL cable to open the following information. ...36/48 Encapsulation LLC/SNAP-Bridging Mode Service Category UBR without PCR PPP Information 38 P-2612HNU-Fx User's Guide
User Guide
Page 39
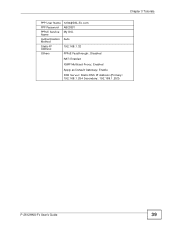
My DSL Auto 192.168.1.32 PPPoE Passthrough: Disabled NAT: Enabled IGMP Multicast Proxy: Enabled Apply as Default Gateway: Enable DNS Server: Static DNS IP Address (Primary: 192.168.1.254 Secondary: 192.168.1.253) P-2612HNU-Fx User's Guide 39 Chapter 3 Tutorials PPP User Name PPP Password PPPoE Service Name Authentication Method Static IP Address Others [email protected] ABCDEF!
My DSL Auto 192.168.1.32 PPPoE Passthrough: Disabled NAT: Enabled IGMP Multicast Proxy: Enabled Apply as Default Gateway: Enable DNS Server: Static DNS IP Address (Primary: 192.168.1.254 Secondary: 192.168.1.253) P-2612HNU-Fx User's Guide 39 Chapter 3 Tutorials PPP User Name PPP Password PPPoE Service Name Authentication Method Static IP Address Others [email protected] ABCDEF!

User Guide
Page 40
Chapter 3 Tutorials Enter or select these values and click Apply. This completes your DSL WAN connection setting. 3 You should see a summary of your new DSL connection setup in the Broadband screen as follows. 40 P-2612HNU-Fx User's Guide
Chapter 3 Tutorials Enter or select these values and click Apply. This completes your DSL WAN connection setting. 3 You should see a summary of your new DSL connection setup in the Broadband screen as follows. 40 P-2612HNU-Fx User's Guide
User Guide
Page 41
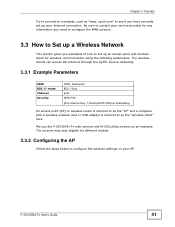
...41 Be sure to contact your service provider for any information you need to configure the WAN screens. 3.3 How to as an example. zyxel.com" to see if you examples of how to set up an access point and wireless client for different models. 3.3.2 Configuring the AP... Follow the steps below to a website, such as "www. We use the P-2612HNU-Fx web screens and M-302 utility screens as the "wireless client" here. Chapter 3 Tutorials Try to connect to configure the wireless settings on your Internet ...
...41 Be sure to contact your service provider for any information you need to configure the WAN screens. 3.3 How to as an example. zyxel.com" to see if you examples of how to set up an access point and wireless client for different models. 3.3.2 Configuring the AP... Follow the steps below to a website, such as "www. We use the P-2612HNU-Fx web screens and M-302 utility screens as the "wireless client" here. Chapter 3 Tutorials Try to connect to configure the wireless settings on your Internet ...
User Guide
Page 42
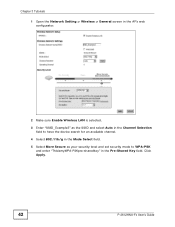
Click Apply. 42 P-2612HNU-Fx User's Guide Chapter 3 Tutorials 1 Open the Network Setting > Wireless > General screen in the Pre-Shared Key field. Tutorial: Network > Wireless LAN > General 2 Make sure Enable Wireless LAN is selected. 3 Enter "SSID_Example3" as the SSID and select Auto in the Channel Selection field to have the device search for an available channel. 4 Select 802.11b/g in the Mode Select field. 5 Select More Secure as your security level and set security mode to WPA-PSK and enter "ThisismyWPA-PSKpre-sharedkey" in the AP's web configurator.
Click Apply. 42 P-2612HNU-Fx User's Guide Chapter 3 Tutorials 1 Open the Network Setting > Wireless > General screen in the Pre-Shared Key field. Tutorial: Network > Wireless LAN > General 2 Make sure Enable Wireless LAN is selected. 3 Enter "SSID_Example3" as the SSID and select Auto in the Channel Selection field to have the device search for an available channel. 4 Select 802.11b/g in the Mode Select field. 5 Select More Secure as your security level and set security mode to WPA-PSK and enter "ThisismyWPA-PSKpre-sharedkey" in the AP's web configurator.
User Guide
Page 43
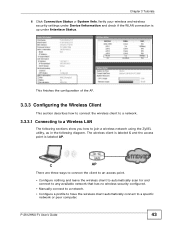
... a network. • Configure a profile to have the wireless client automatically connect to join a wireless network using the ZyXEL utility, as in the following sections show you how to a specific network or peer computer. P-2612HNU-Fx User's Guide 43 The wireless client is labeled C and the access point is labeled AP. Tutorial: Network > Wireless...
... a network. • Configure a profile to have the wireless client automatically connect to join a wireless network using the ZyXEL utility, as in the following sections show you how to a specific network or peer computer. P-2612HNU-Fx User's Guide 43 The wireless client is labeled C and the access point is labeled AP. Tutorial: Network > Wireless...
User Guide
Page 44
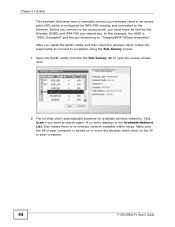
...-shared key is turned on or move the wireless client closer to the AP or peer computer. 44 P-2612HNU-Fx User's Guide Make sure the AP or peer computer is "ThisismyWPA-PSKpre-sharedkey". If no entry displays in...that means there is no wireless network available within range. Click Scan if you install the ZyXEL utility and then insert the wireless client, follow the steps below to connect to a network using the Site... Survey screen. 1 Open the ZyXEL utility and click the Site Survey tab to open the screen shown next. Chapter 3 Tutorials This...
...-shared key is turned on or move the wireless client closer to the AP or peer computer. 44 P-2612HNU-Fx User's Guide Make sure the AP or peer computer is "ThisismyWPA-PSKpre-sharedkey". If no entry displays in...that means there is no wireless network available within range. Click Scan if you install the ZyXEL utility and then insert the wireless client, follow the steps below to connect to a network using the Site... Survey screen. 1 Open the ZyXEL utility and click the Site Survey tab to open the screen shown next. Chapter 3 Tutorials This...

User Guide
Page 45
Use the Next button to move on to specify the security settings. Chapter 3 Tutorials 3 When you try to connect to an AP with security configured, a window will pop up prompting you to the next screen. You can use the Back button at the default setting. Enter the pre-shared key and leave the encryption type at any time to return to the previous screen, or the Exit button to return to continue. Tutorial: Security Settings 4 The Confirm Save window appears. Tutorial: Confirm Save P-2612HNU-Fx User's Guide 45 Check your settings and click Save to the Site Survey screen.
Use the Next button to move on to specify the security settings. Chapter 3 Tutorials 3 When you try to connect to an AP with security configured, a window will pop up prompting you to the next screen. You can use the Back button at the default setting. Enter the pre-shared key and leave the encryption type at any time to return to the previous screen, or the Exit button to return to continue. Tutorial: Security Settings 4 The Confirm Save window appears. Tutorial: Confirm Save P-2612HNU-Fx User's Guide 45 Check your settings and click Save to the Site Survey screen.
User Guide
Page 46
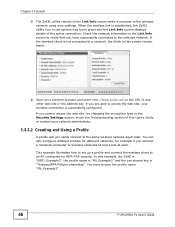
... or contact your network administrator. 3.3.3.2 Creating and Using a Profile A profile lets you have chosen the profile name "PN_Example3". 46 P-2612HNU-Fx User's Guide If you cannot access the web site, try changing the encryption type in this screen remain blank. You can also configure...wireless link is successfully configured. If you connect a notebook computer to the same wireless network again later. Chapter 3 Tutorials 5 The ZyXEL utility returns to the Link Info screen while it connects to a network, the fields in the Security Settings screen, check the Troubleshooting ...
... or contact your network administrator. 3.3.3.2 Creating and Using a Profile A profile lets you have chosen the profile name "PN_Example3". 46 P-2612HNU-Fx User's Guide If you cannot access the web site, try changing the encryption type in this screen remain blank. You can also configure...wireless link is successfully configured. If you connect a notebook computer to the same wireless network again later. Chapter 3 Tutorials 5 The ZyXEL utility returns to the Link Info screen while it connects to a network, the fields in the Security Settings screen, check the Troubleshooting ...
User Guide
Page 47
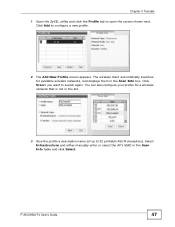
Click Add to 32 printable ASCII characters). Tutorial: Profile 2 The Add New Profile screen appears. P-2612HNU-Fx User's Guide 47 You can also configure your profile for available wireless networks, and displays them in the Scan Info box. Tutorial: Add New Profile 3... Give the profile a descriptive name (of up to configure a new profile. Chapter 3 Tutorials 1 Open the ZyXEL utility and click the Profile tab to search again. Select Infrastructure and either manually enter or select the AP's SSID in the list. The wireless...
Click Add to 32 printable ASCII characters). Tutorial: Profile 2 The Add New Profile screen appears. P-2612HNU-Fx User's Guide 47 You can also configure your profile for available wireless networks, and displays them in the Scan Info box. Tutorial: Add New Profile 3... Give the profile a descriptive name (of up to configure a new profile. Chapter 3 Tutorials 1 Open the ZyXEL utility and click the Profile tab to search again. Select Infrastructure and either manually enter or select the AP's SSID in the list. The wireless...

User Guide
Page 48
Enter the pre-shared key and leave the encryption type at the default setting. Tutorial: Wireless Protocol Settings. 48 P-2612HNU-Fx User's Guide Tutorial: Profile Security 5 This screen varies depending on the encryption method you want to connect (In this example, WPA-PSK). Chapter 3 Tutorials 4 Choose the same encryption method as the AP to which you selected in the previous screen. Tutorial: Profile Encryption 6 In the next screen, leave both boxes selected.
Enter the pre-shared key and leave the encryption type at the default setting. Tutorial: Wireless Protocol Settings. 48 P-2612HNU-Fx User's Guide Tutorial: Profile Security 5 This screen varies depending on the encryption method you want to connect (In this example, WPA-PSK). Chapter 3 Tutorials 4 Choose the same encryption method as the AP to which you selected in the previous screen. Tutorial: Profile Encryption 6 In the next screen, leave both boxes selected.

User Guide
Page 49
.... Tutorial: Activate 9 When you are able to access the web site, your Internet browser, enter http://www.zyxel.com or the URL of this User's Guide or contact your settings. P-2612HNU-Fx User's Guide 49 Click Save to save and go back to the Profile screen, select the profile you activate... the new profile, the ZyXEL utility returns to the Link Info screen while it . Note: Only one profile can...
.... Tutorial: Activate 9 When you are able to access the web site, your Internet browser, enter http://www.zyxel.com or the URL of this User's Guide or contact your settings. P-2612HNU-Fx User's Guide 49 Click Save to save and go back to the Profile screen, select the profile you activate... the new profile, the ZyXEL utility returns to the Link Info screen while it . Note: Only one profile can...

User Guide
Page 50
In order for more information). 1 Click Network Setting > NAT > Port Forwarding. Click Add new rule. 50 P-2612HNU-Fx User's Guide Traffic should be forwarded to the port 666 of the Doom server computer which has an IP address of 192.168.1.34. Tutorial: ... page 200 for players on the Internet (like A in the figure below) to communicate with the Doom server, you manage the Doom server on the ZyXEL Device. Chapter 3 Tutorials 3.4 Setting Up NAT Port Forwarding In this tutorial, you need to configure the port settings and IP address on a computer behind the...
In order for more information). 1 Click Network Setting > NAT > Port Forwarding. Click Add new rule. 50 P-2612HNU-Fx User's Guide Traffic should be forwarded to the port 666 of the Doom server computer which has an IP address of 192.168.1.34. Tutorial: ... page 200 for players on the Internet (like A in the figure below) to communicate with the Doom server, you manage the Doom server on the ZyXEL Device. Chapter 3 Tutorials 3.4 Setting Up NAT Port Forwarding In this tutorial, you need to configure the port settings and IP address on a computer behind the...

User Guide
Page 51
... address of the Doom server. Select TCP/UDP. Make sure the Status check box for this rule is forwarded. P-2612HNU-Fx User's Guide 51 Players on the Internet then can have the ZyXEL Device start forwarding port 666 traffic to your Doom server. Select the WAN interface through which is 192.168.1.34...
... address of the Doom server. Select TCP/UDP. Make sure the Status check box for this rule is forwarded. P-2612HNU-Fx User's Guide 51 Players on the Internet then can have the ZyXEL Device start forwarding port 666 traffic to your Doom server. Select the WAN interface through which is 192.168.1.34...

User Guide
Page 52
... SIP service provider and applied for a SIP account. 3.5.1.1 SIP Service Provider Configuration Follow the steps below to configure your SIP service provider. 1 Make sure your ZyXEL Device is connected to the Internet. 2 Open the web configurator. 3 Click VoIP > SIP to another VoIP device. Chapter 3 Tutorials 3.5 How to Make a VoIP Call You... voice calls over the Internet to open the SIP Service Provider screen. Select Add New from the Service Provider Selection drop-down list box. 52 P-2612HNU-Fx User's Guide
... SIP service provider and applied for a SIP account. 3.5.1.1 SIP Service Provider Configuration Follow the steps below to configure your SIP service provider. 1 Make sure your ZyXEL Device is connected to the Internet. 2 Open the web configurator. 3 Click VoIP > SIP to another VoIP device. Chapter 3 Tutorials 3.5 How to Make a VoIP Call You... voice calls over the Internet to open the SIP Service Provider screen. Select Add New from the Service Provider Selection drop-down list box. 52 P-2612HNU-Fx User's Guide

User Guide
Page 53
Leave other settings as default. P-2612HNU-Fx User's Guide 53 Chapter 3 Tutorials 4 Select the Enable check box of SIP Service Provider and enter the SIP Service Provider Name. 5 Go to the SIP Account screen, click the Edit icon of SIP 3. 6 Select the Active SIP Account check box, then enter the SIP Account Number, Username, and Password.
Leave other settings as default. P-2612HNU-Fx User's Guide 53 Chapter 3 Tutorials 4 Select the Enable check box of SIP Service Provider and enter the SIP Service Provider Name. 5 Go to the SIP Account screen, click the Edit icon of SIP 3. 6 Select the Active SIP Account check box, then enter the SIP Account Number, Username, and Password.

User Guide
Page 54
If the status is Not Registered, check your Internet connection and click Register to make outgoing calls. 54 P-2612HNU-Fx User's Guide Click the Edit icon next to Analog Phone 1 to configure the first phone port. 2 Select SIP 3 from the SIP Account in the SIP ...
If the status is Not Registered, check your Internet connection and click Register to make outgoing calls. 54 P-2612HNU-Fx User's Guide Click the Edit icon next to Analog Phone 1 to configure the first phone port. 2 Select SIP 3 from the SIP Account in the SIP ...

User Guide
Page 55
... connect your USB device, enable file sharing and set up your changes. P-2612HNU-Fx User's Guide 55 Tutorial: VoIP > Phone 3.5.1.4 Making a VoIP Call 1 Make sure you connect a telephone to the first phone port on the ZyXEL Device. 2 Make sure the ZyXEL Device is on and connected to the Internet. 3 Pick up the phone... want to call. 3.6 Using the File Sharing Feature In this section you can: • Set up file sharing of your USB device from the ZyXEL Device • Access the shared files of your USB device from a computer 3.6.1 Set Up File Sharing To set up file sharing you need to ...
... connect your USB device, enable file sharing and set up your changes. P-2612HNU-Fx User's Guide 55 Tutorial: VoIP > Phone 3.5.1.4 Making a VoIP Call 1 Make sure you connect a telephone to the first phone port on the ZyXEL Device. 2 Make sure the ZyXEL Device is on and connected to the Internet. 3 Pick up the phone... want to call. 3.6 Using the File Sharing Feature In this section you can: • Set up file sharing of your USB device from the ZyXEL Device • Access the shared files of your USB device from a computer 3.6.1 Set Up File Sharing To set up file sharing you need to ...

User Guide
Page 56
... share in the File Sharing screen to configure a new share. The ZyXEL Device automatically adds your USB device to the Share Directory List. 3.6.1.2 Set up File Sharing on Your ZyXEL Device You also need to one of the USB ports at the back... panel of the ZyXEL Device. 2 Click Network Setting > Home Networking > File Sharing. Select the folder... your USB device. Select Enable and click Apply to add as a share. Click Apply. 56 P-2612HNU-Fx User's Guide
... share in the File Sharing screen to configure a new share. The ZyXEL Device automatically adds your USB device to the Share Directory List. 3.6.1.2 Set up File Sharing on Your ZyXEL Device You also need to one of the USB ports at the back... panel of the ZyXEL Device. 2 Click Network Setting > Home Networking > File Sharing. Select the folder... your USB device. Select Enable and click Apply to add as a share. Click Apply. 56 P-2612HNU-Fx User's Guide