
User Guide
Page 11
... Security ...25 1.5 Good Habits for Managing the NWA 26 1.6 Hardware Connections ...26 1.7 LEDs ...27 Chapter 2 Introducing the Web Configurator 29 2.1 Accessing the Web Configurator 29 2.2 Resetting the NWA ...30 2.2.1 Methods of Restoring Factory-Defaults 30 2.3 Navigating the Web Configurator 30 Chapter 3 Status Screens ...33...
... Security ...25 1.5 Good Habits for Managing the NWA 26 1.6 Hardware Connections ...26 1.7 LEDs ...27 Chapter 2 Introducing the Web Configurator 29 2.1 Accessing the Web Configurator 29 2.2 Resetting the NWA ...30 2.2.1 Methods of Restoring Factory-Defaults 30 2.3 Navigating the Web Configurator 30 Chapter 3 Status Screens ...33...
User Guide
Page 25
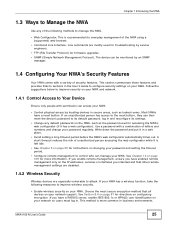
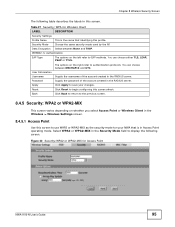
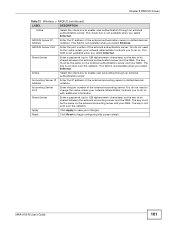
... ensure you intended and that all devices on your password and setting the timeout period. • Configure remote management to control who can then reset the device's password to its default password, log in a safe place. • Avoid setting a long timeout period before the NWA's web...security settings on your NWA. If your NWA has a wireless function, take the following methods to manage the NWA. • Web Configurator. NWA1100-N User's Guide 25 This is more information. If you have enabled remote management only on the IP addresses, services or interfaces you have a ...
... ensure you intended and that all devices on your password and setting the timeout period. • Configure remote management to control who can then reset the device's password to its default password, log in a safe place. • Avoid setting a long timeout period before the NWA's web...security settings on your NWA. If your NWA has a wireless function, take the following methods to manage the NWA. • Web Configurator. NWA1100-N User's Guide 25 This is more information. If you have enabled remote management only on the IP addresses, services or interfaces you have a ...

User Guide
Page 30
...this button in for about the Status screen. This replaces the current configuration file with the factorydefault configuration file. Figure 13 The RESET Button 2.2.1 Methods of Restoring Factory-Defaults You can erase the current configuration and restore factory defaults in the Administrator Inactivity Timer field... Hold this method for details about 10 seconds (the lights will lose all the settings you will be reset to navigate the web configurator from the Status screen. 30 NWA1100-N User's Guide Chapter 2 Introducing the Web Configurator You should now see the Status screen.
...this button in for about the Status screen. This replaces the current configuration file with the factorydefault configuration file. Figure 13 The RESET Button 2.2.1 Methods of Restoring Factory-Defaults You can erase the current configuration and restore factory defaults in the Administrator Inactivity Timer field... Hold this method for details about 10 seconds (the lights will lose all the settings you will be reset to navigate the web configurator from the Status screen. 30 NWA1100-N User's Guide Chapter 2 Introducing the Web Configurator You should now see the Status screen.
User Guide
Page 58
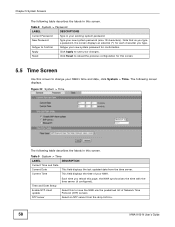
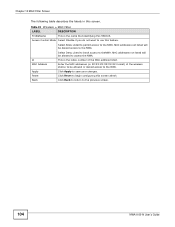
... 9 System > Time LABEL DESCRIPTION Current Time and Date Current Date This field displays the last updated date from the drop-list box. 58 NWA1100-N User's Guide Select this page, the NWA synchronizes the time with the time server (if configured). Select an NTP server from the time server.... Time and Date Setup Enable NTP client update NTP server Each time you type. Reset Click Reset to reload the previous configuration for this screen. 5.5 Time Screen Use this screen to Confirm Retype your new system password for each ...
... 9 System > Time LABEL DESCRIPTION Current Time and Date Current Date This field displays the last updated date from the drop-list box. 58 NWA1100-N User's Guide Select this page, the NWA synchronizes the time with the time server (if configured). Select an NTP server from the time server.... Time and Date Setup Enable NTP client update NTP server Each time you type. Reset Click Reset to reload the previous configuration for this screen. 5.5 Time Screen Use this screen to Confirm Retype your new system password for each ...
User Guide
Page 81
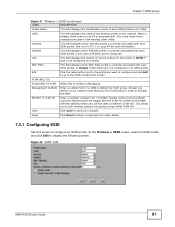
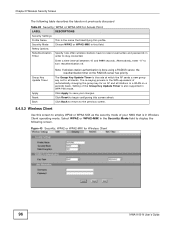
... display the following screen. In the Wireless > SSID screen, select an SSID profile and click Edit to 4094. Figure 32 SSID: Edit NWA1100-N User's Guide 81 SSID This field displays the name of each SSID profile, if you want to configure and click Edit to go to... 31 Wireless > SSID (continued) LABEL DESCRIPTION Profile Name This field displays the identification name of the wireless profile on the network. Reset Click Reset to begin configuring this screen afresh. 7.2.1 Configuring SSID Use this screen to split wireless stations into groups using this VLAN group.
... display the following screen. In the Wireless > SSID screen, select an SSID profile and click Edit to 4094. Figure 32 SSID: Edit NWA1100-N User's Guide 81 SSID This field displays the name of each SSID profile, if you want to configure and click Edit to go to... 31 Wireless > SSID (continued) LABEL DESCRIPTION Profile Name This field displays the identification name of the wireless profile on the network. Reset Click Reset to begin configuring this screen afresh. 7.2.1 Configuring SSID Use this screen to split wireless stations into groups using this VLAN group.
User Guide
Page 82
...scanning for more information. Alternatively, if you do not select the checkbox, the NWA to certified Wi-Fi wireless networks. 82 NWA1100-N User's Guide Click Reset to save your changes. Number of Service priority for an AP to associate with, this is the name that may connect ... to be transmitted over the wireless network. WMM QoS prioritizes wireless traffic according to Associate Hidden SSID Enable Intra-BSS Traffic blocking Save Reset Back Note: When you have a RADIUS server configured. Chapter 7 SSID Screen The following table describes the labels in this profile's ...
...scanning for more information. Alternatively, if you do not select the checkbox, the NWA to certified Wi-Fi wireless networks. 82 NWA1100-N User's Guide Click Reset to save your changes. Number of Service priority for an AP to associate with, this is the name that may connect ... to be transmitted over the wireless network. WMM QoS prioritizes wireless traffic according to Associate Hidden SSID Enable Intra-BSS Traffic blocking Save Reset Back Note: When you have a RADIUS server configured. Chapter 7 SSID Screen The following table describes the labels in this profile's ...
User Guide
Page 90
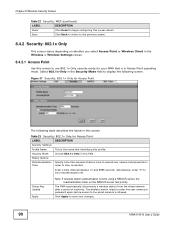
... Point or Wireless Client in Time order to use 802.1x-Only security mode for your changes. 90 NWA1100-N User's Guide Chapter 8 Wireless Security Screen Table 22 Security: WEP (continued) LABEL DESCRIPTION Reset Click Reset to begin configuring this field. Security Mode Rekey Options Choose 802.1x Only in Access Point operating mode...
... Point or Wireless Client in Time order to use 802.1x-Only security mode for your changes. 90 NWA1100-N User's Guide Chapter 8 Wireless Security Screen Table 22 Security: WEP (continued) LABEL DESCRIPTION Reset Click Reset to begin configuring this field. Security Mode Rekey Options Choose 802.1x Only in Access Point operating mode...

User Guide
Page 91
... between None and Dynamic WEP. Choose the same security mode used by the AP. Click Apply to Appendix E on using Dynamic WEP. NWA1100-N User's Guide 91 You can choose either TLS, LEAP, PEAP or TTLS. Click Back to return to begin configuring this profile. Table... previous screen. 8.4.2.2 Wireless Client Use this screen to use 802.1x-Only security mode for Access Point (continued) LABEL DESCRIPTION Reset Click Reset to authentication protocols. Figure 38 Security: 802.1x Only for Wireless Client The following screen. Data Encryption Select between MSCHAPv2 and GTC...
... between None and Dynamic WEP. Choose the same security mode used by the AP. Click Apply to Appendix E on using Dynamic WEP. NWA1100-N User's Guide 91 You can choose either TLS, LEAP, PEAP or TTLS. Click Back to return to begin configuring this profile. Table... previous screen. 8.4.2.2 Wireless Client Use this screen to use 802.1x-Only security mode for Access Point (continued) LABEL DESCRIPTION Reset Click Reset to authentication protocols. Figure 38 Security: 802.1x Only for Wireless Client The following screen. Data Encryption Select between MSCHAPv2 and GTC...
User Guide
Page 93
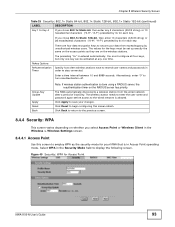
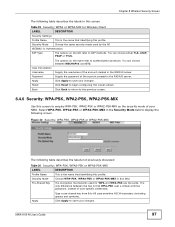
The values for the keys must configure all four keys, but only one time. Group-Key Update Apply Reset Back Note: If wireless station authentication is in the Wireless > Wireless Settings screen. 8.4.4.1 Access Point Use this screen afresh. Click Back to return to ... before access to save your data from the wired network after a period of inactivity. Click Apply to the wired network is entered automatically. Click Reset to begin configuring this screen to employ WPA as they are four data encryption keys to turn reauthentication off. Figure 40 Security: WPA for Access...
The values for the keys must configure all four keys, but only one time. Group-Key Update Apply Reset Back Note: If wireless station authentication is in the Wireless > Wireless Settings screen. 8.4.4.1 Access Point Use this screen afresh. Click Back to return to ... before access to save your data from the wired network after a period of inactivity. Click Apply to the wired network is entered automatically. Click Reset to begin configuring this screen to employ WPA as they are four data encryption keys to turn reauthentication off. Figure 40 Security: WPA for Access...
User Guide
Page 94
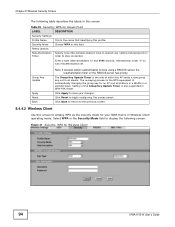
... 8 Wireless Security Screen The following screen. Security Mode Choose WPA in a WLAN on the RADIUS server has priority. Click Reset to turn reauthentication off. Group Key Update Apply Reset Back Note: If wireless station authentication is also supported in WPA-PSK mode. The re-keying process is the WPA equivalent... reauthentication timer on a periodic basis. Alternatively, enter "0" to begin configuring this profile. Setting of automatically changing the group key for Wireless Client 94 NWA1100-N User's Guide Figure 41 Security: WPA for an AP and all clients.
... 8 Wireless Security Screen The following screen. Security Mode Choose WPA in a WLAN on the RADIUS server has priority. Click Reset to turn reauthentication off. Group Key Update Apply Reset Back Note: If wireless station authentication is also supported in WPA-PSK mode. The re-keying process is the WPA equivalent... reauthentication timer on a periodic basis. Alternatively, enter "0" to begin configuring this profile. Setting of automatically changing the group key for Wireless Client 94 NWA1100-N User's Guide Figure 41 Security: WPA for an AP and all clients.
User Guide
Page 95
... that is in Access Point operating mode. Data Encryption Select between MSCHAPv2 and GTC. You can choose either TLS, LEAP, PEAP or TTLS. Click Reset to the previous screen. 8.4.5 Security: WPA2 or WPA2-MIX This screen varies depending on the right refer to EAP methods. Back Click Back to ... account created in the RADIUS server. Security Mode Choose the same security mode used by the AP. Table 27 Security: WPA for Access Point NWA1100-N User's Guide 95 User Information Username Password Apply Reset Supply the username of the account created in the RADIUS server.
... that is in Access Point operating mode. Data Encryption Select between MSCHAPv2 and GTC. You can choose either TLS, LEAP, PEAP or TTLS. Click Reset to the previous screen. 8.4.5 Security: WPA2 or WPA2-MIX This screen varies depending on the right refer to EAP methods. Back Click Back to ... account created in the RADIUS server. Security Mode Choose the same security mode used by the AP. Table 27 Security: WPA for Access Point NWA1100-N User's Guide 95 User Information Username Password Apply Reset Supply the username of the account created in the RADIUS server.
User Guide
Page 96
... WPA-PSK mode. The Group Key Update Timer is the WPA equivalent of automatically changing the group key for Wireless Client 96 NWA1100-N User's Guide Click Apply to resend usernames and passwords in a WLAN on the RADIUS server has priority. Rekey Options ReAuthentication... Specify how often wireless stations have to save your NWA that identifying this screen afresh. Click Reset to the previous screen. 8.4.5.2 Wireless Client Use this field. Click Back to return to begin configuring this profile. Setting of your...
... WPA-PSK mode. The Group Key Update Timer is the WPA equivalent of automatically changing the group key for Wireless Client 96 NWA1100-N User's Guide Click Apply to resend usernames and passwords in a WLAN on the RADIUS server has priority. Rekey Options ReAuthentication... Specify how often wireless stations have to save your NWA that identifying this screen afresh. Click Reset to the previous screen. 8.4.5.2 Wireless Client Use this field. Click Back to return to begin configuring this profile. Setting of your...
User Guide
Page 97
...29 Security: WPA2 or WPA2-MIX for WPA and WPA-PSK are the same. Click Reset to display the following screen. Choose WPA-PSK, WPA2-PSK or WPA2-PSK-MIX in this screen afresh. NWA1100-N User's Guide 97 You can choose either TLS, LEAP, PEAP or TTLS. Supply ...mode used for Wireless Client LABEL DESCRIPTION Security Settings Profile Name This is the name that identifying this screen. User Information Username Password Apply Reset Back The options on the left refer to authentication protocols. Supply the username of user-specific credentials. Apply Type a pre-shared key from...
...29 Security: WPA2 or WPA2-MIX for WPA and WPA-PSK are the same. Click Reset to display the following screen. Choose WPA-PSK, WPA2-PSK or WPA2-PSK-MIX in this screen afresh. NWA1100-N User's Guide 97 You can choose either TLS, LEAP, PEAP or TTLS. Supply ...mode used for Wireless Client LABEL DESCRIPTION Security Settings Profile Name This is the name that identifying this screen. User Information Username Password Apply Reset Back The options on the left refer to authentication protocols. Supply the username of user-specific credentials. Apply Type a pre-shared key from...
User Guide
Page 98
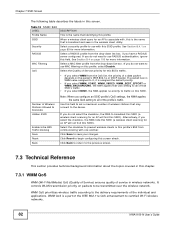
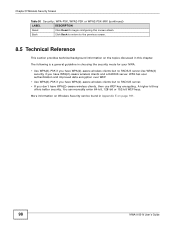
Chapter 8 Wireless Security Screen Table 30 Security: WPA-PSK, WPA2-PSK or WPA2-PSK-MIX (continued) LABEL DESCRIPTION Reset Click Reset to the previous screen. 8.5 Technical Reference This section provides technical background information on the topics discussed in Appendix E on ...keys. Back Click Back to return to begin configuring this chapter. A higher bit key offers better security. More information on page 191. 98 NWA1100-N User's Guide You can be found in this screen afresh. The following is a general guideline in choosing the security mode for your NWA....
Chapter 8 Wireless Security Screen Table 30 Security: WPA-PSK, WPA2-PSK or WPA2-PSK-MIX (continued) LABEL DESCRIPTION Reset Click Reset to the previous screen. 8.5 Technical Reference This section provides technical background information on the topics discussed in Appendix E on ...keys. Back Click Back to return to begin configuring this chapter. A higher bit key offers better security. More information on page 191. 98 NWA1100-N User's Guide You can be found in this screen afresh. The following is a general guideline in choosing the security mode for your NWA....
User Guide
Page 101
...so. Share Secret Enter a password (up to 128 alphanumeric characters) as the key to begin configuring this value unless your changes. Reset Click Reset to be the same on the external authentication server and your NWA. Share Secret Enter a password (up to 128 alphanumeric characters) ...Active Select the check box to save your network administrator instructs you select Internal. The key is not sent over the network. NWA1100-N User's Guide 101 This field is not available when you select Internal. You do so with additional information. This check box ...
...so. Share Secret Enter a password (up to 128 alphanumeric characters) as the key to begin configuring this value unless your changes. Reset Click Reset to be the same on the external authentication server and your NWA. Share Secret Enter a password (up to 128 alphanumeric characters) ...Active Select the check box to save your network administrator instructs you select Internal. The key is not sent over the network. NWA1100-N User's Guide 101 This field is not available when you select Internal. You do so with additional information. This check box ...
User Guide
Page 104
... Click Apply to the NWA. MAC addresses not listed will be denied access to the NWA. # MAC Address Apply Reset Back Select Deny Listed to block access to theNWA. Access Control Mode Select Disable if you do not want to use ...this screen afresh. Click Reset to begin configuring this feature. Enter the MAC addresses (in this RADIUS. Select Allow Listed to permit access to ... MAC address listed. MAC addresses not listed will be allowed to the previous screen. 104 NWA1100-N User's Guide
... Click Apply to the NWA. MAC addresses not listed will be denied access to the NWA. # MAC Address Apply Reset Back Select Deny Listed to block access to theNWA. Access Control Mode Select Disable if you do not want to use ...this screen afresh. Click Reset to begin configuring this feature. Enter the MAC addresses (in this RADIUS. Select Allow Listed to permit access to ... MAC address listed. MAC addresses not listed will be allowed to the previous screen. 104 NWA1100-N User's Guide
User Guide
Page 106
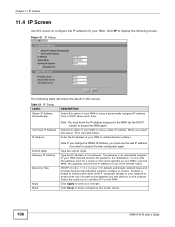
Subnet Mask Gateway IP Address Spanning Tree Apply Reset Note: If you change the NWA's IP address, you must be a router on the same segment as your network to ensure that will forward the ... describes the labels in your NWA; Enter the IP address of the gateway. It allows a bridge to begin configuring this screen. Click Reset to interact with other (R)STP -compliant bridges in this screen afresh. 106 NWA1100-N User's Guide Figure 51 IP Setup The following screen. Type the IP address of your changes.
Subnet Mask Gateway IP Address Spanning Tree Apply Reset Note: If you change the NWA's IP address, you must be a router on the same segment as your network to ensure that will forward the ... describes the labels in your NWA; Enter the IP address of the gateway. It allows a bridge to begin configuring this screen. Click Reset to interact with other (R)STP -compliant bridges in this screen afresh. 106 NWA1100-N User's Guide Figure 51 IP Setup The following screen. Type the IP address of your changes.
User Guide
Page 112
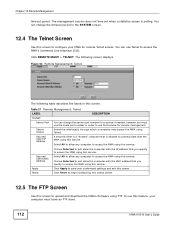
... with the MAC address that service for remote management. A secured client is a "trusted" computer that you must have an FTP client. 112 NWA1100-N User's Guide You can change the server port number for remote Telnet access. You can change the timeout period in this service. Chapter 12... to configure your NWA for a service if needed, however you specify to upload and download the NWA's firmware using this screen. Click Reset to begin configuring this screen afresh. 12.5 The FTP Screen Use this screen to access the NWA using Telnet. The following table describes ...
... with the MAC address that service for remote management. A secured client is a "trusted" computer that you must have an FTP client. 112 NWA1100-N User's Guide You can change the server port number for remote Telnet access. You can change the timeout period in this service. Chapter 12... to configure your NWA for a service if needed, however you specify to upload and download the NWA's firmware using this screen. Click Reset to begin configuring this screen afresh. 12.5 The FTP Screen Use this screen to access the NWA using Telnet. The following table describes ...

User Guide
Page 113
...computer may change your NWA's FTP settings, click REMOTE MGMT > FTP. Secured Client MAC Address Apply Reset Choose Selected to just allow any computer to access the NWA using this service. NWA1100-N User's Guide 113 Select All to allow the computer with the IP address that you specify to ... Management: FTP The following screen displays. Click Apply to save your NWA via the World Wide Web (WWW) using this service. Click Reset to begin configuring this screen afresh. 12.6 The WWW Screen Use this service. The following table describes the labels in order to use the...
...computer may change your NWA's FTP settings, click REMOTE MGMT > FTP. Secured Client MAC Address Apply Reset Choose Selected to just allow any computer to access the NWA using this service. NWA1100-N User's Guide 113 Select All to allow the computer with the IP address that you specify to ... Management: FTP The following screen displays. Click Apply to save your NWA via the World Wide Web (WWW) using this service. Click Reset to begin configuring this screen afresh. 12.6 The WWW Screen Use this service. The following table describes the labels in order to use the...
User Guide
Page 114
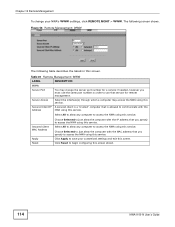
...shows. Table 39 Remote Management: WWW LABEL DESCRIPTION WWW Server Port You may access the NWA using this service. Secured Client MAC Address Apply Reset Choose Selected to just allow the computer with the MAC address that is a "trusted" computer that you specify to begin configuring this screen...with the IP address that service for a service if needed, however you must use the same port number in this screen afresh. 114 NWA1100-N User's Guide Select All to allow any computer to access the NWA using this service. Choose Selected to just allow the computer with ...
...shows. Table 39 Remote Management: WWW LABEL DESCRIPTION WWW Server Port You may access the NWA using this service. Secured Client MAC Address Apply Reset Choose Selected to just allow the computer with the MAC address that is a "trusted" computer that you specify to begin configuring this screen...with the IP address that service for a service if needed, however you must use the same port number in this screen afresh. 114 NWA1100-N User's Guide Select All to allow any computer to access the NWA using this service. Choose Selected to just allow the computer with ...


