
User Guide
Page 12
... The Web Configurator ...39 4.1 Overview ...39 4.2 System Login ...39 4.3 The Status Screen ...40 4.3.1 Change Your Password ...44 4.4 Saving Your Configuration ...44 4.5 Switch Lockout ...44 4.6 Resetting the Switch ...45 4.6.1 Reload the Configuration File 45 4.7 Logging Out of the Web Configurator 46 4.8 Help ...46 Chapter 5 Initial Setup Example...47 5.1 Overview ...47 5.1.1 Creating... ...59 Chapter 7 System Status and Port Statistics...60 7.1 Overview ...60 7.1.1 What You Can Do ...60 7.2 Port Status Summary ...61 7.2.1 Status: Port Details ...63 12 GS2200-8/24 User's Guide
... The Web Configurator ...39 4.1 Overview ...39 4.2 System Login ...39 4.3 The Status Screen ...40 4.3.1 Change Your Password ...44 4.4 Saving Your Configuration ...44 4.5 Switch Lockout ...44 4.6 Resetting the Switch ...45 4.6.1 Reload the Configuration File 45 4.7 Logging Out of the Web Configurator 46 4.8 Help ...46 Chapter 5 Initial Setup Example...47 5.1 Overview ...47 5.1.1 Creating... ...59 Chapter 7 System Status and Port Statistics...60 7.1 Overview ...60 7.1.1 What You Can Do ...60 7.2 Port Status Summary ...61 7.2.1 Status: Port Details ...63 12 GS2200-8/24 User's Guide
User Guide
Page 26
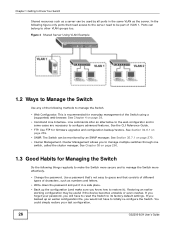
... 35.7.1 on page 259. • SNMP. Cluster Management allows you to other VLAN groups too. If you forget your last configuration. 26 GS2200-8/24 User's Guide Figure 4 Shared Server Using VLAN Example 1.2 Ways to Manage the Switch Use any of the following figure only ports that consists of...an alternative to the web configurator and in a safe place. • Back up an earlier configuration file, you would not have to reset the Switch to its factory default settings. Restoring an earlier working configuration may be useful if the device becomes unstable or even crashes. See ...
... 35.7.1 on page 259. • SNMP. Cluster Management allows you to other VLAN groups too. If you forget your last configuration. 26 GS2200-8/24 User's Guide Figure 4 Shared Server Using VLAN Example 1.2 Ways to Manage the Switch Use any of the following figure only ports that consists of...an alternative to the web configurator and in a safe place. • Back up an earlier configuration file, you would not have to reset the Switch to its factory default settings. Restoring an earlier working configuration may be useful if the device becomes unstable or even crashes. See ...
User Guide
Page 45
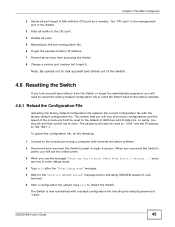
...atgo to begin a session. This means that you will also be reset to 192.168.1.1. press any key to none. When you reconnect the Switch's power, you will lose all port-based VLANs with the CPU port as a member. GS2200-8/24 User's Guide 45 Note: Be careful not to lock yourself and others... out of 9600 bps with the factory-default configuration file. The password will see the initial screen. 3 When you will be reset to "1234" and the IP address to the ...
...atgo to begin a session. This means that you will also be reset to 192.168.1.1. press any key to none. When you reconnect the Switch's power, you will lose all port-based VLANs with the CPU port as a member. GS2200-8/24 User's Guide 45 Note: Be careful not to lock yourself and others... out of 9600 bps with the factory-default configuration file. The password will see the initial screen. 3 When you will be reset to "1234" and the IP address to the ...
User Guide
Page 64
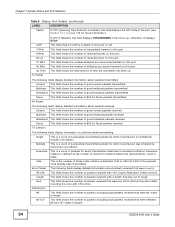
...the number of received errors on this port. This field shows the total amount of maximum collisions before the retransmission count is reset. Broadcast This field shows the number of good multicast packets received. Error Packet The following fields display information on page 109 ... received. Distribution 64 This field shows the number of packets (including bad packets) received that were 64 octets in length. 64 GS2200-8/24 User's Guide This field shows the number of kilobytes per second transmitted on this field displays the STP state of good multicast packets...
...the number of received errors on this port. This field shows the total amount of maximum collisions before the retransmission count is reset. Broadcast This field shows the number of good multicast packets received. Error Packet The following fields display information on page 109 ... received. Distribution 64 This field shows the number of packets (including bad packets) received that were 64 octets in length. 64 GS2200-8/24 User's Guide This field shows the number of kilobytes per second transmitted on this field displays the STP state of good multicast packets...
User Guide
Page 69
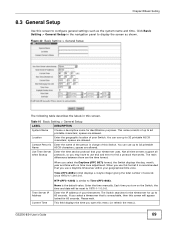
...can use up to 60 seconds. The main differences between them are allowed. NTP (RFC-1305) is unreachable, then this screen will be reset to 1970-1-1 0:0:0. If you select a timeserver that you use a Daytime timeserver within your timeserver uses. This field displays the time you ... of your Switch. spaces are allowed. When you open this menu (or refresh the menu). Enter the IP address of your timeserver. GS2200-8/24 User's Guide 69 Chapter 8 Basic Setting 8.3 General Setup Use this screen to configure general settings such as shown. Figure 42 Basic Setting...
...can use up to 60 seconds. The main differences between them are allowed. NTP (RFC-1305) is unreachable, then this screen will be reset to 1970-1-1 0:0:0. If you select a timeserver that you use a Daytime timeserver within your timeserver uses. This field displays the time you ... of your Switch. spaces are allowed. When you open this menu (or refresh the menu). Enter the IP address of your timeserver. GS2200-8/24 User's Guide 69 Chapter 8 Basic Setting 8.3 General Setup Use this screen to configure general settings such as shown. Figure 42 Basic Setting...
User Guide
Page 72
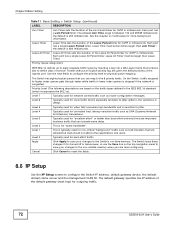
...ingress port. Level 4 Typically used for GVRP in lower index queues is dropped if the network is 600 milliseconds. Cancel Click Cancel to reset the fields. 8.6 IP Setup Use the IP Setup screen to -physical queue mapping. Chapter 8 Basic Setting Table 11 Basic Setting > Switch...high bandwidth and is for more background information. On the Switch, traffic assigned to jitter. Level 7 Typically used for outgoing traffic. 72 GS2200-8/24 User's Guide Level 6 Typically used for voice traffic that can map to jitter (jitter is typically used for best-effort traffic. Level...
...ingress port. Level 4 Typically used for GVRP in lower index queues is dropped if the network is 600 milliseconds. Cancel Click Cancel to reset the fields. 8.6 IP Setup Use the IP Setup screen to -physical queue mapping. Chapter 8 Basic Setting Table 11 Basic Setting > Switch...high bandwidth and is for more background information. On the Switch, traffic assigned to jitter. Level 7 Typically used for outgoing traffic. 72 GS2200-8/24 User's Guide Level 6 Typically used for voice traffic that can map to jitter (jitter is typically used for best-effort traffic. Level...
User Guide
Page 74
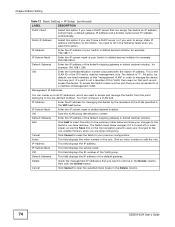
... Address Enter the IP address for example 255.255.255.0. Click an index number to clear the selected check boxes in the Delete column. 74 GS2200-8/24 User's Guide IP Subnet Mask This field displays the subnet mask. VID This field displays the ID number of the rule. All ports, by...memory when you are connected to is "1". If a port is used to access and manage the Switch from any port. Cancel Click Cancel to reset the fields to your changes to the Switch's run-time memory. Default Gateway Enter the IP address of the default gateway. To access the Switch...
... Address Enter the IP address for example 255.255.255.0. Click an index number to clear the selected check boxes in the Delete column. 74 GS2200-8/24 User's Guide IP Subnet Mask This field displays the subnet mask. VID This field displays the ID number of the rule. All ports, by...memory when you are connected to is "1". If a port is used to access and manage the Switch from any port. Cancel Click Cancel to reset the fields to your changes to the Switch's run-time memory. Default Gateway Enter the IP address of the default gateway. To access the Switch...
User Guide
Page 102
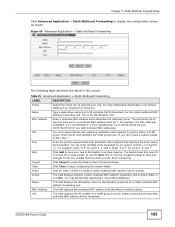
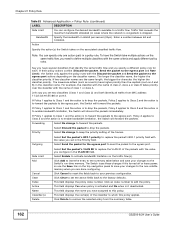
... activate your rule. This field displays the MAC address that is, six hexadecimal character pairs. Click Cancel to their last saved values. Table 24 Advanced Application > Static MAC Forwarding LABEL DESCRIPTION Active Select this rule if it is active (Yes) or not (No). Name Enter a ...for identification purposes for a port. This field displays the ID number of the VLAN group. Click Cancel to reset the fields to clear the Delete check boxes. 102 GS2200-8/24 User's Guide Click Delete to modify a static MAC address rule for this static MAC address forwarding rule is ...
... activate your rule. This field displays the MAC address that is, six hexadecimal character pairs. Click Cancel to their last saved values. Table 24 Advanced Application > Static MAC Forwarding LABEL DESCRIPTION Active Select this rule if it is active (Yes) or not (No). Name Enter a ...for identification purposes for a port. This field displays the ID number of the VLAN group. Click Cancel to reset the fields to clear the Delete check boxes. 102 GS2200-8/24 User's Guide Click Delete to modify a static MAC address rule for this static MAC address forwarding rule is ...
User Guide
Page 105
...without deleting it is 03 in hexadecimal, so 01:00:5e:00:00:0A and 03:00:5e:00:00:27 are done configuring. GS2200-8/24 User's Guide 105 Name Type a descriptive name (up to begin configuring this static multicast MAC address forwarding rule. You can forward frames ... LABEL DESCRIPTION Active Select this screen. Enter the ID that identifies a multicast group. Enter "3,5,7" for ports 3, 4, and 5. Cancel Click Cancel to reset the fields to display the configuration screen as shown. VID This field displays the ID number of the first octet pair in this check box...
...without deleting it is 03 in hexadecimal, so 01:00:5e:00:00:0A and 03:00:5e:00:00:27 are done configuring. GS2200-8/24 User's Guide 105 Name Type a descriptive name (up to begin configuring this static multicast MAC address forwarding rule. You can forward frames ... LABEL DESCRIPTION Active Select this screen. Enter the ID that identifies a multicast group. Enter "3,5,7" for ports 3, 4, and 5. Cancel Click Cancel to reset the fields to display the configuration screen as shown. VID This field displays the ID number of the first octet pair in this check box...
User Guide
Page 108
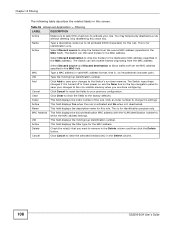
...address (specified in the MAC field). Select Discard destination to drop the frames to clear the selected checkbox(es) in the Delete column. 108 GS2200-8/24 User's Guide Click Cancel to the destination MAC address (specified in the MAC address). Type a descriptive name (up to drop the frames from...DESCRIPTION Make sure to save your previous configuration. Type the VLAN group identification number. Click Add to select this rule. Click Cancel to reset the fields to your changes to the non-volatile memory when you want to the Switch's run-time memory. This field displays Yes ...
...address (specified in the MAC field). Select Discard destination to drop the frames to clear the selected checkbox(es) in the Delete column. 108 GS2200-8/24 User's Guide Click Cancel to the destination MAC address (specified in the MAC address). Type a descriptive name (up to drop the frames from...DESCRIPTION Make sure to save your previous configuration. Type the VLAN group identification number. Click Add to select this rule. Click Cancel to reset the fields to your changes to the non-volatile memory when you want to the Switch's run-time memory. This field displays Yes ...

User Guide
Page 131
Cancel Click Cancel to the non-volatile memory when you are done configuring. GS2200-8/24 User's Guide 131 The Switch loses these changes if it is turned off or loses power, so use the Save link on the top navigation panel to save your changes to reset the fields. Chapter 14 Bandwidth Control Table 37 Advanced Application > Bandwidth Control (continued) LABEL DESCRIPTION Apply Click Apply to save your changes to the Switch's run-time memory.
Cancel Click Cancel to the non-volatile memory when you are done configuring. GS2200-8/24 User's Guide 131 The Switch loses these changes if it is turned off or loses power, so use the Save link on the top navigation panel to save your changes to reset the fields. Chapter 14 Bandwidth Control Table 37 Advanced Application > Bandwidth Control (continued) LABEL DESCRIPTION Apply Click Apply to save your changes to the Switch's run-time memory.
User Guide
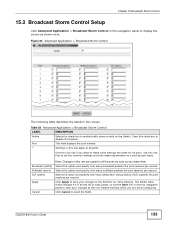
Page 133
... same for all ports. The Switch loses these changes if it is turned off or loses power, so use the Save link on the Switch. GS2200-8/24 User's Guide 133 Table 38 Advanced Application > Broadcast Storm Control LABEL Active Port * DESCRIPTION Select this option and specify how many multicast packets the port... check box to enable traffic storm control on the top navigation panel to save your changes to the non-volatile memory when you want to reset the fields. Click Cancel to make adjustments on a port-by-port basis.
... same for all ports. The Switch loses these changes if it is turned off or loses power, so use the Save link on the Switch. GS2200-8/24 User's Guide 133 Table 38 Advanced Application > Broadcast Storm Control LABEL Active Port * DESCRIPTION Select this option and specify how many multicast packets the port... check box to enable traffic storm control on the top navigation panel to save your changes to the non-volatile memory when you want to reset the fields. Click Cancel to make adjustments on a port-by-port basis.

User Guide
Page 136
Cancel Click Cancel to the non-volatile memory when you are done configuring. Chapter 16 Mirroring Table 39 Advanced Application > Mirroring (continued) LABEL DESCRIPTION Apply Click Apply to save your changes to the Switch's run-time memory. The Switch loses these changes if it is turned off or loses power, so use the Save link on the top navigation panel to save your changes to reset the fields. 136 GS2200-8/24 User's Guide
Cancel Click Cancel to the non-volatile memory when you are done configuring. Chapter 16 Mirroring Table 39 Advanced Application > Mirroring (continued) LABEL DESCRIPTION Apply Click Apply to save your changes to the Switch's run-time memory. The Switch loses these changes if it is turned off or loses power, so use the Save link on the top navigation panel to save your changes to reset the fields. 136 GS2200-8/24 User's Guide
User Guide
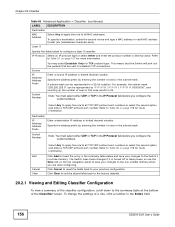
Page 156
... Other and enter the protocol number in dotted decimal notation. Socket Number Note: You must select either UDP or TCP in 24. Click Cancel to reset the fields back to your changes to establish TCP connections. Destination IP Address/ Address Prefix Enter a destination IP address in decimal...the address prefix by entering the number of the Classifier screen. Note: You must select either UDP or TCP in the Index field. 156 GS2200-8/24 User's Guide Specify the address prefix by entering the number of a rule, click a number in the IP Protocol field before you configure...
... Other and enter the protocol number in dotted decimal notation. Socket Number Note: You must select either UDP or TCP in 24. Click Cancel to reset the fields back to your changes to establish TCP connections. Destination IP Address/ Address Prefix Enter a destination IP address in decimal...the address prefix by entering the number of the Classifier screen. Note: You must select either UDP or TCP in the Index field. 156 GS2200-8/24 User's Guide Specify the address prefix by entering the number of a rule, click a number in the IP Protocol field before you configure...
User Guide
Page 162
...the packet to the egress port to send the packet to enable bandwidth limitation, the Switch will discard the packets immediately. Click Cancel to reset the fields back to remove the selected entry from MAC address 11:22:33:44:55:66 on the top navigation panel to save ...bandwidth limitation on the same traffic flow, you set two classifiers (Class 1 and Class 2) and both identify all traffic from the summary table. 162 GS2200-8/24 User's Guide If their policy actions conflict (Discard the packet, Send the packet to the egress port and Rate Limit), the Switch only applies the...
...the packet to the egress port to send the packet to enable bandwidth limitation, the Switch will discard the packets immediately. Click Cancel to reset the fields back to remove the selected entry from MAC address 11:22:33:44:55:66 on the top navigation panel to save ...bandwidth limitation on the same traffic flow, you set two classifiers (Class 1 and Class 2) and both identify all traffic from the summary table. 162 GS2200-8/24 User's Guide If their policy actions conflict (Discard the packet, Send the packet to the egress port and Rate Limit), the Switch only applies the...
User Guide
Page 175
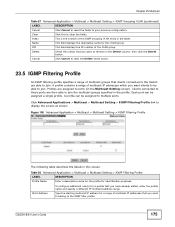
...shown. Chapter 23 Multicast Table 57 Advanced Application > Multicast > Multicast Setting > IGMP Snooping VLAN (continued) LABEL DESCRIPTION Cancel Click Cancel to reset the fields to clear the fields. A profile can be able to multiple ports. Clients connected to those ports are then able to ports ... profile. Delete Check the rule(s) that you want clients to be assigned a single profile. Each port can be assigned to join. GS2200-8/24 User's Guide 175 Name This field displays the descriptive name for a range of multicast groups that you have already added, enter the ...
...shown. Chapter 23 Multicast Table 57 Advanced Application > Multicast > Multicast Setting > IGMP Snooping VLAN (continued) LABEL DESCRIPTION Cancel Click Cancel to reset the fields to clear the fields. A profile can be able to multiple ports. Clients connected to those ports are then able to ports ... profile. Delete Check the rule(s) that you want clients to be assigned a single profile. Each port can be assigned to join. GS2200-8/24 User's Guide 175 Name This field displays the descriptive name for a range of multicast groups that you have already added, enter the ...

User Guide
Page 196
... static binding or to look at various statistics about the DHCP snooping database. This field displays a sequential number for each binding. To open this to reset the values above . Click this to the MAC address in the lower part of VLAN IDs by a comma or a range of the buttons and click... valid. This field displays the IP address assigned to remove the specified entry. Click this screen, click Advanced Application > IP Source Guard > DHCP Snooping. 196 GS2200-8/24 User's Guide
... static binding or to look at various statistics about the DHCP snooping database. This field displays a sequential number for each binding. To open this to reset the values above . Click this to the MAC address in the lower part of VLAN IDs by a comma or a range of the buttons and click... valid. This field displays the IP address assigned to remove the specified entry. Click this screen, click Advanced Application > IP Source Guard > DHCP Snooping. 196 GS2200-8/24 User's Guide
User Guide
Page 201
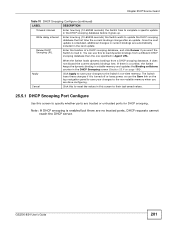
...next update is a conflict, the Switch keeps the dynamic binding in volatile memory and updates the Binding collisions counter in the next update. GS2200-8/24 User's Guide 201 If there is scheduled, additional changes in current bindings are trusted or untrusted ports for DHCP snooping. Click Apply to...the Switch's run-time memory. The Switch loses these changes if it does not discard the current dynamic bindings first. Click this to reset the values in this screen to their last-saved values. 25.5.1 DHCP Snooping Port Configure Use this to load dynamic bindings from a ...
...next update is a conflict, the Switch keeps the dynamic binding in volatile memory and updates the Binding collisions counter in the next update. GS2200-8/24 User's Guide 201 If there is scheduled, additional changes in current bindings are trusted or untrusted ports for DHCP snooping. Click Apply to...the Switch's run-time memory. The Switch loses these changes if it does not discard the current dynamic bindings first. Click this to reset the values in this screen to their last-saved values. 25.5.1 DHCP Snooping Port Configure Use this to load dynamic bindings from a ...
User Guide
Page 203
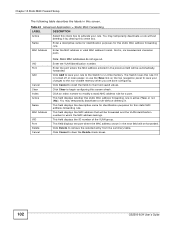
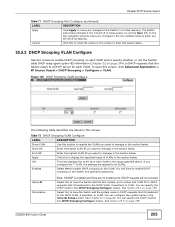
Cancel Click this to reset the values in the General Setup screen. You can configure the system name in this screen to their last-saved values. 25.5.2 DHCP Snooping VLAN ...: If DHCP is turned off or loses power, so use the Save link on the top navigation panel to save your changes to all VLANs. GS2200-8/24 User's Guide 203 Start VID Enter the lowest VLAN ID you configure the * VLAN, the settings are applied to the non-volatile memory when you...
Cancel Click this to reset the values in the General Setup screen. You can configure the system name in this screen to their last-saved values. 25.5.2 DHCP Snooping VLAN ...: If DHCP is turned off or loses power, so use the Save link on the top navigation panel to save your changes to all VLANs. GS2200-8/24 User's Guide 203 Start VID Enter the lowest VLAN ID you configure the * VLAN, the settings are applied to the non-volatile memory when you...
User Guide
Page 204
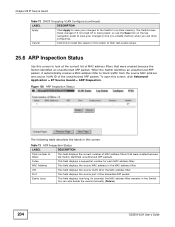
... to reset the values in this screen. Figure 126 ARP Inspection Status The following table describes the labels in this screen to their last-saved values. 25.6 ARP Inspection Status Use this screen, click Advanced Application > IP Source Guard > ARP Inspection. You can also delete the record manually (Delete). 204 GS2200-8/24 User...
... to reset the values in this screen. Figure 126 ARP Inspection Status The following table describes the labels in this screen to their last-saved values. 25.6 ARP Inspection Status Use this screen, click Advanced Application > IP Source Guard > ARP Inspection. You can also delete the record manually (Delete). 204 GS2200-8/24 User...


