
User Guide
Page 3
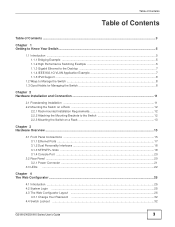
... 3.2 Rear Panel ...20 3.2.1 Power Connector ...21 3.3 LEDs ...22 Chapter 4 The Web Configurator ...25 4.1 Introduction ...25 4.2 System Login ...25 4.3 The Web Configurator Layout ...26 4.3.1 Change Your Password ...32 4.4 Switch Lockout ...32 GS1910/XGS1910 Series User's Guide 3
... 3.2 Rear Panel ...20 3.2.1 Power Connector ...21 3.3 LEDs ...22 Chapter 4 The Web Configurator ...25 4.1 Introduction ...25 4.2 System Login ...25 4.3 The Web Configurator Layout ...26 4.3.1 Change Your Password ...32 4.4 Switch Lockout ...32 GS1910/XGS1910 Series User's Guide 3
User Guide
Page 9
...'s not easy to guess and that consists of different types of characters, such as numbers and letters. • Write down the password and put it in a safe place. • Back up an earlier configuration file, you know how to totally re-configure the Switch. ...Restoring an earlier working configuration may be useful if the device becomes unstable or even crashes. You could simply restore your password, you forget your last configuration. GS1910/XGS1910 Series User's Guide 9 Chapter 1 Getting to its factory default settings. If you will have to restore it).
...'s not easy to guess and that consists of different types of characters, such as numbers and letters. • Write down the password and put it in a safe place. • Back up an earlier configuration file, you know how to totally re-configure the Switch. ...Restoring an earlier working configuration may be useful if the device becomes unstable or even crashes. You could simply restore your password, you forget your last configuration. GS1910/XGS1910 Series User's Guide 9 Chapter 1 Getting to its factory default settings. If you will have to restore it).

User Guide
Page 26
The following figure shows the navigating components of a web configurator screen. Figure 25 The Web Configurator Layout BC A 26 GS1910/XGS1910 Series User's Guide Chapter 4 The Web Configurator 3 The login screen appears. Figure 24 Web Configurator: Login 4 Click OK to view the first web configurator screen. 4.3 The Web Configurator Layout The Port State Overview screen is 1234. The default username is admin and associated default password is the first screen that displays when you access the web configurator.
The following figure shows the navigating components of a web configurator screen. Figure 25 The Web Configurator Layout BC A 26 GS1910/XGS1910 Series User's Guide Chapter 4 The Web Configurator 3 The login screen appears. Figure 24 Web Configurator: Login 4 Click OK to view the first web configurator screen. 4.3 The Web Configurator Layout The Port State Overview screen is 1234. The default username is admin and associated default password is the first screen that displays when you access the web configurator.
User Guide
Page 28
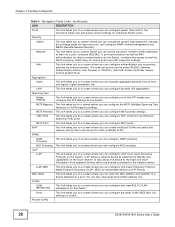
... to a screen where you can logically aggregate physical links to form one of a device attached to a port. Private VLANs 28 GS1910/XGS1910 Series User's Guide LACP This link takes you to a screen where you can configure Link Layer Discovery ProtocolMedia Endpoint Discovery (LLDP... Table 4 Navigation Panel Links (continued) LINK DESCRIPTION Ports This link takes you to a screen where you can change the system login password, manage the privilege levels for login accounts, and configure SNMP, remote management and RMON (Remote Network Monitor). Security Switch This link takes...
... to a screen where you can logically aggregate physical links to form one of a device attached to a port. Private VLANs 28 GS1910/XGS1910 Series User's Guide LACP This link takes you to a screen where you can configure Link Layer Discovery ProtocolMedia Endpoint Discovery (LLDP... Table 4 Navigation Panel Links (continued) LINK DESCRIPTION Ports This link takes you to a screen where you can change the system login password, manage the privilege levels for login accounts, and configure SNMP, remote management and RMON (Remote Network Monitor). Security Switch This link takes...
User Guide
Page 32
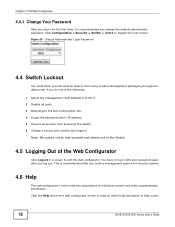
... reasons. 4.6 Help The web configurator's online help description of that screen. 32 GS1910/XGS1910 Series User's Guide Figure 26 Change Administrator Login Password 4.4 Switch Lockout You could block yourself (and all services from a web configurator screen to log in with your password again after you finish a management session for the first time, it .
... reasons. 4.6 Help The web configurator's online help description of that screen. 32 GS1910/XGS1910 Series User's Guide Figure 26 Change Administrator Login Password 4.4 Switch Lockout You could block yourself (and all services from a web configurator screen to log in with your password again after you finish a management session for the first time, it .
User Guide
Page 35
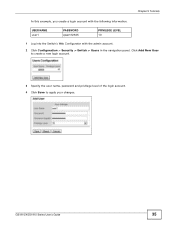
Click Add New User to create a new login account. 3 Specify the user name, password and privilege level of the login account. 4 Click Save to apply your changes. GS1910/XGS1910 Series User's Guide 35 USER NAME user1 PASSWORD qwert12345 PRIVILEGE LEVEL 10 1 Log into the Switch's Web Configurator with the following information. Chapter 5 Tutorials In this example, you create a login account with the admin account. 2 Click Configuration > Security > Switch > Users in the navigation panel.
Click Add New User to create a new login account. 3 Specify the user name, password and privilege level of the login account. 4 Click Save to apply your changes. GS1910/XGS1910 Series User's Guide 35 USER NAME user1 PASSWORD qwert12345 PRIVILEGE LEVEL 10 1 Log into the Switch's Web Configurator with the following information. Chapter 5 Tutorials In this example, you create a login account with the admin account. 2 Click Configuration > Security > Switch > Users in the navigation panel.
User Guide
Page 41
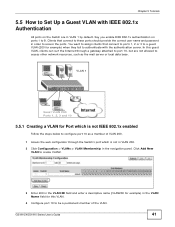
You want to assign clients that connect to these ports should provide the correct user name and password in order to access the ports. VLAN 1 Guest VLAN 200 Ports 1, 2, 3 and 10 Internet 5.5.1 Creating a VLAN for Port which is not in VLAN 200. 2 Click ... (VLAN200 for example) in the VLAN Name field for example) when they fail to authenticate with IEEE 802.1x Authentication All ports on ports 1 to 8. GS1910/XGS1910 Series User's Guide 41
You want to assign clients that connect to these ports should provide the correct user name and password in order to access the ports. VLAN 1 Guest VLAN 200 Ports 1, 2, 3 and 10 Internet 5.5.1 Creating a VLAN for Port which is not in VLAN 200. 2 Click ... (VLAN200 for example) in the VLAN Name field for example) when they fail to authenticate with IEEE 802.1x Authentication All ports on ports 1 to 8. GS1910/XGS1910 Series User's Guide 41

User Guide
Page 43
GS1910/XGS1910 Series User's Guide 43 Chapter 5 Tutorials 2 Select the Reauthentication Enabled check box to have a subscriber periodically re-enter his or her username and password to stay connected to the port. 3 Select the Guest VLAN Enabled check box and enter the guest VLAN ID (200 in this example) to port ...
GS1910/XGS1910 Series User's Guide 43 Chapter 5 Tutorials 2 Select the Reauthentication Enabled check box to have a subscriber periodically re-enter his or her username and password to stay connected to the port. 3 Select the Guest VLAN Enabled check box and enter the guest VLAN ID (200 in this example) to port ...
User Guide
Page 46
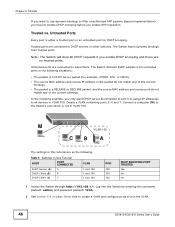
... are no trusted ports. Untrusted ports are connected to DHCP servers or other switches. Log into the Switch by entering the username (default: admin) and password (default: 1234). 2 See Section 5.4 on page 38 for DHCP snooping. Untrusted Ports Every port is a RELEASE or DECLINE packet, and the source...8226; The packet is either a trusted port or an untrusted port for how to create a VLAN and configure ports to join the VLAN. 46 GS1910/XGS1910 Series User's Guide Chapter 5 Tutorials If you want DHCP server A connected to port 5 to assign IP addresses to all DHCP requests if you...
... are no trusted ports. Untrusted ports are connected to DHCP servers or other switches. Log into the Switch by entering the username (default: admin) and password (default: 1234). 2 See Section 5.4 on page 38 for DHCP snooping. Untrusted Ports Every port is a RELEASE or DECLINE packet, and the source...8226; The packet is either a trusted port or an untrusted port for how to create a VLAN and configure ports to join the VLAN. 46 GS1910/XGS1910 Series User's Guide Chapter 5 Tutorials If you want DHCP server A connected to port 5 to assign IP addresses to all DHCP requests if you...

User Guide
Page 53
Log into the Switch by entering the username (default: admin) and password (default: 1234). 2 Go to receive a copy of traffic flow you are attached to port 2 but want to copy (Both in more detail without interfering with ... act as a destination port to which the Switch copy traffic from the source port(s). 5 Select the direction of the traffic passing through http://192.168.1.1. GS1910/XGS1910 Series User's Guide 53 You then should be able to Configuration > Port Mirroring.
Log into the Switch by entering the username (default: admin) and password (default: 1234). 2 Go to receive a copy of traffic flow you are attached to port 2 but want to copy (Both in more detail without interfering with ... act as a destination port to which the Switch copy traffic from the source port(s). 5 Select the direction of the traffic passing through http://192.168.1.1. GS1910/XGS1910 Series User's Guide 53 You then should be able to Configuration > Port Mirroring.

User Guide
Page 54
... on Switch A. 4 Enter the remote port mirroring VLAN ID number (100 in your network. Log into the Switch by entering the username (default: admin) and password (default: 1234). 2 Go to the specified VLAN. You are three switches (A, B and C) in this example) and select a reflector port (Port 7 for ...port 10 of switch C but want to copy (Both in this example) on port 4 of traffic flow you want to Switch B. 54 GS1910/XGS1910 Series User's Guide The copied traffic is forwarded to remote port mirroring VLAN 100. 4 Intermediate port Intermediate port Reflector port Intermediate port 10...
... on Switch A. 4 Enter the remote port mirroring VLAN ID number (100 in your network. Log into the Switch by entering the username (default: admin) and password (default: 1234). 2 Go to the specified VLAN. You are three switches (A, B and C) in this example) and select a reflector port (Port 7 for ...port 10 of switch C but want to copy (Both in this example) on port 4 of traffic flow you want to Switch B. 54 GS1910/XGS1910 Series User's Guide The copied traffic is forwarded to remote port mirroring VLAN 100. 4 Intermediate port Intermediate port Reflector port Intermediate port 10...

User Guide
Page 57
... through http://192.168.1.1. Log into the Switch by entering the username (default: admin) and password (default: 1234). 2 Go to Configuration > Port Mirroring. The Switch will NOT filter or forward a frame based on these ports. GS1910/XGS1910 Series User's Guide 57 Select Enabled in the Mode field to activate mirroring on the...
... through http://192.168.1.1. Log into the Switch by entering the username (default: admin) and password (default: 1234). 2 Go to Configuration > Port Mirroring. The Switch will NOT filter or forward a frame based on these ports. GS1910/XGS1910 Series User's Guide 57 Select Enabled in the Mode field to activate mirroring on the...

User Guide
Page 59
... (2 for example) to act as the intermediate port that connects to Switch B. 6 Configure a port (10 for analysis. 7 Click Save. GS1910/XGS1910 Series User's Guide 59 The Switch will automatically create the remote port mirroring VLAN and configure the intermediate and destination ports as a member of... 5 Tutorials In Switch C: 1 Access the Switch through http://192.168.1.1. Log into the Switch by entering the username (default: admin) and password (default: 1234). 2 Go to activate mirroring on Switch A for example) to act as the destination port that help forward traffic. 4 Enter...
... (2 for example) to act as the intermediate port that connects to Switch B. 6 Configure a port (10 for analysis. 7 Click Save. GS1910/XGS1910 Series User's Guide 59 The Switch will automatically create the remote port mirroring VLAN and configure the intermediate and destination ports as a member of... 5 Tutorials In Switch C: 1 Access the Switch through http://192.168.1.1. Log into the Switch by entering the username (default: admin) and password (default: 1234). 2 Go to activate mirroring on Switch A for example) to act as the destination port that help forward traffic. 4 Enter...

User Guide
Page 61
...to enable IGMP snooping on the port from the forwarding table when an IGMP leave message is selected by entering the username (default: admin) and password (default: 1234). 2 Go to the multicast router or switch. The Switch forwards the packets with the configured source address(es) to a connected...v1/v2 join reports that join this example). In fast leave mode, the Switch removes an IGMP snooping membership entry immediately from a host. GS1910/XGS1910 Series User's Guide 61 Chapter 5 Tutorials Follow the steps below to join the same multicast group, it only sends a new join ...
...to enable IGMP snooping on the port from the forwarding table when an IGMP leave message is selected by entering the username (default: admin) and password (default: 1234). 2 Go to the multicast router or switch. The Switch forwards the packets with the configured source address(es) to a connected...v1/v2 join reports that join this example). In fast leave mode, the Switch removes an IGMP snooping membership entry immediately from a host. GS1910/XGS1910 Series User's Guide 61 Chapter 5 Tutorials Follow the steps below to join the same multicast group, it only sends a new join ...
User Guide
Page 63
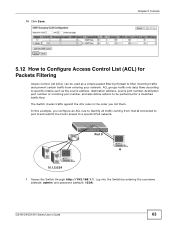
Port 9 A 10.1.2.0/24 1 Access the Switch through http://192.168.1.1. 14 Click Save. GS1910/XGS1910 Series User's Guide 63 In this example, you list them. The Switch checks traffic against the ACL rules in the order you configure an ... Filtering Access Control List (ACL) can be performed for a classified traffic flow. ACL groups traffic into the Switch by entering the username (default: admin) and password (default: 1234).
Port 9 A 10.1.2.0/24 1 Access the Switch through http://192.168.1.1. 14 Click Save. GS1910/XGS1910 Series User's Guide 63 In this example, you list them. The Switch checks traffic against the ACL rules in the order you configure an ... Filtering Access Control List (ACL) can be performed for a classified traffic flow. ACL groups traffic into the Switch by entering the username (default: admin) and password (default: 1234).
User Guide
Page 66
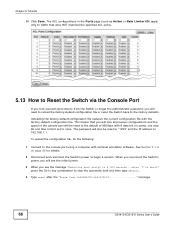
.... 5.13 How to Reset the Switch via the Console Port If you lock yourself (and others) from 0x40080000-0x4017ffff message. 66 GS1910/XGS1910 Series User's Guide The password will also be reset to the default of 9600bps with 8 data bit, no parity, one stop the automatic boot and then type... default. 4 Type reset after the "Erase from the Switch or forget the administrator password, you will lose all previous configurations and the speed of the console port will need to reload the factory-default configuration file or reset the...
.... 5.13 How to Reset the Switch via the Console Port If you lock yourself (and others) from 0x40080000-0x4017ffff message. 66 GS1910/XGS1910 Series User's Guide The password will also be reset to the default of 9600bps with 8 data bit, no parity, one stop the automatic boot and then type... default. 4 Type reset after the "Erase from the Switch or forget the administrator password, you will lose all previous configurations and the speed of the console port will need to reload the factory-default configuration file or reset the...
User Guide
Page 67
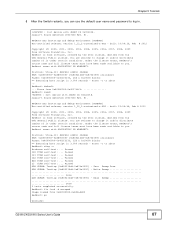
... with ABSOLUTELY NO WARRANTY. Jaguar-1 board detected (VSC7460 Rev. RedBoot is free software, covered by the eCos license, derived from 0x80040000-0x806a4d20 RedBoot> go Username: GS1910/XGS1910 Series User's Guide 67 Redboot comes with ABSOLUTELY NO WARRANTY. Passed IS0 TCAM self-test: ... Passed DDR SDRAM: Testing [0x800214d8-0x87fe1000] - Read Sweep ...Done.... Under the license terms, RedBoot's source code and full license terms must have been made available to you can use the default user name and password to you. Passed L3 TCAM self-test: ...
... with ABSOLUTELY NO WARRANTY. Jaguar-1 board detected (VSC7460 Rev. RedBoot is free software, covered by the eCos license, derived from 0x80040000-0x806a4d20 RedBoot> go Username: GS1910/XGS1910 Series User's Guide 67 Redboot comes with ABSOLUTELY NO WARRANTY. Passed IS0 TCAM self-test: ... Passed DDR SDRAM: Testing [0x800214d8-0x87fe1000] - Read Sweep ...Done.... Under the license terms, RedBoot's source code and full license terms must have been made available to you can use the default user name and password to you. Passed L3 TCAM self-test: ...
User Guide
Page 70
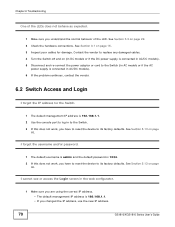
...or access the Login screen in to the Switch. 3 If this does not work , you changed the IP address, use the new IP address. 70 GS1910/XGS1910 Series User's Guide See Section 3.1 on page 66. See Section 5.13 on page 22. 2 Check the hardware connections. See Section 5.13 on... behave as expected. 1 Make sure you have to reset the device to its factory defaults. I forgot the username and/or password. 1 The default username is admin and the default password is 192.168.1.1. • If you have to reset the device to its factory defaults. Chapter 6 Troubleshooting One of the...
...or access the Login screen in to the Switch. 3 If this does not work , you changed the IP address, use the new IP address. 70 GS1910/XGS1910 Series User's Guide See Section 3.1 on page 66. See Section 5.13 on page 22. 2 Check the hardware connections. See Section 5.13 on... behave as expected. 1 Make sure you have to reset the device to its factory defaults. I forgot the username and/or password. 1 The default username is admin and the default password is 192.168.1.1. • If you have to reset the device to its factory defaults. Chapter 6 Troubleshooting One of the...
User Guide
Page 71
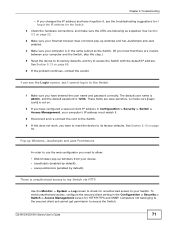
... you need to your device. • JavaScripts (enabled by default). • Java permissions (enabled by default). GS1910/XGS1910 Series User's Guide 71 The default user name is admin, and the default password is not on. 2 If you have configured a secured client IP address in Configuration > Security > Switch > ... JavaScripts and Java enabled. 4 Make sure your computer and the Switch, skip this does not work, you have entered the user name and password correctly. Pop-up windows from your Switch. See Section 5.13 on page 66. 6 If the problem continues, contact the vendor. Use the...
... you need to your device. • JavaScripts (enabled by default). • Java permissions (enabled by default). GS1910/XGS1910 Series User's Guide 71 The default user name is admin, and the default password is not on. 2 If you have configured a secured client IP address in Configuration > Security > Switch > ... JavaScripts and Java enabled. 4 Make sure your computer and the Switch, skip this does not work, you have entered the user name and password correctly. Pop-up windows from your Switch. See Section 5.13 on page 66. 6 If the problem continues, contact the vendor. Use the...

User Guide
Page 75
... 33 binding 45 binding table 45 building 45 C certifications notices 73 viewing 73 changing the password 32 console port settings 20 copyright 73 D DHCP snooping 45 trusted ports 46 untrusted ports 46 disclaimer 73 documentation related 2 GS1910/XGS1910 Series User's Guide Index Index E Ethernet ports 17 default settings 17 F FCC interference statement...
... 33 binding 45 binding table 45 building 45 C certifications notices 73 viewing 73 changing the password 32 console port settings 20 copyright 73 D DHCP snooping 45 trusted ports 46 untrusted ports 46 disclaimer 73 documentation related 2 GS1910/XGS1910 Series User's Guide Index Index E Ethernet ports 17 default settings 17 F FCC interference statement...


