
User Guide
Page 3
... 1.1.2 High Performance Switching Example 6 1.1.3 Gigabit Ethernet to the Desktop 7 1.1.4 IEEE 802.1Q VLAN Application Example 7 1.1.5 IPv6 Support ...8 1.2 Ways to Manage the Switch ...8 1.3 Good Habits for Managing the Switch 8 Chapter 2 Hardware Installation and Connection 11 2.1 Freestanding Installation ...11 2.2 Mounting the Switch on a Rack ...12 2.2.1 Rack-mounted Installation Requirements 12... ...25 4.1 Introduction ...25 4.2 System Login ...25 4.3 The Web Configurator Layout ...26 4.3.1 Change Your Password ...32 4.4 Switch Lockout ...32 GS1910/XGS1910 Series User's Guide 3
... 1.1.2 High Performance Switching Example 6 1.1.3 Gigabit Ethernet to the Desktop 7 1.1.4 IEEE 802.1Q VLAN Application Example 7 1.1.5 IPv6 Support ...8 1.2 Ways to Manage the Switch ...8 1.3 Good Habits for Managing the Switch 8 Chapter 2 Hardware Installation and Connection 11 2.1 Freestanding Installation ...11 2.2 Mounting the Switch on a Rack ...12 2.2.1 Rack-mounted Installation Requirements 12... ...25 4.1 Introduction ...25 4.2 System Login ...25 4.3 The Web Configurator Layout ...26 4.3.1 Change Your Password ...32 4.4 Switch Lockout ...32 GS1910/XGS1910 Series User's Guide 3
User Guide
Page 4
Table of Contents 4.5 Logging Out of the Web Configurator 32 4.6 Help ...32 Chapter 5 Tutorials ...33 5.1 How to Change Switch Management IP Address 33 5.2 How to Configure Login Accounts and Privilege Levels 34 5.3 How to Manage a Configuration File 36 5.3.1 Backing up a Configuration File 36 5.3.2 Restoring a Configuration File 37 5.4 How to Create a VLAN ...38 5.4.1 ...via the Console Port 66 Chapter 6 Troubleshooting...69 6.1 Power, Hardware Connections, and LEDs 69 6.2 Switch Access and Login ...70 Appendix A Legal Information...73 Index ...75 4 GS1910/XGS1910 Series User's Guide
Table of Contents 4.5 Logging Out of the Web Configurator 32 4.6 Help ...32 Chapter 5 Tutorials ...33 5.1 How to Change Switch Management IP Address 33 5.2 How to Configure Login Accounts and Privilege Levels 34 5.3 How to Manage a Configuration File 36 5.3.1 Backing up a Configuration File 36 5.3.2 Restoring a Configuration File 37 5.4 How to Create a VLAN ...38 5.4.1 ...via the Console Port 66 Chapter 6 Troubleshooting...69 6.1 Power, Hardware Connections, and LEDs 69 6.2 Switch Access and Login ...70 Appendix A Legal Information...73 Index ...75 4 GS1910/XGS1910 Series User's Guide
User Guide
Page 5
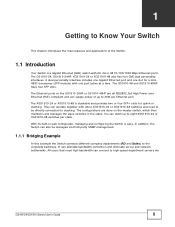
...GS1910-48HP are done on the master switch, which then maintains and manages the slave switches in web configurator, managing and configuring the Switch is easy. With its built-in the stack. They can supply power of the Switch. 1.1 Introduction Your Switch is a Gigabit Ethernet (GbE) switch with other XGS1910-24...Know Your Switch This chapter introduces the main features and applications of up to eight XGS1910-24 or XGS1910-48 switches per Ethernet port. The GS1910-24, GS1910-24HP, XGS1910-24 or XGS1910-48 also has four GbE dual personality interfaces. In addition, the Switch can...
...GS1910-48HP are done on the master switch, which then maintains and manages the slave switches in web configurator, managing and configuring the Switch is easy. With its built-in the stack. They can supply power of the Switch. 1.1 Introduction Your Switch is a Gigabit Ethernet (GbE) switch with other XGS1910-24...Know Your Switch This chapter introduces the main features and applications of up to eight XGS1910-24 or XGS1910-48 switches per Ethernet port. The GS1910-24, GS1910-24HP, XGS1910-24 or XGS1910-48 also has four GbE dual personality interfaces. In addition, the Switch can...
User Guide
Page 8
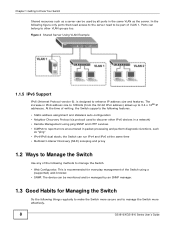
...stateless auto-configuration • Neighbor Discovery Protocol (a protocol used by an SNMP manager. 1.3 Good Habits for everyday management of VLAN 1. The device can be monitored and/or managed by all ports in a network) • Remote Management using a (supported) web browser. • SNMP. At the time of... writing, the Switch supports the following things regularly to make the Switch more secure and to manage the Switch more effectively. 8 GS1910/XGS1910 Series User's Guide In the following methods to be part of the Switch using ping SNMP and HTTP services ...
...stateless auto-configuration • Neighbor Discovery Protocol (a protocol used by an SNMP manager. 1.3 Good Habits for everyday management of VLAN 1. The device can be monitored and/or managed by all ports in a network) • Remote Management using a (supported) web browser. • SNMP. At the time of... writing, the Switch supports the following things regularly to make the Switch more secure and to manage the Switch more effectively. 8 GS1910/XGS1910 Series User's Guide In the following methods to be part of the Switch using ping SNMP and HTTP services ...
User Guide
Page 20
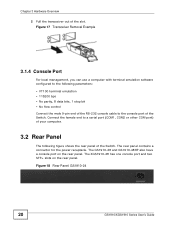
...XGS1910-48 has one console port and two SFP+ slots on the rear panel. Figure 17 Transceiver Removal Example 3.1.4 Console Port For local management, you can use a computer with terminal emulation software configured to the following parameters: • VT100 terminal emulation • 115200 bps •...your computer. 3.2 Rear Panel The following figure shows the rear panel of the slot. Figure 18 Rear Panel: GS1910-24 20 GS1910/XGS1910 Series User's Guide The GS1910-48 and GS1910-48HP also have a console port on the rear panel. Chapter 3 Hardware Overview 2 Pull the transceiver out of...
...XGS1910-48 has one console port and two SFP+ slots on the rear panel. Figure 17 Transceiver Removal Example 3.1.4 Console Port For local management, you can use a computer with terminal emulation software configured to the following parameters: • VT100 terminal emulation • 115200 bps •...your computer. 3.2 Rear Panel The following figure shows the rear panel of the slot. Figure 18 Rear Panel: GS1910-24 20 GS1910/XGS1910 Series User's Guide The GS1910-48 and GS1910-48HP also have a console port on the rear panel. Chapter 3 Hardware Overview 2 Pull the transceiver out of...
User Guide
Page 25
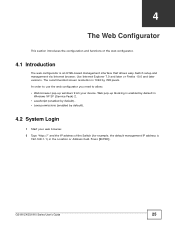
... configurator you need to allow: • Web browser pop-up blocking is an HTML-based management interface that allows easy Switch setup and management via Internet browser. GS1910/XGS1910 Series User's Guide 25 CHAPTER 4 The Web Configurator This section introduces the configuration and ...functions of the Switch (for example, the default management IP address is 192.168.1.1) in Windows XP SP (Service Pack) 2....
... configurator you need to allow: • Web browser pop-up blocking is an HTML-based management interface that allows easy Switch setup and management via Internet browser. GS1910/XGS1910 Series User's Guide 25 CHAPTER 4 The Web Configurator This section introduces the configuration and ...functions of the Switch (for example, the default management IP address is 192.168.1.1) in Windows XP SP (Service Pack) 2....

User Guide
Page 27
... describes the links in the main window. IPv6 This link takes you to a screen where you can configure the Switch's IPv6 address and prefix length. GS1910/XGS1910 Series User's Guide 27 Chapter 4 The Web Configurator A - B - Click this link to a screen where you can configure the NTP time servers...setup a system log server. Log This link takes you to a screen where you can configure the IPv4 address, subnet mask (necessary for Switch management) and DNS (domain name server) settings. Click the menu items to perform certain tasks no matter which allow you to open the screen in ...
... describes the links in the main window. IPv6 This link takes you to a screen where you can configure the Switch's IPv6 address and prefix length. GS1910/XGS1910 Series User's Guide 27 Chapter 4 The Web Configurator A - B - Click this link to a screen where you can configure the NTP time servers...setup a system log server. Log This link takes you to a screen where you can configure the IPv4 address, subnet mask (necessary for Switch management) and DNS (domain name server) settings. Click the menu items to perform certain tasks no matter which allow you to open the screen in ...
User Guide
Page 28
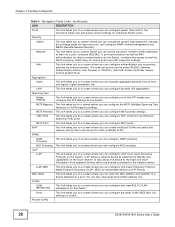
Security Switch This link takes you to a screen where you can change the system login password, manage the privilege levels for login accounts, and configure SNMP, remote management and RMON (Remote Network Monitor). Spanning Tree Bridge Settings This link takes you to screens where you ...and store information from adjacent devices which are directly connected to advertise its identity and capabilities on the Switch. Private VLANs 28 GS1910/XGS1910 Series User's Guide AAA This link takes you to a screen where you can configure authentication and accounting services via the...
Security Switch This link takes you to a screen where you can change the system login password, manage the privilege levels for login accounts, and configure SNMP, remote management and RMON (Remote Network Monitor). Spanning Tree Bridge Settings This link takes you to screens where you ...and store information from adjacent devices which are directly connected to advertise its identity and capabilities on the Switch. Private VLANs 28 GS1910/XGS1910 Series User's Guide AAA This link takes you to a screen where you can configure authentication and accounting services via the...
User Guide
Page 29
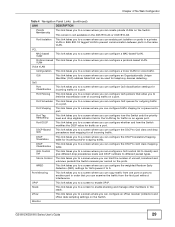
...This link takes you to a screen where you can configure a MAC-based VLAN. UPnP This link takes you to a screen to enable stacking and manage other members in the VLAN tag for traffic on a port. Stack This link takes you to a screen to enable UPnP. VCL MAC-based VLAN...can configure the DSCP to limit the transmission rate of unicast, broadcast and unknown packets the Switch receives per second on the XGS1910-24 or XGS1910-48. Monitor GS1910/XGS1910 Series User's Guide 29 Port Isolation This link takes you to a screen where you can configure a Voice VLAN for voice ...
...This link takes you to a screen where you can configure a MAC-based VLAN. UPnP This link takes you to a screen to enable stacking and manage other members in the VLAN tag for traffic on a port. Stack This link takes you to a screen to enable UPnP. VCL MAC-based VLAN...can configure the DSCP to limit the transmission rate of unicast, broadcast and unknown packets the Switch receives per second on the XGS1910-24 or XGS1910-48. Monitor GS1910/XGS1910 Series User's Guide 29 Port Isolation This link takes you to a screen where you can configure a Voice VLAN for voice ...

User Guide
Page 30
Log This link takes you to a screen where you can view the packet statistics for access control. Security Access Management Statistics This link takes you to a screen that displays view system logs for authentication and accounting servers. Network This link takes ...This link takes you to a screen where you can view IGMP snooping status, IGMP group information and SFM (Source-Filtered Multicast) information. 30 GS1910/XGS1910 Series User's Guide Port Status This link takes you to a screen where you can view MVR channels (groups) information. MVR Channel This...
Log This link takes you to a screen where you can view the packet statistics for access control. Security Access Management Statistics This link takes you to a screen that displays view system logs for authentication and accounting servers. Network This link takes ...This link takes you to a screen where you can view IGMP snooping status, IGMP group information and SFM (Source-Filtered Multicast) information. 30 GS1910/XGS1910 Series User's Guide Port Status This link takes you to a screen where you can view MVR channels (groups) information. MVR Channel This...
User Guide
Page 32
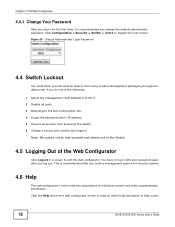
...Administrator Login Password 4.4 Switch Lockout You could block yourself (and all services from using in with your password again after you finish a management session for the first time, it . Click the Help link from a web configurator screen to view an online help has descriptions of... individual screens and some supplementary information. You have to log in -band-management (managing through the data ports) if you do one of that screen. 32 GS1910/XGS1910 Series User's Guide Note: Be careful not to lock yourself and others ) from accessing the ...
...Administrator Login Password 4.4 Switch Lockout You could block yourself (and all services from using in with your password again after you finish a management session for the first time, it . Click the Help link from a web configurator screen to view an online help has descriptions of... individual screens and some supplementary information. You have to log in -band-management (managing through the data ports) if you do one of that screen. 32 GS1910/XGS1910 Series User's Guide Note: Be careful not to lock yourself and others ) from accessing the ...
User Guide
Page 33
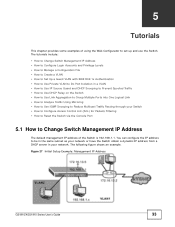
Figure 27 Initial Setup Example: Management IP Address GS1910/XGS1910 Series User's Guide 33 The tutorials include: • How to Change Switch Management IP Address • How to Configure Login Accounts and Privilege Levels • How to Manage a Configuration File • How to Create a VLAN • How to Set Up a... List (ACL) for Packets Filtering • How to Reset the Switch via the Console Port 5.1 How to Change Switch Management IP Address The default management IP address of using the Web Configurator to be in the same subnet as your network or have the Switch obtain a ...
Figure 27 Initial Setup Example: Management IP Address GS1910/XGS1910 Series User's Guide 33 The tutorials include: • How to Change Switch Management IP Address • How to Configure Login Accounts and Privilege Levels • How to Manage a Configuration File • How to Create a VLAN • How to Set Up a... List (ACL) for Packets Filtering • How to Reset the Switch via the Console Port 5.1 How to Change Switch Management IP Address The default management IP address of using the Web Configurator to be in the same subnet as your network or have the Switch obtain a ...
User Guide
Page 34
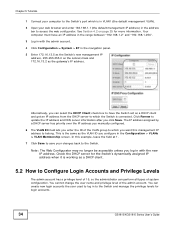
...enter 192.168.1.1 (the default management IP address) in the navigation panel. 5 Enter 172.16.13.5 as the Switch's new management IP address, 255.255.255.0... Connect your computer to the Switch's port which is in VLAN1 (the default management VLAN). 2 Open your changes back to the Switch. The IP address assigned ...create new login accounts the user used to the Switch and manage the privilege levels for more information. You cannot change the ...log in the Configuration > VLANs > VLAN Membership screen. In this management IP address to update the IP address and DNS server information after ...
...enter 192.168.1.1 (the default management IP address) in the navigation panel. 5 Enter 172.16.13.5 as the Switch's new management IP address, 255.255.255.0... Connect your computer to the Switch's port which is in VLAN1 (the default management VLAN). 2 Open your changes back to the Switch. The IP address assigned ...create new login accounts the user used to the Switch and manage the privilege levels for more information. You cannot change the ...log in the Configuration > VLANs > VLAN Membership screen. In this management IP address to update the IP address and DNS server information after ...

User Guide
Page 36
... > Save and click Save Configuration. 2 Click Save to Manage a Configuration File Configuration files define the Switch's settings. To change the access privilege level for each feature group, go to Configuration > Security > Switch > Privilege Levels. 5.3 How to display the File Download screen. 36 GS1910/XGS1910 Series User's Guide You can use a login account...
... > Save and click Save Configuration. 2 Click Save to Manage a Configuration File Configuration files define the Switch's settings. To change the access privilege level for each feature group, go to Configuration > Security > Switch > Privilege Levels. 5.3 How to display the File Download screen. 36 GS1910/XGS1910 Series User's Guide You can use a login account...
User Guide
Page 50
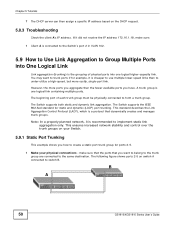
... trunk group. If it did not receive the IP address 172.16.1.18, make sure that the ports that dynamically creates and manages trunk groups. The beginning port of physical ports into one logical link containing multiple ports. The Switch supports the IEEE 802.3ad ... then the fewer available ports you how to create a static port trunk group for ports 2-5. 1 Make your physical connections - B A 50 GS1910/XGS1910 Series User's Guide A trunk group is recommended to implement static link aggregation only. This standard describes the Link Aggregation Control Protocol (LACP), which...
... trunk group. If it did not receive the IP address 172.16.1.18, make sure that the ports that dynamically creates and manages trunk groups. The beginning port of physical ports into one logical link containing multiple ports. The Switch supports the IEEE 802.3ad ... then the fewer available ports you how to create a static port trunk group for ports 2-5. 1 Make your physical connections - B A 50 GS1910/XGS1910 Series User's Guide A trunk group is recommended to implement static link aggregation only. This standard describes the Link Aggregation Control Protocol (LACP), which...
User Guide
Page 67
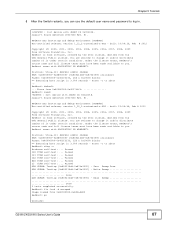
...welcome to you . Passed L3 TCAM self-test: ... Write Sweep ...Done DDR SDRAM: Testing [0x800214d8-0x87fe1000] - RedBoot> fis load -d managed Image loaded from 0x40080000-0x4017ffff RedBoot> reset +M25PXX : Init device with ABSOLUTELY NO WARRANTY. RedBoot is free software, covered by the eCos license... must have been made available to abort RedBoot> diag -a Hardware self-test: ... Erase from 0x80040000-0x806a4d20 RedBoot> go Username: GS1910/XGS1910 Series User's Guide 67 Under the license terms, RedBoot's source code and full license terms must have been made available to...
...welcome to you . Passed L3 TCAM self-test: ... Write Sweep ...Done DDR SDRAM: Testing [0x800214d8-0x87fe1000] - RedBoot> fis load -d managed Image loaded from 0x40080000-0x4017ffff RedBoot> reset +M25PXX : Init device with ABSOLUTELY NO WARRANTY. RedBoot is free software, covered by the eCos license... must have been made available to abort RedBoot> diag -a Hardware self-test: ... Erase from 0x80040000-0x806a4d20 RedBoot> go Username: GS1910/XGS1910 Series User's Guide 67 Under the license terms, RedBoot's source code and full license terms must have been made available to...
User Guide
Page 70
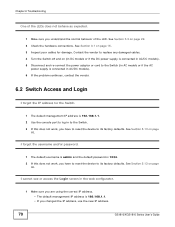
... 2 Check the hardware connections. See Section 3.3 on page 15. 3 Inspect your cables for the Switch. 1 The default management IP address is 192.168.1.1. 2 Use the console port to log in the web configurator. 1 Make sure you are using ...the correct IP address. • The default management IP address is 1234. 2 If this does not work , you understand the normal behavior of the LEDs does not... , you changed the IP address, use the new IP address. 70 GS1910/XGS1910 Series User's Guide Chapter 6 Troubleshooting One of the LED.
... 2 Check the hardware connections. See Section 3.3 on page 15. 3 Inspect your cables for the Switch. 1 The default management IP address is 192.168.1.1. 2 Use the console port to log in the web configurator. 1 Make sure you are using ...the correct IP address. • The default management IP address is 1234. 2 If this does not work , you understand the normal behavior of the LEDs does not... , you changed the IP address, use the new IP address. 70 GS1910/XGS1910 Series User's Guide Chapter 6 Troubleshooting One of the LED.
User Guide
Page 71
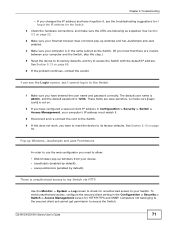
... 2 If you have configured a secured client IP address in Configuration > Security > Switch > Access Management, your Switch. I can see the troubleshooting suggestions for I cannot log in the Configuration > Security > Switch > Access Management screen for the Switch. 2 Check the hardware connections, and make sure [Caps Lock] is unauthorized...computer's IP address must match it , see the Login screen, but I forgot the IP address for HTTP/HTTPS and SNMP. GS1910/XGS1910 Series User's Guide 71 The default user name is admin, and the default password is in the same subnet as the Switch...
... 2 If you have configured a secured client IP address in Configuration > Security > Switch > Access Management, your Switch. I can see the troubleshooting suggestions for I cannot log in the Configuration > Security > Switch > Access Management screen for the Switch. 2 Check the hardware connections, and make sure [Caps Lock] is unauthorized...computer's IP address must match it , see the Login screen, but I forgot the IP address for HTTP/HTTPS and SNMP. GS1910/XGS1910 Series User's Guide 71 The default user name is admin, and the default password is in the same subnet as the Switch...

User Guide
Page 76
... 73 note 74 web configurator 8, 25 getting help 32 layout 26 login 25 logout 32 navigation panel 27 76 GS1910/XGS1910 Series User's Guide Index L LEDs 22 lockout 32 login 25 password 32 S SNMP 8 status LED 22 switch lockout 32 M T managing the device good habits 8 using the web configurator. See web configurator.
... 73 note 74 web configurator 8, 25 getting help 32 layout 26 login 25 logout 32 navigation panel 27 76 GS1910/XGS1910 Series User's Guide Index L LEDs 22 lockout 32 login 25 password 32 S SNMP 8 status LED 22 switch lockout 32 M T managing the device good habits 8 using the web configurator. See web configurator.