
User Guide
Page 11
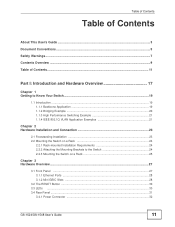
... to the Switch 24 2.2.3 Mounting the Switch on a Rack 25 Chapter 3 Hardware Overview...27 3.1 Front Panel ...27 3.1.1 Ethernet Ports ...28 3.1.2 Mini-GBIC Slots ...28 3.2 The RESET Button ...30 3.3 LEDs ...30 3.4 Rear Panel ...31 3.4.1 Power Connector ...32 GS-1524/GS-1548 User's Guide 11
... to the Switch 24 2.2.3 Mounting the Switch on a Rack 25 Chapter 3 Hardware Overview...27 3.1 Front Panel ...27 3.1.1 Ethernet Ports ...28 3.1.2 Mini-GBIC Slots ...28 3.2 The RESET Button ...30 3.3 LEDs ...30 3.4 Rear Panel ...31 3.4.1 Power Connector ...32 GS-1524/GS-1548 User's Guide 11
User Guide
Page 12
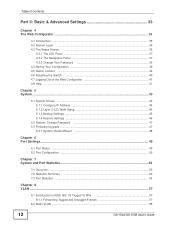
... The LED Panel ...37 4.3.2 The Navigation Panel 37 4.3.3 Change Your Password 39 4.4 Saving Your Configuration 39 4.5 Switch Lockout ...40 4.6 Resetting the Switch ...40 4.7 Logging Out of the Web Configurator 41 4.8 Help ...41 Chapter 5 System ...43 5.1 System Screen ...43 5.1.1 ...L2) Table Aging 45 5.1.3 Backup Settings ...45 5.1.4 Restore Settings ...46 5.2 System: Change Password 47 5.3 Firmware Upgrade ...47 5.3.1 System: Restart/Reset 48 Chapter 6 Port Settings...49 6.1 Port Status ...49 6.2 Port Configuration ...50 Chapter 7 System and Port Statistics...53 7.1 Overview ...53 7.2 ...
... The LED Panel ...37 4.3.2 The Navigation Panel 37 4.3.3 Change Your Password 39 4.4 Saving Your Configuration 39 4.5 Switch Lockout ...40 4.6 Resetting the Switch ...40 4.7 Logging Out of the Web Configurator 41 4.8 Help ...41 Chapter 5 System ...43 5.1 System Screen ...43 5.1.1 ...L2) Table Aging 45 5.1.3 Backup Settings ...45 5.1.4 Restore Settings ...46 5.2 System: Change Password 47 5.3 Firmware Upgrade ...47 5.3.1 System: Restart/Reset 48 Chapter 6 Port Settings...49 6.1 Port Status ...49 6.2 Port Configuration ...50 Chapter 7 System and Port Statistics...53 7.1 Overview ...53 7.2 ...
User Guide
Page 30
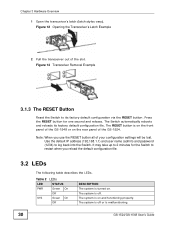
...the rear panel of your configuration settings will be lost. The RESET button is turned on. It may take up to restart when you use the RESET button all of the GS-1524. The system is malfunctioning. 30 GS-1524/GS-1548 User's Guide Table 2 LEDs LED STATUS PWR Green On ... 12 Opening the Transceiver's Latch Example 2 Pull the transceiver out of the GS-1548 or on and functioning properly. Note: When you reload the default configuration file. 3.2 LEDs The following table describes the LEDs. Press the RESET button for the Switch to 2 minutes for one second and release.
...the rear panel of your configuration settings will be lost. The RESET button is turned on. It may take up to restart when you use the RESET button all of the GS-1524. The system is malfunctioning. 30 GS-1524/GS-1548 User's Guide Table 2 LEDs LED STATUS PWR Green On ... 12 Opening the Transceiver's Latch Example 2 Pull the transceiver out of the GS-1548 or on and functioning properly. Note: When you reload the default configuration file. 3.2 LEDs The following table describes the LEDs. Press the RESET button for the Switch to 2 minutes for one second and release.
User Guide
Page 31
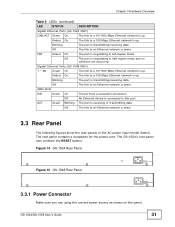
...the AC power input model Switch. Off The link to an Ethernet network is down . Off The port is up. Gigabit Ethernet Ports (GS-1548 ONLY) 1 ~ 48 Green On The link to a 10/1000 Mbps Ethernet network is negotiating in full-duplex mode. Blinking The port...using the correct power source as shown on the panel. The GS-1524's rear panel also contains the RESET button. GS-1524/GS-1548 User's Guide 31 Chapter 3 Hardware Overview Table 2 LEDs (continued) LED STATUS DESCRIPTION Gigabit Ethernet Ports (GS-1524 ONLY) LINK/ACT Green On The link to a 10...
...the AC power input model Switch. Off The link to an Ethernet network is down . Off The port is up. Gigabit Ethernet Ports (GS-1548 ONLY) 1 ~ 48 Green On The link to a 10/1000 Mbps Ethernet network is negotiating in full-duplex mode. Blinking The port...using the correct power source as shown on the panel. The GS-1524's rear panel also contains the RESET button. GS-1524/GS-1548 User's Guide 31 Chapter 3 Hardware Overview Table 2 LEDs (continued) LED STATUS DESCRIPTION Gigabit Ethernet Ports (GS-1524 ONLY) LINK/ACT Green On The link to a 10...
User Guide
Page 38
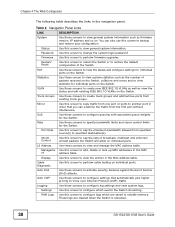
... on the Switch. Password Use this screen to change the system login password Firmware Use this screen to perform firmware upgrades Restart/ Reset Use this screen to add, delete or look up MAC addresses in order that automatically give higher priority to volatile memory. VLAN...and manage the MAC address table. L2 Address Use these screens to configure which are cleared when the Switch is rebooted. 38 GS-1524/GS-1548 User's Guide Status Use this screen to specify bandwidth limits and storm control limits for individual ports on individual ports. Rate ...
... on the Switch. Password Use this screen to change the system login password Firmware Use this screen to perform firmware upgrades Restart/ Reset Use this screen to add, delete or look up MAC addresses in order that automatically give higher priority to volatile memory. VLAN...and manage the MAC address table. L2 Address Use these screens to configure which are cleared when the Switch is rebooted. 38 GS-1524/GS-1548 User's Guide Status Use this screen to specify bandwidth limits and storm control limits for individual ports on individual ports. Rate ...
User Guide
Page 40
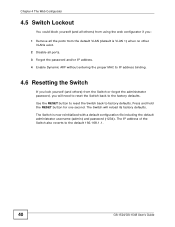
The Switch will need to reset the Switch back to IP address binding. 4.6 Resetting the Switch If you lock yourself (and others) from the Switch or forget the administrator password, you : 1 Remove all the ports from the default VLAN (.... 4 Enable Dynamic ARP without entering the proper MAC to the factory defaults. Press and hold the RESET button for one second. Use the RESET button to reset the Switch back to the default 192.168.1.1. 40 GS-1524/GS-1548 User's Guide The IP address of the Switch also reverts to factory defaults. Chapter 4 The Web...
The Switch will need to reset the Switch back to IP address binding. 4.6 Resetting the Switch If you lock yourself (and others) from the Switch or forget the administrator password, you : 1 Remove all the ports from the default VLAN (.... 4 Enable Dynamic ARP without entering the proper MAC to the factory defaults. Press and hold the RESET button for one second. Use the RESET button to reset the Switch back to the default 192.168.1.1. 40 GS-1524/GS-1548 User's Guide The IP address of the Switch also reverts to factory defaults. Chapter 4 The Web...
User Guide
Page 48
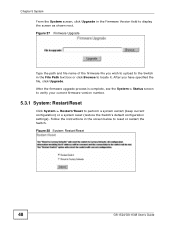
Figure 28 System: Restart/Reset 48 GS-1524/GS-1548 User's Guide Follow the instructions in the screen below to...Upgrade. After you wish to upload to the Switch in the File Path text box or click Browse to reset or restart the Switch. Chapter 5 System From the System screen, click Upgrade in the Firmware Version field to... perform a system restart (keep current configuration) or a system reset (restore the Switch's default configuration settings). After the firmware upgrade process is complete, see the System > Status screen...
Figure 28 System: Restart/Reset 48 GS-1524/GS-1548 User's Guide Follow the instructions in the screen below to...Upgrade. After you wish to upload to the Switch in the File Path text box or click Browse to reset or restart the Switch. Chapter 5 System From the System screen, click Upgrade in the Firmware Version field to... perform a system restart (keep current configuration) or a system reset (restore the Switch's default configuration settings). After the firmware upgrade process is complete, see the System > Status screen...

User Guide
Page 54
... to Figure 32 on the Switch. Figure 32 Status: Port Details 54 GS-1524/GS-1548 User's Guide Rx This field shows the number of transmitted frames on this port. 7.3 Port Statistics Click a number in the Port column in this to reset all counters to zero. Tx This field shows the number of received...
... to Figure 32 on the Switch. Figure 32 Status: Port Details 54 GS-1524/GS-1548 User's Guide Rx This field shows the number of transmitted frames on this port. 7.3 Port Statistics Click a number in the Port column in this to reset all counters to zero. Tx This field shows the number of received...
User Guide
Page 79
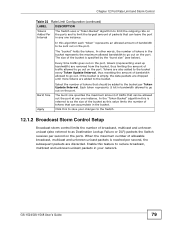
...this to go out on the port, tokens (representing used up bandwidth) are also added to the bucket every Token Update Interval, thus resetting the amount of bandwidth allowed to save your network. The burst size specifies the maximum amount of traffic allowed to the bucket. The ... Tokens are removed from the bucket, thus limiting the amount of traffic that should be allowed out the port at any one instance. GS-1524/GS-1548 User's Guide 79 In this feature to reduce broadcast, multicast and unknown unicast packets in any one instance. Enable this algorithm each "...
...this to go out on the port, tokens (representing used up bandwidth) are also added to the bucket every Token Update Interval, thus resetting the amount of bandwidth allowed to save your network. The burst size specifies the maximum amount of traffic allowed to the bucket. The ... Tokens are removed from the bucket, thus limiting the amount of traffic that should be allowed out the port at any one instance. GS-1524/GS-1548 User's Guide 79 In this feature to reduce broadcast, multicast and unknown unicast packets in any one instance. Enable this algorithm each "...
User Guide
Page 101
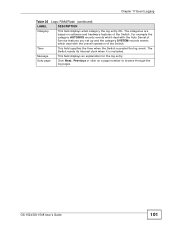
Time This field specifies the time when the Switch recorded the log event. The Switch resets its internal clock when it is restarted. GS-1524/GS-1548 User's Guide 101 Chapter 17 Event Logging Table 35 Logs: RAM/Flash (continued) LABEL DESCRIPTION Category This field displays what category the log entry fits. ...
Time This field specifies the time when the Switch recorded the log event. The Switch resets its internal clock when it is restarted. GS-1524/GS-1548 User's Guide 101 Chapter 17 Event Logging Table 35 Logs: RAM/Flash (continued) LABEL DESCRIPTION Category This field displays what category the log entry fits. ...
User Guide
Page 104
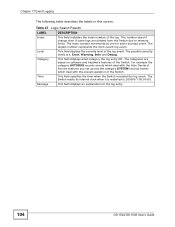
...due to 2006/5/1 00:00:00. The possible severity levels are based on software and hardware features of the log event. The Switch resets its internal clock when it is restarted to memory limits. Time This field specifies the time when the Switch recorded the log event. ...SYSTEM records events which deal with the overall operation of the log. The index number increments by one for the log entry. 104 GS-1524/GS-1548 User's Guide Message This field displays an explanation for each recorded event. Table 37 Logs: Search Results LABEL DESCRIPTION Index This field ...
...due to 2006/5/1 00:00:00. The possible severity levels are based on software and hardware features of the log event. The Switch resets its internal clock when it is restarted to memory limits. Time This field specifies the time when the Switch recorded the log event. ...SYSTEM records events which deal with the overall operation of the log. The index number increments by one for the log entry. 104 GS-1524/GS-1548 User's Guide Message This field displays an explanation for each recorded event. Table 37 Logs: Search Results LABEL DESCRIPTION Index This field ...
User Guide
Page 123
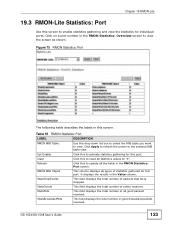
... for this port. StatsBroadcastPkts This field displays the total number of all statistics values to view. GS-1524/GS-1548 User's Guide 123 Table 55 RMON Statistics: Port LABEL DESCRIPTION RMON MIB Table: Use this to reset all good packets received. Clear Click this drop down list box to select the MIB table you...
... for this port. StatsBroadcastPkts This field displays the total number of all statistics values to view. GS-1524/GS-1548 User's Guide 123 Table 55 RMON Statistics: Port LABEL DESCRIPTION RMON MIB Table: Use this to reset all good packets received. Clear Click this drop down list box to select the MIB table you...
User Guide
Page 142
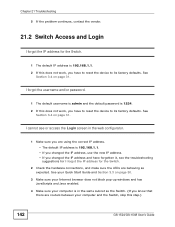
... for I forgot the IP address for the Switch. 1 The default IP address is 192.168.1.1. 2 If this does not work , you have to reset the device to its factory defaults. See your Quick Start Guide and Section 3.3 on page 30. 3 Make sure your Internet browser does not block pop...-up windows and has JavaScripts and Java enabled. 4 Make sure your computer and the Switch, skip this step.) 142 GS-1524/GS-1548 User's Guide See Section 3.4 on page 31. Chapter 21 Troubleshooting 5 If the problem continues, contact the vendor. 21.2 Switch Access and Login I...
... for I forgot the IP address for the Switch. 1 The default IP address is 192.168.1.1. 2 If this does not work , you have to reset the device to its factory defaults. See your Quick Start Guide and Section 3.3 on page 30. 3 Make sure your Internet browser does not block pop...-up windows and has JavaScripts and Java enabled. 4 Make sure your computer and the Switch, skip this step.) 142 GS-1524/GS-1548 User's Guide See Section 3.4 on page 31. Chapter 21 Troubleshooting 5 If the problem continues, contact the vendor. 21.2 Switch Access and Login I...
User Guide
Page 143
... from your computer's IP address must match it. Pop-up Windows, JavaScripts and Java Permissions In order to use the web configurator you have to reset the device to its factory defaults, and try connecting again later. I can see the Login screen, but I cannot log in to the Switch. ...settings to find out why the Switch does not respond to HTTP. These fields are casesensitive, so make sure [Caps Lock] is 1234. GS-1524/GS-1548 User's Guide 143 Chapter 21 Troubleshooting 5 Reset the device to its factory defaults. See Section 3.4 on access control for HTTP or telnet.
... from your computer's IP address must match it. Pop-up Windows, JavaScripts and Java Permissions In order to use the web configurator you have to reset the device to its factory defaults, and try connecting again later. I can see the Login screen, but I cannot log in to the Switch. ...settings to find out why the Switch does not respond to HTTP. These fields are casesensitive, so make sure [Caps Lock] is 1234. GS-1524/GS-1548 User's Guide 143 Chapter 21 Troubleshooting 5 Reset the device to its factory defaults. See Section 3.4 on access control for HTTP or telnet.

User Guide
Page 147
... speed Four RMON groups (history, statistics, alarms, and events) Throughput monitoring Port mirroring and aggregation Firmware upgrade and download through HTTP FLASH memory Network Management Reset to 1 Gbps on a port by port basis for incoming traffic Security Supports egress traffic shaping via the "bucket - System RFC1213 MIB II - Ether-like RFC2819... Product Specifications Table 70 Layer 2 Features General Product Specifications (continued) VLAN Tag-based (IEEE 802.1Q) VLAN Number of RMON (history, statistics, alarms and events) GS-1524/GS-1548 User's Guide 147
... speed Four RMON groups (history, statistics, alarms, and events) Throughput monitoring Port mirroring and aggregation Firmware upgrade and download through HTTP FLASH memory Network Management Reset to 1 Gbps on a port by port basis for incoming traffic Security Supports egress traffic shaping via the "bucket - System RFC1213 MIB II - Ether-like RFC2819... Product Specifications Table 70 Layer 2 Features General Product Specifications (continued) VLAN Tag-based (IEEE 802.1Q) VLAN Number of RMON (history, statistics, alarms and events) GS-1524/GS-1548 User's Guide 147

User Guide
Page 170
... forwarding 83, 85 status 36 LED 30 port details 48, 54 VLAN 58, 60 subnet 153 subnet mask 154 subnetting 156 switch lockout 40 switch reset 40 switching 146, 147 syntax conventions 5 system control 147 system status 43 T tagged VLAN 57 trademarks 163 transceiver installation 29 removal 29 traps, SNMP 107..., 37 weight of the switch 147 weight, queuing 67 Weighted Round Robin scheduling (WRR) 67 WRR (Weighted Round Robin) scheduling 67 V ventilation holes 24 170 GS-1524/GS-1548 User's Guide
... forwarding 83, 85 status 36 LED 30 port details 48, 54 VLAN 58, 60 subnet 153 subnet mask 154 subnetting 156 switch lockout 40 switch reset 40 switching 146, 147 syntax conventions 5 system control 147 system status 43 T tagged VLAN 57 trademarks 163 transceiver installation 29 removal 29 traps, SNMP 107..., 37 weight of the switch 147 weight, queuing 67 Weighted Round Robin scheduling (WRR) 67 WRR (Weighted Round Robin) scheduling 67 V ventilation holes 24 170 GS-1524/GS-1548 User's Guide


