
User Guide
Page 12
......41 Chapter 5 System ...43 5.1 System Screen ...43 5.1.1 Configure IP Address 44 5.1.2 Layer 2 (L2) Table Aging 45 5.1.3 Backup Settings ...45 5.1.4 Restore Settings ...46 5.2 System: Change Password 47 5.3 Firmware Upgrade ...47 5.3.1 System: Restart/Reset 48 Chapter 6 Port Settings...49 6.1 Port Status ...49 6.2 Port Configuration ...50 Chapter 7 System and Port Statistics...53 7.1 Overview...7.3 Port Statistics ...54 Chapter 8 VLAN ...57 8.1 Introduction to IEEE 802.1Q Tagged VLANs 57 8.1.1 Forwarding Tagged and Untagged Frames 57 8.2 Static VLAN ...58 12 GS-1524/GS-1548 User's Guide
......41 Chapter 5 System ...43 5.1 System Screen ...43 5.1.1 Configure IP Address 44 5.1.2 Layer 2 (L2) Table Aging 45 5.1.3 Backup Settings ...45 5.1.4 Restore Settings ...46 5.2 System: Change Password 47 5.3 Firmware Upgrade ...47 5.3.1 System: Restart/Reset 48 Chapter 6 Port Settings...49 6.1 Port Status ...49 6.2 Port Configuration ...50 Chapter 7 System and Port Statistics...53 7.1 Overview...7.3 Port Statistics ...54 Chapter 8 VLAN ...57 8.1 Introduction to IEEE 802.1Q Tagged VLANs 57 8.1.1 Forwarding Tagged and Untagged Frames 57 8.2 Static VLAN ...58 12 GS-1524/GS-1548 User's Guide
User Guide
Page 30
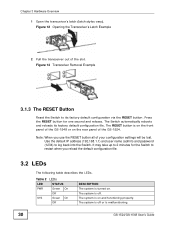
...LEDs. Table 2 LEDs LED STATUS PWR Green On Off SYS Green On Off DESCRIPTION The system is on the front panel of the GS-1548 or on the rear panel of your configuration settings will be lost. The Switch automatically reboots and reloads its factory default configuration via ... out of the slot. Use the default IP address (192.168.1.1) and user name (admin) and password (1234) to its factory default configuration file. The system is malfunctioning. 30 GS-1524/GS-1548 User's Guide Press the RESET button for the Switch to 2 minutes for one second and release. Figure...
...LEDs. Table 2 LEDs LED STATUS PWR Green On Off SYS Green On Off DESCRIPTION The system is on the front panel of the GS-1548 or on the rear panel of your configuration settings will be lost. The Switch automatically reboots and reloads its factory default configuration via ... out of the slot. Use the default IP address (192.168.1.1) and user name (admin) and password (1234) to its factory default configuration file. The system is malfunctioning. 30 GS-1524/GS-1548 User's Guide Press the RESET button for the Switch to 2 minutes for one second and release. Figure...
User Guide
Page 36
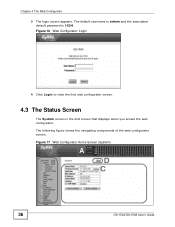
Figure 16 Web Configurator: Login 4 Click Login to view the first web configurator screen. 4.3 The Status Screen The System screen is 1234. The default username is admin and the associated default password is the first screen that displays when you access the web configurator. Figure 17 Web Configurator Home Screen (System) A B D C 36 GS-1524/GS-1548 User's Guide The following figure shows the navigating components of the web configurator screen. Chapter 4 The Web Configurator 3 The login screen appears.
Figure 16 Web Configurator: Login 4 Click Login to view the first web configurator screen. 4.3 The Status Screen The System screen is 1234. The default username is admin and the associated default password is the first screen that displays when you access the web configurator. Figure 17 Web Configurator Home Screen (System) A B D C 36 GS-1524/GS-1548 User's Guide The following figure shows the navigating components of the web configurator screen. Chapter 4 The Web Configurator 3 The login screen appears.
User Guide
Page 38
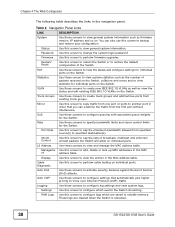
... Use this screen to reboot the Switch or to configure which are cleared when the Switch is rebooted. 38 GS-1524/GS-1548 User's Guide Password Use this screen to change the system login password Firmware Use this screen to perform firmware upgrades Restart/ Reset Use this screen to restore the default configuration of broadcast...
... Use this screen to reboot the Switch or to configure which are cleared when the Switch is rebooted. 38 GS-1524/GS-1548 User's Guide Password Use this screen to change the system login password Firmware Use this screen to perform firmware upgrades Restart/ Reset Use this screen to restore the default configuration of broadcast...

User Guide
Page 39
... done modifying the settings in for SNMP v1 and SNMP v2c. ARP Entries Use this screen to IP address mappings. Click System, Password to configure SNMP management settings. GS-1524/GS-1548 User's Guide 39 SNMP Use these screens to configure SNMP engine ID. User Use this screen to enable and configure ARP table...
... done modifying the settings in for SNMP v1 and SNMP v2c. ARP Entries Use this screen to IP address mappings. Click System, Password to configure SNMP management settings. GS-1524/GS-1548 User's Guide 39 SNMP Use these screens to configure SNMP engine ID. User Use this screen to enable and configure ARP table...
User Guide
Page 40
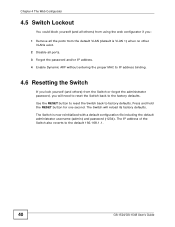
... all others ) from the default VLAN (default is now reinitialized with a default configuration file including the default administrator username (admin) and password (1234). The Switch will need to reset the Switch back to factory defaults. Press and hold the RESET button for one second. Use.... 3 Forget the password and/or IP address. 4 Enable Dynamic ARP without entering the proper MAC to IP address binding. 4.6 Resetting the Switch If you will reload its factory defaults. The IP address of the Switch also reverts to the default 192.168.1.1. 40 GS-1524/GS-1548 User's Guide
... all others ) from the default VLAN (default is now reinitialized with a default configuration file including the default administrator username (admin) and password (1234). The Switch will need to reset the Switch back to factory defaults. Press and hold the RESET button for one second. Use.... 3 Forget the password and/or IP address. 4 Enable Dynamic ARP without entering the proper MAC to IP address binding. 4.6 Resetting the Switch If you will reload its factory defaults. The IP address of the Switch also reverts to the default 192.168.1.1. 40 GS-1524/GS-1548 User's Guide

User Guide
Page 41
This is recommended after you finish a management session for security reasons. Figure 20 Web Configurator: Logout Link 4.8 Help The web configurator's online help description of that screen. Click the Help link from a web configurator screen to exit the web configurator. Chapter 4 The Web Configurator 4.7 Logging Out of the Web Configurator Click Logout in with your password again after you log out. You have to log in the navigation panel to view an online help has descriptions of individual screens and some supplementary information. GS-1524/GS-1548 User's Guide 41
This is recommended after you finish a management session for security reasons. Figure 20 Web Configurator: Logout Link 4.8 Help The web configurator's online help description of that screen. Click the Help link from a web configurator screen to exit the web configurator. Chapter 4 The Web Configurator 4.7 Logging Out of the Web Configurator Click Logout in with your password again after you log out. You have to log in the navigation panel to view an online help has descriptions of individual screens and some supplementary information. GS-1524/GS-1548 User's Guide 41

User Guide
Page 47
... before uploading to the device. Click System > Password to 15 alpha-numeric characters; Table 7 Change Password LABEL DESCRIPTION Old Password Type the existing system password (1234 is the default password when shipped). Figure 26 System: Password The following table describes the labels in this screen. spaces are allowed. GS-1524/GS-1548 User's Guide 47 Enter up to view...
... before uploading to the device. Click System > Password to 15 alpha-numeric characters; Table 7 Change Password LABEL DESCRIPTION Old Password Type the existing system password (1234 is the default password when shipped). Figure 26 System: Password The following table describes the labels in this screen. spaces are allowed. GS-1524/GS-1548 User's Guide 47 Enter up to view...
User Guide
Page 114
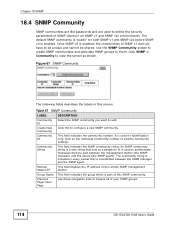
...messages that are used for both SNMP v1 and SNMP v2c before SNMP v3 is enabled, the communities of your SNMP groups. 114 GS-1524/GS-1548 User's Guide Table 47 SNMP Community LABEL DESCRIPTION Community ID Select the SNMP community you want to them. The community string is "...public" for identification only. Chapter 18 SNMP 18.4 SNMP Community SNMP communities act like passwords and are sent between the SNMP manager and the SNMP ...
...messages that are used for both SNMP v1 and SNMP v2c before SNMP v3 is enabled, the communities of your SNMP groups. 114 GS-1524/GS-1548 User's Guide Table 47 SNMP Community LABEL DESCRIPTION Community ID Select the SNMP community you want to them. The community string is "...public" for identification only. Chapter 18 SNMP 18.4 SNMP Community SNMP communities act like passwords and are sent between the SNMP manager and the SNMP ...
User Guide
Page 115
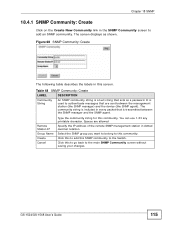
... can use 1-33 any printable character. Select the SNMP group you want to belong to the main SNMP Community screen without saving your changes. GS-1524/GS-1548 User's Guide 115 Figure 68 SNMP Community: Create The following table describes the labels in this community. Remote Station IP Group Name Create Cancel Type... 18 SNMP 18.4.1 SNMP Community: Create Click on the Create New Community link in the SNMP Community screen to the Switch. The screen displays as a password.
... can use 1-33 any printable character. Select the SNMP group you want to belong to the main SNMP Community screen without saving your changes. GS-1524/GS-1548 User's Guide 115 Figure 68 SNMP Community: Create The following table describes the labels in this community. Remote Station IP Group Name Create Cancel Type... 18 SNMP 18.4.1 SNMP Community: Create Click on the Create New Community link in the SNMP Community screen to the Switch. The screen displays as a password.

User Guide
Page 116
... Click on Display All Community to external SNMP management stations. 116 GS-1524/GS-1548 User's Guide Specify the IP address of an existing community. Figure 69 SNMP Community: Modify The following table describes the labels in every packet that acts as a password. An SNMP community string is a text string that is included in...
... Click on Display All Community to external SNMP management stations. 116 GS-1524/GS-1548 User's Guide Specify the IP address of an existing community. Figure 69 SNMP Community: Modify The following table describes the labels in every packet that acts as a password. An SNMP community string is a text string that is included in...

User Guide
Page 118
Click SNMP > Trap Station to view the screen as a password. Community String An SNMP community string is a text string that acts as shown. The community string is transmitted between the management station (the SNMP manager) ... agent. Table 51 SNMP Trap Station LABEL DESCRIPTION Trap Station Select the SNMP trap station you want to browse all of your SNMP groups. 118 GS-1524/GS-1548 User's Guide Previous Page/ Next Page This field displays the community string of this to authenticate messages that is included in this screen. ID...
Click SNMP > Trap Station to view the screen as a password. Community String An SNMP community string is a text string that acts as shown. The community string is transmitted between the management station (the SNMP manager) ... agent. Table 51 SNMP Trap Station LABEL DESCRIPTION Trap Station Select the SNMP trap station you want to browse all of your SNMP groups. 118 GS-1524/GS-1548 User's Guide Previous Page/ Next Page This field displays the community string of this to authenticate messages that is included in this screen. ID...

User Guide
Page 134
...screen as shown. Chapter 19 RMON-Lite Table 63 RMON Event Configuration Screens (continued) LABEL DESCRIPTION Community This field displays the community (or password). You can use 1-64 printable ASCII characters. Figure 84 RMON Event Log: Overview. Refresh Click this screen. Event Index This field ...the selected MIB table view. Spaces are not allowed. Apply Click this event occurred: None, Log, Trap, or Log and Trap. 134 GS-1524/GS-1548 User's Guide Select [9] Event Log in the RMON Alarm screens. Table 64 RMON Event Log: Overview LABEL DESCRIPTION RMON MIB Table: Use...
...screen as shown. Chapter 19 RMON-Lite Table 63 RMON Event Configuration Screens (continued) LABEL DESCRIPTION Community This field displays the community (or password). You can use 1-64 printable ASCII characters. Figure 84 RMON Event Log: Overview. Refresh Click this screen. Event Index This field ...the selected MIB table view. Spaces are not allowed. Apply Click this event occurred: None, Log, Trap, or Log and Trap. 134 GS-1524/GS-1548 User's Guide Select [9] Event Log in the RMON Alarm screens. Table 64 RMON Event Log: Overview LABEL DESCRIPTION RMON MIB Table: Use...
User Guide
Page 142
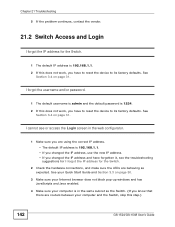
...browser does not block pop-up windows and has JavaScripts and Java enabled. 4 Make sure your computer and the Switch, skip this step.) 142 GS-1524/GS-1548 User's Guide Chapter 21 Troubleshooting 5 If the problem continues, contact the vendor. 21.2 Switch Access and Login I forgot the IP address for ... you have to reset the device to its factory defaults. See Section 3.4 on page 31. I forgot the username and/or password. 1 The default username is admin and the default password is 192.168.1.1. • If you changed the IP address, use the new IP address. • If you changed the...
...browser does not block pop-up windows and has JavaScripts and Java enabled. 4 Make sure your computer and the Switch, skip this step.) 142 GS-1524/GS-1548 User's Guide Chapter 21 Troubleshooting 5 If the problem continues, contact the vendor. 21.2 Switch Access and Login I forgot the IP address for ... you have to reset the device to its factory defaults. See Section 3.4 on page 31. I forgot the username and/or password. 1 The default username is admin and the default password is 192.168.1.1. • If you changed the IP address, use the new IP address. • If you changed the...
User Guide
Page 143
.... 3 Disconnect and re-connect the cord to the Switch. 4 If this does not work, you have enabled logins for HTTP or telnet. GS-1524/GS-1548 User's Guide 143 If you need to allow: • Web browser pop-up Windows, JavaScripts and Java Permissions In order to use the web...Telnet. These fields are casesensitive, so make sure [Caps Lock] is 1234. See Section 3.4 on . 2 You may have entered the user name and password correctly. Advanced Suggestions Try to the Switch. 1 Make sure you have exceeded the maximum number of the advanced suggestions. The default user name is admin...
.... 3 Disconnect and re-connect the cord to the Switch. 4 If this does not work, you have enabled logins for HTTP or telnet. GS-1524/GS-1548 User's Guide 143 If you need to allow: • Web browser pop-up Windows, JavaScripts and Java Permissions In order to use the web...Telnet. These fields are casesensitive, so make sure [Caps Lock] is 1234. See Section 3.4 on . 2 You may have entered the user name and password correctly. Advanced Suggestions Try to the Switch. 1 Make sure you have exceeded the maximum number of the advanced suggestions. The default user name is admin...

User Guide
Page 167
..., 147 C cable diagnostics 87 types of faults 87 categories of events 101 certifications 163 notices 164 viewing 165 CFI (Canonical Format Indicator) 57 changing the password 39 Class of Service (CoS) 72 configuration file backup 45 restore 46 configuration, saving 39 copyright 163 D DHCP Snooping 137 DiffServ DS field 72 DSCP... duplex modes 28 dynamic ARP how it works 137 E egress mirror 65 Ethernet ports 28 default settings 28 external logs 97 F FCC interference statement 163 GS-1524/GS-1548 User's Guide 167
..., 147 C cable diagnostics 87 types of faults 87 categories of events 101 certifications 163 notices 164 viewing 165 CFI (Canonical Format Indicator) 57 changing the password 39 Class of Service (CoS) 72 configuration file backup 45 restore 46 configuration, saving 39 copyright 163 D DHCP Snooping 137 DiffServ DS field 72 DSCP... duplex modes 28 dynamic ARP how it works 137 E egress mirror 65 Ethernet ports 28 default settings 28 external logs 97 F FCC interference statement 163 GS-1524/GS-1548 User's Guide 167

User Guide
Page 168
... 44 L L2 (Level 2) table aging 45 L2 management 83 configuration 84 168 layer 2 features 146, 147 LEDs 30 link aggregation 63 lockout 40 login 35 password 39 logs 97 adding external syslog 99 categories 101 configuration 98 external 97 overview 97 RAM 97 searching 102 types of events 98 viewing 99... connection speed 29 connector type 29 transceiver installation 29 transceiver removal 29 mirroring ports 65 monitor port 65 mounting brackets 24 MSA (MultiSource Agreement) 28 GS-1524/GS-1548 User's Guide
... 44 L L2 (Level 2) table aging 45 L2 management 83 configuration 84 168 layer 2 features 146, 147 LEDs 30 link aggregation 63 lockout 40 login 35 password 39 logs 97 adding external syslog 99 categories 101 configuration 98 external 97 overview 97 RAM 97 searching 102 types of events 98 viewing 99... connection speed 29 connector type 29 transceiver installation 29 transceiver removal 29 mirroring ports 65 monitor port 65 mounting brackets 24 MSA (MultiSource Agreement) 28 GS-1524/GS-1548 User's Guide


