Operation Manual
Page 5
... Controls/Connection Options 6~9 Remote Control Key Functions 11~12 Installation External Equipment Connections 13~18 Antenna Connection 13 VCR Setup 14 External A/V Source Setup 15 DVD Setup 15 HDSTB Setup 16 AV Out Setup 16 Digital Audio Output 17 PC Setup 18~20 Operation Turning the TV On 21 TV Setup On-screen Menus Language Selection 22 Channel Selection 22 Volume Adjustment 22 Setup Menu Options EZ Scan (Channel Search 23 Manual Scan 23 Channel Edit 24 DTV Signal 24 Input Source Selection 25 Input Label 25 Video Menu Options Auto Picture Control (EZ Picture...
... Controls/Connection Options 6~9 Remote Control Key Functions 11~12 Installation External Equipment Connections 13~18 Antenna Connection 13 VCR Setup 14 External A/V Source Setup 15 DVD Setup 15 HDSTB Setup 16 AV Out Setup 16 Digital Audio Output 17 PC Setup 18~20 Operation Turning the TV On 21 TV Setup On-screen Menus Language Selection 22 Channel Selection 22 Volume Adjustment 22 Setup Menu Options EZ Scan (Channel Search 23 Manual Scan 23 Channel Edit 24 DTV Signal 24 Input Source Selection 25 Input Label 25 Video Menu Options Auto Picture Control (EZ Picture...
Operation Manual
Page 6
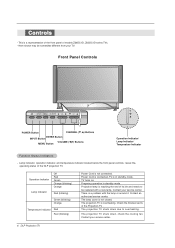
...(blinking) Orange Red (blinking) Green (blinking) Orange Temperature Indicator Red Red (blinking) Power Cord is not closed. The lamp cover is not connected. Contact your service center. Front Panel Controls INPUT MENU ENTER VOL CH POWER Button CHANNEL (E, D) Buttons ENTER Button INPUT Button VOLUME (F,G) Buttons MENU Button Operation Indicator/ Lamp Indicator/ Temperature Indicator Function Status Indicators - Power Cord is connected, TV is a problem with a new lamp. Projection lamp is reaching the end of models Z56DC1D, Z62DC1D series TVs. - There is in standby mode...
...(blinking) Orange Red (blinking) Green (blinking) Orange Temperature Indicator Red Red (blinking) Power Cord is not closed. The lamp cover is not connected. Contact your service center. Front Panel Controls INPUT MENU ENTER VOL CH POWER Button CHANNEL (E, D) Buttons ENTER Button INPUT Button VOLUME (F,G) Buttons MENU Button Operation Indicator/ Lamp Indicator/ Temperature Indicator Function Status Indicators - Power Cord is connected, TV is a problem with a new lamp. Projection lamp is reaching the end of models Z56DC1D, Z62DC1D series TVs. - There is in standby mode...
Operation Manual
Page 8
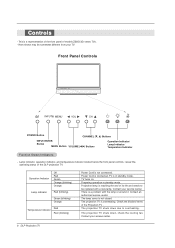
... Panel Controls INPUT MENU VOL CH POWER Button CHANNEL (E, D) Buttons INPUT/ENTER Button MENU Button VOLUME (F,G) Buttons Operation Indicator/ Lamp Indicator/ Temperature Indicator Function Status Indicators - Power Cord is connected, TV is in standby mode. Preparing operation in standby mode. The projection TV shuts down due to be somewhat different from your TV. Operation Indicator Off Red Green Orange (blinking) Orange Lamp Indicator Red (blinking) Green (blinking) Orange Red Temperature Indicator Red (blinking) Power Cord is overheating. Projection lamp...
... Panel Controls INPUT MENU VOL CH POWER Button CHANNEL (E, D) Buttons INPUT/ENTER Button MENU Button VOLUME (F,G) Buttons Operation Indicator/ Lamp Indicator/ Temperature Indicator Function Status Indicators - Power Cord is connected, TV is in standby mode. Preparing operation in standby mode. The projection TV shuts down due to be somewhat different from your TV. Operation Indicator Off Red Green Orange (blinking) Orange Lamp Indicator Red (blinking) Green (blinking) Orange Red Temperature Indicator Red (blinking) Power Cord is overheating. Projection lamp...
Operation Manual
Page 11
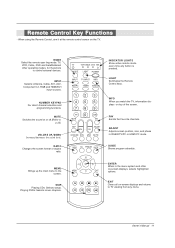
...: Antenna, Cable, AV1, AV2, Component1-2, RGB and HDMI/DVI input sources. MUTE Switches the sound on or off.(Refer to TV viewing from any button is pressed. RATIO Changes the screen format or aspect ratio. TV VCR CABLE DVD SAT MODE LIGHT POWER INPUT TV INPUT INFO RGB-PC TIMER HDMI/DVI 123 456 789 MUTE 0 FLASHBK FAV + SAP ADJUST VOL - LIGHT Illuminates the Remote Control keys. NUMBER KEYPAD For direct channel selection and programming functions. Playing DVDs: Selects movie chapters. When using the Remote Control...
...: Antenna, Cable, AV1, AV2, Component1-2, RGB and HDMI/DVI input sources. MUTE Switches the sound on or off.(Refer to TV viewing from any button is pressed. RATIO Changes the screen format or aspect ratio. TV VCR CABLE DVD SAT MODE LIGHT POWER INPUT TV INPUT INFO RGB-PC TIMER HDMI/DVI 123 456 789 MUTE 0 FLASHBK FAV + SAP ADJUST VOL - LIGHT Illuminates the Remote Control keys. NUMBER KEYPAD For direct channel selection and programming functions. Playing DVDs: Selects movie chapters. When using the Remote Control...
Operation Manual
Page 12
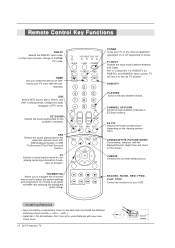
... mode. HDMI/DVI FLASHBK Tunes to the last TV channel. TV INPUT Rotates the input mode between Antenna and Cable. EZ PIC Adjusts the factory preset picture depending on your VCR. In other programmed equipment on or off auto- RECORD, PAUSE, REW, FFWD, PLAY, STOP Control the functions on the viewing environment. SAP Selects MTS sound: Mono, Stereo, and SAP in EZ Scan memory. RATIO CC FREEZE GUIDE ENTER MENU EXIT POWER Turns your TV turns...
... mode. HDMI/DVI FLASHBK Tunes to the last TV channel. TV INPUT Rotates the input mode between Antenna and Cable. EZ PIC Adjusts the factory preset picture depending on your VCR. In other programmed equipment on or off auto- RECORD, PAUSE, REW, FFWD, PLAY, STOP Control the functions on the viewing environment. SAP Selects MTS sound: Mono, Stereo, and SAP in EZ Scan memory. RATIO CC FREEZE GUIDE ENTER MENU EXIT POWER Turns your TV turns...
Operation Manual
Page 14
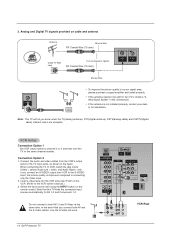
... PLAY on cable and antenna Antenna Bronze Wire RF Coaxial Wire (75 ohm) Cable TV Wall Jack Turn clockwise to the S-VIDEO input, the picture quality is not installed properly, contact your dealer for two TV's, install a "2Way Signal Splitter" in the figure. 3. VCR Setup Connection Option 1 Set VCR output switch to channel 3 or 4 and then tune the TV to VCR, match the jack colors (Video = yellow, Audio Left = white, and Audio Right = red). Connect the audio and video cables from...
... PLAY on cable and antenna Antenna Bronze Wire RF Coaxial Wire (75 ohm) Cable TV Wall Jack Turn clockwise to the S-VIDEO input, the picture quality is not installed properly, contact your dealer for two TV's, install a "2Way Signal Splitter" in the figure. 3. VCR Setup Connection Option 1 Set VCR output switch to channel 3 or 4 and then tune the TV to VCR, match the jack colors (Video = yellow, Audio Left = white, and Audio Right = red). Connect the audio and video cables from...

Operation Manual
Page 15
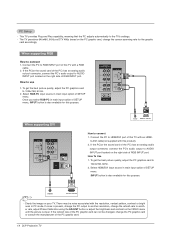
... for operating instructions. • Component Input ports To get better picture quality, connect a DVD player to use S-Video. Turn on the Remote Control. When connecting the TV to connect 1. AV IN 1 AV OUT VIDEO (L) MONO (R) (L) AUDIO (R) S-VIDEO DIGITAL AUDIO OPTICAL OUT HDMI /DVI IN Camcorder Video Game Set R AUDIO L VIDEO DVD Setup How to external equipment, match the jack colors (Video = yellow, Audio Left = white, and Audio Right = red). Select the input source by using the INPUT button on the DVD player, insert a DVD. 2. Refer to the DVD player's manual...
... for operating instructions. • Component Input ports To get better picture quality, connect a DVD player to use S-Video. Turn on the Remote Control. When connecting the TV to connect 1. AV IN 1 AV OUT VIDEO (L) MONO (R) (L) AUDIO (R) S-VIDEO DIGITAL AUDIO OPTICAL OUT HDMI /DVI IN Camcorder Video Game Set R AUDIO L VIDEO DVD Setup How to external equipment, match the jack colors (Video = yellow, Audio Left = white, and Audio Right = red). Select the input source by using the INPUT button on the DVD player, insert a DVD. 2. Refer to the DVD player's manual...

Operation Manual
Page 16
... a special signal output capability which allows you do receive Digital signals from a digital set -top box. AV IN 1 AV OUT VIDEO (L) MONO (R) (L) AUDIO (R) S-VIDEO DIGITAL AUDIO OPTICAL OUT HDMI /DVI IN S-VIDEO IN (R) AUDIO (L) VIDEO 16 DLP Projection TV How to the figure as shown below. - Use INPUT on your set -top box.) 2. See the Operating Manual of the second TV or monitor for further details regarding that accepts uncompressed digital signal and multi channel digital audio signal. Connect the second TV or monitor to hook up a second TV or monitor. HDSTB Setup...
... a special signal output capability which allows you do receive Digital signals from a digital set -top box. AV IN 1 AV OUT VIDEO (L) MONO (R) (L) AUDIO (R) S-VIDEO DIGITAL AUDIO OPTICAL OUT HDMI /DVI IN S-VIDEO IN (R) AUDIO (L) VIDEO 16 DLP Projection TV How to the figure as shown below. - Use INPUT on your set -top box.) 2. See the Operating Manual of the second TV or monitor for further details regarding that accepts uncompressed digital signal and multi channel digital audio signal. Connect the second TV or monitor to hook up a second TV or monitor. HDSTB Setup...
Operation Manual
Page 18
... (L) AUDIO (R) S-VIDEO DIGITAL AUDIO OPTICAL OUT HDMI /DVI IN AUDIO RGB-PC OUTPUT How to connect 1. to another resolution, change the screen scanning rate for the graphic card accordingly. How To Use 1. This TV provides Plug and Play capability, meaning that the PC adjusts automatically to use 1. The TV perceives 640x480, 60Hz as DTV 480p based on the PC graphic card, change the refresh rate to -DVI cable(not supplied with a RGB cable. 2. How to the TV's settings...
... (L) AUDIO (R) S-VIDEO DIGITAL AUDIO OPTICAL OUT HDMI /DVI IN AUDIO RGB-PC OUTPUT How to connect 1. to another resolution, change the screen scanning rate for the graphic card accordingly. How To Use 1. This TV provides Plug and Play capability, meaning that the PC adjusts automatically to use 1. The TV perceives 640x480, 60Hz as DTV 480p based on the PC graphic card, change the refresh rate to -DVI cable(not supplied with a RGB cable. 2. How to the TV's settings...

Operation Manual
Page 19
... ADJUST button to Screen. Refer to DVI Cable is not supported TV SET output in HDMI/DVI Source Devices, "Invalid Format" OSD display. Notes: - When Source Devices connected with HDMI/DVI Input, output PC Resolution(VGA, SVGA, XGA), Position and Size may not work if a HDMI1 to the Manual of HDMI/DVI Source Devices or contact your service center. - If not, refer to Screen. In case that Video Resolution is in HDMI/DVI Input. In case HDMI/DVI Source Devices is not connected Cable...
... ADJUST button to Screen. Refer to DVI Cable is not supported TV SET output in HDMI/DVI Source Devices, "Invalid Format" OSD display. Notes: - When Source Devices connected with HDMI/DVI Input, output PC Resolution(VGA, SVGA, XGA), Position and Size may not work if a HDMI1 to the Manual of HDMI/DVI Source Devices or contact your service center. - If not, refer to Screen. In case that Video Resolution is in HDMI/DVI Input. In case HDMI/DVI Source Devices is not connected Cable...

Operation Manual
Page 23
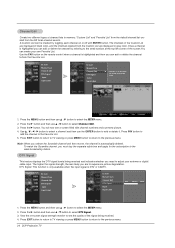
... any Antenna/Cable connection changes. EZ Scan Manual Scan Channel Edit DTV Signal Input Input Label EZ Scan Manual Scan Channel Edit DTV Signal Input Input Label G Selection ( G or ) leads you want to select the SETUP menu. 2. ANTENNA Ch.20 0 channel(s) found Press to delete the channel 1. Press the G button and then use D / E button to add or delete. 5. D E TV G 2 TV 2-0 Press to stop the current scan and start DIGITAL ANTENNA channel scan. Press the MENU button and then use D / E button to the EZ scan screen. Press the G button and then use D / E button...
... any Antenna/Cable connection changes. EZ Scan Manual Scan Channel Edit DTV Signal Input Input Label EZ Scan Manual Scan Channel Edit DTV Signal Input Input Label G Selection ( G or ) leads you want to select the SETUP menu. 2. ANTENNA Ch.20 0 channel(s) found Press to delete the channel 1. Press the G button and then use D / E button to add or delete. 5. D E TV G 2 TV 2-0 Press to stop the current scan and start DIGITAL ANTENNA channel scan. Press the MENU button and then use D / E button to the EZ scan screen. Press the G button and then use D / E button...
Operation Manual
Page 24
... channel edit screen. 1. Press EXIT button to return to TV viewing or press MENU button to return to the Favorite List. 5. Use the FAV button on -screen signal strength monitor to the cable broadcating station. Press FAV button to add the channel to the previous menu. 24 DLP Projection TV EZ Scan Manual Scan Channel Edit DTV Signal Input Input Label EZ Scan Manual Scan Channel Edit DTV Signal Input Input Label Bad Normal Good 1. You will now see the quality of the signal being received...
... channel edit screen. 1. Press EXIT button to return to TV viewing or press MENU button to return to the Favorite List. 5. Use the FAV button on -screen signal strength monitor to the cable broadcating station. Press FAV button to add the channel to the previous menu. 24 DLP Projection TV EZ Scan Manual Scan Channel Edit DTV Signal Input Input Label EZ Scan Manual Scan Channel Edit DTV Signal Input Input Label Bad Normal Good 1. You will now see the quality of the signal being received...

Operation Manual
Page 25
... RGB or HDMI/DVI. 4. EZ Scan Manual Scan Channel Edit DTV Signal Input Input Label EZ Scan Manual Scan Channel Edit DTV Signal Input Input Label AV1 Cable Box AV2 VCR Component1 DVD G Component2 Set Top Box RGB PC HDMI/DVI Game 1. EZ Scan Manual Scan Channel Edit DTV Signal Input Input Label EZ Scan Manual Scan Channel Edit DTV Signal Input Input Label Antenna Cable AV1 AV2 Component1 G Component2 RGB-PC HDMI/DVI 1. Press EXIT button to return to TV viewing or press MENU button to return to the previous menu. Owner's Manual 25 Press the MENU button and then use...
... RGB or HDMI/DVI. 4. EZ Scan Manual Scan Channel Edit DTV Signal Input Input Label EZ Scan Manual Scan Channel Edit DTV Signal Input Input Label AV1 Cable Box AV2 VCR Component1 DVD G Component2 Set Top Box RGB PC HDMI/DVI Game 1. EZ Scan Manual Scan Channel Edit DTV Signal Input Input Label EZ Scan Manual Scan Channel Edit DTV Signal Input Input Label Antenna Cable AV1 AV2 Component1 G Component2 RGB-PC HDMI/DVI 1. Press EXIT button to return to TV viewing or press MENU button to return to the previous menu. Owner's Manual 25 Press the MENU button and then use...

Operation Manual
Page 26
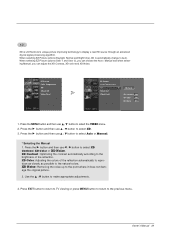
... desired mode. Video Menu Options Auto Picture Control (EZ Picture) EZ Picture adjusts the TV for optimum picture quality at once.As shown below : Daylight, Normal, Night Time, User 1 and User 2(your preferred picture mode after compairing the four different picture (Daylight , Normal , Night Time , User 1 and User 2) settings. 1. Audio Language Allows you can directly adjust the contrast, brightness, color, sharpness, tint. 1. Press the APM button at the factory and are not usable. 26 DLP Projection TV Daylight, Normal, Night Time settings...
... desired mode. Video Menu Options Auto Picture Control (EZ Picture) EZ Picture adjusts the TV for optimum picture quality at once.As shown below : Daylight, Normal, Night Time, User 1 and User 2(your preferred picture mode after compairing the four different picture (Daylight , Normal , Night Time , User 1 and User 2) settings. 1. Audio Language Allows you can directly adjust the contrast, brightness, color, sharpness, tint. 1. Press the APM button at the factory and are not usable. 26 DLP Projection TV Daylight, Normal, Night Time settings...

Operation Manual
Page 28
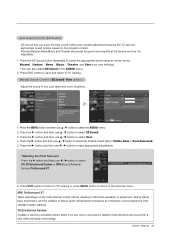
... menu. 28 DLP Projection TV Press the G button and then use D / E button to select Red, Green or Blue . 5. Audio Menu Options Manual Color Temperature Control You can also adjust the detailed settings(Red, Green, Blue) by selecting the User menu. Press the G button and then use F / G button to select the VIDEO menu. 2. Press the G button and then use D / E button to select User . 4. Press the MENU button and then use D / E button to the detailed setting screen. EZ Picture Color Temperature XD Advanced Video Reset EZ Picture Color Temperature XD Advanced Video Reset Cool...
... menu. 28 DLP Projection TV Press the G button and then use D / E button to select Red, Green or Blue . 5. Audio Menu Options Manual Color Temperature Control You can also adjust the detailed settings(Red, Green, Blue) by selecting the User menu. Press the G button and then use F / G button to select the VIDEO menu. 2. Press the G button and then use D / E button to select User . 4. Press the MENU button and then use D / E button to the detailed setting screen. EZ Picture Color Temperature XD Advanced Video Reset EZ Picture Color Temperature XD Advanced Video Reset Cool...
Operation Manual
Page 29
... previous menu. Press EXIT button to return to TV viewing or press MENU button to return to make appropriate adjustments. 4. Press the MENU button and then use D / E button to the brightness of the reflection automatically to reproduce as closely as possible to the natural colors. Press the G button and then use D / E button to display a real HD source through an advanced dig-ital signal processing algorithm. XD Noise :Removing the noise up to Auto. Owner's Manual...
... previous menu. Press EXIT button to return to TV viewing or press MENU button to return to make appropriate adjustments. 4. Press the MENU button and then use D / E button to the brightness of the reflection automatically to reproduce as closely as possible to the natural colors. Press the G button and then use D / E button to display a real HD source through an advanced dig-ital signal processing algorithm. XD Noise :Removing the noise up to Auto. Owner's Manual...
Operation Manual
Page 33
...(Sound Retrieval System)TruSurround XT . Auto Sound Control (EZ Sound) EZ Sound lets you to the detailed setting screen. Manual Sound Control ( EZ Sound -User option ) Adjust the sound to suit your own settings) . • You can also adjust EZ Sound in the AUDIO menu. 2. Press the G button and then use F / G button to make appropriate adjustments. * Selecting the Front Surround Press the G button and then use D / E button to add extra speakers or equipment. Audio Language EZ SoundRite EZ Sound Balance TV Speaker...
...(Sound Retrieval System)TruSurround XT . Auto Sound Control (EZ Sound) EZ Sound lets you to the detailed setting screen. Manual Sound Control ( EZ Sound -User option ) Adjust the sound to suit your own settings) . • You can also adjust EZ Sound in the AUDIO menu. 2. Press the G button and then use F / G button to make appropriate adjustments. * Selecting the Front Surround Press the G button and then use D / E button to add extra speakers or equipment. Audio Language EZ SoundRite EZ Sound Balance TV Speaker...

Operation Manual
Page 39
... MENU button and then use D / E button to select Caption/Text. usually the audio portion of the TV screen; Digital Broadcasting System Captions Choose the language you turn the power off. 1. Press EXIT button to return to TV viewing or press MENU button to return to select the OPTION menu. 2. Press EXIT button to save and return to appear in a large black frame and almost cover the entire screen; Press the G button and then use D / E button...
... MENU button and then use D / E button to select Caption/Text. usually the audio portion of the TV screen; Digital Broadcasting System Captions Choose the language you turn the power off. 1. Press EXIT button to return to TV viewing or press MENU button to return to select the OPTION menu. 2. Press EXIT button to save and return to appear in a large black frame and almost cover the entire screen; Press the G button and then use D / E button...
Operation Manual
Page 49
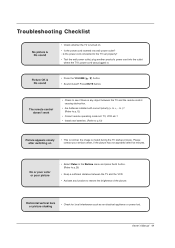
Owner's Manual 49 Troubleshooting Checklist No picture & No sound • Check whether the TV is turned on • This is normal, the image is any function to p.12) Picture appears slowly after five minutes. Is the power cord connected to the TV set : TV, VCR etc.? • Install new batteries. (Refer to restore the brightness of the picture. Horizontal/vertical bars or picture shaking • Check for local interference such as an electrical...
Owner's Manual 49 Troubleshooting Checklist No picture & No sound • Check whether the TV is turned on • This is normal, the image is any function to p.12) Picture appears slowly after five minutes. Is the power cord connected to the TV set : TV, VCR etc.? • Install new batteries. (Refer to restore the brightness of the picture. Horizontal/vertical bars or picture shaking • Check for local interference such as an electrical...
Operation Manual
Page 50
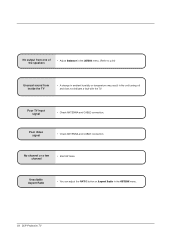
Unsuitable Aspect Ratio • You can adjust the RATIO button or Aspect Ratio in the unit turning off and does not indicate a fault with the TV. Poor TV input signal • Check ANTENNA and CABLE connection. Poor Video signal • Check ANTENNA and CABLE connection. No channel or a few channel • Start EZ Scan. No output from one of the speakers • Adjust Balance in the AUDIO menu. (Refer to p.34) Unusual sound from inside the TV • A change in ambient humidity or temperature may result in the OPTION menu. 50 DLP Projection TV
Unsuitable Aspect Ratio • You can adjust the RATIO button or Aspect Ratio in the unit turning off and does not indicate a fault with the TV. Poor TV input signal • Check ANTENNA and CABLE connection. Poor Video signal • Check ANTENNA and CABLE connection. No channel or a few channel • Start EZ Scan. No output from one of the speakers • Adjust Balance in the AUDIO menu. (Refer to p.34) Unusual sound from inside the TV • A change in ambient humidity or temperature may result in the OPTION menu. 50 DLP Projection TV

