
Operating Guide
Page 3
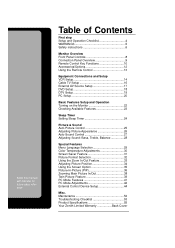
Maintenance 52 Troubleshooting Checklist 53 Product Specifications 55 Your Zenith Limited Warranty Back Cover Keep this manual with Monitor for future easy reference Table of Contents First step Setup and Operation Checklist 4 WARNINGS 5 Safety instructions 6 Monitor Overview Front Panel Controls 8 Connection Panel Overview 9 Remote Control Key Functions 10 Accessories/Options 12 Using the Remote Control 13 Equipment Connections and Setup VCR Setup 14 Cable TV Setup 16 External AV Source Setup 17 DVD Setup 18 DTV Setup 19 PC...
Maintenance 52 Troubleshooting Checklist 53 Product Specifications 55 Your Zenith Limited Warranty Back Cover Keep this manual with Monitor for future easy reference Table of Contents First step Setup and Operation Checklist 4 WARNINGS 5 Safety instructions 6 Monitor Overview Front Panel Controls 8 Connection Panel Overview 9 Remote Control Key Functions 10 Accessories/Options 12 Using the Remote Control 13 Equipment Connections and Setup VCR Setup 14 Cable TV Setup 16 External AV Source Setup 17 DVD Setup 18 DTV Setup 19 PC...
Operating Guide
Page 4
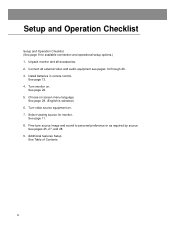
... audio equipment see pages 14 through 20. 3. See page 22. 5. Turn video source equipment on screen menu language. See pages 25, 27, and 28. 9. Setup and Operation Checklist Setup and Operation Checklist (See page 9 for monitor. See page 13. 4. Select viewing source for available connection and operational setup options.) 1. See page 11. 8. Install batteries in remote control. Choose on . 7. See page 29. (English is selected.) 6. Fine-tune source image and sound...
... audio equipment see pages 14 through 20. 3. See page 22. 5. Turn video source equipment on screen menu language. See pages 25, 27, and 28. 9. Setup and Operation Checklist Setup and Operation Checklist (See page 9 for monitor. See page 13. 4. Select viewing source for available connection and operational setup options.) 1. See page 11. 8. Install batteries in remote control. Choose on . 7. See page 29. (English is selected.) 6. Fine-tune source image and sound...
Operating Guide
Page 5
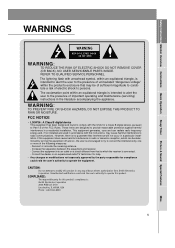
... the following measures: - Unauthorized modification could void the user's authority to persons. COMPLIANCE: The responsible party for a Class B digital device, pursuant to the presence of the FCC Rules. Safety Instructions Monitor Overview Connections Basic Operation Sleep Timer Picture & Sound Special Features WARNINGS WARNING RISK OF ELECTRIC SHOCK DO NOT OPEN WARNING: TO REDUCE THE RISK OF ELECTRIC SHOCK DO...
... the following measures: - Unauthorized modification could void the user's authority to persons. COMPLIANCE: The responsible party for a Class B digital device, pursuant to the presence of the FCC Rules. Safety Instructions Monitor Overview Connections Basic Operation Sleep Timer Picture & Sound Special Features WARNINGS WARNING RISK OF ELECTRIC SHOCK DO NOT OPEN WARNING: TO REDUCE THE RISK OF ELECTRIC SHOCK DO...
Operating Guide
Page 6
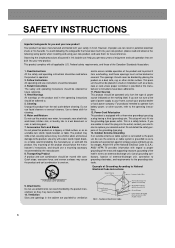
... cart combination to overturn. Any mounting of power source indicated on a bed, sofa, rug, or other sources, refer to the operating instructions. 12. Power Sources This product should be read and observe the following safety points when installing and using your new product, and save them for cleaning. 6. For products intended to operate from the wall outlet before the product is grounded...
... cart combination to overturn. Any mounting of power source indicated on a bed, sofa, rug, or other sources, refer to the operating instructions. 12. Power Sources This product should be read and observe the following safety points when installing and using your new product, and save them for cleaning. 6. For products intended to operate from the wall outlet before the product is grounded...
Operating Guide
Page 7
... keep from the wall outlet and refer servicing to rain or water. b. c. f. Unauthorized substitutions may touch dangerous voltage points or short-out parts that are not likely to lightning and power-line surges. 16. Misc. 7 Safety Instructions Monitor Overview Connections Basic Operation Sleep Timer Picture & Sound Special Features 14. Power Lines An outside antenna system, extreme care should be sure the service technician has used replacement parts...
... keep from the wall outlet and refer servicing to rain or water. b. c. f. Unauthorized substitutions may touch dangerous voltage points or short-out parts that are not likely to lightning and power-line surges. 16. Misc. 7 Safety Instructions Monitor Overview Connections Basic Operation Sleep Timer Picture & Sound Special Features 14. Power Lines An outside antenna system, extreme care should be sure the service technician has used replacement parts...
Operating Guide
Page 15
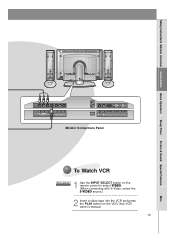
... owner's manual. 15 Misc. Safety Instructions Monitor Overview Connections Basic Operation Sleep Timer Picture & Sound Special Features DC OUTPUT R AUDIO L MONO (DC 12V) AV INPUT VIDEO S-VIDEO Y PB PR COMPONENT (DVD/DTV INPUT) AC INPUT R AUDIO L RGB 2 INPUT RGB 1 INPUT RS 232C INPUT (DIGITAL RGB INPUT) (PC/DTV INPUT) (CONTROL/SERVICE) Monitor Connections Panel To Watch VCR 1 INPUT SELECT Use the INPUT SELECT button on the remote control to select VIDEO. (When connecting with S-Video, select the S-VIDEO source.) 2 Insert a video tape into the VCR and press the PLAY button...
... owner's manual. 15 Misc. Safety Instructions Monitor Overview Connections Basic Operation Sleep Timer Picture & Sound Special Features DC OUTPUT R AUDIO L MONO (DC 12V) AV INPUT VIDEO S-VIDEO Y PB PR COMPONENT (DVD/DTV INPUT) AC INPUT R AUDIO L RGB 2 INPUT RGB 1 INPUT RS 232C INPUT (DIGITAL RGB INPUT) (PC/DTV INPUT) (CONTROL/SERVICE) Monitor Connections Panel To Watch VCR 1 INPUT SELECT Use the INPUT SELECT button on the remote control to select VIDEO. (When connecting with S-Video, select the S-VIDEO source.) 2 Insert a video tape into the VCR and press the PLAY button...

Operating Guide
Page 16
... to and select the VIDEO source. DC OUTPUT (DC 12V) R AUDIO L MONO VIDEO AV INPUT S-VIDEO Y PB PR COMPONENT (DVD/DTV INPUT) AC INPUT R AUDIO L RGB 2 INPUT RGB 1 INPUT RS 232C INPUT (DIGITAL RGB INPUT) (PC/DTV INPUT) (CONTROL/SERVICE) Monitor Connections Panel (R) AUDIO (L) VIDEO TV VCR RF Cable Cable Box Connections Panel To Watch Cable TV Programming 1 Use the INPUT SELECT button on the remote control to a cable TV service from a local provider and installing a converter, you can watch cable TV programming. This monitor cannot display TV programming without a TV...
... to and select the VIDEO source. DC OUTPUT (DC 12V) R AUDIO L MONO VIDEO AV INPUT S-VIDEO Y PB PR COMPONENT (DVD/DTV INPUT) AC INPUT R AUDIO L RGB 2 INPUT RGB 1 INPUT RS 232C INPUT (DIGITAL RGB INPUT) (PC/DTV INPUT) (CONTROL/SERVICE) Monitor Connections Panel (R) AUDIO (L) VIDEO TV VCR RF Cable Cable Box Connections Panel To Watch Cable TV Programming 1 Use the INPUT SELECT button on the remote control to a cable TV service from a local provider and installing a converter, you can watch cable TV programming. This monitor cannot display TV programming without a TV...
Operating Guide
Page 17
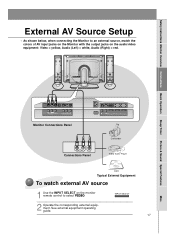
... INPUT R AUDIO L RGB 2 INPUT RGB 1 INPUT RS 232C INPUT (DIGITAL RGB INPUT) (PC/DTV INPUT) (CONTROL/SERVICE) R AUDIO L VIDEO Connections Panel Camcorder Video Game Player DDR Typical External Equipment To watch external AV source 1 Use the INPUT SELECT on the audio/video equipment: Video = yellow, Audio (Left) = white, Audio (Right) = red. See external equipment operating guide. 17 Misc. As shown below, when connecting the Monitor to an external source, match the colors of AV input jacks on the Monitor with the output jacks on the monitor remote control...
... INPUT R AUDIO L RGB 2 INPUT RGB 1 INPUT RS 232C INPUT (DIGITAL RGB INPUT) (PC/DTV INPUT) (CONTROL/SERVICE) R AUDIO L VIDEO Connections Panel Camcorder Video Game Player DDR Typical External Equipment To watch external AV source 1 Use the INPUT SELECT on the audio/video equipment: Video = yellow, Audio (Left) = white, Audio (Right) = red. See external equipment operating guide. 17 Misc. As shown below, when connecting the Monitor to an external source, match the colors of AV input jacks on the Monitor with the output jacks on the monitor remote control...
Operating Guide
Page 18
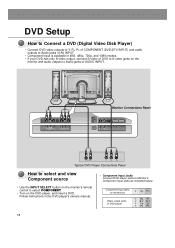
... 12V) R AUDIO L MONO AV INPUT VIDEO S-VIDEO Y PB PR COMPONENT (DVD/DTV INPUT) Monitor Connections Panel AC INPUT R AUDIO L RGB 2 INPUT RGB 1 INPUT RS 232C INPUT (DIGITAL RGB INPUT) (PC/DTV INPUT) (CONTROL/SERVICE) (R) AUDIO (L) B R Typical DVD Player Connections Panel How to select and view Component source • Use the INPUT SELECT button on the monitor's remote control to Audio jacks of DVD player Y PB PR Y Pb Pr Y B-Y R-Y Y Cb Cr Y PB PR 18 DVD Setup How to Connect a DVD (Digital Video Disk Player) • Connect DVD video outputs to...
... 12V) R AUDIO L MONO AV INPUT VIDEO S-VIDEO Y PB PR COMPONENT (DVD/DTV INPUT) Monitor Connections Panel AC INPUT R AUDIO L RGB 2 INPUT RGB 1 INPUT RS 232C INPUT (DIGITAL RGB INPUT) (PC/DTV INPUT) (CONTROL/SERVICE) (R) AUDIO (L) B R Typical DVD Player Connections Panel How to select and view Component source • Use the INPUT SELECT button on the monitor's remote control to Audio jacks of DVD player Y PB PR Y Pb Pr Y B-Y R-Y Y Cb Cr Y PB PR 18 DVD Setup How to Connect a DVD (Digital Video Disk Player) • Connect DVD video outputs to...
Operating Guide
Page 19
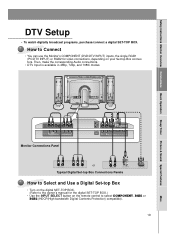
.... Safety Instructions Monitor Overview Connections Basic Operation Sleep Timer Picture & Sound Special Features DTV Setup - Then, make the corresponding Audio connections. • DTV Input is available in 480p, 720p, and 1080i modes. DC OUTPUT (DC 12V) R AUDIO L MONO AV INPUT VIDEO S-VIDEO Y PB PR COMPONENT (DVD/DTV INPUT) Monitor Connections Panel AC INPUT R AUDIO L RGB 2 INPUT RGB 1 INPUT RS 232C INPUT (DIGITAL RGB INPUT) (PC/DTV INPUT) (CONTROL/SERVICE) (R) AUDIO (L) Y PB PR or (R) AUDIO (L) DTV OUTPUT Typical Digital Set-top Box Connections Panels DVI-HDTV...
.... Safety Instructions Monitor Overview Connections Basic Operation Sleep Timer Picture & Sound Special Features DTV Setup - Then, make the corresponding Audio connections. • DTV Input is available in 480p, 720p, and 1080i modes. DC OUTPUT (DC 12V) R AUDIO L MONO AV INPUT VIDEO S-VIDEO Y PB PR COMPONENT (DVD/DTV INPUT) Monitor Connections Panel AC INPUT R AUDIO L RGB 2 INPUT RGB 1 INPUT RS 232C INPUT (DIGITAL RGB INPUT) (PC/DTV INPUT) (CONTROL/SERVICE) (R) AUDIO (L) Y PB PR or (R) AUDIO (L) DTV OUTPUT Typical Digital Set-top Box Connections Panels DVI-HDTV...

Operating Guide
Page 20
... audio cable from the PC to your PC window environment, select Normal, Standard or Default Monitor. Tips • Avoid keeping a fixed image on the monitor. 20 DC OUTPUT R AUDIO L MONO (DC 12V) AV INPUT VIDEO S-VIDEO Y PB PR COMPONENT (DVD/DTV INPUT) Monitor Connection Panel AC INPUT R AUDIO LL RGB 2 INPUT RGB 1 INPUT RS 232C INPUT (DIGITAL RGB INPUT) (PC/DTV INPUT) (CONTROL/SERVICE) How to use a screen saver when possible. • Change the output resolution of the PC to 1024X768 for the best picture. Second, turn...
... audio cable from the PC to your PC window environment, select Normal, Standard or Default Monitor. Tips • Avoid keeping a fixed image on the monitor. 20 DC OUTPUT R AUDIO L MONO (DC 12V) AV INPUT VIDEO S-VIDEO Y PB PR COMPONENT (DVD/DTV INPUT) Monitor Connection Panel AC INPUT R AUDIO LL RGB 2 INPUT RGB 1 INPUT RS 232C INPUT (DIGITAL RGB INPUT) (PC/DTV INPUT) (CONTROL/SERVICE) How to use a screen saver when possible. • Change the output resolution of the PC to 1024X768 for the best picture. Second, turn...
Operating Guide
Page 21
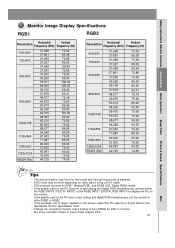
... in the displayable monitor specification chart. • Change the computer's monitor output setting to the L30W36 for RGB1 (Analog RGB), and RGB2 (DVI, Digital RGB) modes. • If the graphic card on the PC does not output analog and digital RGB simultaneously, connect either RGB1 or RGB2. • If the message "out of range" appears on the monitor. Safety Instructions Monitor Overview Connections Basic Operation Sleep Timer Picture & Sound Special Features Monitor Image Display Specifications RGB1 RGB2 Resolution Horizontal Frequency (KHz) Vertical Frequency (Hz) 640x350...
... in the displayable monitor specification chart. • Change the computer's monitor output setting to the L30W36 for RGB1 (Analog RGB), and RGB2 (DVI, Digital RGB) modes. • If the graphic card on the PC does not output analog and digital RGB simultaneously, connect either RGB1 or RGB2. • If the message "out of range" appears on the monitor. Safety Instructions Monitor Overview Connections Basic Operation Sleep Timer Picture & Sound Special Features Monitor Image Display Specifications RGB1 RGB2 Resolution Horizontal Frequency (KHz) Vertical Frequency (Hz) 640x350...

Operating Guide
Page 23
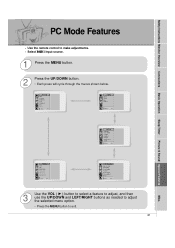
Use the remote control to exit. 23 Misc. PICTURE APC Contrast Brightness Color Sharpness Tint Screen D Move menu Exit E SOUND DASP Treble Bass Balance D Move menu Exit E SPECIAL Language Color TEMP. Auto. Select VIDEO input source. 1 Press the MENU button. 2 Press the UP/DOWN button. • Each press will cycle through the menus shown below. ARC(Main) Zoom In/Out Position Clock Adjust Phase Adjust Reset D Move menu Exit E 3 Use the VOL ( G ) button to select a feature to adjust, and...
Use the remote control to exit. 23 Misc. PICTURE APC Contrast Brightness Color Sharpness Tint Screen D Move menu Exit E SOUND DASP Treble Bass Balance D Move menu Exit E SPECIAL Language Color TEMP. Auto. Select VIDEO input source. 1 Press the MENU button. 2 Press the UP/DOWN button. • Each press will cycle through the menus shown below. ARC(Main) Zoom In/Out Position Clock Adjust Phase Adjust Reset D Move menu Exit E 3 Use the VOL ( G ) button to select a feature to adjust, and...
Operating Guide
Page 41
... Position Clock Adjust Phase Adjust Reset D Move menu Exit E 3 Use the VOL ( G ) button to select a feature to adjust, and then use the UP/DOWN and LEFT/RIGHT buttons as needed to adjust the selected menu option. • Press the MENU button to make adjustments. - Safety Instructions Monitor Overview Connections Basic Operation Sleep Timer Picture & Sound Special Features PC Mode Features - Auto. Use the remote control to exit. 41 Misc. Size Win. R-Adjust G-Adjust B-Adjust Screen Saver Set ID D Move menu Exit E TWIN/PIP Twin PIP Input...
... Position Clock Adjust Phase Adjust Reset D Move menu Exit E 3 Use the VOL ( G ) button to select a feature to adjust, and then use the UP/DOWN and LEFT/RIGHT buttons as needed to adjust the selected menu option. • Press the MENU button to make adjustments. - Safety Instructions Monitor Overview Connections Basic Operation Sleep Timer Picture & Sound Special Features PC Mode Features - Auto. Use the remote control to exit. 41 Misc. Size Win. R-Adjust G-Adjust B-Adjust Screen Saver Set ID D Move menu Exit E TWIN/PIP Twin PIP Input...
Operating Guide
Page 43
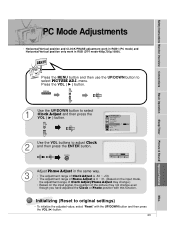
... change.) • Based on the input signal, the position of the picture may not change even though you have adjusted the Clock or Phase position with the UP/DOWN button and then press the VOL (G) button. 43 Misc. MENU VOL 1 Use the UP/DOWN button to adjust Clock 2 and then press the ENTER button. VOL VOL ENTER PICTURE ADJ. Safety Instructions Monitor Overview Connections Basic Operation Sleep Timer Picture & Sound Special Features PC Mode Adjustments...
... change.) • Based on the input signal, the position of the picture may not change even though you have adjusted the Clock or Phase position with the UP/DOWN button and then press the VOL (G) button. 43 Misc. MENU VOL 1 Use the UP/DOWN button to adjust Clock 2 and then press the ENTER button. VOL VOL ENTER PICTURE ADJ. Safety Instructions Monitor Overview Connections Basic Operation Sleep Timer Picture & Sound Special Features PC Mode Adjustments...
Operating Guide
Page 45
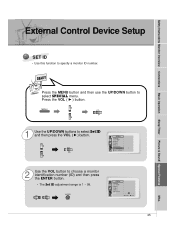
... VOL ( G ) button. MENU VOL 1 Use the UP/DOWN buttons to select SPECIAL menu. R-Adjust G-Adjust B-Adjust Screen Saver Set ID 1 FG Adjust A Prev. 45 Misc. Press the VOL ( G ) button. R-Adjust G-Adjust B-Adjust Screen Saver SSeett IIDD G 1 D E Move F Prev 2 Use the VOL button to specify a monitor ID number. VOL VOL ENTER SPECIAL Language Color TEMP. VOL SPECIAL Language Color TEMP. Safety Instructions Monitor Overview Connections Basic Operation Sleep Timer Picture & Sound Special Features External Control Device Setup SET ID • Use this function...
... VOL ( G ) button. MENU VOL 1 Use the UP/DOWN buttons to select SPECIAL menu. R-Adjust G-Adjust B-Adjust Screen Saver Set ID 1 FG Adjust A Prev. 45 Misc. Press the VOL ( G ) button. R-Adjust G-Adjust B-Adjust Screen Saver SSeett IIDD G 1 D E Move F Prev 2 Use the VOL button to specify a monitor ID number. VOL VOL ENTER SPECIAL Language Color TEMP. VOL SPECIAL Language Color TEMP. Safety Instructions Monitor Overview Connections Basic Operation Sleep Timer Picture & Sound Special Features External Control Device Setup SET ID • Use this function...
Operating Guide
Page 47
...G To select input source for the Monitor. OK Acknowledgement [Command2][ ][Set ID][ ][OK][Data][x] * The Monitor transmits ACK (acknowledgement) based on the Monitor's remote control. Safety Instructions Monitor Overview Connections Basic Operation Sleep Timer Picture & Sound Special Features Transmission / Receiving Protocol Transmission [Command1][Command2][ ][Set ID][ ][Data][Cr] * [Command1] : * [Command2] : * [Set ID] : * [DATA] : * [Cr] : *[ ] : To classify factory-adjustment mode or user-adjustment mode. To control LCD set ID and DATA. * [Set ID], [Data] : Input command...
...G To select input source for the Monitor. OK Acknowledgement [Command2][ ][Set ID][ ][OK][Data][x] * The Monitor transmits ACK (acknowledgement) based on the Monitor's remote control. Safety Instructions Monitor Overview Connections Basic Operation Sleep Timer Picture & Sound Special Features Transmission / Receiving Protocol Transmission [Command1][Command2][ ][Set ID][ ][Data][Cr] * [Command1] : * [Command2] : * [Set ID] : * [DATA] : * [Cr] : *[ ] : To classify factory-adjustment mode or user-adjustment mode. To control LCD set ID and DATA. * [Set ID], [Data] : Input command...
Operating Guide
Page 48
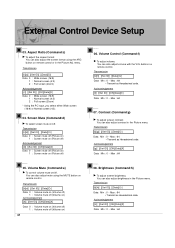
... also adjust mute using the ARC button on ) 48 08. Transmission [k][c][ ][Set ID][ ][Data][Cr] Data 0 : Wide screen (16:9) 1 : Normal screen (4:3) 2 : Full screen (Zoom) Acknowledgement [c][ ][Set ID][ ][OK][Data][X] Data 0 : Wide screen (16:9) 1 : Normal screen (4:3) 2 : Full screen (Zoom) * Using the PC input, you select either Wide screen (16:9) or Normal screen (4:3). 04. External Control Device Setup 03. Acknowledgement [f][ ][Set ID][ ][OK][Data][X] Data Min : 0 ~ Max : 64 07. Contrast (Command:g) G To adjust screen contrast. Acknowledgement [g][ ][Set ID...
... also adjust mute using the ARC button on ) 48 08. Transmission [k][c][ ][Set ID][ ][Data][Cr] Data 0 : Wide screen (16:9) 1 : Normal screen (4:3) 2 : Full screen (Zoom) Acknowledgement [c][ ][Set ID][ ][OK][Data][X] Data 0 : Wide screen (16:9) 1 : Normal screen (4:3) 2 : Full screen (Zoom) * Using the PC input, you select either Wide screen (16:9) or Normal screen (4:3). 04. External Control Device Setup 03. Acknowledgement [f][ ][Set ID][ ][OK][Data][X] Data Min : 0 ~ Max : 64 07. Contrast (Command:g) G To adjust screen contrast. Acknowledgement [g][ ][Set ID...
Operating Guide
Page 53
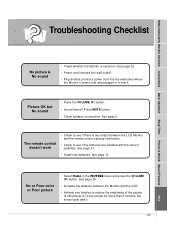
... MUTE button. • Check speaker connections. Picture OK but No sound • Press the VOLUME (G) button. • Sound muted? The remote control doesn't work • Check to restore the brightness of the picture. (If still picture is turned on the screen for more than 5 minutes, the screen gets dark.) 53 Misc. See page 22. • Power cord inserted into wall outlet? • Plug another product's power cord into the wall outlet where the Monitor's power cord was plugged in the PICTURE menu...
... MUTE button. • Check speaker connections. Picture OK but No sound • Press the VOLUME (G) button. • Sound muted? The remote control doesn't work • Check to restore the brightness of the picture. (If still picture is turned on the screen for more than 5 minutes, the screen gets dark.) 53 Misc. See page 22. • Power cord inserted into wall outlet? • Plug another product's power cord into the wall outlet where the Monitor's power cord was plugged in the PICTURE menu...
Operating Guide
Page 54
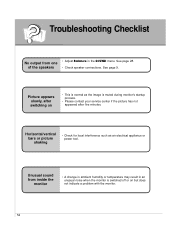
... image is muted during monitor's startup process. • Please contact your service center if the picture has not appeared after switching on but does not indicate a problem with the monitor. 54 See page 28. • Check speaker connections. Troubleshooting Checklist No output from inside the monitor • A change in ambient humidity or temperature may result in the SOUND menu. Unusual sound from one of the speakers • Adjust...
... image is muted during monitor's startup process. • Please contact your service center if the picture has not appeared after switching on but does not indicate a problem with the monitor. 54 See page 28. • Check speaker connections. Troubleshooting Checklist No output from inside the monitor • A change in ambient humidity or temperature may result in the SOUND menu. Unusual sound from one of the speakers • Adjust...

