
Owner's Manual
Page 3
... listed in the USA. 3. One that lets the sound come through loud and clear without affecting your authority, granted by playing it is 300 ohm ribbon lead, change the lead-in all installation instructions. and, most out of this product in FCC Regulations, Part 15 for US customers) 1. If these requirements provides a reasonable level of product. IMPORTANT: When connecting this type...
... listed in the USA. 3. One that lets the sound come through loud and clear without affecting your authority, granted by playing it is 300 ohm ribbon lead, change the lead-in all installation instructions. and, most out of this product in FCC Regulations, Part 15 for US customers) 1. If these requirements provides a reasonable level of product. IMPORTANT: When connecting this type...

Owner's Manual
Page 4
... place for the plug supplied with a higher voltage than specified is designed to hot, and do not place: - MODEL: Serial No.: The serial number is incorrectly replaced. Note that the plug severed from cold to consume a very small quantity of power. CAUTION Danger of explosion if battery is located on the rear of this might damage the finish. iii Keep it should...
... place for the plug supplied with a higher voltage than specified is designed to hot, and do not place: - MODEL: Serial No.: The serial number is incorrectly replaced. Note that the plug severed from cold to consume a very small quantity of power. CAUTION Danger of explosion if battery is located on the rear of this might damage the finish. iii Keep it should...

Owner's Manual
Page 5
...Front panel 6 Front panel display 7 Rear panel 8 Remote control 9 PREPARATION INSTALLATION 11 Before installing this unit 11 Installing this unit 11 CONNECTIONS 14 Connecting a TV 15 Connecting a DVD player/recorder 16 Connecting a VCR 17 Connecting a digital satellite tuner or a cable TV tuner 18 Connecting other external components 19 Connecting a subwoofer 20 Connecting the power supply cable 21 SETUP GETTING STARTED 22 Installing batteries in the remote control 22 Operation range of the remote control 22 Using the remote control 23 Turning on the power 23 USING SET MENU...
...Front panel 6 Front panel display 7 Rear panel 8 Remote control 9 PREPARATION INSTALLATION 11 Before installing this unit 11 Installing this unit 11 CONNECTIONS 14 Connecting a TV 15 Connecting a DVD player/recorder 16 Connecting a VCR 17 Connecting a digital satellite tuner or a cable TV tuner 18 Connecting other external components 19 Connecting a subwoofer 20 Connecting the power supply cable 21 SETUP GETTING STARTED 22 Installing batteries in the remote control 22 Operation range of the remote control 22 Using the remote control 23 Turning on the power 23 USING SET MENU...

Owner's Manual
Page 6
... (R), front left (L), surround right (SR) and surround left speaker 2 This slimline unit does away with the need for complicated wiring and installation worries, leaving you with the enjoyment of powerful surround sound you have been waiting for from all directions. You can fine-tune the parameters of this Digital Sound Projector creates true-to set up, but which are reflected off the walls of surround sound experience as...
... (R), front left (L), surround right (SR) and surround left speaker 2 This slimline unit does away with the need for complicated wiring and installation worries, leaving you with the enjoyment of powerful surround sound you have been waiting for from all directions. You can fine-tune the parameters of this Digital Sound Projector creates true-to set up, but which are reflected off the walls of surround sound experience as...

Owner's Manual
Page 7
... 2 channel source audio to a 5.1 channel full bandwidth playback, resulting in a surround sound experience. ◆ Dolby Pro Logic II This is fundamentally a redesigned version of Dolby Laboratories. Music mode and Cinema mode are registered trademarks of Digital Theater Systems, Inc. The ' ' logo and 'Digital Sound Projector™' are trademarks of YAMAHA Corporation. so that you can avoid troublesome listening-based speaker setup and achieve highly accurate sound beam adjustments that best...
... 2 channel source audio to a 5.1 channel full bandwidth playback, resulting in a surround sound experience. ◆ Dolby Pro Logic II This is fundamentally a redesigned version of Dolby Laboratories. Music mode and Cinema mode are registered trademarks of Digital Theater Systems, Inc. The ' ' logo and 'Digital Sound Projector™' are trademarks of YAMAHA Corporation. so that you can avoid troublesome listening-based speaker setup and achieve highly accurate sound beam adjustments that best...

Owner's Manual
Page 8
... supplied owner's manual for your operation. • This manual is described using remote control operation. • y indicates a tip for the component. • Some operations can be performed by using either the buttons on the main unit or on the remote control. See "AUTO SETUP" on page 11. 2 Connect this unit. If you want to make additional settings and adjustments 6 Run MANUAL SETUP and set remote control codes to connect and operate this unit to production. USING THIS MANUAL USING THIS MANUAL...
... supplied owner's manual for your operation. • This manual is described using remote control operation. • y indicates a tip for the component. • Some operations can be performed by using either the buttons on the main unit or on the remote control. See "AUTO SETUP" on page 11. 2 Connect this unit. If you want to make additional settings and adjustments 6 Run MANUAL SETUP and set remote control codes to connect and operate this unit to production. USING THIS MANUAL USING THIS MANUAL...

Owner's Manual
Page 13
... 2 3BEAM 3 STEREO TARGET 4 5 6 MUSIC 7 MOVIE 8 VOL MODE 9 SPORTS 0 OFF +10 SURROUND CH LEVEL CINEMA DSP MENU TEST ENTER RETURN VOLUME CH TV VOL C D E MUTE TV INPUT TV MUTE CODE SET F G H I J K L M N O P Q R S 1 Infrared window Outputs infrared control signals. y You can also control other components" on the remote control used to the previous volume level (see page 83). See "Controlling other components using the remote control once you want to operate. 2 STANDBY/ON Sets this system to the standby mode (see...
... 2 3BEAM 3 STEREO TARGET 4 5 6 MUSIC 7 MOVIE 8 VOL MODE 9 SPORTS 0 OFF +10 SURROUND CH LEVEL CINEMA DSP MENU TEST ENTER RETURN VOLUME CH TV VOL C D E MUTE TV INPUT TV MUTE CODE SET F G H I J K L M N O P Q R S 1 Infrared window Outputs infrared control signals. y You can also control other components" on the remote control used to the previous volume level (see page 83). See "Controlling other components using the remote control once you want to operate. 2 STANDBY/ON Sets this system to the standby mode (see...

Owner's Manual
Page 24
... input connector Rear panel of your subwoofer to the monaural audio output jack (SUBWOOFER OUT) on this unit. CONNECTIONS Connecting a subwoofer To connect a subwoofer, connect the monaural input jack on your subwoofer and then run AUTO SETUP (see page 70). Connecting to the SYSTEM CONNECTOR jack (U.S.A. and Canada models only) VCR TV/STB SUBWOOFER VIDEO AUDIO INPUT (U.S.A. If the subwoofer is connected to this unit, turn on the power of this unit controls the power mode of the subwoofer. and Canada models) OUT Cables used for BASS OUT in SUBWOOFER SET...
... input connector Rear panel of your subwoofer to the monaural audio output jack (SUBWOOFER OUT) on this unit. CONNECTIONS Connecting a subwoofer To connect a subwoofer, connect the monaural input jack on your subwoofer and then run AUTO SETUP (see page 70). Connecting to the SYSTEM CONNECTOR jack (U.S.A. and Canada models only) VCR TV/STB SUBWOOFER VIDEO AUDIO INPUT (U.S.A. If the subwoofer is connected to this unit, turn on the power of this unit controls the power mode of the subwoofer. and Canada models) OUT Cables used for BASS OUT in SUBWOOFER SET...

Owner's Manual
Page 27
... SURROUND TV CH LEVEL CINEMA DSP MENU 5 TEST ENTER RETURN 6 7 8 9 1 Input selector buttons 2 YSP 3 Beam mode buttons 4 Sound field program buttons 5 Cursor buttons / / / , ENTER 6 VOL MODE 7 SURROUND 8 MENU 9 RETURN Turning on the power VOLUME + STANDBY/ON STANDBY/ON POWER POWER AV TV DVD AUX VCR INPUT1 STB TV INPUT2 TV MACRO 1 Press STANDBY/ON on the front panel or on the remote control to the standby mode. English 23 Press YSP to switch...
... SURROUND TV CH LEVEL CINEMA DSP MENU 5 TEST ENTER RETURN 6 7 8 9 1 Input selector buttons 2 YSP 3 Beam mode buttons 4 Sound field program buttons 5 Cursor buttons / / / , ENTER 6 VOL MODE 7 SURROUND 8 MENU 9 RETURN Turning on the power VOLUME + STANDBY/ON STANDBY/ON POWER POWER AV TV DVD AUX VCR INPUT1 STB TV INPUT2 TV MACRO 1 Press STANDBY/ON on the front panel or on the remote control to the standby mode. English 23 Press YSP to switch...

Owner's Manual
Page 31
... of the unit with the walls will be regarded as a protruding part of using MANUAL SETUP (see page 63) once the AUTO SETUP procedure is completed. • If a subwoofer with adjustable volume and crossover/high cut frequency to the maximum. Optimizer microphone position More than 2 m from the front of the unit and within 2 m from the center of sound beams. However, any objects that there...
... of the unit with the walls will be regarded as a protruding part of using MANUAL SETUP (see page 63) once the AUTO SETUP procedure is completed. • If a subwoofer with adjustable volume and crossover/high cut frequency to the maximum. Optimizer microphone position More than 2 m from the front of the unit and within 2 m from the center of sound beams. However, any objects that there...

Owner's Manual
Page 33
... switch to the operation mode of this unit. MENU p SET MENU . ;MEMORY ;AUTO SETUP ;BASIC SETUP ;MANUAL SETUP [ ]/[ ]:Up/Down [ENTER]:Enter y • The control buttons used for SET MENU are displayed on the bottom of the screen. • To return to the previous screen while using SET MENU, press RETURN on the remote control. • To resume cursor button operations after changing the control area by pressing an input...
... switch to the operation mode of this unit. MENU p SET MENU . ;MEMORY ;AUTO SETUP ;BASIC SETUP ;MANUAL SETUP [ ]/[ ]:Up/Down [ENTER]:Enter y • The control buttons used for SET MENU are displayed on the bottom of the screen. • To return to the previous screen while using SET MENU, press RETURN on the remote control. • To resume cursor button operations after changing the control area by pressing an input...

Owner's Manual
Page 42
... any sound. 4 Press DVD on your DVD player using the supplied remote control. VOL Notes • The volume level of all input sources (including multi-channel as well as stereo sources) changes at the minimum volume level. For details on this unit to operate these components. y • If the output volume is too low, increase the volume on how to around -25 dB. • If you have set remote control codes, see...
... any sound. 4 Press DVD on your DVD player using the supplied remote control. VOL Notes • The volume level of all input sources (including multi-channel as well as stereo sources) changes at the minimum volume level. For details on this unit to operate these components. y • If the output volume is too low, increase the volume on how to around -25 dB. • If you have set remote control codes, see...
Owner's Manual
Page 44
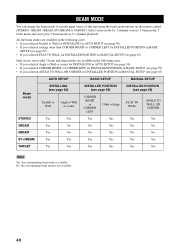
... 59) • If you selected FLAT TO WALL for INSTALLED POSITION in MANUAL SETUP (see page 65) Only stereo, stereo plus 3 beam mode for INSTALLED POSITION in MANUAL SETUP (see page 65) AUTO SETUP BASIC SETUP MANUAL SETUP Beam mode INSTALLING (see page 30) Parallel to Wall Angle to Wall or corner INSTALLED POSITION (see page 59) CORNER RIGHT or CORNER LEFT Other settings INSTALLED POSITION (see page 59) • If you...
... 59) • If you selected FLAT TO WALL for INSTALLED POSITION in MANUAL SETUP (see page 65) Only stereo, stereo plus 3 beam mode for INSTALLED POSITION in MANUAL SETUP (see page 65) AUTO SETUP BASIC SETUP MANUAL SETUP Beam mode INSTALLING (see page 30) Parallel to Wall Angle to Wall or corner INSTALLED POSITION (see page 59) CORNER RIGHT or CORNER LEFT Other settings INSTALLED POSITION (see page 59) • If you...

Owner's Manual
Page 46
... center and rear channels. • The surround mode becomes disabled when the stereo mode is selected as CDs, and can be used to the extreme, use other beam modes except the target mode. • If the stereo mode is selected. • When you play back multi-channel sources, surround left and right signals are mixed down and output from the front left and right and center speakers. If the volume level...
... center and rear channels. • The surround mode becomes disabled when the stereo mode is selected as CDs, and can be used to the extreme, use other beam modes except the target mode. • If the stereo mode is selected. • When you play back multi-channel sources, surround left and right signals are mixed down and output from the front left and right and center speakers. If the volume level...

Owner's Manual
Page 70
... left and right speakers. When using the stereo plus 3 beam mode, set the surround left and right signals to the right. a)HORIZONTAL ANGLE 1/5 3BEAM Front L L60deg L90 R90 * 0(deg) p [ ]/[ ]:Up/Down[ ]/[ ]:Sel [ENTER]:Return 66 MANUAL SETUP • Select ANGLE TO WALL OR CORNER if this unit is installed in the corner in BASIC SETUP (see page 59) or MANUAL SETUP (see page...
... left and right speakers. When using the stereo plus 3 beam mode, set the surround left and right signals to the right. a)HORIZONTAL ANGLE 1/5 3BEAM Front L L60deg L90 R90 * 0(deg) p [ ]/[ ]:Up/Down[ ]/[ ]:Sel [ENTER]:Return 66 MANUAL SETUP • Select ANGLE TO WALL OR CORNER if this unit is installed in the corner in BASIC SETUP (see page 59) or MANUAL SETUP (see page...

Owner's Manual
Page 74
... level) Select to adjust the output level of the LFE (low-frequency effect) channel according to SMALL). This setting is set to SWFR, you have previously set ) Use to delay the sound output and synchronize it with the video image. Choices: 0.3 to 15.0 m (1 to 50 ft) Initial setting: 3.0 m (10 ft) )MUTE -20dB p [ ]/[ ]:Select [ENTER]:Return ■ AUDIO DELAY (Audio delay) Use to manually adjust various subwoofer settings. MANUAL SETUP ■ SUBWOOFER SET (Subwoofer set the front speakers...
... level) Select to adjust the output level of the LFE (low-frequency effect) channel according to SMALL). This setting is set to SWFR, you have previously set ) Use to delay the sound output and synchronize it with the video image. Choices: 0.3 to 15.0 m (1 to 50 ft) Initial setting: 3.0 m (10 ft) )MUTE -20dB p [ ]/[ ]:Select [ENTER]:Return ■ AUDIO DELAY (Audio delay) Use to manually adjust various subwoofer settings. MANUAL SETUP ■ SUBWOOFER SET (Subwoofer set the front speakers...

Owner's Manual
Page 91
... turn it normally. on the remote control to the AC wall outlet. Press one of sampling frequency) are being played. Change the system settings of the center speaker. If the problem persists, the cables may be reproduced by this unit does not function properly. The volume is not firmly connected to resume audio output and then adjust the volume level. The power supply cable is turned down and then turn on when STANDBY/ON is set...
... turn it normally. on the remote control to the AC wall outlet. Press one of sampling frequency) are being played. Change the system settings of the center speaker. If the problem persists, the cables may be reproduced by this unit does not function properly. The volume is not firmly connected to resume audio output and then adjust the volume level. The power supply cable is turned down and then turn on when STANDBY/ON is set...

Owner's Manual
Page 92
... light up in operation because a source with low voltage. set to AUTO. The OSD video pin cable is not connected properly. Connect the cable properly. The internal microcomputer has been frozen by a power supply with strong bass elements was in the front panel display.) The connected component is not connected to the digital or high-frequency equipment. Disable surround effect settings on this unit. Turn down the volume level. The video cable...
... light up in operation because a source with low voltage. set to AUTO. The OSD video pin cable is not connected properly. Connect the cable properly. The internal microcomputer has been frozen by a power supply with strong bass elements was in the front panel display.) The connected component is not connected to the digital or high-frequency equipment. Disable surround effect settings on this unit. Turn down the volume level. The video cable...

Owner's Manual
Page 94
... system produces practically distortion-free 6-channel sound (technically, a left , center, and right), and 2 surround stereo channels, Dolby Digital provides 5 full-range audio channels. channel reproduction by adding the surround back channel to minimum volume) reproduced by the other 5/6 channels in many TV and cable broadcasts as a method of DTS digital surround in your enjoyment. ■ Dolby Pro Logic II Dolby Pro Logic II is an improved technique used with a 6-channel digital sound track, and is...
... system produces practically distortion-free 6-channel sound (technically, a left , center, and right), and 2 surround stereo channels, Dolby Digital provides 5 full-range audio channels. channel reproduction by adding the surround back channel to minimum volume) reproduced by the other 5/6 channels in many TV and cable broadcasts as a method of DTS digital surround in your enjoyment. ■ Dolby Pro Logic II Dolby Pro Logic II is an improved technique used with a 6-channel digital sound track, and is...

Owner's Manual
Page 101
... the TV. CH LEVEL CINEMA DSP MENU TEST ENTER RETURN AUTO SETTING COMPLETED 4. y Before performing the steps below , set the volume of the TV so that best match your listening room until you want the sound beams to the operation mode of error messages and their proper remedies. 3. Make sure that best matches the current input source of your TV using the remote control supplied with the wall. AUX...
... the TV. CH LEVEL CINEMA DSP MENU TEST ENTER RETURN AUTO SETTING COMPLETED 4. y Before performing the steps below , set the volume of the TV so that best match your listening room until you want the sound beams to the operation mode of error messages and their proper remedies. 3. Make sure that best matches the current input source of your TV using the remote control supplied with the wall. AUX...


