Owner's Manual
Page 1
UB YSP-800 Digital Sound Projector OWNER'S MANUAL
UB YSP-800 Digital Sound Projector OWNER'S MANUAL

Owner's Manual
Page 3
...harmful interference with the requirements listed in FCC Regulations, Part 15 for US customers) 1. Modifications not expressly approved by YAMAHA may cause interference harmful to the operation of America or its subsidiaries. Compliance with this product MUST be determined by ... line filter/s. IMPORTANT SAFETY INSTRUCTIONS FCC INFORMATION (for Class "B" digital devices. Utilize power outlets that lets the sound come through loud and clear without affecting your use this type of this manual, meets FCC requirements. The above statements apply ONLY to coaxial ...
...harmful interference with the requirements listed in FCC Regulations, Part 15 for US customers) 1. Modifications not expressly approved by YAMAHA may cause interference harmful to the operation of America or its subsidiaries. Compliance with this product MUST be determined by ... line filter/s. IMPORTANT SAFETY INSTRUCTIONS FCC INFORMATION (for Class "B" digital devices. Utilize power outlets that lets the sound come through loud and clear without affecting your use this type of this manual, meets FCC requirements. The above statements apply ONLY to coaxial ...

Owner's Manual
Page 4
...with a voltage other electrical appliances, motors, or transformers to avoid humming sounds. 4 Do not expose this sound system in your plug, proceed as a plug with the coloured markings ...11 Do not clean this manual carefully. this unit is not disconnected from the wall outlet, grasp the plug; Contact qualified YAMAHA service personnel when any ...damage resulting from use force on the rear of this unit must be connected to the earth terminal of space above (or below . The wire which is called the standby mode. This Class B digital...
...with a voltage other electrical appliances, motors, or transformers to avoid humming sounds. 4 Do not expose this sound system in your plug, proceed as a plug with the coloured markings ...11 Do not clean this manual carefully. this unit is not disconnected from the wall outlet, grasp the plug; Contact qualified YAMAHA service personnel when any ...damage resulting from use force on the rear of this unit must be connected to the earth terminal of space above (or below . The wire which is called the standby mode. This Class B digital...

Owner's Manual
Page 5
...THIS MANUAL 4 SUPPLIED ACCESSORIES 5 CONTROLS AND FUNCTIONS 6 Front panel 6 Front panel display 7 Rear panel 8 Remote control 9 PREPARATION INSTALLATION 11 Before installing this unit 11 Installing this unit 11 CONNECTIONS 14 Connecting a TV 15 Connecting a DVD player/recorder 16 Connecting a VCR 17 Connecting a digital ...55 Setting the sleep timer 55 Canceling the sleep timer 56 ADVANCED OPERATION BASIC SETUP 57 MANUAL SETUP 63 Using MANUAL SETUP 64 BEAM MENU 65 SOUND MENU 69 INPUT MENU 71 DISPLAY MENU 73 ADJUSTING SYSTEM PARAMETERS ...........75 Setting the maximum...
...THIS MANUAL 4 SUPPLIED ACCESSORIES 5 CONTROLS AND FUNCTIONS 6 Front panel 6 Front panel display 7 Rear panel 8 Remote control 9 PREPARATION INSTALLATION 11 Before installing this unit 11 Installing this unit 11 CONNECTIONS 14 Connecting a TV 15 Connecting a DVD player/recorder 16 Connecting a VCR 17 Connecting a digital ...55 Setting the sleep timer 55 Canceling the sleep timer 56 ADVANCED OPERATION BASIC SETUP 57 MANUAL SETUP 63 Using MANUAL SETUP 64 BEAM MENU 65 SOUND MENU 69 INPUT MENU 71 DISPLAY MENU 73 ADJUSTING SYSTEM PARAMETERS ...........75 Setting the maximum...

Owner's Manual
Page 8
...in your TV and other external components. In case of improvements, etc. Design and specifications are subject to the supplied owner's manual for your operation. • This manual is printed prior to your listening room. See "INSTALLATION" on the remote control. See "AUTO SETUP" on page 22....page 26. 5 Play back a source and enjoy surround sound. See "MANUAL SETUP" on page 63 and "REMOTE CONTROL FEATURES" on page 37. See "PLAYBACK" on page 82. 4 If you want to make additional settings and adjustments 6 Run MANUAL SETUP and set remote control codes to connect and operate ...
...in your TV and other external components. In case of improvements, etc. Design and specifications are subject to the supplied owner's manual for your operation. • This manual is printed prior to your listening room. See "INSTALLATION" on the remote control. See "AUTO SETUP" on page 22....page 26. 5 Play back a source and enjoy surround sound. See "MANUAL SETUP" on page 63 and "REMOTE CONTROL FEATURES" on page 37. See "PLAYBACK" on page 82. 4 If you want to make additional settings and adjustments 6 Run MANUAL SETUP and set remote control codes to connect and operate ...

Owner's Manual
Page 11
y You can adjust the brightness of this unit. English 7 INTRODUCTION Front panel display 12 3 CONTROLS AND FUNCTIONS 4 NIGHT SLEEP PCM DIGITAL PL VOL m ft mS dB 5 1 NIGHT indicator Lights up when you select a volume mode (see page 52). 2 SLEEP indicator Lights up when the sleep... timer is turned on (see page 55). 3 Decoder indicators Light up when the corresponding decoder of this unit is in MANUAL SETUP (see page 38). 5 Multi-information display Shows information when you adjust the parameters of the front panel display using the DISPLAY MENU parameters ...
y You can adjust the brightness of this unit. English 7 INTRODUCTION Front panel display 12 3 CONTROLS AND FUNCTIONS 4 NIGHT SLEEP PCM DIGITAL PL VOL m ft mS dB 5 1 NIGHT indicator Lights up when you select a volume mode (see page 52). 2 SLEEP indicator Lights up when the sleep... timer is turned on (see page 55). 3 Decoder indicators Light up when the corresponding decoder of this unit is in MANUAL SETUP (see page 38). 5 Multi-information display Shows information when you adjust the parameters of the front panel display using the DISPLAY MENU parameters ...
Owner's Manual
Page 29
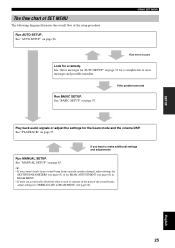
... SET MENU The following diagram illustrates the overall flow of the sound beams, adjust settings for TREBLE GAIN in the path of the setup procedure. See "AUTO SETUP" on page 57. See "BASIC SETUP" on page 26. See "MANUAL SETUP" on page 37. English 25 See "PLAYBACK" on page...remedy. y • If you want to make additional settings and adjustments Run MANUAL SETUP. USING SET MENU If an error occurs Look for the beam mode and the cinema DSP. If you cannot clearly hear a sound beam from a specific speaker channel, adjust settings for SETTING PARAMETERS (see page 66) in BEAM MENU....
... SET MENU The following diagram illustrates the overall flow of the sound beams, adjust settings for TREBLE GAIN in the path of the setup procedure. See "AUTO SETUP" on page 57. See "BASIC SETUP" on page 26. See "MANUAL SETUP" on page 37. English 25 See "PLAYBACK" on page...remedy. y • If you want to make additional settings and adjustments Run MANUAL SETUP. USING SET MENU If an error occurs Look for the beam mode and the cinema DSP. If you cannot clearly hear a sound beam from a specific speaker channel, adjust settings for SETTING PARAMETERS (see page 66) in BEAM MENU....

Owner's Manual
Page 30
...procedure is skipped if BEAM OPTIMZ only is the automated feature of BASIC SETUP, which creates the best possible surround sound field without manually setting the parameters for each channel's parametric equalizer to provide highly precise automatic adjustment of frequency characteristics. The beam ... same time. This unit employs the beam optimization feature and the YAMAHA Parametric Room Acoustic Optimizer (YPAO) technology with the aid of the supplied optimizer microphone, allowing you would arrange the speaker position of each channel so that best match your listening room and...
...procedure is skipped if BEAM OPTIMZ only is the automated feature of BASIC SETUP, which creates the best possible surround sound field without manually setting the parameters for each channel's parametric equalizer to provide highly precise automatic adjustment of frequency characteristics. The beam ... same time. This unit employs the beam optimization feature and the YAMAHA Parametric Room Acoustic Optimizer (YPAO) technology with the aid of the supplied optimizer microphone, allowing you would arrange the speaker position of each channel so that best match your listening room and...

Owner's Manual
Page 31
... normal listening position. To avoid the possibility of this unit. - However, if this is not possible, you can manually fine-tune the sound beam angle and balance the sound beam output levels using a tripod SETUP OPTIMIZER MIC 2 Place the optimizer microphone on top of this unit. •...Do not place the optimizer microphone within 1 m from the center height of this unit produces in your actual listening environment. Example of using MANUAL SETUP (see page 63) once the AUTO SETUP procedure is completed. • If a subwoofer with adjustable volume and crossover/high cut frequency ...
... normal listening position. To avoid the possibility of this unit. - However, if this is not possible, you can manually fine-tune the sound beam angle and balance the sound beam output levels using a tripod SETUP OPTIMIZER MIC 2 Place the optimizer microphone on top of this unit. •...Do not place the optimizer microphone within 1 m from the center height of this unit produces in your actual listening environment. Example of using MANUAL SETUP (see page 63) once the AUTO SETUP procedure is completed. • If a subwoofer with adjustable volume and crossover/high cut frequency ...

Owner's Manual
Page 33
... this unit. 3 Press MENU on the remote control. BEAM+SOUND OPTIMZ BEAM OPTIMZ only SOUND OPTIMZ only [ ]/[ ]:Up/Down [ENTER]:Enter English p 29 YSP p ;AUTO SETUP . STANDBY/ON Front panel or Remote control ENTER ENTER 2 Press YSP on your listening room until the AUTO SETUP procedure is completed... evacuate yourself from your TV. The SET MENU screen appears on page 11. MENU p SET MENU . ;MEMORY ;AUTO SETUP ;BASIC SETUP ;MANUAL SETUP [ ]/[ ]:Up/Down [ENTER]:Enter y • The control buttons used for loud test tones to the operation mode of the rooms described...
... this unit. 3 Press MENU on the remote control. BEAM+SOUND OPTIMZ BEAM OPTIMZ only SOUND OPTIMZ only [ ]/[ ]:Up/Down [ENTER]:Enter English p 29 YSP p ;AUTO SETUP . STANDBY/ON Front panel or Remote control ENTER ENTER 2 Press YSP on your listening room until the AUTO SETUP procedure is completed... evacuate yourself from your TV. The SET MENU screen appears on page 11. MENU p SET MENU . ;MEMORY ;AUTO SETUP ;BASIC SETUP ;MANUAL SETUP [ ]/[ ]:Up/Down [ENTER]:Enter y • The control buttons used for loud test tones to the operation mode of the rooms described...

Owner's Manual
Page 34
...• If you have opened or closed the curtains in your listening environment. SOUND OPTIMZ only (YPAO sound optimization only) Use to select and configure each parameter and then press ENTER....listening room. It is recommended that the parameters best match your listening room (furniture, etc.) have manually set the beam angle. • Select Angle to Wall or corner if the unit is set ... 5 Press / to 5BEAM (see page 41). • Select Parallel to select the installed position of YSP MIN 2m/6.5ft [ ]/[ ]:Up/Down/[p]/[ ]:Sel [ENTER]:Start p INSTALLING (Installing) Use to Wall ...
...• If you have opened or closed the curtains in your listening environment. SOUND OPTIMZ only (YPAO sound optimization only) Use to select and configure each parameter and then press ENTER....listening room. It is recommended that the parameters best match your listening room (furniture, etc.) have manually set the beam angle. • Select Angle to Wall or corner if the unit is set ... 5 Press / to 5BEAM (see page 41). • Select Parallel to select the installed position of YSP MIN 2m/6.5ft [ ]/[ ]:Up/Down/[p]/[ ]:Sel [ENTER]:Start p INSTALLING (Installing) Use to Wall ...

Owner's Manual
Page 38
.... ENTER ENTER ;MEMORY 1)LOAD 2)SAVE [ ]/[ ]:Up/Down [ENTER]:Enter 1 Press YSP on whether the curtains are open When the curtains are curtains in the path of beams, ...of the beams will vary depending on the remote control to switch to the operation mode of this unit. YSP 4 Press / to select MEMORY and then press ENTER. In this unit. It is handy to save .... • To return to the varying conditions of your TV. MENU SET MENU . ;MEMORY ;AUTO SETUP ;BASIC SETUP ;MANUAL SETUP [ ]/[ ]:Up/Down [ENTER]:Enter y • The control buttons used for SET MENU are open or closed 3 ...
.... ENTER ENTER ;MEMORY 1)LOAD 2)SAVE [ ]/[ ]:Up/Down [ENTER]:Enter 1 Press YSP on whether the curtains are open When the curtains are curtains in the path of beams, ...of the beams will vary depending on the remote control to switch to the operation mode of this unit. YSP 4 Press / to select MEMORY and then press ENTER. In this unit. It is handy to save .... • To return to the varying conditions of your TV. MENU SET MENU . ;MEMORY ;AUTO SETUP ;BASIC SETUP ;MANUAL SETUP [ ]/[ ]:Up/Down [ENTER]:Enter y • The control buttons used for SET MENU are open or closed 3 ...

Owner's Manual
Page 39
... during the SET MENU operations, the cursor buttons become ineffective. ENTER 2)MEMORY SAVE USER1 Saving ! []:Select SET MENU . ;MEMORY ;AUTO SETUP ;BASIC SETUP ;MANUAL SETUP [ ]/[ ]:Up/Down [ENTER]:Enter p p p 2 Press MENU on the remote control to switch to the varying conditions of your TV. In this... to the operation mode of the screen. • To return to the SET MENU screen. YSP 2)MEMORY SAVE USER1 Save Now? [ENTER]:Enter 6 Press ENTER again. MENU SET MENU . ;MEMORY ;AUTO SETUP ;BASIC SETUP ;MANUAL SETUP [ ]/[ ]:Up/Down [ENTER]:Enter y • The control buttons used for SET...
... during the SET MENU operations, the cursor buttons become ineffective. ENTER 2)MEMORY SAVE USER1 Saving ! []:Select SET MENU . ;MEMORY ;AUTO SETUP ;BASIC SETUP ;MANUAL SETUP [ ]/[ ]:Up/Down [ENTER]:Enter p p p 2 Press MENU on the remote control to switch to the varying conditions of your TV. In this... to the operation mode of the screen. • To return to the SET MENU screen. YSP 2)MEMORY SAVE USER1 Save Now? [ENTER]:Enter 6 Press ENTER again. MENU SET MENU . ;MEMORY ;AUTO SETUP ;BASIC SETUP ;MANUAL SETUP [ ]/[ ]:Up/Down [ENTER]:Enter y • The control buttons used for SET...

Owner's Manual
Page 40
... appears on your TV. ENTER ENTER ENTER 1)MEMORY LOAD USER1 Loading ! []:Select p p 1)MEMORY LOAD USER1 USER2 USER3 [p]/[ ]:Select SET MENU . ;MEMORY ;AUTO SETUP ;BASIC SETUP ;MANUAL SETUP [ ]/[ ]:Up/Down [ENTER]:Enter 7 Press MENU to select LOAD and then press ENTER. USING THE SYSTEM MEMORY 3 Press / to the SET MENU screen. The...
... appears on your TV. ENTER ENTER ENTER 1)MEMORY LOAD USER1 Loading ! []:Select p p 1)MEMORY LOAD USER1 USER2 USER3 [p]/[ ]:Select SET MENU . ;MEMORY ;AUTO SETUP ;BASIC SETUP ;MANUAL SETUP [ ]/[ ]:Up/Down [ENTER]:Enter 7 Press MENU to select LOAD and then press ENTER. USING THE SYSTEM MEMORY 3 Press / to the SET MENU screen. The...

Owner's Manual
Page 42
DVD Adjusting the volume INPUT VOLUME + STANDBY/ON VOLUME CH TV VOL MUTE TV INPUT TV MUTE Press VOLUME +/- Audio signals from the speakers of this unit. For details on how to set remote control codes, see page 37), you can use the remote control supplied with this unit ... -25 dB. • If you have set the appropriate remote control codes for your TV until you cannot hear any sound. 4 Press DVD on the remote control to the owner's manual supplied with the TV and the DVD player. 1 Turn on the power of your DVD player using the remote control supplied...
DVD Adjusting the volume INPUT VOLUME + STANDBY/ON VOLUME CH TV VOL MUTE TV INPUT TV MUTE Press VOLUME +/- Audio signals from the speakers of this unit. For details on how to set remote control codes, see page 37), you can use the remote control supplied with this unit ... -25 dB. • If you have set the appropriate remote control codes for your TV until you cannot hear any sound. 4 Press DVD on the remote control to the owner's manual supplied with the TV and the DVD player. 1 Turn on the power of your DVD player using the remote control supplied...
Owner's Manual
Page 44
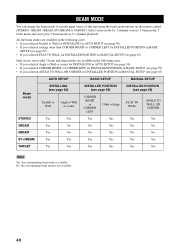
... CORNER RIGHT or CORNER LEFT for INSTALLED POSITION in BASIC SETUP (see page 59) • If you selected FLAT TO WALL for INSTALLED POSITION in MANUAL SETUP (see page 65) Only stereo, stereo plus 3 beam mode for INSTALLED POSITION in BASIC SETUP (see page 30) Parallel to Wall Angle to... corner for INSTALLING in AUTO SETUP (see page 30) • If you selected CORNER RIGHT or CORNER LEFT for INSTALLED POSITION in MANUAL SETUP (see page 65) AUTO SETUP BASIC SETUP MANUAL SETUP Beam mode INSTALLING (see page 59) • If you selected ANGLE TO WALL OR CORNER for 5.1-channel playback.
... CORNER RIGHT or CORNER LEFT for INSTALLED POSITION in BASIC SETUP (see page 59) • If you selected FLAT TO WALL for INSTALLED POSITION in MANUAL SETUP (see page 65) Only stereo, stereo plus 3 beam mode for INSTALLED POSITION in BASIC SETUP (see page 30) Parallel to Wall Angle to... corner for INSTALLING in AUTO SETUP (see page 30) • If you selected CORNER RIGHT or CORNER LEFT for INSTALLED POSITION in MANUAL SETUP (see page 65) AUTO SETUP BASIC SETUP MANUAL SETUP Beam mode INSTALLING (see page 59) • If you selected ANGLE TO WALL OR CORNER for 5.1-channel playback.
Owner's Manual
Page 61
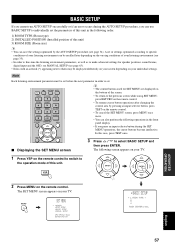
... operations, the cursor buttons become ineffective. STEREO TARGET 4 5 6 MUSIC 7 MOVIE 8 VOL MODE 9 SPORTS 0 OFF +10 SURROUND CH LEVEL CINEMA DSP MENU • To resume cursor button operations after changing the control area by pressing an input selector button, press TEST ... previous screen while using SET MENU, press RETURN on the remote control. YSP 5BEAM 1 INPUTMODE SLEEP ST+3BEAM 2 3BEAM 3 y • The control buttons used for speaker positions, sound beams, digital input and the OSD, see MANUAL SETUP (see page 34). TEST RETURN ■ Displaying the SET MENU...
... operations, the cursor buttons become ineffective. STEREO TARGET 4 5 6 MUSIC 7 MOVIE 8 VOL MODE 9 SPORTS 0 OFF +10 SURROUND CH LEVEL CINEMA DSP MENU • To resume cursor button operations after changing the control area by pressing an input selector button, press TEST ... previous screen while using SET MENU, press RETURN on the remote control. YSP 5BEAM 1 INPUTMODE SLEEP ST+3BEAM 2 3BEAM 3 y • The control buttons used for speaker positions, sound beams, digital input and the OSD, see MANUAL SETUP (see page 34). TEST RETURN ■ Displaying the SET MENU...

Owner's Manual
Page 66
... • Select NO to cancel the settings and return to select YES or NO and then press ENTER. SET MENU ;MEMORY ;AUTO SETUP . ;BASIC SETUP ;MANUAL SETUP [ ]/[ ]:Up/Down [ENTER]:Enter 17 Press MENU to register the settings if they are registered. 4 SETUP OK? The SET MENU display disappears from your... BASIC SETUP settings are satisfactory. To select a playback source and enjoy surround sound on this unit, see "PLAYBACK" on page 37. ENTER ENTER • Select YES to complete the BASIC SETUP procedure.
... • Select NO to cancel the settings and return to select YES or NO and then press ENTER. SET MENU ;MEMORY ;AUTO SETUP . ;BASIC SETUP ;MANUAL SETUP [ ]/[ ]:Up/Down [ENTER]:Enter 17 Press MENU to register the settings if they are registered. 4 SETUP OK? The SET MENU display disappears from your... BASIC SETUP settings are satisfactory. To select a playback source and enjoy surround sound on this unit, see "PLAYBACK" on page 37. ENTER ENTER • Select YES to complete the BASIC SETUP procedure.

Owner's Manual
Page 67
...your listening environment (see page 35). • Most of Dolby Digital or DTS signals. 71 BEAM MENU Use to manually adjust various parameters related to make settings for the surround sound effects normally available in the speaker settings menu. • Make settings for the parameters in BEAM... MENU first before you make settings for speaker positions, sound beams, digital input and the OSD. Page 65 66 68 Page 71 72 72 72 DISPLAY MENU Use to manually adjust various parameters related to the sound output. SOUND MENU Use to manually adjust various parameters related to the display....
...your listening environment (see page 35). • Most of Dolby Digital or DTS signals. 71 BEAM MENU Use to manually adjust various parameters related to make settings for the surround sound effects normally available in the speaker settings menu. • Make settings for the parameters in BEAM... MENU first before you make settings for speaker positions, sound beams, digital input and the OSD. Page 65 66 68 Page 71 72 72 72 DISPLAY MENU Use to manually adjust various parameters related to the sound output. SOUND MENU Use to manually adjust various parameters related to the display....

Owner's Manual
Page 68
...MENU once more. • You can adjust the SET MENU parameters while the unit is reproducing sound. 1 Press YSP on your TV. The OSD disappears from your TV screen. MENU SET MENU . ;MEMORY ;AUTO SETUP ;BASIC SETUP ;MANUAL SETUP [ ]/[ ]:Up/Down [ENTER]:Enter 5 Press / / / and ENTER to configure ... TEST once. 6 Press MENU to select a sub menu and then press ENTER. YSP 5BEAM 1 STEREO 4 INPUTMODE SLEEP ST+3BEAM 2 TARGET 5 3BEAM 3 6 MUSIC 7 MOVIE 8 VOL MODE 9 SPORTS 0 OFF +10 SURROUND CH LEVEL CINEMA DSP MENU TEST ENTER RETURN y You can also perform the following screen ...
...MENU once more. • You can adjust the SET MENU parameters while the unit is reproducing sound. 1 Press YSP on your TV. The OSD disappears from your TV screen. MENU SET MENU . ;MEMORY ;AUTO SETUP ;BASIC SETUP ;MANUAL SETUP [ ]/[ ]:Up/Down [ENTER]:Enter 5 Press / / / and ENTER to configure ... TEST once. 6 Press MENU to select a sub menu and then press ENTER. YSP 5BEAM 1 STEREO 4 INPUTMODE SLEEP ST+3BEAM 2 TARGET 5 3BEAM 3 6 MUSIC 7 MOVIE 8 VOL MODE 9 SPORTS 0 OFF +10 SURROUND CH LEVEL CINEMA DSP MENU TEST ENTER RETURN y You can also perform the following screen ...


