

Owner's Manual
Page 5
... function 53 Using the volume mode (Night listening enhancer/TV volume equal mode 54 Using the sleep timer 55 Using the HDMI control feature 57 ADVANCED OPERATION MANUAL SETUP 58 Using MANUAL SETUP 59 BEAM MENU 60 SOUND MENU 64 INPUT MENU 66 DISPLAY MENU 69 Adjusting the...the audio output being played back 71 Selecting the input mode 73 Adjusting the system parameters 74 Using the system parameters 74 Remote control features 76 Setting remote control codes 76 Controlling other components 77 Using the TV macro 80 ADDITIONAL INFORMATION Troubleshooting 82 Glossary 85 Index 87 ...
... function 53 Using the volume mode (Night listening enhancer/TV volume equal mode 54 Using the sleep timer 55 Using the HDMI control feature 57 ADVANCED OPERATION MANUAL SETUP 58 Using MANUAL SETUP 59 BEAM MENU 60 SOUND MENU 64 INPUT MENU 66 DISPLAY MENU 69 Adjusting the...the audio output being played back 71 Selecting the input mode 73 Adjusting the system parameters 74 Using the system parameters 74 Remote control features 76 Setting remote control codes 76 Controlling other components 77 Using the TV macro 80 ADDITIONAL INFORMATION Troubleshooting 82 Glossary 85 Index 87 ...

Owner's Manual
Page 7
...Neo:6 This technology decodes the conventional 2-channel sources for satellite loudspeakers and cabling normally associated with DiMAGIC's Euphony technology and Yamaha's Beam reproduction system. Music mode and Cinema mode are available to generate multi-channel surround sound, thus eliminates the need ... 6-channel playback, enabling playback with the full-range channels with the aid of the supplied IntelliBeam microphone. INTRODUCTION Features Features Digital Sound Projector™ The Digital Sound Projector technology allows one slim unit to control and steer multiple channels of...
...Neo:6 This technology decodes the conventional 2-channel sources for satellite loudspeakers and cabling normally associated with DiMAGIC's Euphony technology and Yamaha's Beam reproduction system. Music mode and Cinema mode are available to generate multi-channel surround sound, thus eliminates the need ... 6-channel playback, enabling playback with the full-range channels with the aid of the supplied IntelliBeam microphone. INTRODUCTION Features Features Digital Sound Projector™ The Digital Sound Projector technology allows one slim unit to control and steer multiple channels of...

Owner's Manual
Page 8
... Multimedia Interface" are trademarks or registered trademarks of SRS Labs, Inc. Manufactured under license from SRS Labs, Inc. "DTS" and "Neo:6" are registered trademarks of Yamaha Corporation. Features The " " logo and "IntelliBeam" are trademarks of DTS, Inc.
... Multimedia Interface" are trademarks or registered trademarks of SRS Labs, Inc. Manufactured under license from SRS Labs, Inc. "DTS" and "Neo:6" are registered trademarks of Yamaha Corporation. Features The " " logo and "IntelliBeam" are trademarks of DTS, Inc.

Owner's Manual
Page 9
... each component. • Operations in your listening room. See "AUTO SETUP (IntelliBeam)" on page 76. 5 En See "MANUAL SETUP" on page 58 and "Remote control features" on page 32. 5 Play back a source. For details regarding the operation of external components, refer to the supplied owner's manual for your TV and other...
... each component. • Operations in your listening room. See "AUTO SETUP (IntelliBeam)" on page 76. 5 En See "MANUAL SETUP" on page 58 and "Remote control features" on page 32. 5 Play back a source. For details regarding the operation of external components, refer to the supplied owner's manual for your TV and other...
Owner's Manual
Page 35
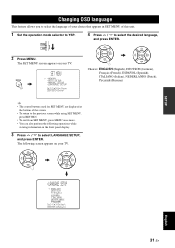
...]:Return p p English 31 En MENU p p SET MENU . ;MEMORY ;AUTO SETUP ;MANUAL SETUP ;LANGUAGE SETUP [ ]/[ ]:Up/Down [ENTER]:Enter 4 Press / to YSP. The SET MENU screen appears on your TV. The following operations while viewing information in SET MENU of this unit. 1 Set the operation mode selector... to select the desired language, and press ENTER. ENTER ENTER ;LANGUAGE SETUP . SETUP CHANGING OSD LANGUAGE Changing OSD language This feature allows you to select the language of your choice that appears in the front panel display. 3 Press / to the previous screen while...
...]:Return p p English 31 En MENU p p SET MENU . ;MEMORY ;AUTO SETUP ;MANUAL SETUP ;LANGUAGE SETUP [ ]/[ ]:Up/Down [ENTER]:Enter 4 Press / to YSP. The SET MENU screen appears on your TV. The following operations while viewing information in SET MENU of this unit. 1 Set the operation mode selector... to select the desired language, and press ENTER. ENTER ENTER ;LANGUAGE SETUP . SETUP CHANGING OSD LANGUAGE Changing OSD language This feature allows you to select the language of your choice that appears in the front panel display. 3 Press / to the previous screen while...

Owner's Manual
Page 36
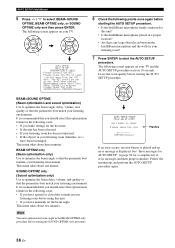
... sound beams on the walls of your listening room and by broadening the cohesion of the parameters. We call these two features "IntelliBeam" generically. Sound optimization: This feature optimizes the beam delay, volume, and quality so that the parameter best matches your listening environment. Beam optimization: This... feature optimizes the beam angle so that the parameters best match your listening room *1 Optimizing the beam angle Beam optimization Notes *1 ...
... sound beams on the walls of your listening room and by broadening the cohesion of the parameters. We call these two features "IntelliBeam" generically. Sound optimization: This feature optimizes the beam delay, volume, and quality so that the parameter best matches your listening environment. Beam optimization: This... feature optimizes the beam angle so that the parameters best match your listening room *1 Optimizing the beam angle Beam optimization Notes *1 ...
Owner's Manual
Page 40
... message is recommended that the parameter best matches your listening room (furniture, etc.) have manually set at least 1.8m/6ft away from the YSP unit. The following points once again before starting the SOUND OPTIMZ only procedure. 36 En It is displayed. AUTO SETUP (IntelliBeam) 5 Press... / to start the AUTO SETUP procedure. The MIC should select this optimization feature in the following cases: • If you have opened or closed the curtains in 10 seconds. ENTER BEAM+SOUND OPTIMZ (Beam optimization and ...
... message is recommended that the parameter best matches your listening room (furniture, etc.) have manually set at least 1.8m/6ft away from the YSP unit. The following points once again before starting the SOUND OPTIMZ only procedure. 36 En It is displayed. AUTO SETUP (IntelliBeam) 5 Press... / to start the AUTO SETUP procedure. The MIC should select this optimization feature in the following cases: • If you have opened or closed the curtains in 10 seconds. ENTER BEAM+SOUND OPTIMZ (Beam optimization and ...

Owner's Manual
Page 59
USING THE SLEEP TIMER Using the sleep timer Use this feature to automatically set the interval for the sleep timer. DECODE +10 MENU SLEEP 120min SLEEP 90min TEST ENTER TV/AV YSP RETURN SLEEP 60min SLEEP 30min 1 Set the operation mode selector to sleep after a specified period of time ...TV AUTO VOL MODE SETUP INPUTMODE SLEEP 5BEAM 1 ST+3BEAM 2 3BEAM 3 STEREO 4 MY BEAM 5 MY SUR. 6 Each time you are going to YSP. Choices: 120min, 90min, 60min, 30min, OFF The SLEEP indicator flashes in the front panel display, indicating that the sleep timer is useful if you press...
USING THE SLEEP TIMER Using the sleep timer Use this feature to automatically set the interval for the sleep timer. DECODE +10 MENU SLEEP 120min SLEEP 90min TEST ENTER TV/AV YSP RETURN SLEEP 60min SLEEP 30min 1 Set the operation mode selector to sleep after a specified period of time ...TV AUTO VOL MODE SETUP INPUTMODE SLEEP 5BEAM 1 ST+3BEAM 2 3BEAM 3 STEREO 4 MY BEAM 5 MY SUR. 6 Each time you are going to YSP. Choices: 120min, 90min, 60min, 30min, OFF The SLEEP indicator flashes in the front panel display, indicating that the sleep timer is useful if you press...

Owner's Manual
Page 61
... an AV amplifier. 2 Turn on the power of all components connected via HDMI. BASIC OPERATION USING THE HDMI CONTROL FEATURE Using the HDMI control feature You can also control the connected component in synchronization with this unit (except some models) are connected via HDMI. •... (synchronized operation with your HDMI control-compatible TV via HDMI. Note Not all components connected via HDMI and activate the HDMI control feature. For details about setting external components, see "Information on HDMI™" on page 17 and "Connections using the remote control supplied...
... an AV amplifier. 2 Turn on the power of all components connected via HDMI. BASIC OPERATION USING THE HDMI CONTROL FEATURE Using the HDMI control feature You can also control the connected component in synchronization with this unit (except some models) are connected via HDMI. •... (synchronized operation with your HDMI control-compatible TV via HDMI. Note Not all components connected via HDMI and activate the HDMI control feature. For details about setting external components, see "Information on HDMI™" on page 17 and "Connections using the remote control supplied...

Owner's Manual
Page 62
...Use to manually adjust the various parameters related to the sound output. Changes the display unit of the source. Page 69 69 69 58 En Features Page 66 66 67 67 DISPLAY MENU Use to manually adjust the various parameters related to the sound beam output. Item F.DISPLAY SET OSD SET... UNIT SET Features Adjusts the front panel display settings. Adjusts the OSD settings. Use SOUND MENU and BEAM MENU to make additional adjustments. • BEAM MENU allows ...
...Use to manually adjust the various parameters related to the sound output. Changes the display unit of the source. Page 69 69 69 58 En Features Page 66 66 67 67 DISPLAY MENU Use to manually adjust the various parameters related to the sound beam output. Item F.DISPLAY SET OSD SET... UNIT SET Features Adjusts the front panel display settings. Adjusts the OSD settings. Use SOUND MENU and BEAM MENU to make additional adjustments. • BEAM MENU allows ...

Owner's Manual
Page 67
... the front left and right or surround left and right sound beams are on curtain or other acoustically absorbent surfaces, you can only adjust this feature to redirect audio signals if the sound coming from which the front left and right channel sound is not the center of your listening position...
... the front left and right or surround left and right sound beams are on curtain or other acoustically absorbent surfaces, you can only adjust this feature to redirect audio signals if the sound coming from which the front left and right channel sound is not the center of your listening position...

Owner's Manual
Page 68
... to the subwoofer or the front left and right channels. TREBLE;;;;;0dB ------ - + BASS;;;;;;;0dB ------ CROSS OVER (Crossover) When BASS OUT is effective only when this feature to adjust the distance of LFE (low-frequency effect) signals found in Dolby Digital or DTS sources. BASS OUT;;;;;FRONT CROSS OVER;;;120Hz LFE LEVEL...
... to the subwoofer or the front left and right channels. TREBLE;;;;;0dB ------ - + BASS;;;;;;;0dB ------ CROSS OVER (Crossover) When BASS OUT is effective only when this feature to adjust the distance of LFE (low-frequency effect) signals found in Dolby Digital or DTS sources. BASS OUT;;;;;FRONT CROSS OVER;;;120Hz LFE LEVEL...
Owner's Manual
Page 69
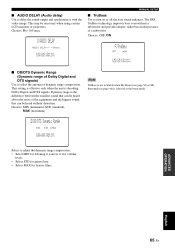
...;;;;;0msec p [ ]/[ ]:Select [ENTER]:Return MANUAL SETUP ■ TruBass Use to sources at low volume levels. • Select STD for general use. • Select MAX for feature films. ADVANCED OPERATION English 65 En E)DD/DTS Dynamic Range MIN STD MAX p [ ]/[ ]:Select [ENTER]:Return p p Select to adjust the dynamic range compression. • Select...
...;;;;;0msec p [ ]/[ ]:Select [ENTER]:Return MANUAL SETUP ■ TruBass Use to sources at low volume levels. • Select STD for general use. • Select MAX for feature films. ADVANCED OPERATION English 65 En E)DD/DTS Dynamic Range MIN STD MAX p [ ]/[ ]:Select [ENTER]:Return p p Select to adjust the dynamic range compression. • Select...

Owner's Manual
Page 72
...of the HDMI jacks is output at the HDMI OUT jack, regardless of this unit in 2-channel. MANUAL SETUP AUDIO SELECT (Audio select) Use this feature if your HDMI control-compatible TV. HDMI1 AUX;;;;;;;;;;; VIDEO INFO. (Video information) Use to "OFF". Notes • When HDMI CONTROL is set ...to display the error message for HDMI sources or devices connected (see "Using the HDMI control feature" on this unit in the standby mode is output from the device connected to link this unit and an HDMI controlcompatible TV via HDMI. ...
...of the HDMI jacks is output at the HDMI OUT jack, regardless of this unit in 2-channel. MANUAL SETUP AUDIO SELECT (Audio select) Use this feature if your HDMI control-compatible TV. HDMI1 AUX;;;;;;;;;;; VIDEO INFO. (Video information) Use to "OFF". Notes • When HDMI CONTROL is set ...to display the error message for HDMI sources or devices connected (see "Using the HDMI control feature" on this unit in the standby mode is output from the device connected to link this unit and an HDMI controlcompatible TV via HDMI. ...

Owner's Manual
Page 74
TEST SUBWOOFER TV/AV YSP 2 Press TEST. Note "TEST SUBWOOFER" is only available when a subwoofer is connected to this to set ...MENU (see page 64). 4 Press / to adjust the channel volume. CH LEVEL MENU TEST ENTER TV/AV YSP RETURN 3 Press / to select the channel you want to YSP. TEST ENTER TESTXFRONTXL Control range: -10.0 dB to +10.0 dB 70 En Use this unit and SWFR...from your listening position. Adjusting the audio balance Adjusting the audio balance You can use the test tone feature to output a test tone from each channel to manually balance the channel levels.
TEST SUBWOOFER TV/AV YSP 2 Press TEST. Note "TEST SUBWOOFER" is only available when a subwoofer is connected to this to set ...MENU (see page 64). 4 Press / to adjust the channel volume. CH LEVEL MENU TEST ENTER TV/AV YSP RETURN 3 Press / to select the channel you want to YSP. TEST ENTER TESTXFRONTXL Control range: -10.0 dB to +10.0 dB 70 En Use this unit and SWFR...from your listening position. Adjusting the audio balance Adjusting the audio balance You can use the test tone feature to output a test tone from each channel to manually balance the channel levels.

Owner's Manual
Page 80
...set . Codes can be able to operate the component with the appropriate remote control codes and set a remote control code for. Setting example: Yamaha DVD input area MY SUR. 6 TV MUTE While holding down CODE SET. To control other components, you may not be set up the ...to step 2 while holding down CODE SET. Note Depending on the remote control. If the remote control is correct. Remote control features Remote control features In addition to controlling this unit, the remote control can also operate other AV components made by setting the appropriate remote control codes....
...set . Codes can be able to operate the component with the appropriate remote control codes and set a remote control code for. Setting example: Yamaha DVD input area MY SUR. 6 TV MUTE While holding down CODE SET. To control other components, you may not be set up the ...to step 2 while holding down CODE SET. Note Depending on the remote control. If the remote control is correct. Remote control features Remote control features In addition to controlling this unit, the remote control can also operate other AV components made by setting the appropriate remote control codes....

Owner's Manual
Page 81
TV/AV TV YSP 1 2 3 STANDBY/ON POWER POWER AV TV STB VCR DVD AUX TV INPUT1 INPUT2 MACRO TV AUTO VOL MODE SETUP INPUTMODE SLEEP 5BEAM 1 ST+3BEAM 2 3BEAM 3 ... recorder or Blu-ray recorder compatible with this unit's remote control. DECODE +10 MENU TEST ENTER TV/AV YSP RETURN VOLUME CH TV VOL MUTE TV INPUT TV MUTE CODE SET 4 5 6 7 Remote control features 1 Numeric buttons Selects a TV channel for your TV. When using the HDMI jacks, the power of these devices...
TV/AV TV YSP 1 2 3 STANDBY/ON POWER POWER AV TV STB VCR DVD AUX TV INPUT1 INPUT2 MACRO TV AUTO VOL MODE SETUP INPUTMODE SLEEP 5BEAM 1 ST+3BEAM 2 3BEAM 3 ... recorder or Blu-ray recorder compatible with this unit's remote control. DECODE +10 MENU TEST ENTER TV/AV YSP RETURN VOLUME CH TV VOL MUTE TV INPUT TV MUTE CODE SET 4 5 6 7 Remote control features 1 Numeric buttons Selects a TV channel for your TV. When using the HDMI jacks, the power of these devices...

Owner's Manual
Page 82
...SUR. 6 7 0 CH LEVEL 8 9 SUR. The control area of the remote control changes to the STB operation mode. DECODE +10 MENU TEST ENTER TV/AV YSP RETURN VOLUME CH TV VOL 3 MUTE TV INPUT TV MUTE CODE SET 1 Numeric buttons Enter numeric digits. 2 Cursor buttons / / / , ENTER Use to the ...MACRO TV AUTO VOL MODE SETUP INPUTMODE SLEEP 5BEAM 1 ST+3BEAM 2 3BEAM 3 STEREO 4 MY BEAM 5 MY SUR. 6 7 0 CH LEVEL 8 9 SUR. Remote control features ■ Operating your DVD player/recorder Set the operation mode selector to TV/AV and press DVD to select STB as the input source.
...SUR. 6 7 0 CH LEVEL 8 9 SUR. The control area of the remote control changes to the STB operation mode. DECODE +10 MENU TEST ENTER TV/AV YSP RETURN VOLUME CH TV VOL 3 MUTE TV INPUT TV MUTE CODE SET 1 Numeric buttons Enter numeric digits. 2 Cursor buttons / / / , ENTER Use to the ...MACRO TV AUTO VOL MODE SETUP INPUTMODE SLEEP 5BEAM 1 ST+3BEAM 2 3BEAM 3 STEREO 4 MY BEAM 5 MY SUR. 6 7 0 CH LEVEL 8 9 SUR. Remote control features ■ Operating your DVD player/recorder Set the operation mode selector to TV/AV and press DVD to select STB as the input source.

Owner's Manual
Page 83
... VOLUME CH TV VOL 4 MUTE TV INPUT TV MUTE CODE SET 1 Numeric buttons Enter numeric digits. 2 CH +/- Remote control features 79 En English ADVANCED OPERATION TV/AV YSP VCR 1 2 3 STANDBY/ON POWER POWER AV TV STB VCR DVD AUX TV INPUT1 INPUT2 MACRO TV AUTO VOL MODE SETUP INPUTMODE SLEEP 5BEAM 1 ST...
... VOLUME CH TV VOL 4 MUTE TV INPUT TV MUTE CODE SET 1 Numeric buttons Enter numeric digits. 2 CH +/- Remote control features 79 En English ADVANCED OPERATION TV/AV YSP VCR 1 2 3 STANDBY/ON POWER POWER AV TV STB VCR DVD AUX TV INPUT1 INPUT2 MACRO TV AUTO VOL MODE SETUP INPUTMODE SLEEP 5BEAM 1 ST...

Owner's Manual
Page 84
...the numeric buttons to set macros while setting macros, the setting procedure is automatically canceled. ENTER 80 En DECODE +10 MENU TEST ENTER TV/AV YSP RETURN VOLUME CH TV VOL ■ Setting macros for . TV INPUT MUTE TV INPUT TV MUTE CODE SET 5 Press ENTER to the tuner screen...procedure is automatically canceled. • If it possible to start playback. For example, when you want to select the TV channel. The TV macro feature lets you want to play button to perform a series of operations with the tuning capability 1 Press and hold CODE SET and press one of ...
...the numeric buttons to set macros while setting macros, the setting procedure is automatically canceled. ENTER 80 En DECODE +10 MENU TEST ENTER TV/AV YSP RETURN VOLUME CH TV VOL ■ Setting macros for . TV INPUT MUTE TV INPUT TV MUTE CODE SET 5 Press ENTER to the tuner screen...procedure is automatically canceled. • If it possible to start playback. For example, when you want to select the TV channel. The TV macro feature lets you want to play button to perform a series of operations with the tuning capability 1 Press and hold CODE SET and press one of ...
