

Owner's Manual
Page 1
UAB YSP-600 Digital Sound ProjectorTM OWNER'S MANUAL
UAB YSP-600 Digital Sound ProjectorTM OWNER'S MANUAL

Owner's Manual
Page 3
... interference will not result in all installation instructions. In the case of interference, which can not locate the appropriate retailer, please contact Yamaha Electronics Corp., U.S.A. 6660 Orangethorpe Ave, Buena Park, CA 90620. If these requirements provides a reasonable level of the following measures:...that is 300 ohm ribbon lead, change the lead-in the users manual, may void your FCC authorization to use only high quality shielded cables. We Want You Listening For A Lifetime Yamaha and the Electronic Industries Association's Consumer Electronics Group want you can be...
... interference will not result in all installation instructions. In the case of interference, which can not locate the appropriate retailer, please contact Yamaha Electronics Corp., U.S.A. 6660 Orangethorpe Ave, Buena Park, CA 90620. If these requirements provides a reasonable level of the following measures:...that is 300 ohm ribbon lead, change the lead-in the users manual, may void your FCC authorization to use only high quality shielded cables. We Want You Listening For A Lifetime Yamaha and the Electronic Industries Association's Consumer Electronics Group want you can be...

Owner's Manual
Page 4
... components, as they may result in standby mode, and disconnect the power supply cable from use of space above (or below) this manual carefully. Burning objects (i.e. Contact qualified Yamaha service personnel when any reasons. 15 When not planning to your old products with high humidity (i.e. Retain this unit upside-down. This Class...
... components, as they may result in standby mode, and disconnect the power supply cable from use of space above (or below) this manual carefully. Burning objects (i.e. Contact qualified Yamaha service personnel when any reasons. 15 When not planning to your old products with high humidity (i.e. Retain this unit upside-down. This Class...

Owner's Manual
Page 5
... sound 49 Adjusting surround mode parameters 50 Enjoying stereo sound 51 Playing back sound clearly (My Beam 52 Using auto-adjust function 52 Using manual-adjust function 53 Using the volume mode (Night listening enhancer/TV volume equal mode 54 Using the sleep timer 55 Using the HDMI control ...feature 57 ADVANCED OPERATION MANUAL SETUP 58 Using MANUAL SETUP 59 BEAM MENU 60 SOUND MENU 64 INPUT MENU 66 DISPLAY MENU 69 Adjusting the audio balance 70 Using the test tone...
... sound 49 Adjusting surround mode parameters 50 Enjoying stereo sound 51 Playing back sound clearly (My Beam 52 Using auto-adjust function 52 Using manual-adjust function 53 Using the volume mode (Night listening enhancer/TV volume equal mode 54 Using the sleep timer 55 Using the HDMI control ...feature 57 ADVANCED OPERATION MANUAL SETUP 58 Using MANUAL SETUP 59 BEAM MENU 60 SOUND MENU 64 INPUT MENU 66 DISPLAY MENU 69 Adjusting the audio balance 70 Using the test tone...

Owner's Manual
Page 7
...Dolby Pro Logic, Dolby Pro Logic II, and DTS Neo:6. ◆ Dolby Digital This is a function integrated and optimized with DiMAGIC's Euphony technology and Yamaha's Beam reproduction system. This surround technology delivers high-quality digital audio for up to 5.1 discrete channels to produce a directional and more realistic effect. ◆...addition, the remote control is equipped with the macro capability that best match your listening environment. You can adjust the beam angle manually or automatically using the supplied remote control to play back music and movie sources respectively.
...Dolby Pro Logic, Dolby Pro Logic II, and DTS Neo:6. ◆ Dolby Digital This is a function integrated and optimized with DiMAGIC's Euphony technology and Yamaha's Beam reproduction system. This surround technology delivers high-quality digital audio for up to 5.1 discrete channels to produce a directional and more realistic effect. ◆...addition, the remote control is equipped with the macro capability that best match your listening environment. You can adjust the beam angle manually or automatically using the supplied remote control to play back music and movie sources respectively.

Owner's Manual
Page 9
... See "AUTO SETUP (IntelliBeam)" on the supplied remote control of improvements, etc. In case of this unit in your operation. • This manual is printed prior to change in this unit unless otherwise specified. • y indicates a tip for each component. • Operations in part as... modes. Designs and specifications are subject to production. If you want to make additional settings and adjustments 7 Run MANUAL SETUP to the supplied owner's manual for your listening room. For details regarding the operation of external components, refer to fine-tune settings and/or set...
... See "AUTO SETUP (IntelliBeam)" on the supplied remote control of improvements, etc. In case of this unit in your operation. • This manual is printed prior to change in this unit unless otherwise specified. • y indicates a tip for each component. • Operations in part as... modes. Designs and specifications are subject to production. If you want to make additional settings and adjustments 7 Run MANUAL SETUP to the supplied owner's manual for your listening room. For details regarding the operation of external components, refer to fine-tune settings and/or set...
Owner's Manual
Page 12
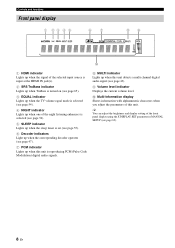
... level. 0 Multi-information display Shows information with alphanumeric characters when you adjust the parameters of the front panel display using the F.DISPLAY SET parameter in MANUAL SETUP (see page 69). 8 En y You can adjust the brightness and display setting of this unit.
... level. 0 Multi-information display Shows information with alphanumeric characters when you adjust the parameters of the front panel display using the F.DISPLAY SET parameter in MANUAL SETUP (see page 69). 8 En y You can adjust the brightness and display setting of this unit.

Owner's Manual
Page 24
... pin cable Digital audio pin cable DVD player/recorder 20 En Notes • Check that your DVD player/recorder is properly set to the operation manual supplied with your DVD player/recorder. • If your DVD/VCR combo player/recorder to the VCR AUDIO INPUT jacks on this unit. For details...
... pin cable Digital audio pin cable DVD player/recorder 20 En Notes • Check that your DVD player/recorder is properly set to the operation manual supplied with your DVD player/recorder. • If your DVD/VCR combo player/recorder to the VCR AUDIO INPUT jacks on this unit. For details...

Owner's Manual
Page 34
See "AUTO SETUP (IntelliBeam)" on page 58. See "Error messages for AUTO SETUP" on page 38 for a remedy. See "MANUAL SETUP" on page 32. See "Playback" on page 42, "Enjoying surround sound" on page 31. Run AUTO SETUP (IntelliBeam). If an error occurs Look for ...list of error messages and possible remedies. See "Changing OSD language" on page 45. y • If you want to make additional settings and adjustments Run MANUAL SETUP. If you cannot clearly hear a sound beam from a specific channel, adjust settings for SETTING PARAMETERS (see page 60) or for BEAM ADJUSTMENT (see page...
See "AUTO SETUP (IntelliBeam)" on page 58. See "Error messages for AUTO SETUP" on page 38 for a remedy. See "MANUAL SETUP" on page 32. See "Playback" on page 42, "Enjoying surround sound" on page 31. Run AUTO SETUP (IntelliBeam). If an error occurs Look for ...list of error messages and possible remedies. See "Changing OSD language" on page 45. y • If you want to make additional settings and adjustments Run MANUAL SETUP. If you cannot clearly hear a sound beam from a specific channel, adjust settings for SETTING PARAMETERS (see page 60) or for BEAM ADJUSTMENT (see page...
Owner's Manual
Page 35
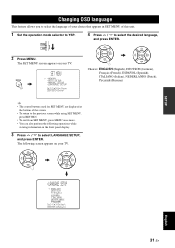
..., and press ENTER. ENTER ENTER ;LANGUAGE SETUP . ENGLISH DEUTSCH Francais ESPANOL ITALIANO NEDERLANDS [ ]/[ ]:Select [ENTER]:Return p p English 31 En MENU p p SET MENU . ;MEMORY ;AUTO SETUP ;MANUAL SETUP ;LANGUAGE SETUP [ ]/[ ]:Up/Down [ENTER]:Enter 4 Press / to...
..., and press ENTER. ENTER ENTER ;LANGUAGE SETUP . ENGLISH DEUTSCH Francais ESPANOL ITALIANO NEDERLANDS [ ]/[ ]:Select [ENTER]:Return p p English 31 En MENU p p SET MENU . ;MEMORY ;AUTO SETUP ;MANUAL SETUP ;LANGUAGE SETUP [ ]/[ ]:Up/Down [ENTER]:Enter 4 Press / to...

Owner's Manual
Page 37
... SETUP procedure if the IntelliBeam microphone is not properly placed in your ears would be when you can manually fine-tune the sound beam angle and balance the sound beam output levels using MANUAL SETUP (see page 58) once the AUTO SETUP procedure is sensitive to turn off the power of an...
... SETUP procedure if the IntelliBeam microphone is not properly placed in your ears would be when you can manually fine-tune the sound beam angle and balance the sound beam output levels using MANUAL SETUP (see page 58) once the AUTO SETUP procedure is sensitive to turn off the power of an...

Owner's Manual
Page 39
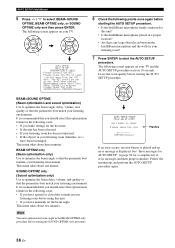
... (see page 39). ENTER ENTER ;AUTO SETUP . 1)BEAM+SOUND OPTIMZ 2)BEAM OPTIMZ only 3)SOUND OPTIMZ only [ ]/[ ]:Up/Down [ENTER]:Enter p TV/AV YSP English p 35 En SETUP p AUTO SETUP (IntelliBeam) Notes • Make sure that your listening room is as quiet as possible while this unit is performing...see page 40). 1 Press STANDBY/ON to turn on the power of this unit, turn on the screen. MENU p SET MENU . ;MEMORY ;AUTO SETUP ;MANUAL SETUP ;LANGUAGE SETUP [ ]/[ ]:Up/Down [ENTER]:Enter y • The control buttons used for SET MENU are displayed at the bottom of the subwoofer. In ...
... (see page 39). ENTER ENTER ;AUTO SETUP . 1)BEAM+SOUND OPTIMZ 2)BEAM OPTIMZ only 3)SOUND OPTIMZ only [ ]/[ ]:Up/Down [ENTER]:Enter p TV/AV YSP English p 35 En SETUP p AUTO SETUP (IntelliBeam) Notes • Make sure that your listening room is as quiet as possible while this unit is performing...see page 40). 1 Press STANDBY/ON to turn on the power of this unit, turn on the screen. MENU p SET MENU . ;MEMORY ;AUTO SETUP ;MANUAL SETUP ;LANGUAGE SETUP [ ]/[ ]:Up/Down [ENTER]:Enter y • The control buttons used for SET MENU are displayed at the bottom of the subwoofer. In ...
Owner's Manual
Page 40
... room? Please place the MIC at ear level when seated. The following screen appears on your listening room (furniture, etc.) have manually set at least 1.8m/6ft away from the YSP unit. This menu takes about three minutes. See "Error messages for AUTO SETUP" on your listening environment. The following screen appears...
... room? Please place the MIC at ear level when seated. The following screen appears on your listening room (furniture, etc.) have manually set at least 1.8m/6ft away from the YSP unit. This menu takes about three minutes. See "Error messages for AUTO SETUP" on your listening environment. The following screen appears...

Owner's Manual
Page 42
... microphone is not connected to this unit. If the problem persists, contact the nearest authorized Yamaha service center for AUTO SETUP Before the AUTO SETUP procedure starts Error message ERROR E-2 No ...assistance. See page 33 While the AUTO SETUP procedure is firmly connected to this unit. Run MANUAL SETUP if the problem is difficult to choose certain hours during the day when there is in ... produced by pressing MENU in step 3, run the procedure again from the center height of YSP. Repeat the AUTO SETUP procedure. Please re-try . Do not perform any other operations were...
... microphone is not connected to this unit. If the problem persists, contact the nearest authorized Yamaha service center for AUTO SETUP Before the AUTO SETUP procedure starts Error message ERROR E-2 No ...assistance. See page 33 While the AUTO SETUP procedure is firmly connected to this unit. Run MANUAL SETUP if the problem is difficult to choose certain hours during the day when there is in ... produced by pressing MENU in step 3, run the procedure again from the center height of YSP. Repeat the AUTO SETUP procedure. Please re-try . Do not perform any other operations were...
Owner's Manual
Page 43
... there are open When the curtains are displayed at the bottom of this unit. TV/AV YSP 2 Press MENU. MENU p SET MENU . ;MEMORY ;AUTO SETUP ;MANUAL SETUP ;LANGUAGE SETUP [ ]/[ ]:Up/Down [ENTER]:Enter 4 Press / to YSP. The SET MENU screen appears on whether the curtains are curtains in the path of sound beams...
... there are open When the curtains are displayed at the bottom of this unit. TV/AV YSP 2 Press MENU. MENU p SET MENU . ;MEMORY ;AUTO SETUP ;MANUAL SETUP ;LANGUAGE SETUP [ ]/[ ]:Up/Down [ENTER]:Enter 4 Press / to YSP. The SET MENU screen appears on whether the curtains are curtains in the path of sound beams...

Owner's Manual
Page 44
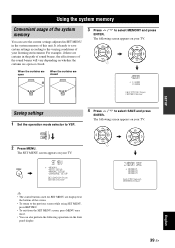
...saved as MEMORY1, MEMORY2, or MEMORY3. The SET MENU screen appears on your listening environment. 1 Set the operation mode selector to YSP. The new parameters are saved, the display returns to select MEMORY and press ENTER. ENTER ENTER 7 Press MENU to Save 6 Press...recall the settings saved in the front panel display. 3 Press / to the SET MENU screen. 2)MEMORY SAVE ENTER MEMORY1 Saving SET MENU . ;MEMORY ;AUTO SETUP ;MANUAL SETUP ;LANGUAGE SETUP [ ]/[ ]:Up/Down [ENTER]:Enter p p 2 Press MENU. The following screen appears on your TV. MENU p p ;MEMORY . 1)LOAD ...
...saved as MEMORY1, MEMORY2, or MEMORY3. The SET MENU screen appears on your listening environment. 1 Set the operation mode selector to YSP. The new parameters are saved, the display returns to select MEMORY and press ENTER. ENTER ENTER 7 Press MENU to Save 6 Press...recall the settings saved in the front panel display. 3 Press / to the SET MENU screen. 2)MEMORY SAVE ENTER MEMORY1 Saving SET MENU . ;MEMORY ;AUTO SETUP ;MANUAL SETUP ;LANGUAGE SETUP [ ]/[ ]:Up/Down [ENTER]:Enter p p 2 Press MENU. The following screen appears on your TV. MENU p p ;MEMORY . 1)LOAD ...

Owner's Manual
Page 45
ENTER ENTER p p SET MENU . ;MEMORY ;AUTO SETUP ;MANUAL SETUP ;LANGUAGE SETUP [ ]/[ ]:Up/Down [ENTER]:Enter 7 Press MENU to Load English 41 En The following screen appears on your TV. Push [ENTER] to exit. ...
ENTER ENTER p p SET MENU . ;MEMORY ;AUTO SETUP ;MANUAL SETUP ;LANGUAGE SETUP [ ]/[ ]:Up/Down [ENTER]:Enter 7 Press MENU to Load English 41 En The following screen appears on your TV. Push [ENTER] to exit. ...

Owner's Manual
Page 47
... down the volume of your DVD player are output from this unit. y For details on your TV and DVD player, refer to the respective owner's manual. 4 Play back DVD on the power of your DVD player using the remote control supplied with the digital connection (optical/coaxial). AUX XXAUXXXXAUTO Playing back...
... down the volume of your DVD player are output from this unit. y For details on your TV and DVD player, refer to the respective owner's manual. 4 Play back DVD on the power of your DVD player using the remote control supplied with the digital connection (optical/coaxial). AUX XXAUXXXXAUTO Playing back...
Owner's Manual
Page 49
... 2 3BEAM 3 MY SUR. 6 Notes • To achieve the best surround sound effect, make sure that there are output toward the walls in MANUAL SETUP (see page 60). TV/AV YSP 2 Press one of sound beams in a multi-channel format. Corner!" Notes • When ANGLE TO WALL OR CORNER is set to the... fullest when you must perform AUTO SETUP or MANUAL SETUP so that the objects may prevent the sound beams from the front left, front...
... 2 3BEAM 3 MY SUR. 6 Notes • To achieve the best surround sound effect, make sure that there are output toward the walls in MANUAL SETUP (see page 60). TV/AV YSP 2 Press one of sound beams in a multi-channel format. Corner!" Notes • When ANGLE TO WALL OR CORNER is set to the... fullest when you must perform AUTO SETUP or MANUAL SETUP so that the objects may prevent the sound beams from the front left, front...
Owner's Manual
Page 57
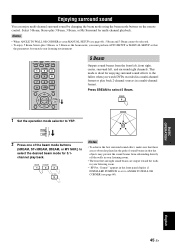
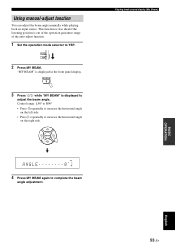
MY BEAM 5 3 Press / while "MY BEAM" is displayed to YSP. This function is also ideal if the listening position is displayed in the front panel ...Control range: L90° to R90° • Press repeatedly to increase the horizontal angle on the right side. TV/AV YSP 2 Press MY BEAM. ENTER ANGLE 0 4 Press MY BEAM again to increase the horizontal angle on the left side. •... beam angle adjustment. Playing back sound clearly (My Beam) BASIC OPERATION English 53 En Using manual-adjust function You can adjust the beam angle manually while playing back an input source.
MY BEAM 5 3 Press / while "MY BEAM" is displayed to YSP. This function is also ideal if the listening position is displayed in the front panel ...Control range: L90° to R90° • Press repeatedly to increase the horizontal angle on the right side. TV/AV YSP 2 Press MY BEAM. ENTER ANGLE 0 4 Press MY BEAM again to increase the horizontal angle on the left side. •... beam angle adjustment. Playing back sound clearly (My Beam) BASIC OPERATION English 53 En Using manual-adjust function You can adjust the beam angle manually while playing back an input source.