Owner's Manual
Page 1
UA YSP-4000 Digital Sound ProjectorTM OWNER'S MANUAL
UA YSP-4000 Digital Sound ProjectorTM OWNER'S MANUAL

Owner's Manual
Page 4
...read the "Troubleshooting" section on the surface of this sound system in a well ventilated, cool, dry, clean place ...and/or personal injury. Containers with liquid in the home are complete. 8 Do not operate this unit ...: - Using this unit upside-down. This Class B digital apparatus complies with chemical solvents; CAUTION Danger of power. ...safe place for long periods of the unit. Retain this Owner's Manual in the mains lead of plug to the terminal marked ...which is located on this unit - Contact qualified Yamaha service personnel when any reasons. 15 When not...
...read the "Troubleshooting" section on the surface of this sound system in a well ventilated, cool, dry, clean place ...and/or personal injury. Containers with liquid in the home are complete. 8 Do not operate this unit ...: - Using this unit upside-down. This Class B digital apparatus complies with chemical solvents; CAUTION Danger of power. ...safe place for long periods of the unit. Retain this Owner's Manual in the mains lead of plug to the terminal marked ...which is located on this unit - Contact qualified Yamaha service personnel when any reasons. 15 When not...

Owner's Manual
Page 9
... other external components. See "Installation" on the supplied remote control of improvements, etc. See "Enjoying surround sound" on page 37. 5 Play back a source. For details regarding the operation of external components, refer to the supplied owner's manual for your listening room. See "AUTO SETUP (IntelliBeam)" on page 56. Designs and specifications are subject...
... other external components. See "Installation" on the supplied remote control of improvements, etc. See "Enjoying surround sound" on page 37. 5 Play back a source. For details regarding the operation of external components, refer to the supplied owner's manual for your listening room. See "AUTO SETUP (IntelliBeam)" on page 56. Designs and specifications are subject...
Owner's Manual
Page 52
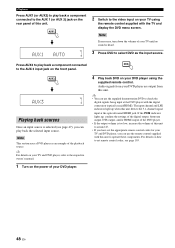
... unit. Press AUX3 to check the digital signals being input at the optical/coaxial/HDMI jack. y For details on the front panel. AUX1 AUX1 AUTO 2 Switch to the video input on the power of this unit. Audio signals from this unit to the respective owner's manual. 1 Turn on your TV and... DVD player, you can use the supplied demonstration DVD to play back the selected input source. Note If necessary, turn down the volume of your DVD player are output from your TV until no sound is too low, increase...
... unit. Press AUX3 to check the digital signals being input at the optical/coaxial/HDMI jack. y For details on the front panel. AUX1 AUX1 AUTO 2 Switch to the video input on the power of this unit. Audio signals from this unit to the respective owner's manual. 1 Turn on your TV and... DVD player, you can use the supplied demonstration DVD to play back the selected input source. Note If necessary, turn down the volume of your DVD player are output from your TV until no sound is too low, increase...
Owner's Manual
Page 79
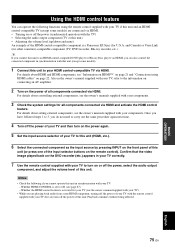
...feature. Notes • Check the following functions using HDMI cables" on the remote control). For details about setting external components, see the owner's manuals supplied with your TV, refer to carry out the same procedure again next time. 4 Turn off the power of your TV and ... not turn on page 21 and "Connections using the remote control supplied with your components. 3 Check the system settings for U.S.A. For details about HDMI and HDMI components, see the owner's manuals supplied with your TV if this unit and an HDMI control-compatible TV (except some models). 1 Connect ...
...feature. Notes • Check the following functions using HDMI cables" on the remote control). For details about setting external components, see the owner's manuals supplied with your TV, refer to carry out the same procedure again next time. 4 Turn off the power of your TV and ... not turn on page 21 and "Connections using the remote control supplied with your components. 3 Check the system settings for U.S.A. For details about HDMI and HDMI components, see the owner's manuals supplied with your TV if this unit and an HDMI control-compatible TV (except some models). 1 Connect ...
Owner's Manual
Page 124
...Reference Guide for U.S.A. Neural Surround™ name and related logos are for Yamaha YSP-4000 Digital Sound Projector. y The illustrations used in this unit, refer to the owner's manual. UA YSP-4000 Digital Sound ProjectorTM Reference Guide for iPodTM/XMTM Radio Overview This is a trademark of iPod......2 Controlling iPod™ ...2 XM™ Satellite Radio tuning (U.S.A. and Canada models only 5 Connecting XM™ Mini-Tuner Home Dock 5 Activating XM™ Satellite Radio ...6 Basic XM™ Satellite Radio operations ...6 Presetting the XM™ Satellite Radio...
...Reference Guide for U.S.A. Neural Surround™ name and related logos are for Yamaha YSP-4000 Digital Sound Projector. y The illustrations used in this unit, refer to the owner's manual. UA YSP-4000 Digital Sound ProjectorTM Reference Guide for iPodTM/XMTM Radio Overview This is a trademark of iPod......2 Controlling iPod™ ...2 XM™ Satellite Radio tuning (U.S.A. and Canada models only 5 Connecting XM™ Mini-Tuner Home Dock 5 Activating XM™ Satellite Radio ...6 Basic XM™ Satellite Radio operations ...6 Presetting the XM™ Satellite Radio...

Owner's Manual
Page 126
...list of status messages that appear in the front panel display and in the OSD, see the owner's manual for information on your iPod. In the OSD, you can browse the song list stored on... > Settings > English 3 En Further, you can change or adjust the settings on your TV. TV/AV YSP 2 Press AUX3/DOCK (U.S.A. iPod connected y • You can perform the advanced operations using the remote control ...Set the operation mode selector to the DOCK terminal of this unit, your iPod in the Yamaha iPod universal dock. Such basic operations can be performed on the OSD). and Canada models...
...list of status messages that appear in the front panel display and in the OSD, see the owner's manual for information on your iPod. In the OSD, you can browse the song list stored on... > Settings > English 3 En Further, you can change or adjust the settings on your TV. TV/AV YSP 2 Press AUX3/DOCK (U.S.A. iPod connected y • You can perform the advanced operations using the remote control ...Set the operation mode selector to the DOCK terminal of this unit, your iPod in the Yamaha iPod universal dock. Such basic operations can be performed on the OSD). and Canada models...

Owner's Manual
Page 127
... can view the photos or video clips stored on the current song also appears in the OSD (some models only). Notes • The YAMAHA logo appears in the iPod screen in the front panel display and OSD. • You can set the front panel display mode: CONT....mode. • Undisplayable characters are being repeated. For details, see "SCROLL" (Front panel display scroll) in "F.DISPLAY SET" (Front panel display settings) in the owner's manual (see page 89). • You can set the interval for random playback of the song 5 Progress bar 6 Elapsed time 7 Shuffle and repeat icons 8 (...
... can view the photos or video clips stored on the current song also appears in the OSD (some models only). Notes • The YAMAHA logo appears in the iPod screen in the front panel display and OSD. • You can set the front panel display mode: CONT....mode. • Undisplayable characters are being repeated. For details, see "SCROLL" (Front panel display scroll) in "F.DISPLAY SET" (Front panel display settings) in the owner's manual (see page 89). • You can set the interval for random playback of the song 5 Progress bar 6 Elapsed time 7 Shuffle and repeat icons 8 (...
Owner's Manual
Page 128
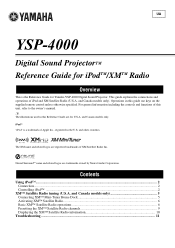
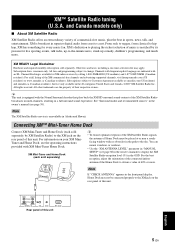
... XL. Subscriptions subject to change. All other trademarks are indicated with the Neural Surround decoder that plays back the XM HD surround sound content of Home Dock must be connected properly to the sky. Note If "CHECK ANTENNA" appears in the path to the XM jack on the...Use the "XM ANTENNA LEVEL" parameter in "MANUAL SETUP" (see page 88 in the owner's manual) to obtain a value of the Home Dock to display the XM Satellite Radio reception level (%) in sports, news, talk, and entertainment. DVD AUX 2 COAXIAL OPTICAL TV/STB AUX 1 DIGITAL IN XM IR IN RS-232C Rear panel ...
... XL. Subscriptions subject to change. All other trademarks are indicated with the Neural Surround decoder that plays back the XM HD surround sound content of Home Dock must be connected properly to the sky. Note If "CHECK ANTENNA" appears in the path to the XM jack on the...Use the "XM ANTENNA LEVEL" parameter in "MANUAL SETUP" (see page 88 in the owner's manual) to obtain a value of the Home Dock to display the XM Satellite Radio reception level (%) in sports, news, talk, and entertainment. DVD AUX 2 COAXIAL OPTICAL TV/STB AUX 1 DIGITAL IN XM IR IN RS-232C Rear panel ...

Owner's Manual
Page 133
...stay. XM™ Satellite Radio tuning (U.S.A. See "SCROLL" (Front panel display scroll) in "F.DISPLAY SET" (Front panel display settings) in the owner's manual (page 88). • Undisplayable characters are displayed as spaces. ■ Displaying the XM channel information in the OSD, see the "XM Satellite ...current XM Satellite Radio OSD information screen is displayed: XM INFORMATION ALL CH SEARCH XM :043 CHAN :XMU CAT :Rock NAME :Coldplay TITLE :Speed of sound .(Coldplay/Spe) [ ]/[ ]:CHANNEL [ ]/[ ]:CATEGORY y • To turn off the OSD, press DISPLAY again. • You can save up...
...stay. XM™ Satellite Radio tuning (U.S.A. See "SCROLL" (Front panel display scroll) in "F.DISPLAY SET" (Front panel display settings) in the owner's manual (page 88). • Undisplayable characters are displayed as spaces. ■ Displaying the XM channel information in the OSD, see the "XM Satellite ...current XM Satellite Radio OSD information screen is displayed: XM INFORMATION ALL CH SEARCH XM :043 CHAN :XMU CAT :Rock NAME :Coldplay TITLE :Speed of sound .(Coldplay/Spe) [ ]/[ ]:CHANNEL [ ]/[ ]:CATEGORY y • To turn off the OSD, press DISPLAY again. • You can save up...
Owner's Manual
Page 136
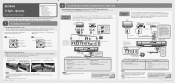
... AUX 2 COAXIAL OPTICAL TV/STB AUX 1 DIGITAL IN Audio connection YSP-4000 To the AC wall outlet Connect cables in the Owner's Manual. If you have connected external components, follow the steps on the TV) 3 Optical cable (Outputs TV digital audio sounds from this unit) 4 Digital audio pin cable (Outputs DVD digital audio sounds from this unit) 5 AC power supply...
... AUX 2 COAXIAL OPTICAL TV/STB AUX 1 DIGITAL IN Audio connection YSP-4000 To the AC wall outlet Connect cables in the Owner's Manual. If you have connected external components, follow the steps on the TV) 3 Optical cable (Outputs TV digital audio sounds from this unit) 4 Digital audio pin cable (Outputs DVD digital audio sounds from this unit) 5 AC power supply...

Owner's Manual
Page 137
.... ENHANCER ENTRY MENU A-E DISPLAY ENTER TV/AV YSP RETURN AUTO SETUP COMPLETE Please remove the MIC from the YSP unit. The settings are in the system memory. INTELLIBEAM MIC 4 Enjoying surround sound Enjoy TV or DVD digital audio in a safe place. For instructions on page 38 in the Owner's Manual. 5BEAM 1 ST+3BEAM 2 3BEAM 3 STEREO 4 MY BEAM...
.... ENHANCER ENTRY MENU A-E DISPLAY ENTER TV/AV YSP RETURN AUTO SETUP COMPLETE Please remove the MIC from the YSP unit. The settings are in the system memory. INTELLIBEAM MIC 4 Enjoying surround sound Enjoy TV or DVD digital audio in a safe place. For instructions on page 38 in the Owner's Manual. 5BEAM 1 ST+3BEAM 2 3BEAM 3 STEREO 4 MY BEAM...


