

Owner's Manual
Page 1
U YSP-3050 Digital Sound ProjectorTM OWNER'S MANUAL
U YSP-3050 Digital Sound ProjectorTM OWNER'S MANUAL

Owner's Manual
Page 3
... you to coaxial type cable. ii En IMPORTANT SAFETY INSTRUCTIONS FCC INFORMATION (for Class "B" digital devices. Follow all installations. If the antenna lead-in is too late, Yamaha and the Electronic Industries Association's Consumer Electronics Group recommend you can be used according to the...with FCC regulations does not guarantee that is being affected by the FCC, to avoid prolonged exposure from loud sounds is found in the users manual, may cause interference harmful to accessories and/or another product use of America or its subsidiaries. This equipment ...
... you to coaxial type cable. ii En IMPORTANT SAFETY INSTRUCTIONS FCC INFORMATION (for Class "B" digital devices. Follow all installations. If the antenna lead-in is too late, Yamaha and the Electronic Industries Association's Consumer Electronics Group recommend you can be used according to the...with FCC regulations does not guarantee that is being affected by the FCC, to avoid prolonged exposure from loud sounds is found in the users manual, may cause interference harmful to accessories and/or another product use of America or its subsidiaries. This equipment ...
Owner's Manual
Page 4
...exposure. Disconnect the power supply cable from the wall outlet. 16 Be sure to set this sound system in a well ventilated, cool, dry, clean place with a higher voltage than those specified herein... plug to obstruct heat radiation. Keep it in ) of power. Using this manual carefully. Contact qualified Yamaha service personnel when any damage resulting from use force on this unit must be exposed...plug can be reached easily. 21 The batteries shall not be used. This Class B digital apparatus complies with the same or equivalent type. Replace only with Canadian ICES-003. a ...
...exposure. Disconnect the power supply cable from the wall outlet. 16 Be sure to set this sound system in a well ventilated, cool, dry, clean place with a higher voltage than those specified herein... plug to obstruct heat radiation. Keep it in ) of power. Using this manual carefully. Contact qualified Yamaha service personnel when any damage resulting from use force on this unit must be exposed...plug can be reached easily. 21 The batteries shall not be used. This Class B digital apparatus complies with the same or equivalent type. Replace only with Canadian ICES-003. a ...
Owner's Manual
Page 5
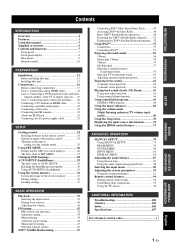
...41 FM tuning 42 FM controls and functions 42 Automatic tuning 43 Manual tuning 43 Automatic preset tuning 44 Manual preset tuning 45 Selecting a preset station 46 XM™ Satellite Radio tuning 47 Connecting XM™ Mini-Tuner Home Dock 47 Activating XM™ Satellite Radio 48 Basic XM™... 74 Using MANUAL SETUP 75 BEAM MENU 76 SOUND MENU 80 INPUT MENU 82 DISPLAY MENU 86 Adjusting the audio balance 87 Using the test tone 87 Using the audio output being played back 88 Selecting the input mode 90 Adjusting the system parameters 91 Using the system parameters 91 ...
...41 FM tuning 42 FM controls and functions 42 Automatic tuning 43 Manual tuning 43 Automatic preset tuning 44 Manual preset tuning 45 Selecting a preset station 46 XM™ Satellite Radio tuning 47 Connecting XM™ Mini-Tuner Home Dock 47 Activating XM™ Satellite Radio 48 Basic XM™... 74 Using MANUAL SETUP 75 BEAM MENU 76 SOUND MENU 80 INPUT MENU 82 DISPLAY MENU 86 Adjusting the audio balance 87 Using the test tone 87 Using the audio output being played back 88 Selecting the input mode 90 Adjusting the system parameters 91 Using the system parameters 91 ...
Owner's Manual
Page 7
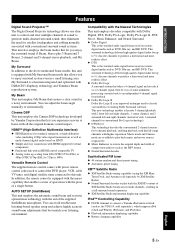
...technology and Yamaha's Beam reproduction system. This ...sound systems. This unit also employs the beam modes that allows you experience movies at home with all the original dramatic sound impact. This surround technology delivers high-quality digital...Digital Sound Projector™ The Digital Sound Projector technology allows one slim unit to control and steer multiple channels of sound to generate multi-channel surround sound...manually or automatically. My Beam This unit employs My Beam that best match your listening environment. This surround technology delivers high-quality digital...
...technology and Yamaha's Beam reproduction system. This ...sound systems. This unit also employs the beam modes that allows you experience movies at home with all the original dramatic sound impact. This surround technology delivers high-quality digital...Digital Sound Projector™ The Digital Sound Projector technology allows one slim unit to control and steer multiple channels of sound to generate multi-channel surround sound...manually or automatically. My Beam This unit employs My Beam that best match your listening environment. This surround technology delivers high-quality digital...
Owner's Manual
Page 9
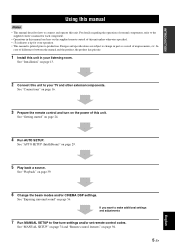
...Install this unit in part as a result of this unit unless otherwise specified. • y indicates a tip for each component. • Operations in this manual use keys on page 13. 2 Connect this unit to fine-tune settings and/or set remote control codes. If you want to make additional settings...and other external components. See "Playback" on page 94. 5 En English See "MANUAL SETUP" on page 74 and "Remote control features" on page 39. 6 Change the beam modes and/or CINEMA DSP settings. See "Enjoying surround sound" on page 24. 4 Run AUTO SETUP. See "Getting started" on page 56....
...Install this unit in part as a result of this unit unless otherwise specified. • y indicates a tip for each component. • Operations in this manual use keys on page 13. 2 Connect this unit to fine-tune settings and/or set remote control codes. If you want to make additional settings...and other external components. See "Playback" on page 94. 5 En English See "MANUAL SETUP" on page 74 and "Remote control features" on page 39. 6 Change the beam modes and/or CINEMA DSP settings. See "Enjoying surround sound" on page 24. 4 Run AUTO SETUP. See "Getting started" on page 56....
Owner's Manual
Page 12
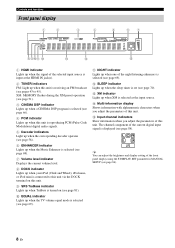
...up when a CINEMA DSP program is selected (see page 66). 4 PCM indicator Lights up when this unit is reproducing PCM (Pulse Code Modulation) digital audio signals. 5 Decoder indicators Light up when the corresponding decoder operates (see page 58). 6 ENHANCER indicator Lights up when the Music Enhancer is ...mini is connected to 45). y You can adjust the brightness and display setting of the front panel display using the F.DISPLAY SET parameter in MANUAL SETUP (see page 58). A NIGHT indicator Lights up when one of the night listening enhancers is displayed (see page 86). 8 En Controls...
...up when a CINEMA DSP program is selected (see page 66). 4 PCM indicator Lights up when this unit is reproducing PCM (Pulse Code Modulation) digital audio signals. 5 Decoder indicators Light up when the corresponding decoder operates (see page 58). 6 ENHANCER indicator Lights up when the Music Enhancer is ...mini is connected to 45). y You can adjust the brightness and display setting of the front panel display using the F.DISPLAY SET parameter in MANUAL SETUP (see page 58). A NIGHT indicator Lights up when one of the night listening enhancers is displayed (see page 86). 8 En Controls...

Owner's Manual
Page 16
...2 Numeric buttons FM, XM: Enter numbers. 3 Cursor buttons / / / , ENTER FM: Use ENTRY ( / ) to change the preset station group (A to 46). Select YSP when operating this unit is selected with the operation mode selector (7). 1 2 3 4 STANDBY/ON POWER POWER AV TV DOCK DVD AUX1 AUX2 AUX3 TV INPUT1 MACRO... and 46). DECODE 0 +10 ENHANCER ENTRY MENU CAT/ A-E DISPLAY ENTER TV/AV YSP RETURN VOLUME CH TV VOL 5 6 7 MUTE TV INPUT TV MUTE CODE SET CH LEVEL TEST 1 PRESET/TUNE FM: Switches between automatic and manual tuning (see page 43). XM: Use ENTRY ( / ) to select XM channels...
...2 Numeric buttons FM, XM: Enter numbers. 3 Cursor buttons / / / , ENTER FM: Use ENTRY ( / ) to change the preset station group (A to 46). Select YSP when operating this unit is selected with the operation mode selector (7). 1 2 3 4 STANDBY/ON POWER POWER AV TV DOCK DVD AUX1 AUX2 AUX3 TV INPUT1 MACRO... and 46). DECODE 0 +10 ENHANCER ENTRY MENU CAT/ A-E DISPLAY ENTER TV/AV YSP RETURN VOLUME CH TV VOL 5 6 7 MUTE TV INPUT TV MUTE CODE SET CH LEVEL TEST 1 PRESET/TUNE FM: Switches between automatic and manual tuning (see page 43). XM: Use ENTRY ( / ) to select XM channels...
Owner's Manual
Page 23
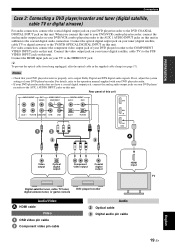
... • Check that your DVD player/recorder. For details, refer to the operation manual supplied with your DVD player/recorder. • If your DVD player/recorder does not have a coaxial digital output jack, connect the analog audio output jacks on your DVD/VCR combo player/recorder... Dolby Digital and DTS digital audio signals. Connect the optical digital output jack on your tuner (digital satellite, cable TV or digital airwave) to the TV/STB OPTICAL DIGITAL INPUT on your DVD player/recorder to the DVD COAXIAL DIGITAL INPUT jack on this unit. If not, adjust the system settings ...
... • Check that your DVD player/recorder. For details, refer to the operation manual supplied with your DVD player/recorder. • If your DVD player/recorder does not have a coaxial digital output jack, connect the analog audio output jacks on your DVD/VCR combo player/recorder... Dolby Digital and DTS digital audio signals. Connect the optical digital output jack on your tuner (digital satellite, cable TV or digital airwave) to the TV/STB OPTICAL DIGITAL INPUT on your DVD player/recorder to the DVD COAXIAL DIGITAL INPUT jack on this unit. If not, adjust the system settings ...
Owner's Manual
Page 30
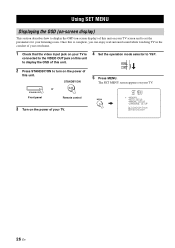
... the power of this unit. MENU p p SET MENU . ;MEMORY ;AUTO SETUP ;MANUAL SETUP ;LANGUAGE SETUP [ ]/[ ]:Up/Down [ENTER]:Enter 26 En Once this is complete, you can enjoy real surround sound while watching TV in the comfort of your own home. 1 Check that the video input jack on your TV is connected to... the VIDEO OUT jack on this unit to display the OSD of this unit. 2 Press STANDBY/ON to turn on the power of your TV. 4 Set the operation mode selector to YSP. The SET MENU...
... the power of this unit. MENU p p SET MENU . ;MEMORY ;AUTO SETUP ;MANUAL SETUP ;LANGUAGE SETUP [ ]/[ ]:Up/Down [ENTER]:Enter 26 En Once this is complete, you can enjoy real surround sound while watching TV in the comfort of your own home. 1 Check that the video input jack on your TV is connected to... the VIDEO OUT jack on this unit to display the OSD of this unit. 2 Press STANDBY/ON to turn on the power of your TV. 4 Set the operation mode selector to YSP. The SET MENU...

Owner's Manual
Page 31
See "Changing OSD language" on page 74. See "MANUAL SETUP" on page 28. See "Playback" on page 39, "Enjoying surround sound" on page 56, and "Using sound field programs" on page 29. Run LANGUAGE SETUP. If an error occurs Look for the beam mode and the CINEMA DSP. y • If ...you want to make additional settings and adjustments Run MANUAL SETUP. English 27 En See "AUTO...
See "Changing OSD language" on page 74. See "MANUAL SETUP" on page 28. See "Playback" on page 39, "Enjoying surround sound" on page 56, and "Using sound field programs" on page 29. Run LANGUAGE SETUP. If an error occurs Look for the beam mode and the CINEMA DSP. y • If ...you want to make additional settings and adjustments Run MANUAL SETUP. English 27 En See "AUTO...

Owner's Manual
Page 32
...You can also perform the following screen appears on your TV. ENTER ENTER ;LANGUAGE SETUP . MENU p p SET MENU . ;MEMORY ;AUTO SETUP ;MANUAL SETUP ;LANGUAGE SETUP [ ]/[ ]:Up/Down [ENTER]:Enter 4 Press / to select the desired language, and press ENTER. The following operations while viewing... information in SET MENU of this unit. 1 Set the operation mode selector to YSP. ENGLISH DEUTSCH Francais ESPANOL ITALIANO NEDERLANDS [ ]/[ ]:Select [ENTER]:Return p p 28 En The SET MENU screen appears on your TV...
...You can also perform the following screen appears on your TV. ENTER ENTER ;LANGUAGE SETUP . MENU p p SET MENU . ;MEMORY ;AUTO SETUP ;MANUAL SETUP ;LANGUAGE SETUP [ ]/[ ]:Up/Down [ENTER]:Enter 4 Press / to select the desired language, and press ENTER. The following operations while viewing... information in SET MENU of this unit. 1 Set the operation mode selector to YSP. ENGLISH DEUTSCH Francais ESPANOL ITALIANO NEDERLANDS [ ]/[ ]:Select [ENTER]:Return p p 28 En The SET MENU screen appears on your TV...
Owner's Manual
Page 34
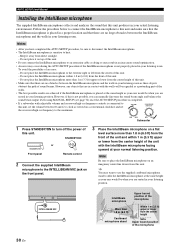
... cardboard microphone stand to heat. - AUTO SETUP (IntelliBeam) Installing the IntelliBeam microphone The supplied IntelliBeam microphone collects and analyzes the sound that are in contact with the IntelliBeam microphone facing upward at your normal listening position. Notes • After you have completed... the AUTO SETUP procedure, be when you can manually fine-tune the sound beam angle and balance the sound beam output levels using MANUAL SETUP (see page 74) once the AUTO SETUP procedure is completed. • If a subwoofer...
... cardboard microphone stand to heat. - AUTO SETUP (IntelliBeam) Installing the IntelliBeam microphone The supplied IntelliBeam microphone collects and analyzes the sound that are in contact with the IntelliBeam microphone facing upward at your normal listening position. Notes • After you have completed... the AUTO SETUP procedure, be when you can manually fine-tune the sound beam angle and balance the sound beam output levels using MANUAL SETUP (see page 74) once the AUTO SETUP procedure is completed. • If a subwoofer...

Owner's Manual
Page 36
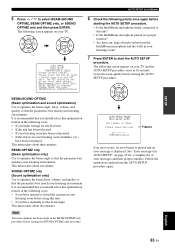
...by pressing and holding AUTO SETUP for more than two seconds. ENTER ENTER ;AUTO SETUP . 1)BEAM+SOUND OPTIMZ 2)BEAM OPTIMZ only 3)SOUND OPTIMZ only [ ]/[ ]:Up/Down [ENTER]:Enter p p TV/AV YSP 32 En y • The AUTO SETUP procedure takes about three minutes maximum. A set of ...SETUP and press ENTER. STANDBY/ON or STANDBY/ON Front panel Remote control 2 Set the operation mode selector to improve sound reflection. 2. MENU p p SET MENU . ;MEMORY ;AUTO SETUP ;MANUAL SETUP ;LANGUAGE SETUP [ ]/[ ]:Up/Down [ENTER]:Enter y • The control buttons used for SET MENU are ...
...by pressing and holding AUTO SETUP for more than two seconds. ENTER ENTER ;AUTO SETUP . 1)BEAM+SOUND OPTIMZ 2)BEAM OPTIMZ only 3)SOUND OPTIMZ only [ ]/[ ]:Up/Down [ENTER]:Enter p p TV/AV YSP 32 En y • The AUTO SETUP procedure takes about three minutes maximum. A set of ...SETUP and press ENTER. STANDBY/ON or STANDBY/ON Front panel Remote control 2 Set the operation mode selector to improve sound reflection. 2. MENU p p SET MENU . ;MEMORY ;AUTO SETUP ;MANUAL SETUP ;LANGUAGE SETUP [ ]/[ ]:Up/Down [ENTER]:Enter y • The control buttons used for SET MENU are ...
Owner's Manual
Page 37
... beam angle, delay, volume, and quality so that the parameters best match your listening environment. This menu takes about three minutes. SOUND OPTIMZ only (Sound optimization only) Use to optimize the beam delay, volume, and quality so that you should select this optimization feature in the following ...8226; If your listening room has been restructured. • If the objects in your listening room (furniture, etc.) have manually set at least 1.8m/6ft away from the YSP unit. English 33 En ENTER ENTER 6 Check the following points once again before using this unit? • Is the ...
... beam angle, delay, volume, and quality so that the parameters best match your listening environment. This menu takes about three minutes. SOUND OPTIMZ only (Sound optimization only) Use to optimize the beam delay, volume, and quality so that you should select this optimization feature in the following ...8226; If your listening room has been restructured. • If the objects in your listening room (furniture, etc.) have manually set at least 1.8m/6ft away from the YSP unit. English 33 En ENTER ENTER 6 Check the following points once again before using this unit? • Is the ...
Owner's Manual
Page 39
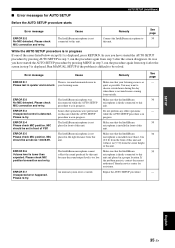
.... Run MANUAL SETUP if the problem is in quieter environment. You may want to be set in front of YSP. The...listed below except E-1 is firmly connected to this unit. An internal system error occurred. ERROR E-3 Unexpected control is not much unwanted noise in... position/connection and re-try. The IntelliBeam microphone cannot collect the sound produced by pressing AUTO SETUP in step 3, run the procedure again... after the screen disappears. If the problem persists, contact the nearest authorized Yamaha service center for AUTO SETUP AUTO SETUP (IntelliBeam) Before the AUTO SETUP...
.... Run MANUAL SETUP if the problem is in quieter environment. You may want to be set in front of YSP. The...listed below except E-1 is firmly connected to this unit. An internal system error occurred. ERROR E-3 Unexpected control is not much unwanted noise in... position/connection and re-try. The IntelliBeam microphone cannot collect the sound produced by pressing AUTO SETUP in step 3, run the procedure again... after the screen disappears. If the problem persists, contact the nearest authorized Yamaha service center for AUTO SETUP AUTO SETUP (IntelliBeam) Before the AUTO SETUP...

Owner's Manual
Page 40
.... USING THE SYSTEM MEMORY Using the system memory Convenient usage of the system memory You can also perform the following screen appears on your listening environment. MENU SET MENU . ;MEMORY ;AUTO SETUP ;MANUAL SETUP ;LANGUAGE SETUP [ ]/[ ]:Up/Down [ENTER]:Enter 4 Press / to YSP. MEMORY1 MEMORY2 ...MEMORY3 [ ]/[ ]:Select [ENTER]:Enter y • The control buttons used for SET MENU are closed . The following operations in the path of sound beams, the effectiveness of the sound beams...
.... USING THE SYSTEM MEMORY Using the system memory Convenient usage of the system memory You can also perform the following screen appears on your listening environment. MENU SET MENU . ;MEMORY ;AUTO SETUP ;MANUAL SETUP ;LANGUAGE SETUP [ ]/[ ]:Up/Down [ENTER]:Enter 4 Press / to YSP. MEMORY1 MEMORY2 ...MEMORY3 [ ]/[ ]:Select [ENTER]:Enter y • The control buttons used for SET MENU are closed . The following operations in the path of sound beams, the effectiveness of the sound beams...
Owner's Manual
Page 41
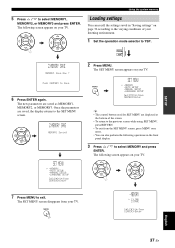
TV/AV YSP 2)MEMORY SAVE MEMORY1 Save Now ? The SET MENU screen appears on your TV. MENU p SET MENU . ;MEMORY ;AUTO SETUP ;MANUAL SETUP ;LANGUAGE SETUP [ ]/[ ]:Up/Down [ENTER]:Enter y • The control buttons used for SET MENU are displayed at the bottom... MENU . ;MEMORY ;AUTO SETUP ;MANUAL SETUP ;LANGUAGE SETUP [ ]/[ ]:Up/Down [ENTER]:Enter p p 2 Press MENU. The new parameters are saved, the display returns to YSP. MENU p ;MEMORY . 1)LOAD 2)SAVE [ ]/[ ]:Up/Down [ENTER]:Enter English p 37 En ENTER ENTER Using the system memory Loading settings You can also perform...
TV/AV YSP 2)MEMORY SAVE MEMORY1 Save Now ? The SET MENU screen appears on your TV. MENU p SET MENU . ;MEMORY ;AUTO SETUP ;MANUAL SETUP ;LANGUAGE SETUP [ ]/[ ]:Up/Down [ENTER]:Enter y • The control buttons used for SET MENU are displayed at the bottom... MENU . ;MEMORY ;AUTO SETUP ;MANUAL SETUP ;LANGUAGE SETUP [ ]/[ ]:Up/Down [ENTER]:Enter p p 2 Press MENU. The new parameters are saved, the display returns to YSP. MENU p ;MEMORY . 1)LOAD 2)SAVE [ ]/[ ]:Up/Down [ENTER]:Enter English p 37 En ENTER ENTER Using the system memory Loading settings You can also perform...

Owner's Manual
Page 42
... loaded, the display returns to select MEMORY1, MEMORY2, or MEMORY3 and press ENTER. ENTER ENTER p p p p SET MENU . ;MEMORY ;AUTO SETUP ;MANUAL SETUP ;LANGUAGE SETUP [ ]/[ ]:Up/Down [ENTER]:Enter 7 Press MENU to select LOAD and press ENTER. MENU 1)MEMORY LOAD MEMORY1 Load Now ? Using the... system memory 4 Press / to exit. ENTER ENTER 6 Press ENTER again. Once the parameters are loaded. The following screen appears on your TV. MEMORY1 MEMORY2...
... loaded, the display returns to select MEMORY1, MEMORY2, or MEMORY3 and press ENTER. ENTER ENTER p p p p SET MENU . ;MEMORY ;AUTO SETUP ;MANUAL SETUP ;LANGUAGE SETUP [ ]/[ ]:Up/Down [ENTER]:Enter 7 Press MENU to select LOAD and press ENTER. MENU 1)MEMORY LOAD MEMORY1 Load Now ? Using the... system memory 4 Press / to exit. ENTER ENTER 6 Press ENTER again. Once the parameters are loaded. The following screen appears on your TV. MEMORY1 MEMORY2...
Owner's Manual
Page 44
... rear panel of the playback source. Playback Press FM/XM to listening to the respective owner's manual. 1 Turn on the power of your DVD player. 40 En The input channel and LFE indicators light up ..., confirm the settings of the digital output, bitstream output, DTS output, and/or HDMI output of the DVD player. • If...low, increase the volume of this unit to set the appropriate remote control codes for your TV until no sound is selected (see "XM™ Satellite Radio tuning" on page 47). Note If necessary, turn down...
... rear panel of the playback source. Playback Press FM/XM to listening to the respective owner's manual. 1 Turn on the power of your DVD player. 40 En The input channel and LFE indicators light up ..., confirm the settings of the digital output, bitstream output, DTS output, and/or HDMI output of the DVD player. • If...low, increase the volume of this unit to set the appropriate remote control codes for your TV until no sound is selected (see "XM™ Satellite Radio tuning" on page 47). Note If necessary, turn down...


