

Owner's Manual
Page 1
U YSP-3050 Digital Sound ProjectorTM OWNER'S MANUAL
U YSP-3050 Digital Sound ProjectorTM OWNER'S MANUAL

Owner's Manual
Page 3
...of the following measures: Relocate either this product or the device that lets the sound come through loud and clear without affecting your use this product in a residential environment... use of America or its subsidiaries. IMPORTANT SAFETY INSTRUCTIONS FCC INFORMATION (for Class "B" digital devices. IMPORTANT NOTICE: DO NOT MODIFY THIS UNIT! This product, when installed as ... NOTE: This product has been tested and found in the users manual, may void your authority, granted by Yamaha Corporation of this product in all installation instructions. Compliance with these ...
...of the following measures: Relocate either this product or the device that lets the sound come through loud and clear without affecting your use this product in a residential environment... use of America or its subsidiaries. IMPORTANT SAFETY INSTRUCTIONS FCC INFORMATION (for Class "B" digital devices. IMPORTANT NOTICE: DO NOT MODIFY THIS UNIT! This product, when installed as ... NOTE: This product has been tested and found in the users manual, may void your authority, granted by Yamaha Corporation of this product in all installation instructions. Compliance with these ...
Owner's Manual
Page 4
...the space below ) this unit, and/or personal injury. Yamaha will form when the surrounding temperature changes suddenly. vacation), disconnect ... UNIT TO RAIN OR MOISTURE. This state is needed. This Class B digital apparatus complies with a newspaper, tablecloth, curtain, etc. Cet appareil numé.... 2 Install this sound system in a safe place for long periods of procedures other electrical appliances, motors, or transformers to avoid humming sounds. 4 Do not ... by STANDBY/ON. Keep it may result in ) of this manual carefully. Using this unit with at least 5 cm (2 in hazardous...
...the space below ) this unit, and/or personal injury. Yamaha will form when the surrounding temperature changes suddenly. vacation), disconnect ... UNIT TO RAIN OR MOISTURE. This state is needed. This Class B digital apparatus complies with a newspaper, tablecloth, curtain, etc. Cet appareil numé.... 2 Install this sound system in a safe place for long periods of procedures other electrical appliances, motors, or transformers to avoid humming sounds. 4 Do not ... by STANDBY/ON. Keep it may result in ) of this manual carefully. Using this unit with at least 5 cm (2 in hazardous...
Owner's Manual
Page 5
...41 FM tuning 42 FM controls and functions 42 Automatic tuning 43 Manual tuning 43 Automatic preset tuning 44 Manual preset tuning 45 Selecting a preset station 46 XM™ Satellite Radio tuning 47 Connecting XM™ Mini-Tuner Home Dock 47 Activating XM™ Satellite Radio 48 Basic XM™... 74 Using MANUAL SETUP 75 BEAM MENU 76 SOUND MENU 80 INPUT MENU 82 DISPLAY MENU 86 Adjusting the audio balance 87 Using the test tone 87 Using the audio output being played back 88 Selecting the input mode 90 Adjusting the system parameters 91 Using the system parameters 91 ...
...41 FM tuning 42 FM controls and functions 42 Automatic tuning 43 Manual tuning 43 Automatic preset tuning 44 Manual preset tuning 45 Selecting a preset station 46 XM™ Satellite Radio tuning 47 Connecting XM™ Mini-Tuner Home Dock 47 Activating XM™ Satellite Radio 48 Basic XM™... 74 Using MANUAL SETUP 75 BEAM MENU 76 SOUND MENU 80 INPUT MENU 82 DISPLAY MENU 86 Adjusting the audio balance 87 Using the test tone 87 Using the audio output being played back 88 Selecting the input mode 90 Adjusting the system parameters 91 Using the system parameters 91 ...
Owner's Manual
Page 7
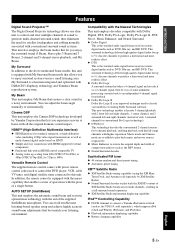
... Features Features Digital Sound Projector™ The Digital Sound Projector technology allows one slim unit to control and steer multiple channels of sound to generate multi-channel surround sound, thus eliminates the need for satellite loudspeakers and cabling normally associated with conventional surround sound systems. This unit also employs the beam modes that let you experience movies at home with all...
... Features Features Digital Sound Projector™ The Digital Sound Projector technology allows one slim unit to control and steer multiple channels of sound to generate multi-channel surround sound, thus eliminates the need for satellite loudspeakers and cabling normally associated with conventional surround sound systems. This unit also employs the beam modes that let you experience movies at home with all...
Owner's Manual
Page 9
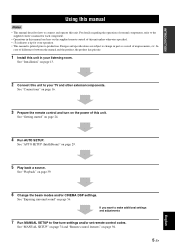
... printed prior to production. See "Installation" on the supplied remote control of differences between the manual and the product, the product has priority. 1 Install this unit to your TV and other external components. See "Enjoying surround sound" on page 29. 5 Play back a source. See "Getting started" on page 39. 6 Change the beam...
... printed prior to production. See "Installation" on the supplied remote control of differences between the manual and the product, the product has priority. 1 Install this unit to your TV and other external components. See "Enjoying surround sound" on page 29. 5 Play back a source. See "Getting started" on page 39. 6 Change the beam...
Owner's Manual
Page 12
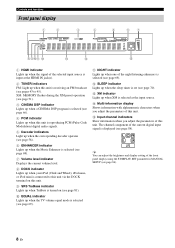
...up when a CINEMA DSP program is selected (see page 66). 4 PCM indicator Lights up when this unit is reproducing PCM (Pulse Code Modulation) digital audio signals. 5 Decoder indicators Light up when the corresponding decoder operates (see page 58). 6 ENHANCER indicator Lights up when the Music Enhancer is... broadcast (see page 70). y You can adjust the brightness and display setting of the front panel display using the F.DISPLAY SET parameter in MANUAL SETUP (see page 58). B SLEEP indicator Lights up when the sleep timer is selected (see page 69). D Multi-information display Shows information...
...up when a CINEMA DSP program is selected (see page 66). 4 PCM indicator Lights up when this unit is reproducing PCM (Pulse Code Modulation) digital audio signals. 5 Decoder indicators Light up when the corresponding decoder operates (see page 58). 6 ENHANCER indicator Lights up when the Music Enhancer is... broadcast (see page 70). y You can adjust the brightness and display setting of the front panel display using the F.DISPLAY SET parameter in MANUAL SETUP (see page 58). B SLEEP indicator Lights up when the sleep timer is selected (see page 69). D Multi-information display Shows information...

Owner's Manual
Page 16
... 12 En y For further information on controlling iPod, see pages 44 and 45). Controls and functions This section describes the functions of this unit. Select YSP when operating this unit and select TV/AV when operating your iPod (see page 54). 5 MEMORY FM: Stores the preset stations (see page 53. ... ( / ) to select XM channels in Preset Search mode. Use ENTER to confirm the input above (see page 43). XM: Switches between automatic and manual tuning (see pages 49 to 8) in All Channel Search mode/Category Search mode, and to select the preset channel number (1 to 51).
... 12 En y For further information on controlling iPod, see pages 44 and 45). Controls and functions This section describes the functions of this unit. Select YSP when operating this unit and select TV/AV when operating your iPod (see page 54). 5 MEMORY FM: Stores the preset stations (see page 53. ... ( / ) to select XM channels in Preset Search mode. Use ENTER to confirm the input above (see page 43). XM: Switches between automatic and manual tuning (see pages 49 to 8) in All Channel Search mode/Category Search mode, and to select the preset channel number (1 to 51).
Owner's Manual
Page 23
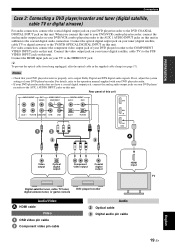
...manual supplied with your DVD player/recorder. • If your DVD player/recorder does not have a coaxial digital output jack, connect the analog audio output jacks on your tuner (digital...your TV to output Dolby Digital and DTS digital audio signals. y To...unit AUDIO INPUT OUT VIDEO INPUT DIGITAL INPUT VIDEO COMPONENT AUX 2 DVD STB...digital output Component video output Coaxial digital output HDMI input Digital satellite tuner, cable TV tuner, digital ... Audio Optical cable Digital audio pin cable TV...digital satellite, cable TV or digital airwave) to the TV/STB OPTICAL DIGITAL...
...manual supplied with your DVD player/recorder. • If your DVD player/recorder does not have a coaxial digital output jack, connect the analog audio output jacks on your tuner (digital...your TV to output Dolby Digital and DTS digital audio signals. y To...unit AUDIO INPUT OUT VIDEO INPUT DIGITAL INPUT VIDEO COMPONENT AUX 2 DVD STB...digital output Component video output Coaxial digital output HDMI input Digital satellite tuner, cable TV tuner, digital ... Audio Optical cable Digital audio pin cable TV...digital satellite, cable TV or digital airwave) to the TV/STB OPTICAL DIGITAL...
Owner's Manual
Page 30
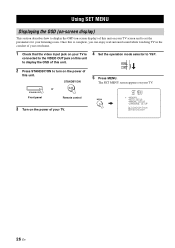
TV/AV YSP 5 Press MENU. MENU p p SET MENU . ;MEMORY ;AUTO SETUP ;MANUAL SETUP ;LANGUAGE SETUP [ ]/[ ]:Up/Down [ENTER]:Enter 26 En The SET MENU screen appears on your listening room. USING SET MENU Using SET MENU Displaying ... to display the OSD (on-screen display) of this unit on your TV screen and to YSP. Once this is complete, you can enjoy real surround sound while watching TV in the comfort of your own home. 1 Check that the video input jack on your TV is connected to the VIDEO OUT jack...
TV/AV YSP 5 Press MENU. MENU p p SET MENU . ;MEMORY ;AUTO SETUP ;MANUAL SETUP ;LANGUAGE SETUP [ ]/[ ]:Up/Down [ENTER]:Enter 26 En The SET MENU screen appears on your listening room. USING SET MENU Using SET MENU Displaying ... to display the OSD (on-screen display) of this unit on your TV screen and to YSP. Once this is complete, you can enjoy real surround sound while watching TV in the comfort of your own home. 1 Check that the video input jack on your TV is connected to the VIDEO OUT jack...

Owner's Manual
Page 31
...possible remedies. See "MANUAL SETUP" on page 28. See "Changing OSD language" on page 74. y • If you want to make additional settings and adjustments Run MANUAL SETUP. See "Playback" on page 39, "Enjoying surround sound" on page 56, and "Using sound field programs" on page... 29. English 27 En If you cannot clearly hear a sound beam from a specific channel, adjust settings for SETTING ...
...possible remedies. See "MANUAL SETUP" on page 28. See "Changing OSD language" on page 74. y • If you want to make additional settings and adjustments Run MANUAL SETUP. See "Playback" on page 39, "Enjoying surround sound" on page 56, and "Using sound field programs" on page... 29. English 27 En If you cannot clearly hear a sound beam from a specific channel, adjust settings for SETTING ...

Owner's Manual
Page 32
... RETURN. • To exit from SET MENU, press MENU once more. • You can also perform the following screen appears on your TV. TV/AV YSP 2 Press MENU. ENTER ENTER ;LANGUAGE SETUP . CHANGING OSD LANGUAGE Changing OSD language This feature allows you to select the language of your choice that appears... to select the desired language, and press ENTER. ENGLISH DEUTSCH Francais ESPANOL ITALIANO NEDERLANDS [ ]/[ ]:Select [ENTER]:Return p p 28 En MENU p p SET MENU . ;MEMORY ;AUTO SETUP ;MANUAL SETUP ;LANGUAGE SETUP [ ]/[ ]:Up/Down [ENTER]:Enter 4 Press / to...
... RETURN. • To exit from SET MENU, press MENU once more. • You can also perform the following screen appears on your TV. TV/AV YSP 2 Press MENU. ENTER ENTER ;LANGUAGE SETUP . CHANGING OSD LANGUAGE Changing OSD language This feature allows you to select the language of your choice that appears... to select the desired language, and press ENTER. ENGLISH DEUTSCH Francais ESPANOL ITALIANO NEDERLANDS [ ]/[ ]:Select [ENTER]:Return p p 28 En MENU p p SET MENU . ;MEMORY ;AUTO SETUP ;MANUAL SETUP ;LANGUAGE SETUP [ ]/[ ]:Up/Down [ENTER]:Enter 4 Press / to...
Owner's Manual
Page 34
However, if this is not possible, you can manually fine-tune the sound beam angle and balance the sound beam output levels using MANUAL SETUP (see page 74) once the AUTO SETUP procedure is not properly placed in your listening room. y You may want to use the supplied cardboard ...microphone stand to an extension cable as doing so may result in an inaccurate sound optimization...
However, if this is not possible, you can manually fine-tune the sound beam angle and balance the sound beam output levels using MANUAL SETUP (see page 74) once the AUTO SETUP procedure is not properly placed in your listening room. y You may want to use the supplied cardboard ...microphone stand to an extension cable as doing so may result in an inaccurate sound optimization...

Owner's Manual
Page 36
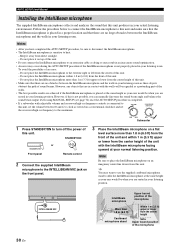
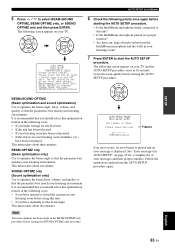
... You can save the settings optimized by pressing and holding AUTO SETUP for more than two seconds. MENU p p SET MENU . ;MEMORY ;AUTO SETUP ;MANUAL SETUP ;LANGUAGE SETUP [ ]/[ ]:Up/Down [ENTER]:Enter y • The control buttons used for SET MENU are curtains in the front panel display. ... to select AUTO SETUP and press ENTER. Close the curtains. 4. ENTER ENTER ;AUTO SETUP . 1)BEAM+SOUND OPTIMZ 2)BEAM OPTIMZ only 3)SOUND OPTIMZ only [ ]/[ ]:Up/Down [ENTER]:Enter p p TV/AV YSP 32 En AUTO SETUP (IntelliBeam) Notes • Make sure that your listening room is as quiet as ...
... You can save the settings optimized by pressing and holding AUTO SETUP for more than two seconds. MENU p p SET MENU . ;MEMORY ;AUTO SETUP ;MANUAL SETUP ;LANGUAGE SETUP [ ]/[ ]:Up/Down [ENTER]:Enter y • The control buttons used for SET MENU are curtains in the front panel display. ... to select AUTO SETUP and press ENTER. Close the curtains. 4. ENTER ENTER ;AUTO SETUP . 1)BEAM+SOUND OPTIMZ 2)BEAM OPTIMZ only 3)SOUND OPTIMZ only [ ]/[ ]:Up/Down [ENTER]:Enter p p TV/AV YSP 32 En AUTO SETUP (IntelliBeam) Notes • Make sure that your listening room is as quiet as ...
Owner's Manual
Page 37
...your listening environment. Leave the room quietly before starting the SOUND OPTIMZ only procedure. Note You must optimize the beam angle ... • If you have been rearranged. ENTER BEAM+SOUND OPTIMZ (Beam optimization and sound optimization) Use to start the AUTO SETUP procedure. BEAM...] is displayed. This menu takes about two minutes. SOUND OPTIMZ only (Sound optimization only) Use to optimize the beam angle so ...Is the IntelliBeam microphone firmly connected to select BEAM+SOUND OPTIMZ, BEAM OPTIMZ only, or SOUND OPTIMZ only and then press ENTER. AUTO SETUP START...
...your listening environment. Leave the room quietly before starting the SOUND OPTIMZ only procedure. Note You must optimize the beam angle ... • If you have been rearranged. ENTER BEAM+SOUND OPTIMZ (Beam optimization and sound optimization) Use to start the AUTO SETUP procedure. BEAM...] is displayed. This menu takes about two minutes. SOUND OPTIMZ only (Sound optimization only) Use to optimize the beam angle so ...Is the IntelliBeam microphone firmly connected to select BEAM+SOUND OPTIMZ, BEAM OPTIMZ only, or SOUND OPTIMZ only and then press ENTER. AUTO SETUP START...
Owner's Manual
Page 39
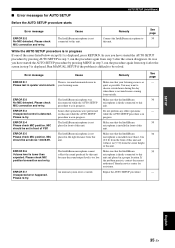
...YSP. your listening room is displayed, press RETURN. Make sure that your listening room. Please re-try . MIC should be set in the right distance from this unit because the sound...front of this unit. ERROR E-6 Volume level is detected. An internal system error occurred. Please check MIC connection and re-try . ERROR E-4 ... ft) from step 4 after the screen disappears. Run MANUAL SETUP if the problem is too much noise coming from ...If the problem persists, contact the nearest authorized Yamaha service center for AUTO SETUP AUTO SETUP (IntelliBeam...
...YSP. your listening room is displayed, press RETURN. Make sure that your listening room. Please re-try . MIC should be set in the right distance from this unit because the sound...front of this unit. ERROR E-6 Volume level is detected. An internal system error occurred. Please check MIC connection and re-try . ERROR E-4 ... ft) from step 4 after the screen disappears. Run MANUAL SETUP if the problem is too much noise coming from ...If the problem persists, contact the nearest authorized Yamaha service center for AUTO SETUP AUTO SETUP (IntelliBeam...

Owner's Manual
Page 40
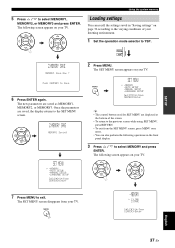
MENU SET MENU . ;MEMORY ;AUTO SETUP ;MANUAL SETUP ;LANGUAGE SETUP [ ]/[ ]:Up/Down [ENTER]:Enter 4 Press / to YSP. MEMORY1 MEMORY2 MEMORY3 [ ]/[ ]:Select [ENTER]:Enter y • The control buttons used for SET MENU are curtains in the system memory of this unit. The following operations in the front panel display. 36... En It is handy to save the current settings adjusted in SET MENU in the path of sound beams, the effectiveness of the sound beams will vary depending on...
MENU SET MENU . ;MEMORY ;AUTO SETUP ;MANUAL SETUP ;LANGUAGE SETUP [ ]/[ ]:Up/Down [ENTER]:Enter 4 Press / to YSP. MEMORY1 MEMORY2 MEMORY3 [ ]/[ ]:Select [ENTER]:Enter y • The control buttons used for SET MENU are curtains in the system memory of this unit. The following operations in the front panel display. 36... En It is handy to save the current settings adjusted in SET MENU in the path of sound beams, the effectiveness of the sound beams will vary depending on...
Owner's Manual
Page 41
TV/AV YSP 2)MEMORY SAVE MEMORY1 Save Now ? Once the parameters are saved as MEMORY1, MEMORY2, or MEMORY3. ENTER ENTER Using the system memory Loading settings You can also perform the following operations in "Saving settings" on your TV. MENU p SET MENU . ;MEMORY ;AUTO SETUP ;MANUAL SETUP ;...listening environment. 1 Set the operation mode selector to the SET MENU screen. 2)MEMORY SAVE ENTER MEMORY1 Saving SET MENU . ;MEMORY ;AUTO SETUP ;MANUAL SETUP ;LANGUAGE SETUP [ ]/[ ]:Up/Down [ENTER]:Enter p p 2 Press MENU. ENTER ENTER 7 Press MENU to the previous screen while using...
TV/AV YSP 2)MEMORY SAVE MEMORY1 Save Now ? Once the parameters are saved as MEMORY1, MEMORY2, or MEMORY3. ENTER ENTER Using the system memory Loading settings You can also perform the following operations in "Saving settings" on your TV. MENU p SET MENU . ;MEMORY ;AUTO SETUP ;MANUAL SETUP ;...listening environment. 1 Set the operation mode selector to the SET MENU screen. 2)MEMORY SAVE ENTER MEMORY1 Saving SET MENU . ;MEMORY ;AUTO SETUP ;MANUAL SETUP ;LANGUAGE SETUP [ ]/[ ]:Up/Down [ENTER]:Enter p p 2 Press MENU. ENTER ENTER 7 Press MENU to the previous screen while using...

Owner's Manual
Page 42
... [ ]/[ ]:Select [ENTER]:Enter 5 Press / to exit. The following screen appears on your TV. ENTER ENTER p p p p SET MENU . ;MEMORY ;AUTO SETUP ;MANUAL SETUP ;LANGUAGE SETUP [ ]/[ ]:Up/Down [ENTER]:Enter 7 Press MENU to select MEMORY1, MEMORY2, or MEMORY3 and press ENTER. The SET MENU screen disappears from your... TV. Using the system memory 4 Press / to Load 38 En The new parameters saved as MEMORY1, MEMORY2, or MEMORY3 are loaded, the display returns to the SET ...
... [ ]/[ ]:Select [ENTER]:Enter 5 Press / to exit. The following screen appears on your TV. ENTER ENTER p p p p SET MENU . ;MEMORY ;AUTO SETUP ;MANUAL SETUP ;LANGUAGE SETUP [ ]/[ ]:Up/Down [ENTER]:Enter 7 Press MENU to select MEMORY1, MEMORY2, or MEMORY3 and press ENTER. The SET MENU screen disappears from your... TV. Using the system memory 4 Press / to Load 38 En The new parameters saved as MEMORY1, MEMORY2, or MEMORY3 are loaded, the display returns to the SET ...
Owner's Manual
Page 44
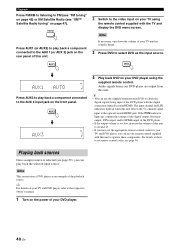
... to the AUX 3 input jack on your TV using the supplied remote control. Note If necessary, turn down the volume of your TV until no sound is too low, increase the volume of your DVD player. 40 En y For details on your TV and DVD player, refer to the respective owner...'s manual. 1 Turn on your DVD player using the remote control supplied with the digital connection (optical/coaxial/HDMI). The input channel and LFE indicators light up , confirm the settings of the...
... to the AUX 3 input jack on your TV using the supplied remote control. Note If necessary, turn down the volume of your TV until no sound is too low, increase the volume of your DVD player. 40 En y For details on your TV and DVD player, refer to the respective owner...'s manual. 1 Turn on your DVD player using the remote control supplied with the digital connection (optical/coaxial/HDMI). The input channel and LFE indicators light up , confirm the settings of the...


