
Owner's Manual
Page 5
... this unit 13 Connections 16 Before connecting components 17 Case 1: Connections using HDMI cables 18 Case 2: Connecting a DVD player/recorder and tuner (digital satellite, cable TV or digital airwave)..... 19 Case 3: Connecting other connection...SOUND MENU 80 INPUT MENU 82 DISPLAY MENU 86 Adjusting the audio balance 87 Using the test tone 87 Using the audio output being played back 88 Selecting the input mode 90 Adjusting the system parameters 91 Using the system parameters 91 Remote control features 94 Setting remote control codes 94 Controlling other components 95 Using...
... this unit 13 Connections 16 Before connecting components 17 Case 1: Connections using HDMI cables 18 Case 2: Connecting a DVD player/recorder and tuner (digital satellite, cable TV or digital airwave)..... 19 Case 3: Connecting other connection...SOUND MENU 80 INPUT MENU 82 DISPLAY MENU 86 Adjusting the audio balance 87 Using the test tone 87 Using the audio output being played back 88 Selecting the input mode 90 Adjusting the system parameters 91 Using the system parameters 91 Remote control features 94 Setting remote control codes 94 Controlling other components 95 Using...
Owner's Manual
Page 12
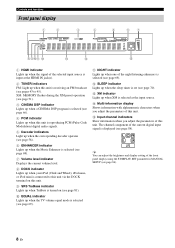
... of the night listening enhancers is selected (see page 70). The channel component of the current digital input signal is set (see page 69). A NIGHT indicator Lights up when XM is selected as the input source. E Input channel indicators Show information when you adjust the parameters of this unit is ... when the Music Enhancer is selected (see page 86). 8 En y You can adjust the brightness and display setting of the front panel display using the F.DISPLAY SET parameter in MANUAL SETUP (see page 68). 7 Volume level indicator Displays the current volume level. 8 DOCK indicator Lights up...
... of the night listening enhancers is selected (see page 70). The channel component of the current digital input signal is set (see page 69). A NIGHT indicator Lights up when XM is selected as the input source. E Input channel indicators Show information when you adjust the parameters of this unit is ... when the Music Enhancer is selected (see page 86). 8 En y You can adjust the brightness and display setting of the front panel display using the F.DISPLAY SET parameter in MANUAL SETUP (see page 68). 7 Volume level indicator Displays the current volume level. 8 DOCK indicator Lights up...

Owner's Manual
Page 13
...2 DOCK terminal Connect the Yamaha iPod universal dock (such as a TV or a projector connected to the AC wall outlet (see page 20). H AC power supply cable Connect to this unit (see page 21). 0 AUX 1 OPTICAL DIGITAL INPUT jack Connect an external component via an HDMI connection (...to display the OSD of your XM Mini-Tuner Home Dock (sold separately) (see page 18). Rear panel Controls and functions INTRODUCTION H ANTENNA AUDIO INPUT OUT VIDEO INPUT DIGITAL INPUT XM FM75Ω UNBAL. E STB HDMI IN jack Connect your HDMI component such as YDS10, sold separately) (see page...
...2 DOCK terminal Connect the Yamaha iPod universal dock (such as a TV or a projector connected to the AC wall outlet (see page 20). H AC power supply cable Connect to this unit (see page 21). 0 AUX 1 OPTICAL DIGITAL INPUT jack Connect an external component via an HDMI connection (...to display the OSD of your XM Mini-Tuner Home Dock (sold separately) (see page 18). Rear panel Controls and functions INTRODUCTION H ANTENNA AUDIO INPUT OUT VIDEO INPUT DIGITAL INPUT XM FM75Ω UNBAL. E STB HDMI IN jack Connect your HDMI component such as YDS10, sold separately) (see page...

Owner's Manual
Page 14
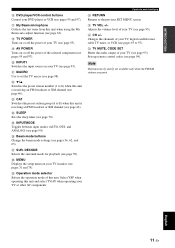
...input signal. Press again to restore the audio output to control this system to the standby mode (see page 25). 3 Transmission indicator Lights up when infrared control signals are being output. 4 Input selector buttons Use to select an input... on or off the Music Enhancer (see page 87). 10 En B MUTE Mutes the sound. y You can also control other components" on page 95 for details. 1 * 2 3 *4 5 6 7 8 9...MUSIC 7 MOVIE 8 SPORTS 9 OFF SUR. A VOLUME +/- C TV INPUT Toggles between the YSP and TV/AV operation modes (S). Controls and functions Remote control This section describes...
...input signal. Press again to restore the audio output to control this system to the standby mode (see page 25). 3 Transmission indicator Lights up when infrared control signals are being output. 4 Input selector buttons Use to select an input... on or off the Music Enhancer (see page 87). 10 En B MUTE Mutes the sound. y You can also control other components" on page 95 for details. 1 * 2 3 *4 5 6 7 8 9...MUSIC 7 MOVIE 8 SPORTS 9 OFF SUR. A VOLUME +/- C TV INPUT Toggles between the YSP and TV/AV operation modes (S). Controls and functions Remote control This section describes...
Owner's Manual
Page 15
...input source on your TV or other AV components. Changes the channels of your TV (see page 95). W TV MUTE, CODE SET Mutes the audio output of your TV (see page 95). M CAT Switches the preset station group (A to 97). R MENU Displays the setup menu on your TV (see page 95). Select YSP...). K MACRO Use to the previous SET MENU screen. O INPUTMODE Toggles between input modes (AUTO, DTS, and ANALOG) (see pages 56, 62, and 63). P Beam mode buttons Change the beam mode settings (see page 90). I AV POWER Turns on or off the power of your TV, digital satellite tuner, cable...
...input source on your TV or other AV components. Changes the channels of your TV (see page 95). W TV MUTE, CODE SET Mutes the audio output of your TV (see page 95). M CAT Switches the preset station group (A to 97). R MENU Displays the setup menu on your TV (see page 95). Select YSP...). K MACRO Use to the previous SET MENU screen. O INPUTMODE Toggles between input modes (AUTO, DTS, and ANALOG) (see pages 56, 62, and 63). P Beam mode buttons Change the beam mode settings (see page 90). I AV POWER Turns on or off the power of your TV, digital satellite tuner, cable...

Owner's Manual
Page 16
...page 52) or playing back your TV or other AV components. 12 En XM: Switches between the preset search mode and the frequency search mode (see pages 43 to 46). 2 Numeric buttons FM, XM: Enter numbers. 3 Cursor buttons / / / , ENTER FM: Use ENTRY ( / ) to change the preset station group... (A to E) in Preset Search mode. DECODE 0 +10 ENHANCER ENTRY MENU CAT/ A-E DISPLAY ENTER TV/AV YSP RETURN VOLUME CH TV VOL 5 6 7 MUTE TV INPUT TV MUTE CODE SET CH LEVEL TEST 1 PRESET/TUNE FM:...
...page 52) or playing back your TV or other AV components. 12 En XM: Switches between the preset search mode and the frequency search mode (see pages 43 to 46). 2 Numeric buttons FM, XM: Enter numbers. 3 Cursor buttons / / / , ENTER FM: Use ENTRY ( / ) to change the preset station group... (A to E) in Preset Search mode. DECODE 0 +10 ENHANCER ENTRY MENU CAT/ A-E DISPLAY ENTER TV/AV YSP RETURN VOLUME CH TV VOL 5 6 7 MUTE TV INPUT TV MUTE CODE SET CH LEVEL TEST 1 PRESET/TUNE FM:...
Owner's Manual
Page 20
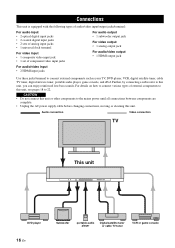
...power supply cable before changing connections, moving or cleaning this unit, you can enjoy reinforced low-bass sounds. For details on how to connect various types of component video input jacks For audio output • 1 subwoofer output jack For video output • 1 analog ...audio/video output • 1 HDMI output jack For audio/video input • 2 HDMI input jacks Use these jacks/terminal to connect external components such as your TV, DVD player, VCR, digital satellite tuner, cable TV tuner, digital airwave tuner, portable audio player, game console, and iPod. Connections ...
...power supply cable before changing connections, moving or cleaning this unit, you can enjoy reinforced low-bass sounds. For details on how to connect various types of component video input jacks For audio output • 1 subwoofer output jack For video output • 1 analog ...audio/video output • 1 HDMI output jack For audio/video input • 2 HDMI input jacks Use these jacks/terminal to connect external components such as your TV, DVD player, VCR, digital satellite tuner, cable TV tuner, digital airwave tuner, portable audio player, game console, and iPod. Connections ...
Owner's Manual
Page 21
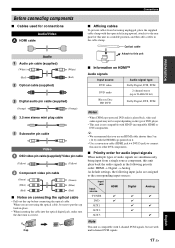
... the cap before connecting the optical cable. PREPARATION Connections Before connecting components ■ Cables used for audio input signals When multiple types of audio signals are assigned to the corresponding input sources: Input jack Input source TV/STB DVD AUX 1 AUX 2 AUX 3 HDMI ✔ ✔ Digital Analog ✔ ✔ ✔ Note This unit is not compatible with...
... the cap before connecting the optical cable. PREPARATION Connections Before connecting components ■ Cables used for audio input signals When multiple types of audio signals are assigned to the corresponding input sources: Input jack Input source TV/STB DVD AUX 1 AUX 2 AUX 3 HDMI ✔ ✔ Digital Analog ✔ ✔ ✔ Note This unit is not compatible with...

Owner's Manual
Page 22
...Similarly, this unit outputs analog audio signals input at the analog input jacks at the HDMI OUT jack. once you have HDMI jacks, use HDMI cables for a game console) is used, connect the optical digital output jack on your TV to the TV/STB OPTICAL DIGITAL IN jack on this unit * If .... If your TV has a built-in digital satellite tuner and an optical digital output jack, connect the optical digital output jack on your TV to the TV/STB OPTICAL DIGITAL INPUT jack on this unit. • This unit outputs analog video signals input at the video/component video jacks at the HDMI OUT jack....
...Similarly, this unit outputs analog audio signals input at the analog input jacks at the HDMI OUT jack. once you have HDMI jacks, use HDMI cables for a game console) is used, connect the optical digital output jack on your TV to the TV/STB OPTICAL DIGITAL IN jack on this unit * If .... If your TV has a built-in digital satellite tuner and an optical digital output jack, connect the optical digital output jack on your TV to the TV/STB OPTICAL DIGITAL INPUT jack on this unit. • This unit outputs analog video signals input at the video/component video jacks at the HDMI OUT jack....

Owner's Manual
Page 27
DIGITAL INPUT AUX 2 DVD COAXIAL OPTICAL AUX 1 TV/STB Rear panel of this unit XM...ANTENNA FM75Ω UNBAL. English To the AC wall outlet 23 En Rear panel of this unit AUDIO INPUT OUT VIDEO VIDEO INPUT COMPONENT DOCK AUX 1 TV/STB SUBWOOFER STB DVD Connections About the IR IN jack The IR IN jack does ...not support normal external component connection. This is a control expansion terminal for commercial use only. PREPARATION Connecting the FM ...
DIGITAL INPUT AUX 2 DVD COAXIAL OPTICAL AUX 1 TV/STB Rear panel of this unit XM...ANTENNA FM75Ω UNBAL. English To the AC wall outlet 23 En Rear panel of this unit AUDIO INPUT OUT VIDEO VIDEO INPUT COMPONENT DOCK AUX 1 TV/STB SUBWOOFER STB DVD Connections About the IR IN jack The IR IN jack does ...not support normal external component connection. This is a control expansion terminal for commercial use only. PREPARATION Connecting the FM ...
Owner's Manual
Page 44
...detects the 5.1-channel signal input at the DVD player ... input channel and LFE indicators light up , confirm the settings of the digital ...using the remote control supplied with the digital connection (optical/coaxial/HDMI). Note This section uses a DVD player as the input source. FM/XM Press AUX1 (or AUX2) to play back a component...component connected to select DVD as an example of this unit to operate these components. AUX1 DVD AUX1 AUTO Press AUX3 to play back the selected input source. y • You can use...use the supplied demonstration DVD to check the digital signals being input ...
...detects the 5.1-channel signal input at the DVD player ... input channel and LFE indicators light up , confirm the settings of the digital ...using the remote control supplied with the digital connection (optical/coaxial/HDMI). Note This section uses a DVD player as the input source. FM/XM Press AUX1 (or AUX2) to play back a component...component connected to select DVD as an example of this unit to operate these components. AUX1 DVD AUX1 AUTO Press AUX3 to play back the selected input source. y • You can use...use the supplied demonstration DVD to check the digital signals being input ...

Owner's Manual
Page 57
...iPod mini are supported. • Some features may not be compatible depending on -screen menu) menu. 3 Selects AUX3/DOCK as the input source. 4 Use to return to the previous iPod menu. 5 Sets the operation mode of this unit at the same time, and when the DOCK indicator...between play and pause operations in the Yamaha iPod universal dock, and use the supplied remote control to operate your iPod and external component using a dedicated cable. DECODE +10 ENHANCER ENTRY MENU CAT/ A-E DISPLAY ENTER TV/AV YSP RETURN VOLUME CH TV VOL 3 4 5 6 Yamaha iPod universal dock (such as YDS-...
...iPod mini are supported. • Some features may not be compatible depending on -screen menu) menu. 3 Selects AUX3/DOCK as the input source. 4 Use to return to the previous iPod menu. 5 Sets the operation mode of this unit at the same time, and when the DOCK indicator...between play and pause operations in the Yamaha iPod universal dock, and use the supplied remote control to operate your iPod and external component using a dedicated cable. DECODE +10 ENHANCER ENTRY MENU CAT/ A-E DISPLAY ENTER TV/AV YSP RETURN VOLUME CH TV VOL 3 4 5 6 Yamaha iPod universal dock (such as YDS-...

Owner's Manual
Page 62
... - Enjoying surround sound ■ Decoder indicators Depending on the input source and the selected surround mode, the decoder indicators in the front panel display light up as follows: Status Indicator When PCM signals are being input PCM When DTS digital signals are being input When DTS Neo:6... unit is turned off and on the channel component of the current digital input signal, the input channel indicators in the front panel display when you select an input source (see page 39), the surround mode used for the previously selected input source before the power was turned off is ...
... - Enjoying surround sound ■ Decoder indicators Depending on the input source and the selected surround mode, the decoder indicators in the front panel display light up as follows: Status Indicator When PCM signals are being input PCM When DTS digital signals are being input When DTS Neo:6... unit is turned off and on the channel component of the current digital input signal, the input channel indicators in the front panel display when you select an input source (see page 39), the surround mode used for the previously selected input source before the power was turned off is ...
Owner's Manual
Page 77
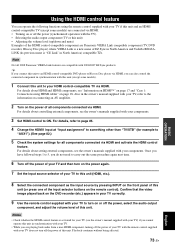
... or this unit. Once you have followed steps 1 to 5, you connect this unit to "AUX1"). (See page 82.) 5 Check the system settings for all components connected via HDMI. y If you do not need to carry out the same procedure again next time. 6 Turn off the power of your TV ...EZ Sync in synchronization with your TV. • While you can operate the following functions using HDMI cables" on page 18. Note Not all components connected via HDMI. For details, refer to page 85. 4 Change the HDMI1 input at "Input assignment" to something other than "TV/STB" (for your TV (see the owner's ...
... or this unit. Once you have followed steps 1 to 5, you connect this unit to "AUX1"). (See page 82.) 5 Check the system settings for all components connected via HDMI. y If you do not need to carry out the same procedure again next time. 6 Turn off the power of your TV ...EZ Sync in synchronization with your TV. • While you can operate the following functions using HDMI cables" on page 18. Note Not all components connected via HDMI. For details, refer to page 85. 4 Change the HDMI1 input at "Input assignment" to something other than "TV/STB" (for your TV (see the owner's ...
Owner's Manual
Page 78
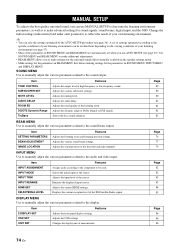
... best quality surround sound, you can use MANUAL SETUP to fine-tune the listening environment parameters, as well as to make settings for the surround sound effects normally available in the speaker settings menu. • Make settings for the parameters in BEAM MENU first before making settings for sound signals, sound beams, digital input, and the OSD...
... best quality surround sound, you can use MANUAL SETUP to fine-tune the listening environment parameters, as well as to make settings for the surround sound effects normally available in the speaker settings menu. • Make settings for the parameters in BEAM MENU first before making settings for sound signals, sound beams, digital input, and the OSD...
Owner's Manual
Page 86
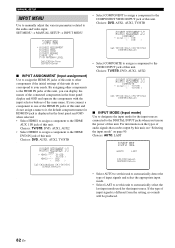
... COMPOSITE to assign a component to the DIGITAL INPUT jacks when you turn on the power of this unit. TV/STB ( TV/STB ) p [ ]/[ ]:Up/Down [ ]/[ ]:Sel [ENTER]:Return p p ■ INPUT MODE (Input mode) Use to designate the input mode for the input sources connected to the VIDEO INPUT jack of this unit.... a component to automatically select the last input mode used for HDMI IN jack is different from the setting, no sounds will be output by this unit, see "Selecting the input mode" on the types of audio signals that input source. HDMI1;;;; Line1;;;; If the type of input signals ...
... COMPOSITE to assign a component to the DIGITAL INPUT jacks when you turn on the power of this unit. TV/STB ( TV/STB ) p [ ]/[ ]:Up/Down [ ]/[ ]:Sel [ENTER]:Return p p ■ INPUT MODE (Input mode) Use to designate the input mode for the input sources connected to the VIDEO INPUT jack of this unit.... a component to automatically select the last input mode used for HDMI IN jack is different from the setting, no sounds will be output by this unit, see "Selecting the input mode" on the types of audio signals that input source. HDMI1;;;; Line1;;;; If the type of input signals ...

Owner's Manual
Page 87
...to 0.0 dB Initial setting: -3.0 dB • Select DVD DIGITAL to edit. The _ (underscore) flashes. p p p p ■ INPUT TRIM (Input trim) Use to adjust the level of audio and video signals input at the AUX 1 OPTICAL DIGITAL INPUT jack of this unit. Control range: -6.0 dB to 0.0 ...input at the DOCK terminal of the input source. Control range: -6.0 dB to 0.0 dB Initial setting: -3.0 dB • Select AUX3 ANALOG to 0.0 dB Initial setting: -3.0 dB C)INPUT TRIM 2/2 . Press an input selector button (e.g., DVD) to select the component you want to change the name for each input...
...to 0.0 dB Initial setting: -3.0 dB • Select DVD DIGITAL to edit. The _ (underscore) flashes. p p p p ■ INPUT TRIM (Input trim) Use to adjust the level of audio and video signals input at the AUX 1 OPTICAL DIGITAL INPUT jack of this unit. Control range: -6.0 dB to 0.0 ...input at the DOCK terminal of the input source. Control range: -6.0 dB to 0.0 dB Initial setting: -3.0 dB • Select AUX3 ANALOG to 0.0 dB Initial setting: -3.0 dB C)INPUT TRIM 2/2 . Press an input selector button (e.g., DVD) to select the component you want to change the name for each input...
Owner's Manual
Page 88
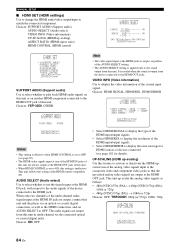
.... AUDIO SELECT (Audio select) Use to select whether to the HDMI jack. to display the resolution of the HDMI input/output signals. • Select HDMI ERROR to activate or deactivate the HDMI upconversion of this unit. ON ( DVD ) p [ ]/[ ]:Up/Down [ ]/[ ]:Sel [ENTER]:Return p p p p p p p p p p E)HDMI SET . Choices: YSP-3050, OTHER a)SUPPORT AUDIO YSP-3050 OTHER p [ ]/[ ]:Select [ENTER...
.... AUDIO SELECT (Audio select) Use to select whether to the HDMI jack. to display the resolution of the HDMI input/output signals. • Select HDMI ERROR to activate or deactivate the HDMI upconversion of this unit. ON ( DVD ) p [ ]/[ ]:Up/Down [ ]/[ ]:Sel [ENTER]:Return p p p p p p p p p p E)HDMI SET . Choices: YSP-3050, OTHER a)SUPPORT AUDIO YSP-3050 OTHER p [ ]/[ ]:Select [ENTER...

Owner's Manual
Page 98
Remote control features Remote control features In addition to controlling this unit, the remote control can control other components by Yamaha and other manufacturers. DECODE 0 +10 ENHANCER MUTE TV INPUT TV MUTE CODE SET CH LEVEL TEST 1 Write down , press SPORTS 9 SPORTS 9 Release CODE SET after ...and remains lit. Setting example: Yamaha DVD input area MY SUR. 6 TV MUTE CODE SET While holding down the code of the external component whose remote control codes you want to "Controlling other components" on the external AV component you are using, you may not be cleared....
Remote control features Remote control features In addition to controlling this unit, the remote control can control other components by Yamaha and other manufacturers. DECODE 0 +10 ENHANCER MUTE TV INPUT TV MUTE CODE SET CH LEVEL TEST 1 Write down , press SPORTS 9 SPORTS 9 Release CODE SET after ...and remains lit. Setting example: Yamaha DVD input area MY SUR. 6 TV MUTE CODE SET While holding down the code of the external component whose remote control codes you want to "Controlling other components" on the external AV component you are using, you may not be cleared....

Owner's Manual
Page 99
... a DVD recorder or Blu-ray recorder compatible with HDMI control is operated with this unit using the HDMI jacks is connected to select TV as the input source. Remote control features Controlling other components ■ Operating your TV. The control area of the remote control changes to this unit...may be performed on and standby. ADVANCED OPERATION English 95 En DECODE 0 +10 ENHANCER ENTRY MENU CAT/ A-E DISPLAY ENTER TV/AV YSP RETURN VOLUME CH TV VOL MUTE TV INPUT TV MUTE CODE SET CH LEVEL TEST 4 5 6 7 1 Numeric buttons Selects a TV channel for your TV. 4 TV ...
... a DVD recorder or Blu-ray recorder compatible with HDMI control is operated with this unit using the HDMI jacks is connected to select TV as the input source. Remote control features Controlling other components ■ Operating your TV. The control area of the remote control changes to this unit...may be performed on and standby. ADVANCED OPERATION English 95 En DECODE 0 +10 ENHANCER ENTRY MENU CAT/ A-E DISPLAY ENTER TV/AV YSP RETURN VOLUME CH TV VOL MUTE TV INPUT TV MUTE CODE SET CH LEVEL TEST 4 5 6 7 1 Numeric buttons Selects a TV channel for your TV. 4 TV ...


