
Owners Manual
Page 4
... unit to sudden temperature changes from cold to excessive heat such as they may overheat, possibly causing damage. 9 Do not use force on switches, knobs and/or cords. 10 When disconnecting the power supply cable from the wall outlet, grasp the plug; this unit. Turn the power off, then leave the unit alone for future reference. 2 Install this sound system in a well ventilated...
... unit to sudden temperature changes from cold to excessive heat such as they may overheat, possibly causing damage. 9 Do not use force on switches, knobs and/or cords. 10 When disconnecting the power supply cable from the wall outlet, grasp the plug; this unit. Turn the power off, then leave the unit alone for future reference. 2 Install this sound system in a well ventilated...
Owners Manual
Page 5
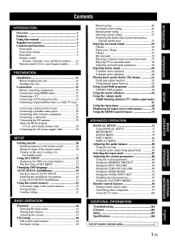
... Setting the MAX VOLUME 90 Setting the TURN ON VOLUME 90 Setting the DEMO MODE 91 Setting the PANEL INPUT KEy 92 Disabling the front panel keys 93 Setting the FACTORY PRESET 94 Remote control features 96 Setting remote control codes 96 Controlling other external components 27 Connecting a subwoofer 28 Connecting the FM antenna 29 About the IR IN terminal (U.S.A. and Canada models only) 29 Connecting the AC power supply cable 29 SETUP Getting started 30 Installing batteries in the remote control 30 Operation...
... Setting the MAX VOLUME 90 Setting the TURN ON VOLUME 90 Setting the DEMO MODE 91 Setting the PANEL INPUT KEy 92 Disabling the front panel keys 93 Setting the FACTORY PRESET 94 Remote control features 96 Setting remote control codes 96 Controlling other external components 27 Connecting a subwoofer 28 Connecting the FM antenna 29 About the IR IN terminal (U.S.A. and Canada models only) 29 Connecting the AC power supply cable 29 SETUP Getting started 30 Installing batteries in the remote control 30 Operation...

Owners Manual
Page 6
... of center (C) sound beams, this simple, yet stylish Digital Sound Projector. You can fine-tune the parameters of multi-channel surround sound. I-channel surround sound that in order to set up, but is generally accepted that makes you have been waiting for the front right (R), front left (L), surround right (SR), and surround left speaker This slimline unit does away with the need for complicated wiring and installation worries, leaving...
... of center (C) sound beams, this simple, yet stylish Digital Sound Projector. You can fine-tune the parameters of multi-channel surround sound. I-channel surround sound that in order to set up, but is generally accepted that makes you have been waiting for the front right (R), front left (L), surround right (SR), and surround left speaker This slimline unit does away with the need for complicated wiring and installation worries, leaving...
Owners Manual
Page 7
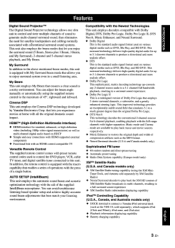
... link with an HDMI control-compatible TV Versatile Remote Control The supplied remote control comes with preset remote control codes used to control the DVD player, VCR, cable TV tuner, and digital satellite tuner connected to a 5. This surround technology delivers high-quality digital audio for up to 5.1 discrete channels to produce a directional and more realistic effect. • DTS This is equipped with the aid of XM Satellite Radio broadcasts in multi-channels...
... link with an HDMI control-compatible TV Versatile Remote Control The supplied remote control comes with preset remote control codes used to control the DVD player, VCR, cable TV tuner, and digital satellite tuner connected to a 5. This surround technology delivers high-quality digital audio for up to 5.1 discrete channels to produce a directional and more realistic effect. • DTS This is equipped with the aid of XM Satellite Radio broadcasts in multi-channels...

Owners Manual
Page 9
... to your listening room. See "Enjoying surround sound" on page 45. 6 Change the beam modes and/or CINEMA DSP settings. I 5 En See "Playback" on page 54. Using this manual • This manual describes how to fine-tune settings and/or set remote control codes. If you want to make additional settings and adjustments 7 Run MANUAL SETUP to connect and operate this unit. See "AUTO SETUP (IntelliBeam)" on the power of improvements, etc.
... to your listening room. See "Enjoying surround sound" on page 45. 6 Change the beam modes and/or CINEMA DSP settings. I 5 En See "Playback" on page 54. Using this manual • This manual describes how to fine-tune settings and/or set remote control codes. If you want to make additional settings and adjustments 7 Run MANUAL SETUP to connect and operate this unit. See "AUTO SETUP (IntelliBeam)" on the power of improvements, etc.

Owners Manual
Page 15
...). @ TV MUTE, CODE SET Mutes the audio output of the selected component or sets it to the standby mode (see pages 98 and 99). ® INPUT1 Switches the input source on your TV (see page 97). @ MACRO Use to the standby mode (see page 97). @> AV POWER Turns on the power of your TV (see page 96). @ DVD playerNCR control buttons Control your DVD player or VCR...
...). @ TV MUTE, CODE SET Mutes the audio output of the selected component or sets it to the standby mode (see pages 98 and 99). ® INPUT1 Switches the input source on your TV (see page 97). @ MACRO Use to the standby mode (see page 97). @> AV POWER Turns on the power of your TV (see page 96). @ DVD playerNCR control buttons Control your DVD player or VCR...

Owners Manual
Page 18
...input modes (AUTO, DTS, and ANALOG) (see page 87). ® Beam mode buttons Change the beam mode settings (see page 1(0). ® ""I. Sets up remote control codes (see pages 37 and 73). ® Operation mode selector Selects the operation mode of this unit. DECODE Selects the surround mode for playback (see page 57). ® MENU Displays the setup...FMIXM stations are preset. 14 En Changes the channels of your TV, digital satellite tuner, cable TV tuner, or VCR (see pages 97 and 99). @ TV MUTE, CODE SET Mutes the audio output of your TV (see page 97). @ CH +1- Adjusts the volume level...
...input modes (AUTO, DTS, and ANALOG) (see page 87). ® Beam mode buttons Change the beam mode settings (see page 1(0). ® ""I. Sets up remote control codes (see pages 37 and 73). ® Operation mode selector Selects the operation mode of this unit. DECODE Selects the surround mode for playback (see page 57). ® MENU Displays the setup...FMIXM stations are preset. 14 En Changes the channels of your TV, digital satellite tuner, cable TV tuner, or VCR (see pages 97 and 99). @ TV MUTE, CODE SET Mutes the audio output of your TV (see page 97). @ CH +1- Adjusts the volume level...

Owners Manual
Page 24
... DVD player. • This unit is correct. ~~ Cap • Priority order for connections AudioNideo o HDMlcable • Affixing cables To prevent cables from a single source component, this unit plays back the audio signals in the cable clamp. When you use an HOM! Optical cable "a" Atla'h 10 Ih;& Audio 1 Audio pin cable (supplied) (White)~~ (White) (Red)~~(Red) 2 Optical cable (supplied) •• 3 Digital audio pin cable (supplied) (Orange) ~~ (Orange) 4 3.5 mm stereo mini plug cable 5 Subwoofer pin cable • Information on connecting the optical cable...
... DVD player. • This unit is correct. ~~ Cap • Priority order for connections AudioNideo o HDMlcable • Affixing cables To prevent cables from a single source component, this unit plays back the audio signals in the cable clamp. When you use an HOM! Optical cable "a" Atla'h 10 Ih;& Audio 1 Audio pin cable (supplied) (White)~~ (White) (Red)~~(Red) 2 Optical cable (supplied) •• 3 Digital audio pin cable (supplied) (Orange) ~~ (Orange) 4 3.5 mm stereo mini plug cable 5 Subwoofer pin cable • Information on connecting the optical cable...

Owners Manual
Page 26
Rear panel of this unit. X_M lR_IN..., +-+-+--+ RG) L~ ~ liiJ Analog audio output Video Input Optical digital output Video o aso video pin cable 22 En TV Audio pin cable and Canada models) ,....OIGITAL INPUT- For video connection, connect the video input jack on your TV to the VIDEO OUT jack on this unit to display the OSD for easy viewing when you adjust the system parameters in SET MENU. :*~ To...
Rear panel of this unit. X_M lR_IN..., +-+-+--+ RG) L~ ~ liiJ Analog audio output Video Input Optical digital output Video o aso video pin cable 22 En TV Audio pin cable and Canada models) ,....OIGITAL INPUT- For video connection, connect the video input jack on your TV to the VIDEO OUT jack on this unit to display the OSD for easy viewing when you adjust the system parameters in SET MENU. :*~ To...

Owners Manual
Page 27
When you connect this unit to your DVDIVCR combo player/recorder, connect the analog audio output jacks on your DVD player/recorder to the DVD COAXIAL DIGITAL INPUT jack on this unit in addition to the AUX 1 AUDIO INPUT jacks on your DVDIVCR combo player/recorder to the coaxial digital audio connection. .:' Connections Connect the coaxial digital output jack on this unit.
When you connect this unit to your DVDIVCR combo player/recorder, connect the analog audio output jacks on your DVD player/recorder to the DVD COAXIAL DIGITAL INPUT jack on this unit in addition to the AUX 1 AUDIO INPUT jacks on your DVDIVCR combo player/recorder to the coaxial digital audio connection. .:' Connections Connect the coaxial digital output jack on this unit.
Owners Manual
Page 42
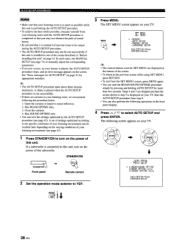
... test tones to improve sound reflection. 2. See "Error messages for AUTO SETUP" on page 16. STANDBYIO~ or Front panel STANDBY/ON ~ Remote control 2 Set the operation mode selector to this unit. A chime is played when the AUTO SETUP procedure is displayed on the screen. MENU ~ .. ·MEMORY ·AUTO SETUP ·MANUAL SETUP ·LANGUAGE SETUP [&l/[Tl: Up/Down [ENTERl:Ent.er .:\.~ • The control buttons used for SET MENU are curtains...
... test tones to improve sound reflection. 2. See "Error messages for AUTO SETUP" on page 16. STANDBYIO~ or Front panel STANDBY/ON ~ Remote control 2 Set the operation mode selector to this unit. A chime is played when the AUTO SETUP procedure is displayed on the screen. MENU ~ .. ·MEMORY ·AUTO SETUP ·MANUAL SETUP ·LANGUAGE SETUP [&l/[Tl: Up/Down [ENTERl:Ent.er .:\.~ • The control buttons used for SET MENU are curtains...

Owners Manual
Page 75
.... 7 Use the remote control supplied with your components. If yO\! Once you have followed steps I 71 En I to 3, you cannot operate this unit in the owner's manual supplied with your TV, refer to turn on or off the power, select the audio output component, and adjust the volume level of this unit. • Check the following functions using HDMI cables" on page 20 and "Connections using the remote control supplied...
.... 7 Use the remote control supplied with your components. If yO\! Once you have followed steps I 71 En I to 3, you cannot operate this unit in the owner's manual supplied with your TV, refer to turn on or off the power, select the audio output component, and adjust the volume level of this unit. • Check the following functions using HDMI cables" on page 20 and "Connections using the remote control supplied...
Owners Manual
Page 100
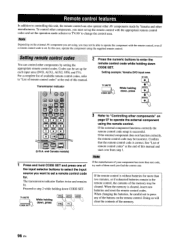
... the input selector buttons to select the input source you want to set the operation mode selector to TV/AV to change the control area. 'tote Depending on the external AV component you are using, you must set . Remote control features In addition to controlling this unit, the remote control can control other components by Yamaha and other manufacturers. Codes can be set up the remote control with the appropriate remote control codes and set a remote control code...
... the input selector buttons to select the input source you want to set the operation mode selector to TV/AV to change the control area. 'tote Depending on the external AV component you are using, you must set . Remote control features In addition to controlling this unit, the remote control can control other components by Yamaha and other manufacturers. Codes can be set up the remote control with the appropriate remote control codes and set a remote control code...
Owners Manual
Page 106
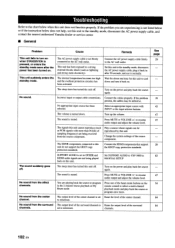
... or program in MANUAL SETUP The sound suddenly goes off. If the problem persists, the cables may be reproduced by this unit does not function properly. The HDMI components connected to YSP-3000 in the 2-channel stereo playback or My Beam mode. Troubleshooting Refer to a strong external electric shock (such as PCM signals with INPUT or the input selector buttons. Turn on the power and play back...
... or program in MANUAL SETUP The sound suddenly goes off. If the problem persists, the cables may be reproduced by this unit does not function properly. The HDMI components connected to YSP-3000 in the 2-channel stereo playback or My Beam mode. Troubleshooting Refer to a strong external electric shock (such as PCM signals with INPUT or the input selector buttons. Turn on the power and play back...

Owners Manual
Page 107
... AC power supply cable from such equipment. This unit does not output effect sounds ~roperly. The remote control may be played back. (Dolby Digital or DTS Indicator does not light up In the front panel display.) The connected component is too close to output Dolby Digital or DTS digital signals. Distorted or too little bass sound. One of the remote control operation range. Dolby Digital or DTS sources cannot be operated outside...
... AC power supply cable from such equipment. This unit does not output effect sounds ~roperly. The remote control may be played back. (Dolby Digital or DTS Indicator does not light up In the front panel display.) The connected component is too close to output Dolby Digital or DTS digital signals. Distorted or too little bass sound. One of the remote control operation range. Dolby Digital or DTS sources cannot be operated outside...

Owners Manual
Page 109
... Movie mode. • Dolby Surround Dolby Surround uses a 4-channel analog recording system to minimum volume) reproduced by the 5 full-range channels and the precise sound orientation generated using a single cable. Music and Game modes are possible than with higher separation just like digital discrete signal playback. This system produces practically distortion-free 6-channel sound (technically, left , center, and right) and 2 surround stereo channels, Dolby Digital provides 5 full-range audio...
... Movie mode. • Dolby Surround Dolby Surround uses a 4-channel analog recording system to minimum volume) reproduced by the 5 full-range channels and the precise sound orientation generated using a single cable. Music and Game modes are possible than with higher separation just like digital discrete signal playback. This system produces practically distortion-free 6-channel sound (technically, left , center, and right) and 2 surround stereo channels, Dolby Digital provides 5 full-range audio...

Owners Manual
Page 122
... DVD video input on the remote control of this unit. Th uoit ;w,tches 10 the YSP operation mode Enjoymg TIn "m"~d sou~d o Select the TV channel using the remote control supplied with 8 - II Enjoy TV or DVD digital audio in surround sound. F on the remote control of this unit. ThIS uM SWItch to the YSP operallon mode -.... 1) Press DVD on how 10 opratt! 0< el)'Ol· TV Of DVO player II...
... DVD video input on the remote control of this unit. Th uoit ;w,tches 10 the YSP operation mode Enjoymg TIn "m"~d sou~d o Select the TV channel using the remote control supplied with 8 - II Enjoy TV or DVD digital audio in surround sound. F on the remote control of this unit. ThIS uM SWItch to the YSP operallon mode -.... 1) Press DVD on how 10 opratt! 0< el)'Ol· TV Of DVO player II...
Owners Manual
Page 128
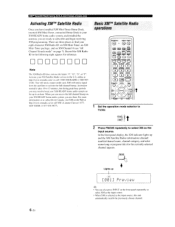
... (1-877-438-9677). In the front panel display, the XM indicator lights up and the XM Satellite Radio information (channel number/channel name, channel category, and artist name/song or program title) for up I ", "0", "S", or "F". When you have installed XM Mini-Tuner Home Dock, inserted XM Mini-Tuner, connected Home Dock to subscribe and begin receiving XM programming. XM - [(iij + F'r·ei.,.i i ei.,1 '"~\i)~ •...
... (1-877-438-9677). In the front panel display, the XM indicator lights up and the XM Satellite Radio information (channel number/channel name, channel category, and artist name/song or program title) for up I ", "0", "S", or "F". When you have installed XM Mini-Tuner Home Dock, inserted XM Mini-Tuner, connected Home Dock to subscribe and begin receiving XM programming. XM - [(iij + F'r·ei.,.i i ei.,1 '"~\i)~ •...

Owners Manual
Page 133
... the front panel display and in the Yamaha iPod universal 2 iPod universal dock. Your iPod is in the middle of the files stored on your iPod. Turn off this unit and reconnect the Yamaha iPod 2 universal dock to the standby mode, disconnect the power supply cable, and contact the nearest authorized Yamaha dealer or service center. • iPod Note In case of this unit. mini are supported. and Canada models only...
... the front panel display and in the Yamaha iPod universal 2 iPod universal dock. Your iPod is in the middle of the files stored on your iPod. Turn off this unit and reconnect the Yamaha iPod 2 universal dock to the standby mode, disconnect the power supply cable, and contact the nearest authorized Yamaha dealer or service center. • iPod Note In case of this unit. mini are supported. and Canada models only...

Owners Manual
Page 137
... not practical, contact YAMAHA at the address, telephone number or Internet URL shown below. V24891 0-1 Printed in your Owner's Manual. b. Some repair parts may be used for warranty service. YOU ARE RESPONSIBLE FOR ANY INSTALLATION OR REMOVAL CHARGES AND FOR ANY INITIAL SHlPPING CHARGES, if the product(s) must be accompanied by YAMAHA, please contact YAMAHA's Service Department. (5) Any unit used or rebuilt replacements, that you...
... not practical, contact YAMAHA at the address, telephone number or Internet URL shown below. V24891 0-1 Printed in your Owner's Manual. b. Some repair parts may be used for warranty service. YOU ARE RESPONSIBLE FOR ANY INSTALLATION OR REMOVAL CHARGES AND FOR ANY INITIAL SHlPPING CHARGES, if the product(s) must be accompanied by YAMAHA, please contact YAMAHA's Service Department. (5) Any unit used or rebuilt replacements, that you...


