
Owners Manual
Page 4
... connected to use force on this unit in standby mode, and disconnect the power supply cable from the wall outlet, grasp the plug; Make sure that this unit in the space below. Keep it may become warm. Containers with liquid in an environment with a newspaper, tablecloth, curtain, etc. Yamaha will form when the surrounding temperature changes suddenly. MODEL: Serial No.: The serial number is needed. away from direct...
... connected to use force on this unit in standby mode, and disconnect the power supply cable from the wall outlet, grasp the plug; Make sure that this unit in the space below. Keep it may become warm. Containers with liquid in an environment with a newspaper, tablecloth, curtain, etc. Yamaha will form when the surrounding temperature changes suddenly. MODEL: Serial No.: The serial number is needed. away from direct...

Owners Manual
Page 5
... Enjoying stereo sound 60 2-channel stereo playback 60 5-channel stereo playback 60 Playing back sound clearly (My Beam 61 Using auto-adjust function 61 Using manual-adjust function 62 Using sound field programs 63 CINEMA DSP programs 64 Using the music enhancer 66 Using the volume mode (Night listening enhancer/TV volume equal mode) 67 Using the sleep timer 68 Displaying the input source information 70 Using the HDMI control feature 71 ADVANCED OPERATION MANUAL SETUP 72 Using MANUAL SETUP 73...
... Enjoying stereo sound 60 2-channel stereo playback 60 5-channel stereo playback 60 Playing back sound clearly (My Beam 61 Using auto-adjust function 61 Using manual-adjust function 62 Using sound field programs 63 CINEMA DSP programs 64 Using the music enhancer 66 Using the volume mode (Night listening enhancer/TV volume equal mode) 67 Using the sleep timer 68 Displaying the input source information 70 Using the HDMI control feature 71 ADVANCED OPERATION MANUAL SETUP 72 Using MANUAL SETUP 73...
Owners Manual
Page 6
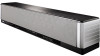
... there are reflected off the walls of powerful surround sound you have been waiting for complicated wiring and installation worries, leaving you must endure the agony of wiring and installing a great number of speakers in 2 woofers and 21 full-range small speakers. Yamaha YSP-3000 Digital Sound Projector challenges this Digital Sound Projector creates true-to fully enjoy the benefits of surround sound at home, you with the enjoyment of multi-channel surround sound.
... there are reflected off the walls of powerful surround sound you have been waiting for complicated wiring and installation worries, leaving you must endure the agony of wiring and installing a great number of speakers in 2 woofers and 21 full-range small speakers. Yamaha YSP-3000 Digital Sound Projector challenges this Digital Sound Projector creates true-to fully enjoy the benefits of surround sound at home, you with the enjoyment of multi-channel surround sound.
Owners Manual
Page 7
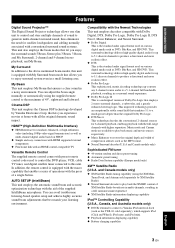
... preset remote control codes used to control the DVD player, VCR, cable TV tuner, and digital satellite tuner connected to the above mentioned beam modes, this unit. This surround technology delivers high-quality digital audio for up -converts any 2-channel source audio to a 5.1-channel full bandwidth playback, resulting in a full surround sound experience ◆ XM Satellite Radio information displaying capability iPod™ Controlling Capability (U.S.A., Canada, and Australia models only) ◆ DOCK...
... preset remote control codes used to control the DVD player, VCR, cable TV tuner, and digital satellite tuner connected to the above mentioned beam modes, this unit. This surround technology delivers high-quality digital audio for up -converts any 2-channel source audio to a 5.1-channel full bandwidth playback, resulting in a full surround sound experience ◆ XM Satellite Radio information displaying capability iPod™ Controlling Capability (U.S.A., Canada, and Australia models only) ◆ DOCK...

Owners Manual
Page 9
... the remote control and turn on page 16. 2 Connect this manual use keys on page 54. See "Getting started" on page 96. 5 En English Designs and specifications are subject to the supplied owner's manual for your TV and other external components. See "MANUAL SETUP" on page 72 and "Remote control features" on page 30. 4 Run AUTO SETUP. If you want to make additional settings and adjustments 7 Run MANUAL SETUP to connect and operate...
... the remote control and turn on page 16. 2 Connect this manual use keys on page 54. See "Getting started" on page 96. 5 En English Designs and specifications are subject to the supplied owner's manual for your TV and other external components. See "MANUAL SETUP" on page 72 and "Remote control features" on page 30. 4 Run AUTO SETUP. If you want to make additional settings and adjustments 7 Run MANUAL SETUP to connect and operate...
Owners Manual
Page 10
... actual rear panel of this unit. • Check whether the digital audio output of your TV does not have received all of a rack, etc., use the optional metal wall bracket (sold separately) to start the Continued AUTO SETUP procedure. Check the direction Optical cable Pull out the cap before installing this unit. In case your TV and DVD player is completed. Do not plug the power supply cable...
... actual rear panel of this unit. • Check whether the digital audio output of your TV does not have received all of a rack, etc., use the optional metal wall bracket (sold separately) to start the Continued AUTO SETUP procedure. Check the direction Optical cable Pull out the cap before installing this unit. In case your TV and DVD player is completed. Do not plug the power supply cable...

Owners Manual
Page 24
... the optical digital jack, make sure the direction is not compatible with the open side facing upward, attach it . • Use a conversion cable (HDMI jack ↔ DVI-D jack) to connect this unit to other DVI components. ■ Priority order for connections Audio/Video A HDMI cable Audio Audio pin cable (supplied) (White) (Red) Optical cable (supplied) (White) (Red) Digital audio pin cable (supplied) (Orange) (Orange) 3.5 mm stereo mini plug cable 5 Subwoofer pin cable Video OSD video pin cable (supplied) (Yellow) (Yellow) ■ Notes on connecting the optical cable •...
... the optical digital jack, make sure the direction is not compatible with the open side facing upward, attach it . • Use a conversion cable (HDMI jack ↔ DVI-D jack) to connect this unit to other DVI components. ■ Priority order for connections Audio/Video A HDMI cable Audio Audio pin cable (supplied) (White) (Red) Optical cable (supplied) (White) (Red) Digital audio pin cable (supplied) (Orange) (Orange) 3.5 mm stereo mini plug cable 5 Subwoofer pin cable Video OSD video pin cable (supplied) (Yellow) (Yellow) ■ Notes on connecting the optical cable •...

Owners Manual
Page 26
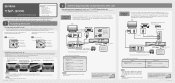
and Canada models) ANTENNA AUDIO INPUT OUT VIDEO DOCK AUX 1 TV/STB SUBWOOFER DIGITAL INPUT AUX 2 DVD COAXIAL OPTICAL AUX 1 TV/STB XM IR IN R L Analog audio output Video input Optical digital output Video OSD video pin cable 22 En TV Audio Audio pin cable Optical cable If your TV has an optical digital output jack, connect the optical digital output jack on your TV to the TV/STB OPTICAL DIGITAL INPUT jack on this unit to display...
and Canada models) ANTENNA AUDIO INPUT OUT VIDEO DOCK AUX 1 TV/STB SUBWOOFER DIGITAL INPUT AUX 2 DVD COAXIAL OPTICAL AUX 1 TV/STB XM IR IN R L Analog audio output Video input Optical digital output Video OSD video pin cable 22 En TV Audio Audio pin cable Optical cable If your TV has an optical digital output jack, connect the optical digital output jack on your TV to the TV/STB OPTICAL DIGITAL INPUT jack on this unit to display...

Owners Manual
Page 27
... DVD/VCR combo player/recorder, connect the analog audio output jacks on your DVD player/recorder. Rear panel of your DVD/VCR combo player/recorder to the AUX 1 AUDIO INPUT jacks on this unit. PREPARATION Connections Connecting a DVD player/recorder Connect the coaxial digital output jack on your DVD player/recorder to the operation manual supplied with your DVD player/recorder. • If your DVD player/recorder does not have a coaxial digital output jack, make an optical digital audio connection instead (see...
... DVD/VCR combo player/recorder, connect the analog audio output jacks on your DVD player/recorder. Rear panel of your DVD/VCR combo player/recorder to the AUX 1 AUDIO INPUT jacks on this unit. PREPARATION Connections Connecting a DVD player/recorder Connect the coaxial digital output jack on your DVD player/recorder to the operation manual supplied with your DVD player/recorder. • If your DVD player/recorder does not have a coaxial digital output jack, make an optical digital audio connection instead (see...

Owners Manual
Page 42
... p p TV/AV YSP 38 En A chime is played when the AUTO SETUP procedure is run successfully. • If there are skipped and then the screen shown in "Before installing this unit" on your TV. Open the curtains to YSP. 3 Press MENU. STANDBY/ON or STANDBY/ON Front panel Remote control 2 Set the operation mode selector to improve sound reflection. 2. AUTO SETUP (IntelliBeam) Notes • Make sure that...
... p p TV/AV YSP 38 En A chime is played when the AUTO SETUP procedure is run successfully. • If there are skipped and then the screen shown in "Before installing this unit" on your TV. Open the curtains to YSP. 3 Press MENU. STANDBY/ON or STANDBY/ON Front panel Remote control 2 Set the operation mode selector to improve sound reflection. 2. AUTO SETUP (IntelliBeam) Notes • Make sure that...

Owners Manual
Page 75
... using HDMI cables" on the power of all components connected via HDMI. and Canada) or Viera Link (for U.S.A. Playback continues without being affected. 71 En English Whether HDMI CONTROL is activated for all components connected via HDMI and activate the HDMI control feature. Also in the owner's manual supplied with the TV) • Selecting the audio output component (TV or this unit) • Adjusting the volume...
... using HDMI cables" on the power of all components connected via HDMI. and Canada) or Viera Link (for U.S.A. Playback continues without being affected. 71 En English Whether HDMI CONTROL is activated for all components connected via HDMI and activate the HDMI control feature. Also in the owner's manual supplied with the TV) • Selecting the audio output component (TV or this unit) • Adjusting the volume...
Owners Manual
Page 85
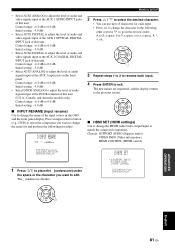
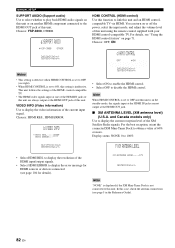
... character in the OSD and the front panel display. Control range: -6.0 dB to 0.0 dB Initial setting: -3.0 dB • Select AUX2 DIGITAL to adjust the level of audio and video signals input at the AUX 1 OPTICAL DIGITAL INPUT jack of this unit. p MANUAL SETUP 2 Press / to select the desired character. • You can use up to 8 characters for and perform the following order...
... character in the OSD and the front panel display. Control range: -6.0 dB to 0.0 dB Initial setting: -3.0 dB • Select AUX2 DIGITAL to adjust the level of audio and video signals input at the AUX 1 OPTICAL DIGITAL INPUT jack of this unit. p MANUAL SETUP 2 Press / to select the desired character. • You can use up to 8 characters for and perform the following order...
Owners Manual
Page 86
... of the HDMI input/output signals. • Select HDMI ERROR to OFF (see "Using the HDMI control feature" on or off the power, select the input mode, and adjust the volume level of this unit using the remote control supplied with your HDMI control-compatible TV. p p MANUAL SETUP SUPPORT AUDIO (Support audio) Use to select whether to play back HDMI audio signals on this unit or on another HDMI component connected to display the...
... of the HDMI input/output signals. • Select HDMI ERROR to OFF (see "Using the HDMI control feature" on or off the power, select the input mode, and adjust the volume level of this unit using the remote control supplied with your HDMI control-compatible TV. p p MANUAL SETUP SUPPORT AUDIO (Support audio) Use to select whether to play back HDMI audio signals on this unit or on another HDMI component connected to display the...

Owners Manual
Page 106
... audio output and adjust the volume level. Troubleshooting Troubleshooting Refer to the chart below does not help, set this unit to the standby mode, disconnect the AC power supply cable, and contact the nearest authorized Yamaha dealer or service center. ■ General Problem Cause Remedy This unit fails to turn it normally. If the problem you are playing back the source or program in after the power has been turned...
... audio output and adjust the volume level. Troubleshooting Troubleshooting Refer to the chart below does not help, set this unit to the standby mode, disconnect the AC power supply cable, and contact the nearest authorized Yamaha dealer or service center. ■ General Problem Cause Remedy This unit fails to turn it normally. If the problem you are playing back the source or program in after the power has been turned...

Owners Manual
Page 107
... played back. Convert the multi-channel audio signals to the digital or high- is no more than 45 degrees off-axis from such frequency equipment. The function does not work . Troubleshooting Problem Cause Remedy No sound from the TV connected via HDMI. One of the remote control operation range. Too much . TruBass is currently selected. Install this unit. There is too much bass sound. The input mode...
... played back. Convert the multi-channel audio signals to the digital or high- is no more than 45 degrees off-axis from such frequency equipment. The function does not work . Troubleshooting Problem Cause Remedy No sound from the TV connected via HDMI. One of the remote control operation range. Too much . TruBass is currently selected. Install this unit. There is too much bass sound. The input mode...

Owners Manual
Page 109
... on the number of input channels, the number of DTS digital surround in many TV and cable broadcasts as multi-channel digital audio using a single cable. The wide dynamic range (from monaural up to a 5.1-channel configuration can enjoy the depth of sound and natural spatial representation of speakers (two or more accurate moving sound effects and directionality. ■ DTS Digital Surround DTS digital surround was developed to replace the...
... on the number of input channels, the number of DTS digital surround in many TV and cable broadcasts as multi-channel digital audio using a single cable. The wide dynamic range (from monaural up to a 5.1-channel configuration can enjoy the depth of sound and natural spatial representation of speakers (two or more accurate moving sound effects and directionality. ■ DTS Digital Surround DTS digital surround was developed to replace the...

Owners Manual
Page 121
.... Activate your XM READY home audio system, you may need a major credit card. Activation normally takes 10 to an hour. Basic XM™ Satellite Radio operations STANDBY/ON POWER POWER AV TV DOCK DVD AUX1 AUX2 AUX3 TV INPUT1 MACRO STB TV PRESET/TUNE SEARCH MEMORY FM/XM CAT AUTO VOL MODE SETUP INPUTMODE SLEEP 5BEAM 1 ST+3BEAM 2 3BEAM 3 STEREO 4 MY BEAM 5 MY SUR. 6 MUSIC...
.... Activate your XM READY home audio system, you may need a major credit card. Activation normally takes 10 to an hour. Basic XM™ Satellite Radio operations STANDBY/ON POWER POWER AV TV DOCK DVD AUX1 AUX2 AUX3 TV INPUT1 MACRO STB TV PRESET/TUNE SEARCH MEMORY FM/XM CAT AUTO VOL MODE SETUP INPUTMODE SLEEP 5BEAM 1 ST+3BEAM 2 3BEAM 3 STEREO 4 MY BEAM 5 MY SUR. 6 MUSIC...

Owners Manual
Page 126
... the standby mode, disconnect the power supply cable, and contact the nearest authorized Yamaha dealer or service center. ■ iPod Note In case of Home Dock for the best reception level. Only iPod (Click and Wheel), iPod nano, and iPod mini are not connected to the XM jack of acquiring the song lists from the Yamaha iPod universal dock. XM Mini-Tuner and Home Dock are supported. Check XM Mini-Tuner and Home Dock connections and...
... the standby mode, disconnect the power supply cable, and contact the nearest authorized Yamaha dealer or service center. ■ iPod Note In case of Home Dock for the best reception level. Only iPod (Click and Wheel), iPod nano, and iPod mini are not connected to the XM jack of acquiring the song lists from the Yamaha iPod universal dock. XM Mini-Tuner and Home Dock are supported. Check XM Mini-Tuner and Home Dock connections and...
Owners Manual
Page 128
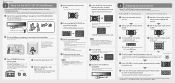
... some models) via HDMI, you have connected external components, follow the steps on installation, see "Connections using the supplied cable. TV DVD player ANALOG AUDIO VIDEO OUTPUT INPUT L 1 R 2 Video connection OPTICAL AUDIO OUTPUT COAXIAL AUDIO OUTPUT 1. Note Check whether the digital audio output of sound beams. Otherwise, the desired surround sound effects may install this unit rack. down and connect this unit in the corner at a 40˚ to start the Continued AUTO SETUP procedure. Install this unit. Supplied...
... some models) via HDMI, you have connected external components, follow the steps on installation, see "Connections using the supplied cable. TV DVD player ANALOG AUDIO VIDEO OUTPUT INPUT L 1 R 2 Video connection OPTICAL AUDIO OUTPUT COAXIAL AUDIO OUTPUT 1. Note Check whether the digital audio output of sound beams. Otherwise, the desired surround sound effects may install this unit rack. down and connect this unit in the corner at a 40˚ to start the Continued AUTO SETUP procedure. Install this unit. Supplied...
Owners Manual
Page 129
... this unit turns on the remote control. The AUTO SETUP has completed. INTELLIBEAM MIC 4 Enjoying surround sound Enjoy TV or DVD digital audio in a safe place. Also, make advanced settings for the AUTO SETUP. For further information on the beam modes, see page 54 in the Owner's Manual. Refer to the hint on the remote control to the YSP operation mode. on page 36 in the Owner's Manual. 5BEAM 1 ST+3BEAM 2 3BEAM 3 STEREO 4 MY...
... this unit turns on the remote control. The AUTO SETUP has completed. INTELLIBEAM MIC 4 Enjoying surround sound Enjoy TV or DVD digital audio in a safe place. Also, make advanced settings for the AUTO SETUP. For further information on the beam modes, see page 54 in the Owner's Manual. Refer to the hint on the remote control to the YSP operation mode. on page 36 in the Owner's Manual. 5BEAM 1 ST+3BEAM 2 3BEAM 3 STEREO 4 MY...


