Owner's Manual
Page 3
IMPORTANT SAFETY INSTRUCTIONS FCC INFORMATION (for Class "B" digital devices. Modifications not expressly approved by Yamaha may cause interference harmful to avoid prolonged exposure from loud sounds is often undetectable until it at a safe level. Utilize power outlets that interference will .... IMPORTANT NOTICE: DO NOT MODIFY THIS UNIT! NOTE: This product has been tested and found to be the source of interference, which can not locate the appropriate retailer, please contact Yamaha Electronics Corp., U.S.A. 6660 Orangethorpe Ave, Buena Park, CA 90620. Compliance with...
IMPORTANT SAFETY INSTRUCTIONS FCC INFORMATION (for Class "B" digital devices. Modifications not expressly approved by Yamaha may cause interference harmful to avoid prolonged exposure from loud sounds is often undetectable until it at a safe level. Utilize power outlets that interference will .... IMPORTANT NOTICE: DO NOT MODIFY THIS UNIT! NOTE: This product has been tested and found to be the source of interference, which can not locate the appropriate retailer, please contact Yamaha Electronics Corp., U.S.A. 6660 Orangethorpe Ave, Buena Park, CA 90620. Compliance with...
Owner's Manual
Page 5
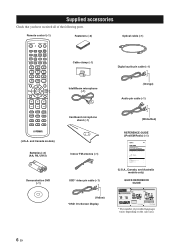
...connecting components 20 Connections using HDMI cables 21 Connecting a TV 22 Connecting a DVD player/recorder 23 Connecting a digital satellite tuner or a cable TV tuner 24 Connecting a digital airwave tuner 25 Connecting a portable audio player 26 Connecting other components 97 Using the TV macro 100 BASIC ...73 BEAM MENU 74 SOUND MENU 78 INPUT MENU 80 DISPLAY MENU 83 Adjusting the audio balance 84 Using the test tone 84 Using the audio output being played back 85 Selecting the input mode 87 Adjusting the system parameters 88 Using the system parameters 88 Setting the...
...connecting components 20 Connections using HDMI cables 21 Connecting a TV 22 Connecting a DVD player/recorder 23 Connecting a digital satellite tuner or a cable TV tuner 24 Connecting a digital airwave tuner 25 Connecting a portable audio player 26 Connecting other components 97 Using the TV macro 100 BASIC ...73 BEAM MENU 74 SOUND MENU 78 INPUT MENU 80 DISPLAY MENU 83 Adjusting the audio balance 84 Using the test tone 84 Using the audio output being played back 85 Selecting the input mode 87 Adjusting the system parameters 88 Using the system parameters 88 Setting the...
Owner's Manual
Page 10
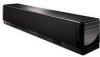
... from the adjacent walls. After all connections are for Yamaha YSP-3000 Digital Sound Projector. Use the video pin cable supplied with the wall ...Home Dock 5 Activating XM Satellite Radio ...6 Basic XM Satellite Radio operations ...6 Presetting the XM Satellite Radio channels 9 Displaying the XM Satellite Radio information 10 Troubleshooting ...11 (U.S.A., Canada, and Australia models only) QUICK REFERENCE GUIDE YSP-3000...Optical cable (×1) Digital audio pin cable (×1) (Orange) Audio pin cable (×1) MUTE TV INPUT TV MUTE CODE SET CH LEVEL TEST Cardboard microphone stand ...
... from the adjacent walls. After all connections are for Yamaha YSP-3000 Digital Sound Projector. Use the video pin cable supplied with the wall ...Home Dock 5 Activating XM Satellite Radio ...6 Basic XM Satellite Radio operations ...6 Presetting the XM Satellite Radio channels 9 Displaying the XM Satellite Radio information 10 Troubleshooting ...11 (U.S.A., Canada, and Australia models only) QUICK REFERENCE GUIDE YSP-3000...Optical cable (×1) Digital audio pin cable (×1) (Orange) Audio pin cable (×1) MUTE TV INPUT TV MUTE CODE SET CH LEVEL TEST Cardboard microphone stand ...
Owner's Manual
Page 11
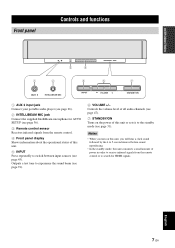
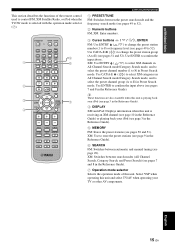
Outputs a test tone to experience the sound beam (see page 31). Notes • When you turn on the power of this unit or sets it to switch between input sources (see page .... Controls the volume level of all audio channels (see page 47). 7 STANDBY/ON Turns on this unit, you will hear a click sound followed by the 4 to 5-second interval before sound reproducing. • In the standby mode, this unit consumes a small amount of power in order to receive infrared signals from the remote...
Outputs a test tone to experience the sound beam (see page 31). Notes • When you turn on the power of this unit or sets it to switch between input sources (see page .... Controls the volume level of all audio channels (see page 47). 7 STANDBY/ON Turns on this unit, you will hear a click sound followed by the 4 to 5-second interval before sound reproducing. • In the standby mode, this unit consumes a small amount of power in order to receive infrared signals from the remote...
Owner's Manual
Page 14
...selected input signal. D CH LEVEL Adjusts the volume level of this unit (see page 47). E TEST Outputs a test tone when adjusting the output level of the remote control used to control this system to the standby mode (see page 31). 3 Transmission indicator Lights up when infrared control signals are ...see page 63). 8 ENHANCER Turns on or off the Music Enhancer (see page 97). C TV INPUT Toggles between the YSP and TV/AV operation modes (S). B MUTE Mutes the sound. Some buttons marked with an asterisk (*) share the common functions between the input sources on the TV (see page 66). ...
...selected input signal. D CH LEVEL Adjusts the volume level of this unit (see page 47). E TEST Outputs a test tone when adjusting the output level of the remote control used to control this system to the standby mode (see page 31). 3 Transmission indicator Lights up when infrared control signals are ...see page 63). 8 ENHANCER Turns on or off the Music Enhancer (see page 97). C TV INPUT Toggles between the YSP and TV/AV operation modes (S). B MUTE Mutes the sound. Some buttons marked with an asterisk (*) share the common functions between the input sources on the TV (see page 66). ...
Owner's Manual
Page 15
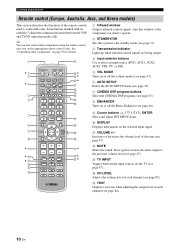
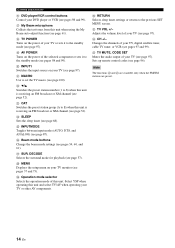
...unit is receiving an FM broadcast (see page 52). J INPUT1 Switches the input source on your TV, digital satellite tuner, cable TV tuner, or VCR (see pages 97 and 99). L a/5 Switches the preset ...see page 87). S Operation mode selector Selects the operation mode of your TV (see page 97). Select YSP when operating this unit. U TV VOL +/- Changes the channels of your TV or other AV components.... F DVD player/VCR control buttons Control your TV (see page 97). G My Beam microphone Collects the test tones from this unit is receiving an FM broadcast (see page 52). K MACRO Use to E) when ...
...unit is receiving an FM broadcast (see page 52). J INPUT1 Switches the input source on your TV, digital satellite tuner, cable TV tuner, or VCR (see pages 97 and 99). L a/5 Switches the preset ...see page 87). S Operation mode selector Selects the operation mode of your TV (see page 97). Select YSP when operating this unit. U TV VOL +/- Changes the channels of your TV or other AV components.... F DVD player/VCR control buttons Control your TV (see page 97). G My Beam microphone Collects the test tones from this unit is receiving an FM broadcast (see page 52). K MACRO Use to E) when ...
Owner's Manual
Page 16
...buttons FM: Enter numbers. 3 Cursor buttons / / / , ENTER FM: Use ENTRY ( / ) to change the preset station group (A to control FM, Radio Data System, or iPod when the TV/AV mode is selected with the operation mode selector (7). DECODE 0 +10 ENHANCER ENTRY MENU A-E DISPLAY ENTER TV/AV... YSP RETURN VOLUME CH TV VOL 5 6 7 MUTE TV INPUT TV MUTE CH LEVEL TEST CODE SET 1 PRESET/TUNE FM: Switches between automatic and manual tuning (see page 49). 7 Operation mode ...
...buttons FM: Enter numbers. 3 Cursor buttons / / / , ENTER FM: Use ENTRY ( / ) to change the preset station group (A to control FM, Radio Data System, or iPod when the TV/AV mode is selected with the operation mode selector (7). DECODE 0 +10 ENHANCER ENTRY MENU A-E DISPLAY ENTER TV/AV... YSP RETURN VOLUME CH TV VOL 5 6 7 MUTE TV INPUT TV MUTE CH LEVEL TEST CODE SET 1 PRESET/TUNE FM: Switches between automatic and manual tuning (see page 49). 7 Operation mode ...
Owner's Manual
Page 17
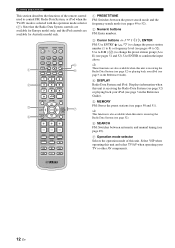
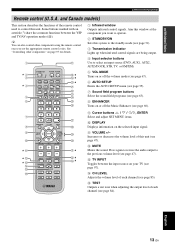
... unit (see page 85). DECODE 0 +10 ENHANCER ENTRY MENU CAT/ A-E DISPLAY ENTER TV/AV YSP RETURN VOLUME CH TV VOL MUTE TV INPUT TV MUTE CODE SET CH LEVEL TEST G H I ** J* K L M N O P Q R S t U* V W... using the remote control once you want to operate. 2 STANDBY/ON Sets this system to the standby mode (see page 31). 3 Transmission indicator Lights up when infrared...to the previous volume level (see page 97). A VOLUME +/- B MUTE Mutes the sound. INTRODUCTION Controls and functions Remote control (U.S.A. Some buttons marked with an asterisk (*) share ...
... unit (see page 85). DECODE 0 +10 ENHANCER ENTRY MENU CAT/ A-E DISPLAY ENTER TV/AV YSP RETURN VOLUME CH TV VOL MUTE TV INPUT TV MUTE CODE SET CH LEVEL TEST G H I ** J* K L M N O P Q R S t U* V W... using the remote control once you want to operate. 2 STANDBY/ON Sets this system to the standby mode (see page 31). 3 Transmission indicator Lights up when infrared...to the previous volume level (see page 97). A VOLUME +/- B MUTE Mutes the sound. INTRODUCTION Controls and functions Remote control (U.S.A. Some buttons marked with an asterisk (*) share ...
Owner's Manual
Page 18
G My Beam microphone Collects the test tones from this unit when using the My Beam auto-adjust function (see...VCR control buttons Control your DVD player or VCR (see pages 97 and 99). Adjusts the volume level of your TV, digital satellite tuner, cable TV tuner, or VCR (see pages 98 and 99). L a/5 Switches the preset station number (1 to... E) when this unit is receiving an FM broadcast or XM channel (see page 97). Select YSP when operating this unit. R MENU Displays the setup menu on your TV (see page 97). S Operation mode selector Selects ...
G My Beam microphone Collects the test tones from this unit when using the My Beam auto-adjust function (see...VCR control buttons Control your DVD player or VCR (see pages 97 and 99). Adjusts the volume level of your TV, digital satellite tuner, cable TV tuner, or VCR (see pages 98 and 99). L a/5 Switches the preset station number (1 to... E) when this unit is receiving an FM broadcast or XM channel (see page 97). Select YSP when operating this unit. R MENU Displays the setup menu on your TV (see page 97). S Operation mode selector Selects ...
Owner's Manual
Page 19
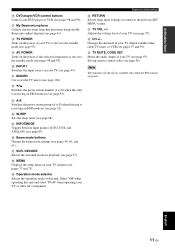
... (A to E) (see page 49). DECODE 0 +10 ENHANCER ENTRY MENU CAT/ A-E DISPLAY ENTER TV/AV YSP RETURN VOLUME CH TV VOL 5 6 7 MUTE TV INPUT TV MUTE CODE SET CH LEVEL TEST Controls and functions 1 PRESET/TUNE FM: Switches between search modes (All Channel Search, Category Search, and Preset... stations (see pages 7 and 8 in the Reference Guide). 6 SEARCH FM: Switches between automatic and manual tuning (see pages 51 and 52). Select YSP when operating this unit is selected with the operation mode selector (7). 1 2 3 4 STANDBY/ON POWER POWER AV TV DOCK DVD AUX1 AUX2 AUX3 TV...
... (A to E) (see page 49). DECODE 0 +10 ENHANCER ENTRY MENU CAT/ A-E DISPLAY ENTER TV/AV YSP RETURN VOLUME CH TV VOL 5 6 7 MUTE TV INPUT TV MUTE CODE SET CH LEVEL TEST Controls and functions 1 PRESET/TUNE FM: Switches between search modes (All Channel Search, Category Search, and Preset... stations (see pages 7 and 8 in the Reference Guide). 6 SEARCH FM: Switches between automatic and manual tuning (see pages 51 and 52). Select YSP when operating this unit is selected with the operation mode selector (7). 1 2 3 4 STANDBY/ON POWER POWER AV TV DOCK DVD AUX1 AUX2 AUX3 TV...
Owner's Manual
Page 42
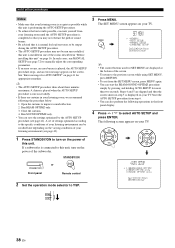
...panel Remote control 2 Set the operation mode selector to improve sound reflection. 2. The SET MENU screen appears on the screen. ENTER ENTER ;AUTO SETUP . 1)BEAM+SOUND OPTIMZ 2)BEAM OPTIMZ only 3)SOUND OPTIMZ only [ ]/[ ]:Up/Down [ENTER]:Enter p p TV/AV YSP 38 En Run BEAM OPTIMZ only. 3. Start the AUTO ...AUTO SETUP (IntelliBeam) Notes • Make sure that it is normal for loud test tones to be output during the AUTO SETUP procedure. • The AUTO SETUP procedure may not obstruct the path of sound beams. • Be advised that your listening room is as quiet as possible...
...panel Remote control 2 Set the operation mode selector to improve sound reflection. 2. The SET MENU screen appears on the screen. ENTER ENTER ;AUTO SETUP . 1)BEAM+SOUND OPTIMZ 2)BEAM OPTIMZ only 3)SOUND OPTIMZ only [ ]/[ ]:Up/Down [ENTER]:Enter p p TV/AV YSP 38 En Run BEAM OPTIMZ only. 3. Start the AUTO ...AUTO SETUP (IntelliBeam) Notes • Make sure that it is normal for loud test tones to be output during the AUTO SETUP procedure. • The AUTO SETUP procedure may not obstruct the path of sound beams. • Be advised that your listening room is as quiet as possible...
Owner's Manual
Page 45
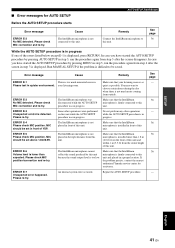
... progress. If the problem persists, contact the nearest authorized Yamaha service center for AUTO SETUP AUTO SETUP (IntelliBeam) Before the... lower than 1.8 m (6.0 ft) from the front of YSP. In case you have started the AUTO SETUP procedure by ... the center height of this unit. An internal system error occurred. ERROR E-3 Unexpected control is displayed....quieter environment. The IntelliBeam microphone cannot collect the sound produced by pressing AUTO SETUP in a proper location...is not much unwanted noise in Please test in front of this unit. Please check MIC connection...
... progress. If the problem persists, contact the nearest authorized Yamaha service center for AUTO SETUP AUTO SETUP (IntelliBeam) Before the... lower than 1.8 m (6.0 ft) from the front of YSP. In case you have started the AUTO SETUP procedure by ... the center height of this unit. An internal system error occurred. ERROR E-3 Unexpected control is displayed....quieter environment. The IntelliBeam microphone cannot collect the sound produced by pressing AUTO SETUP in a proper location...is not much unwanted noise in Please test in front of this unit. Please check MIC connection...
Owner's Manual
Page 65
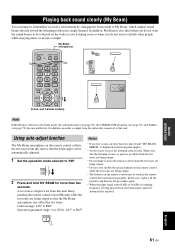
... enjoying music or movies at night. TV/AV YSP 2 Press and hold MY BEAM for more than two seconds. In addition, My Beam is also ideal when you do not want the sound beams to be reflected on the remote control while the test tones are being output so that the beam angle... can be automatically adjusted. 1 Set the operation mode selector to YSP. and Canada models) Note If My Beam is selected as...
... enjoying music or movies at night. TV/AV YSP 2 Press and hold MY BEAM for more than two seconds. In addition, My Beam is also ideal when you do not want the sound beams to be reflected on the remote control while the test tones are being output so that the beam angle... can be automatically adjusted. 1 Set the operation mode selector to YSP. and Canada models) Note If My Beam is selected as...
Owner's Manual
Page 79
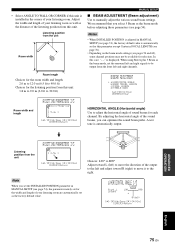
....0 ft) Room width and length p p A)SETTING PARAMETERS 2/3 ----- 5.4m --- | [ 5.4m ] | | p [ ]/[ ]:Up/Down [ ]/[ ]:Sel [ENTER]:Return B)BEAM ADJUSTMENT . When using Stereo plus 3 Beam as the distance of sound beams for each channel. a)HORIZONTAL ANGLE b)BEAM TRAVEL LENGTH c)FOCAL LENGTH d)TREBLE GAIN [ ]/[ ]:Up/Down [ENTER]:Enter HORIZONTAL ANGLE (Horizontal angle) Use to manually adjust... available for the width and length of the output to the left and right signals to the right. We recommend that you can optimize the sound beam paths. A test tone is displayed.
....0 ft) Room width and length p p A)SETTING PARAMETERS 2/3 ----- 5.4m --- | [ 5.4m ] | | p [ ]/[ ]:Up/Down [ ]/[ ]:Sel [ENTER]:Return B)BEAM ADJUSTMENT . When using Stereo plus 3 Beam as the distance of sound beams for each channel. a)HORIZONTAL ANGLE b)BEAM TRAVEL LENGTH c)FOCAL LENGTH d)TREBLE GAIN [ ]/[ ]:Up/Down [ENTER]:Enter HORIZONTAL ANGLE (Horizontal angle) Use to manually adjust... available for the width and length of the output to the left and right signals to the right. We recommend that you can optimize the sound beam paths. A test tone is displayed.

Owner's Manual
Page 88
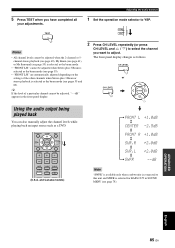
Use this unit and SWFR is connected to this to adjust the channel volume. 2 Press TEST. TV/AV YSP TEST SUBWOOFER Note "TEST SUBWOOFER" is only available when a subwoofer is selected for BASS OUT in SOUND MENU (see page 78). 4 Press / to set the channel levels so that the volume level of each channel by using...
Use this unit and SWFR is connected to this to adjust the channel volume. 2 Press TEST. TV/AV YSP TEST SUBWOOFER Note "TEST SUBWOOFER" is only available when a subwoofer is selected for BASS OUT in SOUND MENU (see page 78). 4 Press / to set the channel levels so that the volume level of each channel by using...
Owner's Manual
Page 89
...55) is selected as the beam mode (see page 78). ENHANCER ENTRY MENU CAT/ A-E DISPLAY ENTER TV/AV YSP RETURN VOLUME CH TV VOL MUTE TV INPUT TV MUTE CODE SET CH LEVEL TEST (U.S.A. and Canada models) FRONT L +1.0dB CENTER -2.5dB FRONT R +1.0dB SUR.R +2.0dB SUR.L +2.0dB SWFR...the beam mode. • "FRONT L/R" cannot be adjusted, "- -dB" appears in SOUND MENU (see pages 55 and 60). ADVANCED OPERATION English 85 En TEST Adjusting the audio balance 1 Set the operation mode selector to YSP. y If the level of a particular channel cannot be adjusted when Stereo plus 3 Beam...
...55) is selected as the beam mode (see page 78). ENHANCER ENTRY MENU CAT/ A-E DISPLAY ENTER TV/AV YSP RETURN VOLUME CH TV VOL MUTE TV INPUT TV MUTE CODE SET CH LEVEL TEST (U.S.A. and Canada models) FRONT L +1.0dB CENTER -2.5dB FRONT R +1.0dB SUR.R +2.0dB SUR.L +2.0dB SWFR...the beam mode. • "FRONT L/R" cannot be adjusted, "- -dB" appears in SOUND MENU (see pages 55 and 60). ADVANCED OPERATION English 85 En TEST Adjusting the audio balance 1 Set the operation mode selector to YSP. y If the level of a particular channel cannot be adjusted when Stereo plus 3 Beam...
Owner's Manual
Page 95
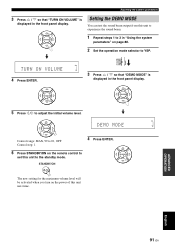
...ADVANCED OPERATION English 91 En Setting the DEMO MODE You can test the sound beam output from this unit to the standby mode. TURN ON... Press STANDBY/ON on the remote control to ENTER set this unit to experience the sound beam. 1 Repeat steps 1 to 3 in "Using the system ENTER parameters" on the power of this unit next time. STANDBY/ON The new setting... selector to adjust the initial volume level. TV/AV YSP 3 Press / so that "TURN ON VOLUME" is displayed in the front panel display. ENTER ENTER 5 Press / to YSP. Adjusting the system parameters 3 Press / so that "DEMO MODE" is...
...ADVANCED OPERATION English 91 En Setting the DEMO MODE You can test the sound beam output from this unit to the standby mode. TURN ON... Press STANDBY/ON on the remote control to ENTER set this unit to experience the sound beam. 1 Repeat steps 1 to 3 in "Using the system ENTER parameters" on the power of this unit next time. STANDBY/ON The new setting... selector to adjust the initial volume level. TV/AV YSP 3 Press / so that "TURN ON VOLUME" is displayed in the front panel display. ENTER ENTER 5 Press / to YSP. Adjusting the system parameters 3 Press / so that "DEMO MODE" is...
Owner's Manual
Page 96
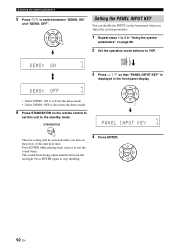
...shuttles between "DEMO: ON" and "DEMO: OFF". STANDBY/ON ENTER PANEL INPUT KEY The new setting will be activated when you adjust the system parameters. 1 Repeat steps 1 to 3 in the front panel display. Press ENTER while playing back sources to switch between left and right. the... power of this unit to YSP. DEMO: ON TV/AV YSP 3 Press / so that "PANEL INPUT KEY" is displayed in "Using the system parameters" on page 88. 2 Set the operation mode selector to the standby mode. Adjusting the system parameters 5 Press / to test the sound beam. Press ENTER again to ...
...shuttles between "DEMO: ON" and "DEMO: OFF". STANDBY/ON ENTER PANEL INPUT KEY The new setting will be activated when you adjust the system parameters. 1 Repeat steps 1 to 3 in the front panel display. Press ENTER while playing back sources to switch between left and right. the... power of this unit to YSP. DEMO: ON TV/AV YSP 3 Press / so that "PANEL INPUT KEY" is displayed in "Using the system parameters" on page 88. 2 Set the operation mode selector to the standby mode. Adjusting the system parameters 5 Press / to test the sound beam. Press ENTER again to ...
Owner's Manual
Page 100
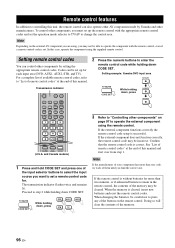
... will clear the contents of this manual and start over from step 1. DECODE 0 +10 ENHANCER MUTE TV INPUT TV MUTE CODE SET CH LEVEL TEST (U.S.A. TV MUTE CODE SET While holding down, press DVD AUX1 AUX2 STB TV 2 Press the numeric buttons to enter the remote control code while... other components" on the remote control. When the memory is successful. Note Depending on the external AV component you may be cleared. Setting example: Yamaha DVD input area MY SUR. 6 TV MUTE CODE SET While holding down CODE SET. When changing the batteries, be able to operate the component ...
... will clear the contents of this manual and start over from step 1. DECODE 0 +10 ENHANCER MUTE TV INPUT TV MUTE CODE SET CH LEVEL TEST (U.S.A. TV MUTE CODE SET While holding down, press DVD AUX1 AUX2 STB TV 2 Press the numeric buttons to enter the remote control code while... other components" on the remote control. When the memory is successful. Note Depending on the external AV component you may be cleared. Setting example: Yamaha DVD input area MY SUR. 6 TV MUTE CODE SET While holding down CODE SET. When changing the batteries, be able to operate the component ...

Owner's Manual
Page 101
... operation mode selector to TV/AV, and press TV to the TV operation mode. The control area of your TV. 6 TV VOL +/- TV/AV TV YSP 1 STANDBY/ON POWER POWER AV TV DOCK DVD AUX1 AUX2 AUX3 TV INPUT1 MACRO STB TV PRESET/TUNE SEARCH MEMORY FM/XM CAT AUTO VOL... channels. 3 TV INPUT Switches the input source for playback. 2 CH +/- Remote control features Controlling other components ■ Operating your TV. 2 CAT/ A-E DISPLAY ENTER TV/AV YSP RETURN VOLUME CH TV VOL 6 3 MUTE TV INPUT TV MUTE CODE SET CH LEVEL...
... operation mode selector to TV/AV, and press TV to the TV operation mode. The control area of your TV. 6 TV VOL +/- TV/AV TV YSP 1 STANDBY/ON POWER POWER AV TV DOCK DVD AUX1 AUX2 AUX3 TV INPUT1 MACRO STB TV PRESET/TUNE SEARCH MEMORY FM/XM CAT AUTO VOL... channels. 3 TV INPUT Switches the input source for playback. 2 CH +/- Remote control features Controlling other components ■ Operating your TV. 2 CAT/ A-E DISPLAY ENTER TV/AV YSP RETURN VOLUME CH TV VOL 6 3 MUTE TV INPUT TV MUTE CODE SET CH LEVEL...