
Owner's Manual
Page 10
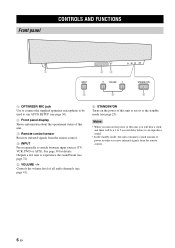
...Front panel 1 23 INPUT VOLUME + STANDBY/ON 4 5 6 1 OPTIMIZER MIC jack Use to connect the supplied optimizer microphone to be a 4 to 5-second delay before it to run AUTO SETUP (see page 25). Outputs a test tone to experience the sound beam (see page 72). 5 VOLUME -/+ Controls the volume level of ... Receives infrared signals from the remote control. 6 En Notes • When you turn on the power of this unit or sets it can reproduce sound. • In the standby mode, this unit consumes a small amount of power in order to receive infrared-signals from the remote control. 4...
...Front panel 1 23 INPUT VOLUME + STANDBY/ON 4 5 6 1 OPTIMIZER MIC jack Use to connect the supplied optimizer microphone to be a 4 to 5-second delay before it to run AUTO SETUP (see page 25). Outputs a test tone to experience the sound beam (see page 72). 5 VOLUME -/+ Controls the volume level of ... Receives infrared signals from the remote control. 6 En Notes • When you turn on the power of this unit or sets it can reproduce sound. • In the standby mode, this unit consumes a small amount of power in order to receive infrared-signals from the remote control. 4...
Owner's Manual
Page 34
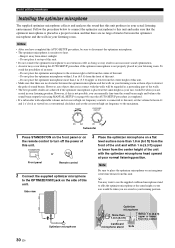
...so may result in your listening room. STANDBY/ON or Front panel Remote control 2 Connect the supplied optimizer microphone to the OPTIMIZER MIC jack on a conventional clockface and set the volume between 11 and 1 o'clock as your ears would be when you can manually ...as viewed on the side of this unit. AUTO SETUP (IntelliBeam) Installing the optimizer microphone The supplied optimizer microphone collects and analyzes the sound that this unit. Notes • After you are no obstacles between the optimizer microphone and the walls in your actual listening environment....
...so may result in your listening room. STANDBY/ON or Front panel Remote control 2 Connect the supplied optimizer microphone to the OPTIMIZER MIC jack on a conventional clockface and set the volume between 11 and 1 o'clock as your ears would be when you can manually ...as viewed on the side of this unit. AUTO SETUP (IntelliBeam) Installing the optimizer microphone The supplied optimizer microphone collects and analyzes the sound that this unit. Notes • After you are no obstacles between the optimizer microphone and the walls in your actual listening environment....
Owner's Manual
Page 37
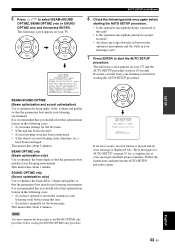
...restructured. • If the objects in the BEAM OPTIMZ only procedure before starting the SOUND OPTIMZ only procedure. AUTO SETUP PREPARATION & CHECK Please connect the MIC. SOUND OPTIMZ only (Sound optimization only) Use to start the AUTO SETUP procedure. Note You must optimize the... please leave the room. [ENTER]:Start [RETURN]:Cancel BEAM+SOUND OPTIMZ (Beam optimization and sound optimizaiton) Use to select BEAM+SOUND OPTIMZ, BEAM OPTIMZ only or SOUND OPTIMZ only and then press ENTER. Evacuate yourself from the YSP unit. SETUP AUTO SETUP (IntelliBeam) 5 Press / to ...
...restructured. • If the objects in the BEAM OPTIMZ only procedure before starting the SOUND OPTIMZ only procedure. AUTO SETUP PREPARATION & CHECK Please connect the MIC. SOUND OPTIMZ only (Sound optimization only) Use to start the AUTO SETUP procedure. Note You must optimize the... please leave the room. [ENTER]:Start [RETURN]:Cancel BEAM+SOUND OPTIMZ (Beam optimization and sound optimizaiton) Use to select BEAM+SOUND OPTIMZ, BEAM OPTIMZ only or SOUND OPTIMZ only and then press ENTER. Evacuate yourself from the YSP unit. SETUP AUTO SETUP (IntelliBeam) 5 Press / to ...

Owner's Manual
Page 38
...not save set up correctly. Optimizer microphone ENTER AUTO SETUP COMPLETE Please remove the MIC from your TV. If ''ENVIRONMENT CHECK [FAILED]'' is displayed in "Error messages for 2 seconds and then disappears from the YSP and the listening position. y • If ''ENVIRONMENT CHECK [FAILED]'' is ...displayed on the front panel. In this unit, increase the volume level of the subwoofer and run the procedure again from the OPTIMIZER MIC jack on your TV. Side view Example 2 SHOW RESULT MEASUREMENT COMPLETE ENVIRONMENT CHECK[FAILED] BEAM MODE :5 BEAM SUBWOOFER :YES [...
...not save set up correctly. Optimizer microphone ENTER AUTO SETUP COMPLETE Please remove the MIC from your TV. If ''ENVIRONMENT CHECK [FAILED]'' is displayed in "Error messages for 2 seconds and then disappears from the YSP and the listening position. y • If ''ENVIRONMENT CHECK [FAILED]'' is ...displayed on the front panel. In this unit, increase the volume level of the subwoofer and run the procedure again from the OPTIMIZER MIC jack on your TV. Side view Example 2 SHOW RESULT MEASUREMENT COMPLETE ENVIRONMENT CHECK[FAILED] BEAM MODE :5 BEAM SUBWOOFER :YES [...
Owner's Manual
Page 39
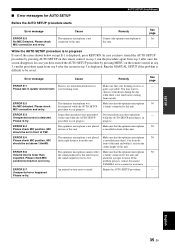
...- 30 30 30 - ERROR E-5 Please check MIC position. If the problem persists, contact the nearest YAMAHA service center for AUTO SETUP AUTO SETUP (IntelliBeam) Before the AUTO SETUP procedure starts Error message ERROR E-2 No MIC Detected. Repeat the AUTO SETUP procedure. SETUP English ...YSP. Please re-try . ■ Error messages for assistance. Please check MIC connection and re-try. Make sure that the optimizer microphone is installed more than expected. Make sure that the optimizer microphone is firmly connected to this unit because the sound...
...- 30 30 30 - ERROR E-5 Please check MIC position. If the problem persists, contact the nearest YAMAHA service center for AUTO SETUP AUTO SETUP (IntelliBeam) Before the AUTO SETUP procedure starts Error message ERROR E-2 No MIC Detected. Repeat the AUTO SETUP procedure. SETUP English ...YSP. Please re-try . ■ Error messages for assistance. Please check MIC connection and re-try. Make sure that the optimizer microphone is installed more than expected. Make sure that the optimizer microphone is firmly connected to this unit because the sound...
Owner's Manual
Page 95
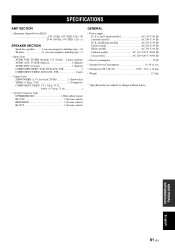
...speakers .........4 cm cone magnetic shielding type × 40 Woofers 11 cm cone magnetic shielding type × 2 • Input Jacks AUDIO VCR, TV/STB (Analog) (1 V, 32 kΩ) ... 2 pairs (Analog) AUDIO AUX, TV/STB (Optical 2 (Digital) AUDIO DVD (Coaxial 1 (Digital...) COMPOSITE VIDEO, VCR, DVD/AUX, STB 3 COMPONENT VIDEO, DVD/AUX, STB 2 pairs • Output Jacks SUBWOOFER (1.5 V, less than 120 Hz 1 (Subwoofer) VIDEO (1 Vp-p, 75 1 (Composite) COMPONENT VIDEO (Y: 1 Vp-p, 75 Ω PB/PR: 0.5 Vp-p, 75 1 • System Connector Jacks OPTIMIZER MIC...
...speakers .........4 cm cone magnetic shielding type × 40 Woofers 11 cm cone magnetic shielding type × 2 • Input Jacks AUDIO VCR, TV/STB (Analog) (1 V, 32 kΩ) ... 2 pairs (Analog) AUDIO AUX, TV/STB (Optical 2 (Digital) AUDIO DVD (Coaxial 1 (Digital...) COMPOSITE VIDEO, VCR, DVD/AUX, STB 3 COMPONENT VIDEO, DVD/AUX, STB 2 pairs • Output Jacks SUBWOOFER (1.5 V, less than 120 Hz 1 (Subwoofer) VIDEO (1 Vp-p, 75 1 (Composite) COMPONENT VIDEO (Y: 1 Vp-p, 75 Ω PB/PR: 0.5 Vp-p, 75 1 • System Connector Jacks OPTIMIZER MIC...
Owner's Manual
Page 99
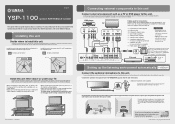
...on the backside to the Owner's Manual. Optimizer microphone (supplied) Set the optimizer microphone at your listening environment using the cable (b). 1 Digital audio pin cable (supplied) $"65*0/ 2a Video pin cable ɾDo not plug the power 2b Component video pin cable 3 Optical cable... (a) or (b). If your TV, place it . Connect the optimizer microphone to the OPTIMIZER MIC jack on the extended center line of sound beams. Otherwise, the desired surround sound effects may install this unit using appropriate cables as shown below . Place the optimizer microphone on...
...on the backside to the Owner's Manual. Optimizer microphone (supplied) Set the optimizer microphone at your listening environment using the cable (b). 1 Digital audio pin cable (supplied) $"65*0/ 2a Video pin cable ɾDo not plug the power 2b Component video pin cable 3 Optical cable... (a) or (b). If your TV, place it . Connect the optimizer microphone to the OPTIMIZER MIC jack on the extended center line of sound beams. Otherwise, the desired surround sound effects may install this unit using appropriate cables as shown below . Place the optimizer microphone on...
Owner's Manual
Page 100
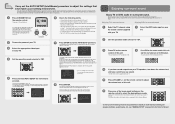
...to YSP. Enjoying TV in surround sound Enjoying DVDs in surround sound 1 Select the TV channel using the remote control supplied with your TV. 1 Select the DVD video input on your TV speakers, ... connected properly and then press YSP followed by MENU. Use the remote control supplied with the aid of the result screen. This unit employs the YAMAHA IntelliBeam technology with your listening ...of this unit. To start the AUTO SETUP procedure. CH LEVEL MENU TEST ENTER TV/AV YSP RETURN AUTO SETUP COMPLETE Please remove the MIC from step 5. Before carrying out the procedure below, ...
...to YSP. Enjoying TV in surround sound Enjoying DVDs in surround sound 1 Select the TV channel using the remote control supplied with your TV. 1 Select the DVD video input on your TV speakers, ... connected properly and then press YSP followed by MENU. Use the remote control supplied with the aid of the result screen. This unit employs the YAMAHA IntelliBeam technology with your listening ...of this unit. To start the AUTO SETUP procedure. CH LEVEL MENU TEST ENTER TV/AV YSP RETURN AUTO SETUP COMPLETE Please remove the MIC from step 5. Before carrying out the procedure below, ...