
Owner's Manual
Page 5
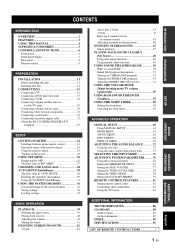
... this unit 11 CONNECTIONS 15 Connecting a TV 16 Connecting a DVD player/recorder 17 Connecting a VCR 18 Connecting a digital satellite tuner or a cable TV tuner 19 Connecting a digital airwave tuner 20 Connecting other external components 21 Connecting a subwoofer 22 Connecting the power supply cable 23 About the RS... 57 USING THE SLEEP TIMER 58 Setting the sleep timer 58 Canceling the sleep timer 59 ADVANCED OPERATION MANUAL SETUP 60 Using MANUAL SETUP 61 BEAM MENU 62 SOUND MENU 66 INPUT MENU 68 DISPLAY MENU 70 ADJUSTING THE AUDIO BALANCE 72 Using the test tone 72 Using ...
... this unit 11 CONNECTIONS 15 Connecting a TV 16 Connecting a DVD player/recorder 17 Connecting a VCR 18 Connecting a digital satellite tuner or a cable TV tuner 19 Connecting a digital airwave tuner 20 Connecting other external components 21 Connecting a subwoofer 22 Connecting the power supply cable 23 About the RS... 57 USING THE SLEEP TIMER 58 Setting the sleep timer 58 Canceling the sleep timer 59 ADVANCED OPERATION MANUAL SETUP 60 Using MANUAL SETUP 61 BEAM MENU 62 SOUND MENU 66 INPUT MENU 68 DISPLAY MENU 70 ADJUSTING THE AUDIO BALANCE 72 Using the test tone 72 Using ...

Owner's Manual
Page 6
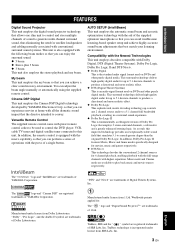
...fine-tune the parameters of this preconception that complicated speaker setup and troublesome wiring go hand-in 2 woofers and 40 full-range small speakers. With the addition of center (C) sound beams, this simple, yet stylish Digital Sound Projector. OVERVIEW OVERVIEW It is generally accepted that in ... a great number of speakers in on the listening position from its built-in -hand with a unit that is also capable of reproducing the kind of powerful surround sound you have been waiting for from all directions. YAMAHA YSP-1100 Digital Sound Projector challenges this unit to ...
...fine-tune the parameters of this preconception that complicated speaker setup and troublesome wiring go hand-in 2 woofers and 40 full-range small speakers. With the addition of center (C) sound beams, this simple, yet stylish Digital Sound Projector. OVERVIEW OVERVIEW It is generally accepted that in ... a great number of speakers in on the listening position from its built-in -hand with a unit that is also capable of reproducing the kind of powerful surround sound you have been waiting for from all directions. YAMAHA YSP-1100 Digital Sound Projector challenges this unit to ...
Owner's Manual
Page 7
... you can avoid troublesome listening-based speaker setup and achieve highly accurate sound beam adjustments that best match your listening environment. Manufactured under license from Dolby Laboratories. The " " logo and "Digital Sound Projector™" are registered trademarks of 1... DSP" are trademarks of YAMAHA Corporation. INTRODUCTION FEATURES FEATURES Digital Sound Projector This unit employs the digital sound projector technology that allows one slim unit to control and steer multiple channels of sound to generate multi channel surround sound, thus eliminating the need ...
... you can avoid troublesome listening-based speaker setup and achieve highly accurate sound beam adjustments that best match your listening environment. Manufactured under license from Dolby Laboratories. The " " logo and "Digital Sound Projector™" are registered trademarks of 1... DSP" are trademarks of YAMAHA Corporation. INTRODUCTION FEATURES FEATURES Digital Sound Projector This unit employs the digital sound projector technology that allows one slim unit to control and steer multiple channels of sound to generate multi channel surround sound, thus eliminating the need ...

Owner's Manual
Page 8
...can be performed by using either the buttons on the main unit or on the power of improvements, etc. See "ENJOYING SURROUND SOUND" on page 24. 4 Run AUTO SETUP. For details regarding the operation of differences between the manual and product, the product has priority. 1 Install this unit to ...your TV and other external components. See "GETTING STARTED" on page 42. If you want to make additional settings and adjustments 7 Run MANUAL SETUP to the supplied owner's manual for your listening room. USING THIS MANUAL USING THIS MANUAL Notes • This manual describes how to connect and...
...can be performed by using either the buttons on the main unit or on the power of improvements, etc. See "ENJOYING SURROUND SOUND" on page 24. 4 Run AUTO SETUP. For details regarding the operation of differences between the manual and product, the product has priority. 1 Install this unit to ...your TV and other external components. See "GETTING STARTED" on page 42. If you want to make additional settings and adjustments 7 Run MANUAL SETUP to the supplied owner's manual for your listening room. USING THIS MANUAL USING THIS MANUAL Notes • This manual describes how to connect and...
Owner's Manual
Page 9
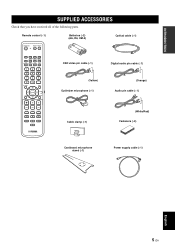
... DVD AUX TV INPUT1 INPUT2 MACRO TV AUTO VOL MODE SETUP INPUTMODE SLEEP 5BEAM 1 ST+3BEAM 2 3BEAM 3 STEREO 4 MY BEAM SURROUND 5 6 MUSIC 7 MOVIE 8 SPORTS 9 OFF 0 +10 CH LEVEL MENU TEST ENTER TV/AV YSP RETURN VOLUME CH TV VOL OSD video pin cable (×1) Digital audio pin cable (×1) (Yellow) Optimizer microphone (×1) (Orange) Audio...
... DVD AUX TV INPUT1 INPUT2 MACRO TV AUTO VOL MODE SETUP INPUTMODE SLEEP 5BEAM 1 ST+3BEAM 2 3BEAM 3 STEREO 4 MY BEAM SURROUND 5 6 MUSIC 7 MOVIE 8 SPORTS 9 OFF 0 +10 CH LEVEL MENU TEST ENTER TV/AV YSP RETURN VOLUME CH TV VOL OSD video pin cable (×1) Digital audio pin cable (×1) (Yellow) Optimizer microphone (×1) (Orange) Audio...
Owner's Manual
Page 10
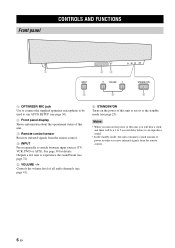
... before it to the standby mode (see page 30). 2 Front panel display Shows information about the operational status of power in order to run AUTO SETUP (see page 25). Notes • When you will hear a click and there will be used to receive infrared-signals from the remote control. 4 INPUT ...Press repeatedly to switch between input sources (TV, VCR, DVD or AUX). See page 39 for details. Outputs a test tone to experience the sound beam (see page 72). 5 VOLUME -/+ Controls the volume level of all audio channels (see page 41). 6 STANDBY/ON Turns on the power of this ...
... before it to the standby mode (see page 30). 2 Front panel display Shows information about the operational status of power in order to run AUTO SETUP (see page 25). Notes • When you will hear a click and there will be used to receive infrared-signals from the remote control. 4 INPUT ...Press repeatedly to switch between input sources (TV, VCR, DVD or AUX). See page 39 for details. Outputs a test tone to experience the sound beam (see page 72). 5 VOLUME -/+ Controls the volume level of all audio channels (see page 41). 6 STANDBY/ON Turns on the power of this ...
Owner's Manual
Page 11
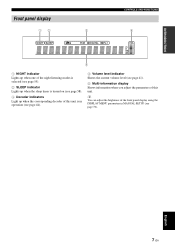
y You can adjust the brightness of this unit. English 7 En INTRODUCTION Front panel display 12 3 CONTROLS AND FUNCTIONS 4 NIGHT SLEEP PCM DIGITAL PL VOL m ft mS dB 5 1 NIGHT indicator Lights up when one of the night listening modes is selected (see page 55). 2 SLEEP indicator Lights up ... (see page 41). 5 Multi-information display Shows information when you adjust the parameters of the front panel display using the DISPLAY MENU parameters in MANUAL SETUP (see page 70).
y You can adjust the brightness of this unit. English 7 En INTRODUCTION Front panel display 12 3 CONTROLS AND FUNCTIONS 4 NIGHT SLEEP PCM DIGITAL PL VOL m ft mS dB 5 1 NIGHT indicator Lights up when one of the night listening modes is selected (see page 55). 2 SLEEP indicator Lights up ... (see page 41). 5 Multi-information display Shows information when you adjust the parameters of the front panel display using the DISPLAY MENU parameters in MANUAL SETUP (see page 70).

Owner's Manual
Page 13
... VCR DVD AUX TV INPUT1 INPUT2 MACRO TV AUTO VOL MODE SETUP INPUTMODE SLEEP 5BEAM ST+3BEAM 3BEAM 1 2 3 STEREO MY BEAM SURROUND 4 5 6 MUSIC 7 MOVIE 8 SPORTS 9 OFF 0 +10 CH LEVEL MENU TEST ENTER TV/AV YSP RETURN VOLUME CH TV VOL MUTE TV INPUT TV MUTE CODE SET 1 Infrared ...AUTO SETUP Use to enter the AUTO SETUP menu (see page 29). 7 Numeric buttons Use to enter numbers. (S:TV/AV) 8 STEREO Use the playback sources in 2-channel stereo (see page 47). 9 Sound field program buttons Use to select sound field programs (see page 50). 0 CH LEVEL Adjusts the volume level of each speaker ...
... VCR DVD AUX TV INPUT1 INPUT2 MACRO TV AUTO VOL MODE SETUP INPUTMODE SLEEP 5BEAM ST+3BEAM 3BEAM 1 2 3 STEREO MY BEAM SURROUND 4 5 6 MUSIC 7 MOVIE 8 SPORTS 9 OFF 0 +10 CH LEVEL MENU TEST ENTER TV/AV YSP RETURN VOLUME CH TV VOL MUTE TV INPUT TV MUTE CODE SET 1 Infrared ...AUTO SETUP Use to enter the AUTO SETUP menu (see page 29). 7 Numeric buttons Use to enter numbers. (S:TV/AV) 8 STEREO Use the playback sources in 2-channel stereo (see page 47). 9 Sound field program buttons Use to select sound field programs (see page 50). 0 CH LEVEL Adjusts the volume level of each speaker ...
Owner's Manual
Page 14
...the TV (see page 58). See page 75 for playback (see page 42). R MENU Displays the setup menu on the power of the TV (see page 82). Use to return to select the my ...to the previous DVD menu screen or exit the DVD menu. (S:TV/AV) U TV VOL +/- Select YSP when operating this unit. V CH +/- W TV MUTE, CODE SET Mutes the audio output of the TV or the VCR (see pages 82... page 81). 10 En T RETURN Use to select sleep timer settings or return to effectively reproduce the bass sound (see page 57). CONTROLS AND FUNCTIONS H TV POWER Turns on your TV monitor (see pages 31 and ...
...the TV (see page 58). See page 75 for playback (see page 42). R MENU Displays the setup menu on the power of the TV (see page 82). Use to return to select the my ...to the previous DVD menu screen or exit the DVD menu. (S:TV/AV) U TV VOL +/- Select YSP when operating this unit. V CH +/- W TV MUTE, CODE SET Mutes the audio output of the TV or the VCR (see pages 82... page 81). 10 En T RETURN Use to select sleep timer settings or return to effectively reproduce the bass sound (see page 57). CONTROLS AND FUNCTIONS H TV POWER Turns on your TV monitor (see pages 31 and ...
Owner's Manual
Page 26
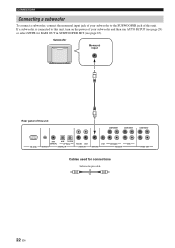
... unit. If a subwoofer is connected to the SUBWOOFER jack of this unit COMPONENT COMPONENT COMPONENT RS-232C DVD COAXIAL AUX TV/STB OPTICAL REMOTE IN DIGITAL IN TV/STB VCR AUDIO IN VCR SUBWOOFER DVD/AUX STB VIDEO IN VIDEO OUT Cables used for BASS OUT in SUBWOOFER SET (see page... 67). CONNECTIONS Connecting a subwoofer To connect a subwoofer, connect the monaural input jack of your subwoofer and then run AUTO SETUP (see page 29) or select SWFR for connections Subwoofer pin cable 22 En
... unit. If a subwoofer is connected to the SUBWOOFER jack of this unit COMPONENT COMPONENT COMPONENT RS-232C DVD COAXIAL AUX TV/STB OPTICAL REMOTE IN DIGITAL IN TV/STB VCR AUDIO IN VCR SUBWOOFER DVD/AUX STB VIDEO IN VIDEO OUT Cables used for BASS OUT in SUBWOOFER SET (see page... 67). CONNECTIONS Connecting a subwoofer To connect a subwoofer, connect the monaural input jack of your subwoofer and then run AUTO SETUP (see page 29) or select SWFR for connections Subwoofer pin cable 22 En
Owner's Manual
Page 29
... STB VCR DVD AUX TV INPUT1 INPUT2 MACRO TV AUTO VOL MODE SETUP INPUTMODE SLEEP 5BEAM ST+3BEAM 3BEAM 1 2 3 STEREO MY BEAM SURROUND 4 5 6 MUSIC 7 MOVIE 8 SPORTS 9 OFF 0 +10 CH LEVEL MENU TEST ENTER TV/AV YSP RETURN VOLUME CH TV VOL 4 Function-varying buttons 5 6 7 STB VCR DVD AUX... TV INPUT1 INPUT2 MACRO TV AUTO VOL MODE SETUP INPUTMODE SLEEP 5BEAM ST+3BEAM 3BEAM 1 2 3 STEREO MY BEAM SURROUND 4 5 6 MUSIC 7 MOVIE 8 SPORTS 9 OFF 0 +10 CH LEVEL MENU TEST ENTER TV/AV YSP RETURN VOLUME CH TV VOL 8 9 Turning on the power INPUT VOLUME + ...
... STB VCR DVD AUX TV INPUT1 INPUT2 MACRO TV AUTO VOL MODE SETUP INPUTMODE SLEEP 5BEAM ST+3BEAM 3BEAM 1 2 3 STEREO MY BEAM SURROUND 4 5 6 MUSIC 7 MOVIE 8 SPORTS 9 OFF 0 +10 CH LEVEL MENU TEST ENTER TV/AV YSP RETURN VOLUME CH TV VOL 4 Function-varying buttons 5 6 7 STB VCR DVD AUX... TV INPUT1 INPUT2 MACRO TV AUTO VOL MODE SETUP INPUTMODE SLEEP 5BEAM ST+3BEAM 3BEAM 1 2 3 STEREO MY BEAM SURROUND 4 5 6 MUSIC 7 MOVIE 8 SPORTS 9 OFF 0 +10 CH LEVEL MENU TEST ENTER TV/AV YSP RETURN VOLUME CH TV VOL 8 9 Turning on the power INPUT VOLUME + ...
Owner's Manual
Page 30
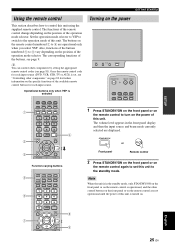
... TV INPUT1 INPUT2 MACRO TV AUTO VOL MODE SETUP INPUTMODE SLEEP 5BEAM ST+3BEAM 3BEAM 1 2 3 STEREO MY BEAM SURROUND 4 5 6 MUSIC 7 MOVIE 8 SPORTS 9 OFF 0 +10 CH LEVEL MENU 5 Press TV on the remote control...not appear, use the remote control provided with your TV. 4 Set the operation mode selector to YSP to switch to the operation mode of this unit. It may take a few seconds before this ...screen example TEST ENTER TV/AV YSP RETURN 1 Check that the video input jack on your listening room. Once this is complete, you can enjoy real surround sound while watching TV in the comfort...
... TV INPUT1 INPUT2 MACRO TV AUTO VOL MODE SETUP INPUTMODE SLEEP 5BEAM ST+3BEAM 3BEAM 1 2 3 STEREO MY BEAM SURROUND 4 5 6 MUSIC 7 MOVIE 8 SPORTS 9 OFF 0 +10 CH LEVEL MENU 5 Press TV on the remote control...not appear, use the remote control provided with your TV. 4 Set the operation mode selector to YSP to switch to the operation mode of this unit. It may take a few seconds before this ...screen example TEST ENTER TV/AV YSP RETURN 1 Check that the video input jack on your listening room. Once this is complete, you can enjoy real surround sound while watching TV in the comfort...
Owner's Manual
Page 31
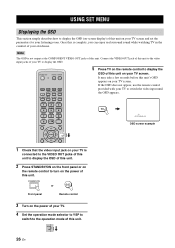
... If there are acoustically absorbent objects such as curtains in BEAM MENU (see page 65). See "MANUAL SETUP" on page 35 for a complete list of error messages and possible remedies. See "Error messages for AUTO SETUP" on page 60. Play back audio signals or adjust the settings for a remedy. y • ... flow chart of SET MENU The following diagram illustrates the overall flow of the sound beams, adjust settings for TREBLE GAIN in the path of the setup procedure. See "AUTO SETUP (IntelliBeam)" on page 29. If an error occurs Look for the beam mode and the CINEMA DSP. USING SET MENU ...
... If there are acoustically absorbent objects such as curtains in BEAM MENU (see page 65). See "MANUAL SETUP" on page 35 for a complete list of error messages and possible remedies. See "Error messages for AUTO SETUP" on page 60. Play back audio signals or adjust the settings for a remedy. y • ... flow chart of SET MENU The following diagram illustrates the overall flow of the sound beams, adjust settings for TREBLE GAIN in the path of the setup procedure. See "AUTO SETUP (IntelliBeam)" on page 29. If an error occurs Look for the beam mode and the CINEMA DSP. USING SET MENU ...
Owner's Manual
Page 32
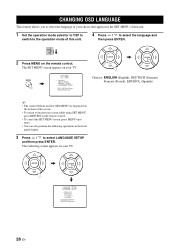
... then press ENTER. The following operations in the SET MENU of this unit. 4 Press / to select LANGUAGE SETUP and then press ENTER. The SET MENU screen appears on your TV. ENTER ENTER p p p p LANGUAGE SETUP . TV/AV YSP 2 Press MENU on the remote control. • To cancel the SET MENU screen, press MENU once...
... then press ENTER. The following operations in the SET MENU of this unit. 4 Press / to select LANGUAGE SETUP and then press ENTER. The SET MENU screen appears on your TV. ENTER ENTER p p p p LANGUAGE SETUP . TV/AV YSP 2 Press MENU on the remote control. • To cancel the SET MENU screen, press MENU once...

Owner's Manual
Page 33
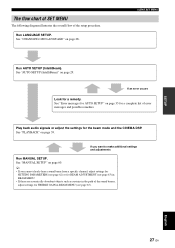
... is selected. *2 *3 Checking the subwoofer Optimizing the beam delay, frequency and volume Sound optimization SETUP English 29 En Just as you would arrange the speaker position of other audio systems, you to avoid troublesome listening-based setup and achieving highly accurate sound adjustments that each of the seven bands in its parametric equalizer to optimize...
... is selected. *2 *3 Checking the subwoofer Optimizing the beam delay, frequency and volume Sound optimization SETUP English 29 En Just as you would arrange the speaker position of other audio systems, you to avoid troublesome listening-based setup and achieving highly accurate sound adjustments that each of the seven bands in its parametric equalizer to optimize...
Owner's Manual
Page 34
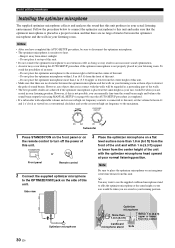
...an extension cable as your ears would be when you can manually fine-tune the sound beam angle and balance the sound beam output levels using MANUAL SETUP (see page 60) once the AUTO SETUP procedure is not properly placed in your listening position. 30 En Optimizer microphone Optimizer microphone... microphone stand to affix the optimizer microphone at the same height as doing so may result in an inaccurate sound optimization. • An error may occur during the AUTO SETUP procedure if the optimizer microphone is completed. • If a subwoofer with the walls will be sure to...
...an extension cable as your ears would be when you can manually fine-tune the sound beam angle and balance the sound beam output levels using MANUAL SETUP (see page 60) once the AUTO SETUP procedure is not properly placed in your listening position. 30 En Optimizer microphone Optimizer microphone... microphone stand to affix the optimizer microphone at the same height as doing so may result in an inaccurate sound optimization. • An error may occur during the AUTO SETUP procedure if the optimizer microphone is completed. • If a subwoofer with the walls will be sure to...

Owner's Manual
Page 35
...BEAM SURROUND 4 5 6 MUSIC 7 MOVIE 8 SPORTS 9 OFF 0 +10 CH LEVEL MENU TEST ENTER TV/AV YSP RETURN English 31 En You can also enter the AUTO SETUP procedure simply by pressing and holding AUTO SETUP on top of the circular-shaped part. In this case, this unit and properly... placed in your listening room, follow the procedure below to this unit performs both of the beam optimization and sound...
...BEAM SURROUND 4 5 6 MUSIC 7 MOVIE 8 SPORTS 9 OFF 0 +10 CH LEVEL MENU TEST ENTER TV/AV YSP RETURN English 31 En You can also enter the AUTO SETUP procedure simply by pressing and holding AUTO SETUP on top of the circular-shaped part. In this case, this unit and properly... placed in your listening room, follow the procedure below to this unit performs both of the beam optimization and sound...
Owner's Manual
Page 36
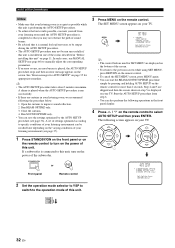
... can save the settings optimized by pressing and holding AUTO SETUP on the remote control for more than 2 seconds. STANDBY/ON or Front panel Remote control 2 Set the operation mode selector to YSP to switch to improve sound reflection. 2. The SET MENU screen appears on your TV.... MENU SET MENU . ;MEMORY ;AUTO SETUP ;MANUAL SETUP ;LANGUAGE SETUP [ ]/[ ]:Up/Down [ENTER]:Enter y • The control buttons used for SET...
... can save the settings optimized by pressing and holding AUTO SETUP on the remote control for more than 2 seconds. STANDBY/ON or Front panel Remote control 2 Set the operation mode selector to YSP to switch to improve sound reflection. 2. The SET MENU screen appears on your TV.... MENU SET MENU . ;MEMORY ;AUTO SETUP ;MANUAL SETUP ;LANGUAGE SETUP [ ]/[ ]:Up/Down [ENTER]:Enter y • The control buttons used for SET...
Owner's Manual
Page 37
...and the walls in 10 seconds. This menu takes about 1 minute. Evacuate yourself from the YSP unit. Follow the instructions and perform the AUTO SETUP procedure again. SOUND OPTIMZ only (Sound optimization only) Use to optimize the beam angle so that the parameter best matches your listening ... set at least 1.8m/6ft away from your listening room before starting the SOUND OPTIMZ only procedure. ENTER AUTO SETUP START WILL BEGIN in the BEAM OPTIMZ only procedure before starting the AUTO SETUP procedure. • Is the optimizer microphone firmly connected to optimize the beam ...
...and the walls in 10 seconds. This menu takes about 1 minute. Evacuate yourself from the YSP unit. Follow the instructions and perform the AUTO SETUP procedure again. SOUND OPTIMZ only (Sound optimization only) Use to optimize the beam angle so that the parameter best matches your listening ... set at least 1.8m/6ft away from your listening room before starting the SOUND OPTIMZ only procedure. ENTER AUTO SETUP START WILL BEGIN in the BEAM OPTIMZ only procedure before starting the AUTO SETUP procedure. • Is the optimizer microphone firmly connected to optimize the beam ...

Owner's Manual
Page 38
AUTO SETUP COMPLETE Your YSP unit may be set up correctly. The results of the AUTO SETUP procedure are displayed on your TV. If ''ENVIRONMENT CHECK [FAILED]'' is displayed in "Error messages for 2 seconds and then disappears from the OPTIMIZER... unit, increase the volume level of the subwoofer and run the procedure again from the YSP and the listening position. For details, see ERROR E-1 in step 8, the following screen is displayed, we recommend running the AUTO SETUP procedure again. y • If ''ENVIRONMENT CHECK [FAILED]'' is displayed after pressing ENTER. ...
AUTO SETUP COMPLETE Your YSP unit may be set up correctly. The results of the AUTO SETUP procedure are displayed on your TV. If ''ENVIRONMENT CHECK [FAILED]'' is displayed in "Error messages for 2 seconds and then disappears from the OPTIMIZER... unit, increase the volume level of the subwoofer and run the procedure again from the YSP and the listening position. For details, see ERROR E-1 in step 8, the following screen is displayed, we recommend running the AUTO SETUP procedure again. y • If ''ENVIRONMENT CHECK [FAILED]'' is displayed after pressing ENTER. ...
