
Owner's Manual
Page 5
...digital airwave tuner 20 Connecting other external components 21 Connecting a subwoofer 22 Affixing the optical cable 23 Connecting the power supply cable 23 About the RS-232C/REMOTE IN/ IR-OUT terminals 23 SETUP...26 The flow chart of SET MENU 27 AUTO SETUP 28 The flow chart of AUTO SETUP 28 Installing the optimizer microphone 29 Using AUTO SETUP 31 USING THE SYSTEM MEMORY 36 Saving ... timer 60 Canceling the sleep timer 61 ADVANCED OPERATION BASIC SETUP 62 MANUAL SETUP 68 Using MANUAL SETUP 69 BEAM MENU 70 SOUND MENU 74 INPUT MENU 77 DISPLAY MENU 79 ADJUSTING SYSTEM PARAMETERS...
...digital airwave tuner 20 Connecting other external components 21 Connecting a subwoofer 22 Affixing the optical cable 23 Connecting the power supply cable 23 About the RS-232C/REMOTE IN/ IR-OUT terminals 23 SETUP...26 The flow chart of SET MENU 27 AUTO SETUP 28 The flow chart of AUTO SETUP 28 Installing the optimizer microphone 29 Using AUTO SETUP 31 USING THE SYSTEM MEMORY 36 Saving ... timer 60 Canceling the sleep timer 61 ADVANCED OPERATION BASIC SETUP 62 MANUAL SETUP 68 Using MANUAL SETUP 69 BEAM MENU 70 SOUND MENU 74 INPUT MENU 77 DISPLAY MENU 79 ADJUSTING SYSTEM PARAMETERS...
Owner's Manual
Page 8
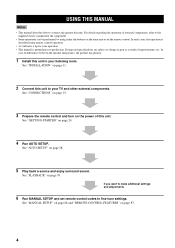
...manual and product, the product has priority. 1 Install this unit. See "MANUAL SETUP" on page 68 and "REMOTE CONTROL FEATURES" on page 24. 4 Run AUTO SETUP. USING THIS MANUAL USING THIS MANUAL Notes • This manual... describes how to connect and operate this unit to your operation. • This manual...to production. See "AUTO SETUP" on page 39. If you want to make additional settings and adjustments 6 Run MANUAL SETUP and set remote ...
...manual and product, the product has priority. 1 Install this unit. See "MANUAL SETUP" on page 68 and "REMOTE CONTROL FEATURES" on page 24. 4 Run AUTO SETUP. USING THIS MANUAL USING THIS MANUAL Notes • This manual... describes how to connect and operate this unit to your operation. • This manual...to production. See "AUTO SETUP" on page 39. If you want to make additional settings and adjustments 6 Run MANUAL SETUP and set remote ...
Owner's Manual
Page 31
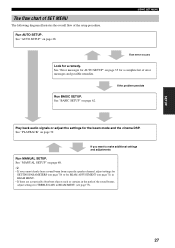
... cannot clearly hear a sound beam from a specific speaker channel, adjust settings for SETTING PARAMETERS (see page 70) or for BEAM ADJUSTMENT (see page 73). 27 y • If you want to make additional settings and adjustments Run MANUAL SETUP. See "Error messages for AUTO SETUP" on page 35 for...absorbent objects such as curtains in the path of the sound beams, adjust settings for a complete list of the setup procedure. See "PLAYBACK" on page 68. See "MANUAL SETUP" on page 39. Run AUTO SETUP. Run BASIC SETUP. SETUP The flow chart of SET MENU The following diagram illustrates ...
... cannot clearly hear a sound beam from a specific speaker channel, adjust settings for SETTING PARAMETERS (see page 70) or for BEAM ADJUSTMENT (see page 73). 27 y • If you want to make additional settings and adjustments Run MANUAL SETUP. See "Error messages for AUTO SETUP" on page 35 for...absorbent objects such as curtains in the path of the sound beams, adjust settings for a complete list of the setup procedure. See "PLAYBACK" on page 68. See "MANUAL SETUP" on page 39. Run AUTO SETUP. Run BASIC SETUP. SETUP The flow chart of SET MENU The following diagram illustrates ...
Owner's Manual
Page 32
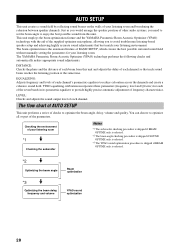
...speaker position of other audio systems, you to provide highly precise automatic adjustment of frequency characteristics. The YAMAHA Parametric Room Acoustic Optimizer (YPAO) technology performs the following checks and automatically makes appropriate sound adjustments. AUTO SETUP AUTO SETUP This unit creates a sound field by reflecting sound... SETUP, which creates the best possible surround sound field without manually setting the parameters for each of the seven bands in its parametric equalizer to avoid troublesome listening-based speaker setup and achieving highly accurate sound ...
...speaker position of other audio systems, you to provide highly precise automatic adjustment of frequency characteristics. The YAMAHA Parametric Room Acoustic Optimizer (YPAO) technology performs the following checks and automatically makes appropriate sound adjustments. AUTO SETUP AUTO SETUP This unit creates a sound field by reflecting sound... SETUP, which creates the best possible surround sound field without manually setting the parameters for each of the seven bands in its parametric equalizer to avoid troublesome listening-based speaker setup and achieving highly accurate sound ...
Owner's Manual
Page 33
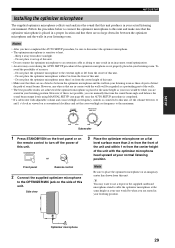
... more than 1 m from the center height of this unit produces in your listening room. SETUP AUTO SETUP Installing the optimizer microphone The supplied optimizer microphone collects and analyzes the sound that this unit. - Follow the procedure below to connect the optimizer microphone to heat. ...listening position. Notes • After you have completed the AUTO SETUP procedure, be when you can manually fine-tune the sound beam angle and balance the sound beam output levels using MANUAL SETUP (see page 68) once the AUTO SETUP procedure is completed. • If a subwoofer with ...
... more than 1 m from the center height of this unit produces in your listening room. SETUP AUTO SETUP Installing the optimizer microphone The supplied optimizer microphone collects and analyzes the sound that this unit. - Follow the procedure below to connect the optimizer microphone to heat. ...listening position. Notes • After you have completed the AUTO SETUP procedure, be when you can manually fine-tune the sound beam angle and balance the sound beam output levels using MANUAL SETUP (see page 68) once the AUTO SETUP procedure is completed. • If a subwoofer with ...

Owner's Manual
Page 35
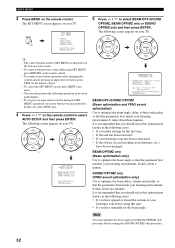
...CH LEVEL CINEMA DSP MENU Notes • If your listening room has curtains, open the curtains before starting the BEAM OPT+SOUND OPTIMZ or the BEAM OPTIMZ only procedure. • Make sure that your listening room is as quiet as possible while this unit is performing the AUTO SETUP procedure. • Once the AUTO SETUP... start the AUTO SETUP procedure. STANDBY/ON or TEST ENTER RETURN Front panel Remote control 2 Press YSP on the remote... run BASIC SETUP (see page 62) or MANUAL SETUP (see page 68) to manually adjust the corresponding parameters. • If the AUTO SETUP procedure stops ...
...CH LEVEL CINEMA DSP MENU Notes • If your listening room has curtains, open the curtains before starting the BEAM OPT+SOUND OPTIMZ or the BEAM OPTIMZ only procedure. • Make sure that your listening room is as quiet as possible while this unit is performing the AUTO SETUP procedure. • Once the AUTO SETUP... start the AUTO SETUP procedure. STANDBY/ON or TEST ENTER RETURN Front panel Remote control 2 Press YSP on the remote... run BASIC SETUP (see page 62) or MANUAL SETUP (see page 68) to manually adjust the corresponding parameters. • If the AUTO SETUP procedure stops ...
Owner's Manual
Page 36
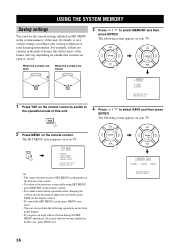
... the bottom of YSP MIN 2m/6.5ft [ ]/[ ]:Up/Down/[p]/[ ]:Sel [ENTER]:Start BEAM OPT+SOUND OPTIMZ (Beam optimization and YPAO sound optimization) Use to the previous screen while using this case, press TEST once. 4 Press / on your listening environment. MENU p SET MENU . ;MEMORY ;AUTO SETUP ;BASIC SETUP ;MANUAL SETUP [ ]/[ ]:Up/Down [ENTER]:Enter 5 Press / to select AUTO SETUP and then...
... the bottom of YSP MIN 2m/6.5ft [ ]/[ ]:Up/Down/[p]/[ ]:Sel [ENTER]:Start BEAM OPT+SOUND OPTIMZ (Beam optimization and YPAO sound optimization) Use to the previous screen while using this case, press TEST once. 4 Press / on your listening environment. MENU p SET MENU . ;MEMORY ;AUTO SETUP ;BASIC SETUP ;MANUAL SETUP [ ]/[ ]:Up/Down [ENTER]:Enter 5 Press / to select AUTO SETUP and then...
Owner's Manual
Page 40
.... • If you press an input selector button during the SET MENU operations, the cursor buttons become ineffective. MENU SET MENU . ;MEMORY ;AUTO SETUP ;BASIC SETUP ;MANUAL SETUP [ ]/[ ]:Up/Down [ENTER]:Enter y • The control buttons used for SET MENU are open When the curtains are closed . When the...MENU in the system memory of this unit. In this unit. ENTER ENTER ;MEMORY 1)LOAD 2)SAVE [ ]/[ ]:Up/Down [ENTER]:Enter 1 Press YSP on the remote control. • To cancel the SET MENU screen, press MENU once more. • You can save certain settings according to ...
.... • If you press an input selector button during the SET MENU operations, the cursor buttons become ineffective. MENU SET MENU . ;MEMORY ;AUTO SETUP ;BASIC SETUP ;MANUAL SETUP [ ]/[ ]:Up/Down [ENTER]:Enter y • The control buttons used for SET MENU are open When the curtains are closed . When the...MENU in the system memory of this unit. In this unit. ENTER ENTER ;MEMORY 1)LOAD 2)SAVE [ ]/[ ]:Up/Down [ENTER]:Enter 1 Press YSP on the remote control. • To cancel the SET MENU screen, press MENU once more. • You can save certain settings according to ...

Owner's Manual
Page 41
...operations, the cursor buttons become ineffective. In this unit. MENU 37 The SET MENU screen disappears from your listening environment. 1 Press YSP on the remote control to switch to the varying conditions of this case, press TEST once. 7 Press MENU to select USER1, USER2...Saving settings" on page 36 according to the operation mode of your TV. ENTER 2)MEMORY SAVE USER1 Saving ! []:Select SET MENU . ;MEMORY ;AUTO SETUP ;BASIC SETUP ;MANUAL SETUP [ ]/[ ]:Up/Down [ENTER]:Enter p p 2 Press MENU on your TV. ENTER ENTER USING THE SYSTEM MEMORY Loading settings You can also ...
...operations, the cursor buttons become ineffective. In this unit. MENU 37 The SET MENU screen disappears from your listening environment. 1 Press YSP on the remote control to switch to the varying conditions of this case, press TEST once. 7 Press MENU to select USER1, USER2...Saving settings" on page 36 according to the operation mode of your TV. ENTER 2)MEMORY SAVE USER1 Saving ! []:Select SET MENU . ;MEMORY ;AUTO SETUP ;BASIC SETUP ;MANUAL SETUP [ ]/[ ]:Up/Down [ENTER]:Enter p p 2 Press MENU on your TV. ENTER ENTER USING THE SYSTEM MEMORY Loading settings You can also ...
Owner's Manual
Page 42
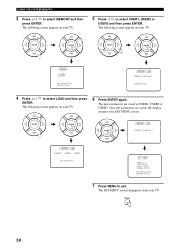
USING THE SYSTEM MEMORY 3 Press / to exit. ENTER ENTER ENTER 1)MEMORY LOAD USER1 Loading ! []:Select p p 1)MEMORY LOAD USER1 USER2 USER3 [p]/[ ]:Select SET MENU . ;MEMORY ;AUTO SETUP ;BASIC SETUP ;MANUAL SETUP [ ]/[ ]:Up/Down [ENTER]:Enter 7 Press MENU to select MEMORY and then press ENTER. The following screen appears on your TV. ENTER ENTER ENTER ENTER ;MEMORY 1)...
USING THE SYSTEM MEMORY 3 Press / to exit. ENTER ENTER ENTER 1)MEMORY LOAD USER1 Loading ! []:Select p p 1)MEMORY LOAD USER1 USER2 USER3 [p]/[ ]:Select SET MENU . ;MEMORY ;AUTO SETUP ;BASIC SETUP ;MANUAL SETUP [ ]/[ ]:Up/Down [ENTER]:Enter 7 Press MENU to select MEMORY and then press ENTER. The following screen appears on your TV. ENTER ENTER ENTER ENTER ;MEMORY 1)...

Owner's Manual
Page 46
... page 64) • If you selected FLAT TO WALL for INSTALLED POSITION in MANUAL SETUP (see page 70) Only stereo, stereo plus 3 beam mode for INSTALLED POSITION in MANUAL SETUP (see page 70) AUTO SETUP BASIC SETUP MANUAL SETUP Beam mode INSTALLING (see page 70) FLAT TO WALL ANGLE TO WALL OR CORNER STEREO Yes Yes Yes Yes Yes...
... page 64) • If you selected FLAT TO WALL for INSTALLED POSITION in MANUAL SETUP (see page 70) Only stereo, stereo plus 3 beam mode for INSTALLED POSITION in MANUAL SETUP (see page 70) AUTO SETUP BASIC SETUP MANUAL SETUP Beam mode INSTALLING (see page 70) FLAT TO WALL ANGLE TO WALL OR CORNER STEREO Yes Yes Yes Yes Yes...
Owner's Manual
Page 66
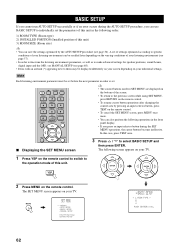
...speaker positions, sound beams, digital input and the OSD, see MANUAL SETUP (see page 68). • Items with an asterisk (*) appearing next to the operation mode of this unit. The SET MENU screen appears on your TV. 1 Press YSP...6 MUSIC 7 MOVIE 8 VOL MODE 9 SPORTS 0 OFF +10 SURROUND CH LEVEL CINEMA DSP MENU • To resume cursor button operations after changing the...AUTO SETUP ;BASIC SETUP ;MANUAL SETUP [ ]/[ ]:Up/Down [ENTER]:Enter ;BASIC SETUP . 1 ROOM TYPE ? 2 3 4 PUSH [ENTER] Key. 62 BASIC SETUP BASIC SETUP If you can use BASIC SETUP to select BASIC SETUP ...
...speaker positions, sound beams, digital input and the OSD, see MANUAL SETUP (see page 68). • Items with an asterisk (*) appearing next to the operation mode of this unit. The SET MENU screen appears on your TV. 1 Press YSP...6 MUSIC 7 MOVIE 8 VOL MODE 9 SPORTS 0 OFF +10 SURROUND CH LEVEL CINEMA DSP MENU • To resume cursor button operations after changing the...AUTO SETUP ;BASIC SETUP ;MANUAL SETUP [ ]/[ ]:Up/Down [ENTER]:Enter ;BASIC SETUP . 1 ROOM TYPE ? 2 3 4 PUSH [ENTER] Key. 62 BASIC SETUP BASIC SETUP If you can use BASIC SETUP to select BASIC SETUP ...

Owner's Manual
Page 71
... SET MENU display disappears from your BASIC SETUP settings are satisfactory. MENU This completes the parameter settings for BASIC SETUP. SET MENU ;MEMORY ;AUTO SETUP . ;BASIC SETUP ;MANUAL SETUP [ ]/[ ]:Up/Down [ENTER]:Enter ...17 Press MENU to register the settings if they are registered. 4 SETUP OK? p BASIC SETUP 67 The following screen appears, and your TV screen. Data Setting ! ENTER ENTER • Select YES to complete the BASIC SETUP procedure. To select a playback source and enjoy surround sound...
... SET MENU display disappears from your BASIC SETUP settings are satisfactory. MENU This completes the parameter settings for BASIC SETUP. SET MENU ;MEMORY ;AUTO SETUP . ;BASIC SETUP ;MANUAL SETUP [ ]/[ ]:Up/Down [ENTER]:Enter ...17 Press MENU to register the settings if they are registered. 4 SETUP OK? p BASIC SETUP 67 The following screen appears, and your TV screen. Data Setting ! ENTER ENTER • Select YES to complete the BASIC SETUP procedure. To select a playback source and enjoy surround sound...

Owner's Manual
Page 72
... Adjusts the dynamic range of Dolby Digital or DTS signals. 76 BEAM MENU Use to manually adjust various parameters related to the sound beam output. y • You can save the settings optimized by the AUTO SETUP procedure (see page 28). Use SOUND MENU and BEAM MENU to make ...can be used. Renames the displayed input source. MANUAL SETUP MANUAL SETUP To achieve the best quality surround sound, you can use MANUAL SETUP to fine-tune the listening environment parameters, as well as to make settings for speaker positions, sound beams, digital input and the OSD. Item Features DIMMER SET ...
... Adjusts the dynamic range of Dolby Digital or DTS signals. 76 BEAM MENU Use to manually adjust various parameters related to the sound beam output. y • You can save the settings optimized by the AUTO SETUP procedure (see page 28). Use SOUND MENU and BEAM MENU to make ...can be used. Renames the displayed input source. MANUAL SETUP MANUAL SETUP To achieve the best quality surround sound, you can use MANUAL SETUP to fine-tune the listening environment parameters, as well as to make settings for speaker positions, sound beams, digital input and the OSD. Item Features DIMMER SET ...
Owner's Manual
Page 73
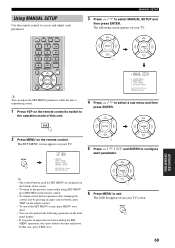
...p p ADVANCED OPERATION p p 2 Press MENU on your TV. YSP 5BEAM 1 STEREO 4 INPUTMODE SLEEP ST+3BEAM 2 TARGET 5 3BEAM 3 6 MUSIC 7 MOVIE 8 VOL MODE 9 SPORTS 0 OFF +10 SURROUND CH LEVEL CINEMA DSP MENU TEST ENTER RETURN y You can also perform ... the unit is reproducing sound. 1 Press YSP on your TV screen. ENTER ENTER ;MANUAL SETUP . 1 SOUND MENU 2 BEAM MENU 3 INPUT MENU 4 DISPLAY MENU [ ]/[ ]:Up/Down [ENTER]:Enter 4 Press / to select MANUAL SETUP and then press ENTER. In this unit. MENU SET MENU . ;MEMORY ;AUTO SETUP ;BASIC SETUP ;MANUAL SETUP [ ]/[ ]:Up/Down...
...p p ADVANCED OPERATION p p 2 Press MENU on your TV. YSP 5BEAM 1 STEREO 4 INPUTMODE SLEEP ST+3BEAM 2 TARGET 5 3BEAM 3 6 MUSIC 7 MOVIE 8 VOL MODE 9 SPORTS 0 OFF +10 SURROUND CH LEVEL CINEMA DSP MENU TEST ENTER RETURN y You can also perform ... the unit is reproducing sound. 1 Press YSP on your TV screen. ENTER ENTER ;MANUAL SETUP . 1 SOUND MENU 2 BEAM MENU 3 INPUT MENU 4 DISPLAY MENU [ ]/[ ]:Up/Down [ENTER]:Enter 4 Press / to select MANUAL SETUP and then press ENTER. In this unit. MENU SET MENU . ;MEMORY ;AUTO SETUP ;BASIC SETUP ;MANUAL SETUP [ ]/[ ]:Up/Down...

Owner's Manual
Page 74
...listening position from the left wall Room length Listening position from the unit p p p p ■ SETTING PARAMETERS (Setting parameters) Use to the sound beam output. When you want to adjust the installed position of this unit. INSTALLED POSITION ;;;;;FLAT TO WALL INSTALLED HEIGHT 1.0m p [ ]/[ ]:Up... to keep the beam optimization settings made in the AUTO SETUP procedure will be lost. If you make further adjustments, adjust settings in BEAM ADJUSTMENT first (see page 71). MANUAL SETUP BEAM MENU Use to manually adjust various parameters related to set the position of this...
...listening position from the left wall Room length Listening position from the unit p p p p ■ SETTING PARAMETERS (Setting parameters) Use to the sound beam output. When you want to adjust the installed position of this unit. INSTALLED POSITION ;;;;;FLAT TO WALL INSTALLED HEIGHT 1.0m p [ ]/[ ]:Up... to keep the beam optimization settings made in the AUTO SETUP procedure will be lost. If you make further adjustments, adjust settings in BEAM ADJUSTMENT first (see page 71). MANUAL SETUP BEAM MENU Use to manually adjust various parameters related to set the position of this...

Owner's Manual
Page 79
... if you connect a subwoofer. p p MANUAL SETUP ■ SUBWOOFER SET (Subwoofer set the front speakers to the subwoofer or the front left speakers and each speaker selected. Choices: SWFR (subwoofer), FRONT • Select SWFR if you do not use this unit decodes Dolby Digital or DTS signals. This setting is set in AUTO SETUP, BASIC SETUP or ROOM EQ in...
... if you connect a subwoofer. p p MANUAL SETUP ■ SUBWOOFER SET (Subwoofer set the front speakers to the subwoofer or the front left speakers and each speaker selected. Choices: SWFR (subwoofer), FRONT • Select SWFR if you do not use this unit decodes Dolby Digital or DTS signals. This setting is set in AUTO SETUP, BASIC SETUP or ROOM EQ in...
Owner's Manual
Page 81
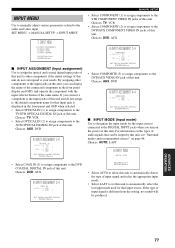
...]:Enter ■ INPUT ASSIGNMENT (Input assignment) Use to assign the optical and coaxial digital input jacks of this unit to other components to the input jacks on this unit...the types of audio signals that input jack is different from the setting, no sounds will be output by this unit. TV (. (1);;;;( TV ) (. (2);;;;; AUX ... p p p p p p MANUAL SETUP • Select COMPONENT (1) to assign components to set this unit. For information on page 46. Choices: AUTO, LAST B)INPUT MODE )AUTO LAST p [ ]/[ ]:Select [ENTER]:Retern • Select AUTO to allow this unit to automatically detect...
...]:Enter ■ INPUT ASSIGNMENT (Input assignment) Use to assign the optical and coaxial digital input jacks of this unit to other components to the input jacks on this unit...the types of audio signals that input jack is different from the setting, no sounds will be output by this unit. TV (. (1);;;;( TV ) (. (2);;;;; AUX ... p p p p p p MANUAL SETUP • Select COMPONENT (1) to assign components to set this unit. For information on page 46. Choices: AUTO, LAST B)INPUT MODE )AUTO LAST p [ ]/[ ]:Select [ENTER]:Retern • Select AUTO to allow this unit to automatically detect...

Owner's Manual
Page 83
...OSD SHIFT (OSD shift) Use to lower it. Choices: BLUE, GRAY ■ UNIT SET (Unit settings) (U.S.A. Choices: -2, -1, OFF AUTO DIMMER (Auto dimmer) If no operation is performed for a specified period, the front panel display dims. Use to change the display unit of measurement. ...p [ ]/[ ]:Select [ENTER]:Retern • Select METERS to input speaker distances in feet. 79 SET MENU → MANUAL SETUP → OPTION MENU 4 DISPLAY MENU . B)OSD SET . ADVANCED OPERATION p p p p p p DISPLAY MENU Use to manually adjust various parameters related to select the background color of the OSD. ...
...OSD SHIFT (OSD shift) Use to lower it. Choices: BLUE, GRAY ■ UNIT SET (Unit settings) (U.S.A. Choices: -2, -1, OFF AUTO DIMMER (Auto dimmer) If no operation is performed for a specified period, the front panel display dims. Use to change the display unit of measurement. ...p [ ]/[ ]:Select [ENTER]:Retern • Select METERS to input speaker distances in feet. 79 SET MENU → MANUAL SETUP → OPTION MENU 4 DISPLAY MENU . B)OSD SET . ADVANCED OPERATION p p p p p p DISPLAY MENU Use to manually adjust various parameters related to select the background color of the OSD. ...
Owner's Manual
Page 100
INDEX INDEX A O Audio pin cable 16 to 19 AUTO SETUP 28 B BASIC SETUP 62 Beam modes 42 C Cable clamp 23 Cardboard microphone stand 30 Coaxial digital output jack 8 Coaxial digital input jack 8 D Digital audio pin cable 17 Display 7, 26 Dolby Digital 46 Dolby Pro Logic 46 Dolby Pro Logic II 46 DTS 46 ...control 9, 24 Remote control code 87 S Surround mode 46 Sleep timer 60 SET MENU 26 Sound field program 51 T Test tone 83 TruBass 58 TV macro 90 V Video pin cable 16 Volume mode 56 LFE 0.1 channel 75, 95 M MANUAL SETUP 68 MEMORY 36, 37 N Night listening modes 56 96
INDEX INDEX A O Audio pin cable 16 to 19 AUTO SETUP 28 B BASIC SETUP 62 Beam modes 42 C Cable clamp 23 Cardboard microphone stand 30 Coaxial digital output jack 8 Coaxial digital input jack 8 D Digital audio pin cable 17 Display 7, 26 Dolby Digital 46 Dolby Pro Logic 46 Dolby Pro Logic II 46 DTS 46 ...control 9, 24 Remote control code 87 S Surround mode 46 Sleep timer 60 SET MENU 26 Sound field program 51 T Test tone 83 TruBass 58 TV macro 90 V Video pin cable 16 Volume mode 56 LFE 0.1 channel 75, 95 M MANUAL SETUP 68 MEMORY 36, 37 N Night listening modes 56 96


