Owner's Manual
Page 5
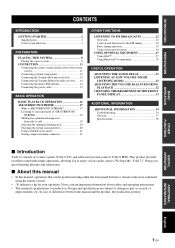
... be performed using the remote control. • y...YAS-71 consists of a center system (YAS-71CU) and subwoofer/system control (YAS-71SPX). We hope the "YAS-71" brings you to enjoy various audio sources. Notes contain important information about safety and operating instructions. • This manual is AIR SURROUND XTREME 17 Listening to surround mode of AIR SURROUND XTREME...Yamaha iPod universal dock 14 Connecting the Yamaha Bluetooth audio receiver ...... 14 Connecting the indoor FM antenna 14 Connecting the power cable 15 BASIC OPERATION BASIC PLAYBACK OPERATION 16 AIR SURROUND XTREME...
... be performed using the remote control. • y...YAS-71 consists of a center system (YAS-71CU) and subwoofer/system control (YAS-71SPX). We hope the "YAS-71" brings you to enjoy various audio sources. Notes contain important information about safety and operating instructions. • This manual is AIR SURROUND XTREME 17 Listening to surround mode of AIR SURROUND XTREME...Yamaha iPod universal dock 14 Connecting the Yamaha Bluetooth audio receiver ...... 14 Connecting the indoor FM antenna 14 Connecting the power cable 15 BASIC OPERATION BASIC PLAYBACK OPERATION 16 AIR SURROUND XTREME...
Owner's Manual
Page 6
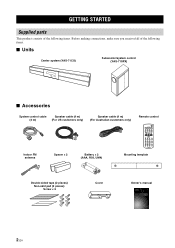
... System control cable Speaker cable (4 m) (4 m) (For US customers only) Speaker cable (4 m) (For Australian customers only) Remote control Indoor FM antenna Spacer × 2 Battery × 2 (AAA, R03, UM4) Mounting template Double-sided tape (2 pieces) Non-skid pad (2 pieces) Screw × 6 Cover Owner's manual UA Front Surround System (CENTER SYSTEM + SUBWOOFER/SYSTEM CONTROL) YAS-71 (YAS-71CU + YAS-71SPX) OWNER...
... System control cable Speaker cable (4 m) (4 m) (For US customers only) Speaker cable (4 m) (For Australian customers only) Remote control Indoor FM antenna Spacer × 2 Battery × 2 (AAA, R03, UM4) Mounting template Double-sided tape (2 pieces) Non-skid pad (2 pieces) Screw × 6 Cover Owner's manual UA Front Surround System (CENTER SYSTEM + SUBWOOFER/SYSTEM CONTROL) YAS-71 (YAS-71CU + YAS-71SPX) OWNER...
Owner's Manual
Page 7
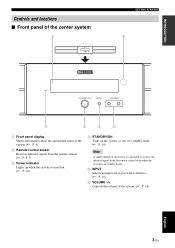
... panel of the center system GETTING STARTED 1 Front panel display Shows information about the operational status of the system. (☞ P. 4) 2 Remote control sensor Receives infrared signals from the remote control. (☞ P. 5, 7) 3 Power indicator Lights up when the system is turned on. (☞ P. 16) 4 STANDBY/ON Turns...system, or sets it to standby mode. (☞ P. 16) Note A small amount of electricity is consumed to receive the infrared signal from the remote control even when the system is in standby mode. 5 INPUT Selects an input source you want to listen to. (☞ P. 16) 6 ...
... panel of the center system GETTING STARTED 1 Front panel display Shows information about the operational status of the system. (☞ P. 4) 2 Remote control sensor Receives infrared signals from the remote control. (☞ P. 5, 7) 3 Power indicator Lights up when the system is turned on. (☞ P. 16) 4 STANDBY/ON Turns...system, or sets it to standby mode. (☞ P. 16) Note A small amount of electricity is consumed to receive the infrared signal from the remote control even when the system is in standby mode. 5 INPUT Selects an input source you want to listen to. (☞ P. 16) 6 ...
Owner's Manual
Page 9
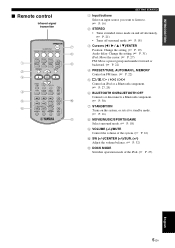
INTRODUCTION ■ Remote control Infrared signal transmitter GETTING STARTED 1 Input buttons Select an input source you want to listen to. (☞ P. 16) 2 STEREO • Turns extended stereo mode on and off alternately. (☞ P. 21) • Turns off surround mode. (☞ P. 18) 3 Cursors (W / X / S / .... (☞ P. 30) 7 STANDBY/ON Turns on the system, or sets it to standby mode. (☞ P. 16) 8 MOVIE/MUSIC/SPORTS/GAME Select surround mode. (☞ P. 18) 9 VOLUME (+/-)/MUTE Control the volume of the system. (☞ P. 16) 0 SW (+/-)/CENTER (+/-)/SUR. (+/-) Adjust the volume...
INTRODUCTION ■ Remote control Infrared signal transmitter GETTING STARTED 1 Input buttons Select an input source you want to listen to. (☞ P. 16) 2 STEREO • Turns extended stereo mode on and off alternately. (☞ P. 21) • Turns off surround mode. (☞ P. 18) 3 Cursors (W / X / S / .... (☞ P. 30) 7 STANDBY/ON Turns on the system, or sets it to standby mode. (☞ P. 16) 8 MOVIE/MUSIC/SPORTS/GAME Select surround mode. (☞ P. 18) 9 VOLUME (+/-)/MUTE Control the volume of the system. (☞ P. 16) 0 SW (+/-)/CENTER (+/-)/SUR. (+/-) Adjust the volume...

Owner's Manual
Page 11
...1 Take off the battery compartment cover. 2 Insert the 2 supplied batteries (AAA, R03, UM4), observing the polarity markings (+ and -) on the remote control. • Be careful not to spill liquid on the inside of batteries (for example, alkaline and manganese) together. Notes • Be careful...If a battery starts leaking, dispose of the center system and point it immediately. Notes • If the effective operation distance of the remote control decreases considerably, replace the batteries with new one. • Do not use different types of the battery compartment. 3 Snap the...
...1 Take off the battery compartment cover. 2 Insert the 2 supplied batteries (AAA, R03, UM4), observing the polarity markings (+ and -) on the remote control. • Be careful not to spill liquid on the inside of batteries (for example, alkaline and manganese) together. Notes • Be careful...If a battery starts leaking, dispose of the center system and point it immediately. Notes • If the effective operation distance of the remote control decreases considerably, replace the batteries with new one. • Do not use different types of the battery compartment. 3 Snap the...
Owner's Manual
Page 12
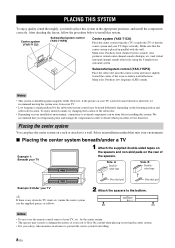
...follow the procedure below to install this system. Main roles: Produces front channel (stereo) sounds. Notes • Do not cover the remote control sensor of your TV, etc., by the subwoofer/system control may scratch or damage the surface of the spacers. Be careful ...shielded against magnetic fields. Subwoofer/system control (YAS-71SPX) Place the subwoofer near the center system and turn it to a wall. Also produces virtual center channel sounds (dialogue, etc.) and virtual surround channel sounds effectively using the Yamaha front surround system. However, if the picture on your...
...follow the procedure below to install this system. Main roles: Produces front channel (stereo) sounds. Notes • Do not cover the remote control sensor of your TV, etc., by the subwoofer/system control may scratch or damage the surface of the spacers. Be careful ...shielded against magnetic fields. Subwoofer/system control (YAS-71SPX) Place the subwoofer near the center system and turn it to a wall. Also produces virtual center channel sounds (dialogue, etc.) and virtual surround channel sounds effectively using the Yamaha front surround system. However, if the picture on your...
Owner's Manual
Page 20
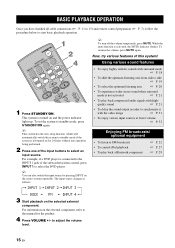
..., press INPUT 1 to side ☞ P. 19 • To select the optimum listening area ☞ P. 20 • To experience wider stereo sound when surround mode is not activated ☞ P. 21 • To play back a Bluetooth component ☞ P. 22 ☞ P. 27 ☞ P. 29 3 Start... to start basic playback operation. BASIC OPERATION BASIC PLAYBACK OPERATION Once you have finished all cable connections (☞ P. 11 to 15) and remote control preparation (☞ P. 7), follow the procedure below to FM broadcasts • To control iPod playback • To play back compressed ...
..., press INPUT 1 to side ☞ P. 19 • To select the optimum listening area ☞ P. 20 • To experience wider stereo sound when surround mode is not activated ☞ P. 21 • To play back a Bluetooth component ☞ P. 22 ☞ P. 27 ☞ P. 29 3 Start... to start basic playback operation. BASIC OPERATION BASIC PLAYBACK OPERATION Once you have finished all cable connections (☞ P. 11 to 15) and remote control preparation (☞ P. 7), follow the procedure below to FM broadcasts • To control iPod playback • To play back compressed ...
Owner's Manual
Page 31
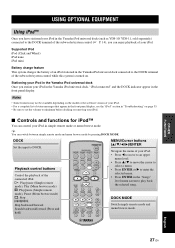
... b/a: Skip backward/forward Search backward/forward (Press and hold) MENU/Cursor buttons (S / T / W / X)/ENTER Navigate the menu of your iPod in simple remote mode or menu browse mode. Supported iPod iPod (Click and Wheel) iPod nano iPod mini Battery charge feature This system charges the battery of an... display, see the "iPod" section in "Troubleshooting" on . USING OPTIONAL EQUIPMENT Using iPod™ Once you have stationed your iPod in the Yamaha iPod universal dock (such as YDS-10/ YDS-11, sold separately) connected to the DOCK terminal of the subwoofer/system control (☞ P. ...
... b/a: Skip backward/forward Search backward/forward (Press and hold) MENU/Cursor buttons (S / T / W / X)/ENTER Navigate the menu of your iPod in simple remote mode or menu browse mode. Supported iPod iPod (Click and Wheel) iPod nano iPod mini Battery charge feature This system charges the battery of an... display, see the "iPod" section in "Troubleshooting" on . USING OPTIONAL EQUIPMENT Using iPod™ Once you have stationed your iPod in the Yamaha iPod universal dock (such as YDS-10/ YDS-11, sold separately) connected to the DOCK terminal of the subwoofer/system control (☞ P. ...
Owner's Manual
Page 32
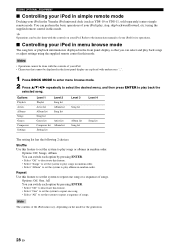
... be displayed in the front panel display are replaced with the controls of your iPod in the Yamaha iPod universal dock (such as YDS-10 or YDS-11, sold separately) enters simple remote mode. Options Playlists Artists Albums Songs Genres Composers Settings Level 1 Level 2 Playlist Song list Artist... to the instruction manuals of your iPod for its operations. ■ Controlling your iPod (play, stop, skip backward/forward, etc.) using the supplied remote control in this feature. • Select "Songs" to set the system to play songs in random order. • Select "Album" to set the...
... be displayed in the front panel display are replaced with the controls of your iPod in the Yamaha iPod universal dock (such as YDS-10 or YDS-11, sold separately) enters simple remote mode. Options Playlists Artists Albums Songs Genres Composers Settings Level 1 Level 2 Playlist Song list Artist... to the instruction manuals of your iPod for its operations. ■ Controlling your iPod (play, stop, skip backward/forward, etc.) using the supplied remote control in this feature. • Select "Songs" to set the system to play songs in random order. • Select "Album" to set the...
Owner's Manual
Page 34
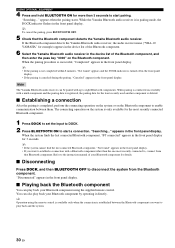
... your Bluetooth component for the most recently connected to start pairing. While the Yamaha Bluetooth audio receiver is successful, "Completed" appears in the front panel display. y Operation using the supplied remote control. y To cancel the pairing, press BLUETOOTH OFF. 5 Check that Bluetooth... " appears and the DOCK indicator is turned off in the front panel display. Note The Yamaha Bluetooth audio receiver can play back your Bluetooth component using the remote control is available only when the connection is canceled during the pairing, "Canceled" appears in ...
... your Bluetooth component for the most recently connected to start pairing. While the Yamaha Bluetooth audio receiver is successful, "Completed" appears in the front panel display. y Operation using the supplied remote control. y To cancel the pairing, press BLUETOOTH OFF. 5 Check that Bluetooth... " appears and the DOCK indicator is turned off in the front panel display. Note The Yamaha Bluetooth audio receiver can play back your Bluetooth component using the remote control is available only when the connection is canceled during the pairing, "Canceled" appears in ...
Owner's Manual
Page 39
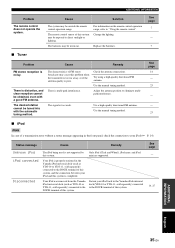
...interference. Adjust the antenna position to your iPod and this system. The desired station cannot be outside the remote control operation range. Your iPod was removed from the Yamaha iPod universal dock (such as YDS-10 or YDS-11, sold separately) connected to the DOCK terminal ...-11, sold separately) connected to the DOCK terminal of FM stereo broadcasts may be tuned into with a good FM antenna. For information on the remote control operation range, refer to direct sunlight or lighting. Try using a high-quality directional FM antenna. See page 7 - 7 ■ Tuner...
...interference. Adjust the antenna position to your iPod and this system. The desired station cannot be outside the remote control operation range. Your iPod was removed from the Yamaha iPod universal dock (such as YDS-10 or YDS-11, sold separately) connected to the DOCK terminal ...-11, sold separately) connected to the DOCK terminal of FM stereo broadcasts may be tuned into with a good FM antenna. For information on the remote control operation range, refer to direct sunlight or lighting. Try using a high-quality directional FM antenna. See page 7 - 7 ■ Tuner...


