
Owner's Manual
Page 1
U RX-V565 AV Receiver OWNER'S MANUAL
U RX-V565 AV Receiver OWNER'S MANUAL

Owner's Manual
Page 3
... this apparatus during lightning storms or when unused for replacement of interference, which can not locate the appropriate retailer, please contact Yamaha Electronics Corp., U.S.A. 6660 Orangethorpe Ave, Buena Park, CA 90620. FCC INFORMATION (for Class "B" digital devices. Cable/s supplied...with these corrective measures do not produce satisfactory results, please contact the local retailer authorized to those products distributed by Yamaha may be determined by the interference. REFER SERVICING TO QUALIFIED SERVICE PERSONNEL. • Explanation of Graphical Symbols The lightning...
... this apparatus during lightning storms or when unused for replacement of interference, which can not locate the appropriate retailer, please contact Yamaha Electronics Corp., U.S.A. 6660 Orangethorpe Ave, Buena Park, CA 90620. FCC INFORMATION (for Class "B" digital devices. Cable/s supplied...with these corrective measures do not produce satisfactory results, please contact the local retailer authorized to those products distributed by Yamaha may be determined by the interference. REFER SERVICING TO QUALIFIED SERVICE PERSONNEL. • Explanation of Graphical Symbols The lightning...

Owner's Manual
Page 4
...solvents; Caution-ii En On the top of plug to sudden temperature changes from direct sunlight, heat sources, vibration, dust, moisture, and/or cold. Yamaha will not be used. a room with a humidifier) to prevent condensation inside this unit, and/or personal injury. 7 Do not plug in an...plug can cause hearing loss. 22 When replacing the batteries, be reached easily. 17 Be sure to use of time (i.e. Contact qualified Yamaha service personnel when any damage resulting from use this unit for future reference. 2 Install this sound system in the standby mode, and disconnect...
...solvents; Caution-ii En On the top of plug to sudden temperature changes from direct sunlight, heat sources, vibration, dust, moisture, and/or cold. Yamaha will not be used. a room with a humidifier) to prevent condensation inside this unit, and/or personal injury. 7 Do not plug in an...plug can cause hearing loss. 22 When replacing the batteries, be reached easily. 17 Be sure to use of time (i.e. Contact qualified Yamaha service personnel when any damage resulting from use this unit for future reference. 2 Install this sound system in the standby mode, and disconnect...

Owner's Manual
Page 5
...Information on jacks and cable plugs 13 Connecting a TV monitor or projector 14 Connecting other components 15 Connecting a Yamaha iPod universal dock or Bluetooth™ wireless audio receiver 16 Using the VIDEO AUX jacks on the front panel .... 16 Connecting the FM and AM antennas 17 ...tuning in (Preset tuning 28 Using iPod 30 Controlling iPod 30 Using Bluetooth™ components 32 Pairing the Bluetooth™ wireless audio receiver and your Bluetooth component 32 Playback of the Bluetooth™ component 32 ADVANCED OPERATION Setting the option menu for each input source (...
...Information on jacks and cable plugs 13 Connecting a TV monitor or projector 14 Connecting other components 15 Connecting a Yamaha iPod universal dock or Bluetooth™ wireless audio receiver 16 Using the VIDEO AUX jacks on the front panel .... 16 Connecting the FM and AM antennas 17 ...tuning in (Preset tuning 28 Using iPod 30 Controlling iPod 30 Using Bluetooth™ components 32 Pairing the Bluetooth™ wireless audio receiver and your Bluetooth component 32 Playback of the Bluetooth™ component 32 ADVANCED OPERATION Setting the option menu for each input source (...
Owner's Manual
Page 6
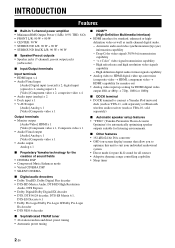
...OSD (on-screen display) menus that allow you to optimize this unit to connect a Yamaha iPod universal dock (such as YDS-11, sold separately) or Bluetooth wireless audio receiver (such as multi-channel digital audio. - INTRODUCTION Features ■ Built-in 7-channel ... Composite video x 1 • Audio/Visual output [Audio] Analog x 1 [Video] Composite video x 1 • Audio output Analog x 1 ■ Proprietary Yamaha technology for the creation of sound fields • CINEMA DSP • Compressed Music Enhancer mode • Virtual CINEMA DSP • SILENT CINEMA ■ Digital audio...
...OSD (on-screen display) menus that allow you to optimize this unit to connect a Yamaha iPod universal dock (such as YDS-11, sold separately) or Bluetooth wireless audio receiver (such as multi-channel digital audio. - INTRODUCTION Features ■ Built-in 7-channel ... Composite video x 1 • Audio/Visual output [Audio] Analog x 1 [Video] Composite video x 1 • Audio output Analog x 1 ■ Proprietary Yamaha technology for the creation of sound fields • CINEMA DSP • Compressed Music Enhancer mode • Virtual CINEMA DSP • SILENT CINEMA ■ Digital audio...
Owner's Manual
Page 7
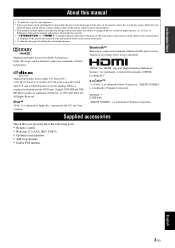
...-Definition Multimedia Interface" are trademark of DTS, Inc. © 1996-2007 DTS, Inc. Supplied accessories Check that you received all of Yamaha Corporation. Manufactured under U.S. Bluetooth™ Bluetooth is a registered trademark of Bluetooth SIG and is a trademark of Sony Corporation...as a result of improvements, etc. INTRODUCTION PREPARATION About this manual for your operation. • Some operations can be performed by Yamaha in accordance with a license agreement. "SILENT CINEMA" is a trademark of the following parts. • Remote control • Batteries...
...-Definition Multimedia Interface" are trademark of DTS, Inc. © 1996-2007 DTS, Inc. Supplied accessories Check that you received all of Yamaha Corporation. Manufactured under U.S. Bluetooth™ Bluetooth is a registered trademark of Bluetooth SIG and is a trademark of Sony Corporation...as a result of improvements, etc. INTRODUCTION PREPARATION About this manual for your operation. • Some operations can be performed by Yamaha in accordance with a license agreement. "SILENT CINEMA" is a trademark of the following parts. • Remote control • Batteries...

Owner's Manual
Page 8
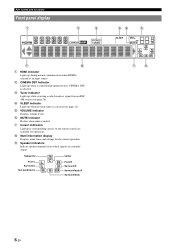
G AM Sets the FM/AM tuner band to FM (see page 28). D MEMORY Registers FM/AM stations as preset stations (see page 28). F FM Sets the FM/AM tuner band to AM (see page 28). R AUDIO L/R (VIDEO AUX) jack For connecting the audio output cable of an HDMI signal input to this unit while this unit between linked sets of input sources and sound field programs (see page 21). U HDMI THROUGH Lights up during pass-through output of a camcorder or game console (see page 16). H TUNING l / h Changes FM/AM tuner frequencies (see page 29). I Q R S A STANDBY/ON Switches this ...
G AM Sets the FM/AM tuner band to FM (see page 28). D MEMORY Registers FM/AM stations as preset stations (see page 28). F FM Sets the FM/AM tuner band to AM (see page 28). R AUDIO L/R (VIDEO AUX) jack For connecting the audio output cable of an HDMI signal input to this unit while this unit between linked sets of input sources and sound field programs (see page 21). U HDMI THROUGH Lights up during pass-through output of a camcorder or game console (see page 16). H TUNING l / h Changes FM/AM tuner frequencies (see page 29). I Q R S A STANDBY/ON Switches this ...

Owner's Manual
Page 9
... CENTER SURROUND SURROUND BACK/BI-AMP OPTICAL ( TV ) AV 1 COAXIAL AV 2 COAXIAL (CD) AV 3 OPTICAL AV 4 AV 5 AV 6 AV OUT AUDIO1 AUDIO2 AUDIO OUT SUBWOOFER PRE OUT e fg h i j a DOCK terminal For connecting an optional Yamaha iPod universal dock (YDS11) or Bluetooth wireless audio receiver (YBA-10) (see page 15). g AUDIO 1/2...components for audio inputs 1-2 (see page 11). c ANTENNA jack For connecting supplied FM and AM antennas (see page 15). f AV OUT Outputs audio/visual signals from a selected analog input source to a video monitor, such as a TV (see page 16). ADVANCED...
... CENTER SURROUND SURROUND BACK/BI-AMP OPTICAL ( TV ) AV 1 COAXIAL AV 2 COAXIAL (CD) AV 3 OPTICAL AV 4 AV 5 AV 6 AV OUT AUDIO1 AUDIO2 AUDIO OUT SUBWOOFER PRE OUT e fg h i j a DOCK terminal For connecting an optional Yamaha iPod universal dock (YDS11) or Bluetooth wireless audio receiver (YBA-10) (see page 15). g AUDIO 1/2...components for audio inputs 1-2 (see page 11). c ANTENNA jack For connecting supplied FM and AM antennas (see page 15). f AV OUT Outputs audio/visual signals from a selected analog input source to a video monitor, such as a TV (see page 16). ADVANCED...
Owner's Manual
Page 10
... that uses CINEMA DSP is activated (see page 28). f MUTE indicator Flashes when audio is selected as an input source. c Tuner indicator Lights up while receiving a radio broadcast signal from which signals are available for the current operation. g Cursor indicators Light up during normal communication when HDMI is muted. Part names...
... that uses CINEMA DSP is activated (see page 28). f MUTE indicator Flashes when audio is selected as an input source. c Tuner indicator Lights up while receiving a radio broadcast signal from which signals are available for the current operation. g Cursor indicators Light up during normal communication when HDMI is muted. Part names...

Owner's Manual
Page 11
... operations (see page 39). f POWER Switches this unit (see page 23). Selects a Yamaha iPod universal dock/ Bluetooth wireless audio receiver connected to the Yamaha iPod universal dock (see page 21). l SETUP Displays the setup menu (see page 44... numbers. INTRODUCTION PREPARATION BASIC OPERATION ADVANCED OPERATION Remote control a d g h i j k l n r TRANSMIT CODE SET POWER SOURCE 1 1 5 SLEEP POWER HDMI 2 3 4 AV 2 3 4 AUDIO 6 1 2 V-AUX [ A ] [ B ] DOCK TUNER FM AM PRESET TUNING INFO MEMORY MOVIE ENHANCER SUR. Selects the FM/AM tuner. Selects a...
... operations (see page 39). f POWER Switches this unit (see page 23). Selects a Yamaha iPod universal dock/ Bluetooth wireless audio receiver connected to the Yamaha iPod universal dock (see page 21). l SETUP Displays the setup menu (see page 44... numbers. INTRODUCTION PREPARATION BASIC OPERATION ADVANCED OPERATION Remote control a d g h i j k l n r TRANSMIT CODE SET POWER SOURCE 1 1 5 SLEEP POWER HDMI 2 3 4 AV 2 3 4 AUDIO 6 1 2 V-AUX [ A ] [ B ] DOCK TUNER FM AM PRESET TUNING INFO MEMORY MOVIE ENHANCER SUR. Selects the FM/AM tuner. Selects a...
Owner's Manual
Page 12
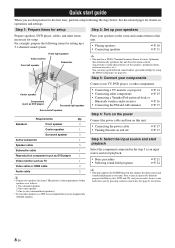
...to this unit. • Placing speakers • Connecting speakers ☞P. 10 ☞P. 11 y • This unit has a YPAO (Yamaha Parametric Room Acoustic Optimizer) that automatically optimizes this unit based on and off ☞P. 17 ☞P. 17 Step 5: Select the input source ...8226; Connecting a TV monitor or projector ☞P. 14 • Connecting other components ☞P. 15 • Connecting a Yamaha iPod universal dock or Bluetooth wireless audio receiver ☞P. 16 • Connecting the FM and AM antennas ☞P. 17 Step 4: Turn on the power Connect the power...
...to this unit. • Placing speakers • Connecting speakers ☞P. 10 ☞P. 11 y • This unit has a YPAO (Yamaha Parametric Room Acoustic Optimizer) that automatically optimizes this unit based on and off ☞P. 17 ☞P. 17 Step 5: Select the input source ...8226; Connecting a TV monitor or projector ☞P. 14 • Connecting other components ☞P. 15 • Connecting a Yamaha iPod universal dock or Bluetooth wireless audio receiver ☞P. 16 • Connecting the FM and AM antennas ☞P. 17 Step 4: Turn on the power Connect the power...
Owner's Manual
Page 13
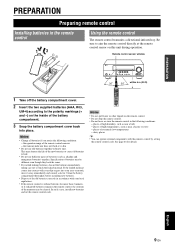
If the leaked material comes into contact with this unit during operation. ADVANCED OPERATION ADDITIONAL INFORMATION APPENDIX English 9 En Be sure to the polarity markings (+ and -) on the inside of the battery compartment. 3 Snap the battery compartment cover back into your local regulations. • If the remote control is dim • Do not use different types of batteries (such as alkaline and manganese batteries) together. Notes • Change all batteries if you find leaking batteries, discard the batteries immediately, taking care not to leak. • Do not ...
If the leaked material comes into contact with this unit during operation. ADVANCED OPERATION ADDITIONAL INFORMATION APPENDIX English 9 En Be sure to the polarity markings (+ and -) on the inside of the battery compartment. 3 Snap the battery compartment cover back into your local regulations. • If the remote control is dim • Do not use different types of batteries (such as alkaline and manganese batteries) together. Notes • Change all batteries if you find leaking batteries, discard the batteries immediately, taking care not to leak. • Do not ...

Owner's Manual
Page 14
... at the rear of the room facing the listening position at least 30 cm away from each other, ideally at the same distance as the Yamaha Active Servo Processing Subwoofer System. Use a subwoofer with the front surfaces of the TV with a built-in the 5.1-channel speaker layout, place them at an...
... at the rear of the room facing the listening position at least 30 cm away from each other, ideally at the same distance as the Yamaha Active Servo Processing Subwoofer System. Use a subwoofer with the front surfaces of the TV with a built-in the 5.1-channel speaker layout, place them at an...

Owner's Manual
Page 15
ba c gf DMI 3 HDMI 4 FRONT SPEAKERS CENTER SURROUND SURROUND BACK/BI-AMP ■ 7.1-channel Speakers a Front speaker L b Front speaker R c Center speaker d Surround speaker L e Surround speaker R f Surround back speaker L g Surround back speaker R h Subwoofer Jacks on this unit FRONT (L) FRONT (R) CENTER SURROUND (L) SURROUND (R) SURROUND BACK/BI-AMP (L) SURROUND BACK/BI-AMP (R) SUB WOOFER AUDIO OUT SUBWOOFER PRE OUT ed h ■ 6.1-channel Speakers a Front speaker L b Front speaker R c Center speaker d Surround speaker L e Surround speaker R f Surround back speaker h ...
ba c gf DMI 3 HDMI 4 FRONT SPEAKERS CENTER SURROUND SURROUND BACK/BI-AMP ■ 7.1-channel Speakers a Front speaker L b Front speaker R c Center speaker d Surround speaker L e Surround speaker R f Surround back speaker L g Surround back speaker R h Subwoofer Jacks on this unit FRONT (L) FRONT (R) CENTER SURROUND (L) SURROUND (R) SURROUND BACK/BI-AMP (L) SURROUND BACK/BI-AMP (R) SUB WOOFER AUDIO OUT SUBWOOFER PRE OUT ed h ■ 6.1-channel Speakers a Front speaker L b Front speaker R c Center speaker d Surround speaker L e Surround speaker R f Surround back speaker h ...

Owner's Manual
Page 16
appears on the front panel display when this unit is a pair of speakers for details. Refer to this unit. Using bi-amplification connections You can connect speakers that support bi-amplification connections to the instruction manuals of insulated cables running side by side in general. Front speakers Right Left Connecting the banana plug (Except U.K., Europe, Asia and Korea models) Tighten the knob, and then insert the banana plug into the end of 6-ohm or larger. When not making bi-amplification connections, remove any metal part of the speaker cable into the hole, ...
appears on the front panel display when this unit is a pair of speakers for details. Refer to this unit. Using bi-amplification connections You can connect speakers that support bi-amplification connections to the instruction manuals of insulated cables running side by side in general. Front speakers Right Left Connecting the banana plug (Except U.K., Europe, Asia and Korea models) Tighten the knob, and then insert the banana plug into the end of 6-ohm or larger. When not making bi-amplification connections, remove any metal part of the speaker cable into the hole, ...
Owner's Manual
Page 17
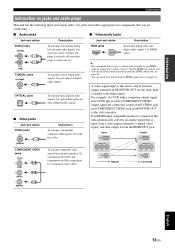
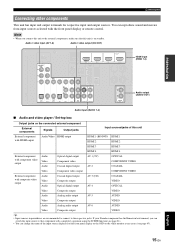
INTRODUCTION PREPARATION BASIC OPERATION Connections Information on HDMI connections (see page 23). • You can check the potential problem about the HDMI connection (see page 23). Use stereo pin cables. Connect red plugs to red jacks (R) and white plugs to a digital video signal, and then output it . • You can check error information on jacks and cable plugs This unit has the following input and output jacks. To transmit coaxial digital audio signals. Use video pin cables. Use component video cables. Use jacks and cables appropriate for the same kind of ...
INTRODUCTION PREPARATION BASIC OPERATION Connections Information on HDMI connections (see page 23). • You can check the potential problem about the HDMI connection (see page 23). Use stereo pin cables. Connect red plugs to red jacks (R) and white plugs to a digital video signal, and then output it . • You can check error information on jacks and cable plugs This unit has the following input and output jacks. To transmit coaxial digital audio signals. Use video pin cables. Use component video cables. Use jacks and cables appropriate for the same kind of ...
Owner's Manual
Page 18
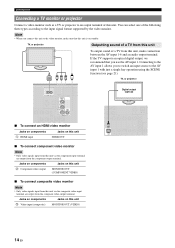
...video signals input from the component output terminal. Note • When you connect this unit to the video monitor, make connection between the AV input 1-6 and an audio output terminal. TV, or projector (BD/DVD) HDMI OUT HDMI 1 HDMI 2 HD ANTENNA COMPONENT VIDEO UNBAL....MONITOR OUT (VIDEO) Digital output (optical) PR PB VIDEO Y UNBAL. P FM GND AM P Y O OPTICAL ( TV ) AV 1 COAXIAL AV 2 COAXIAL (CD) AV 3 OPTICAL AV 4 AV 5 AV 6 AV OUT AUDIO1 14 En If the TV supports an optical digital output, we recommend that this unit. Connections Connecting a TV monitor or...
...video signals input from the component output terminal. Note • When you connect this unit to the video monitor, make connection between the AV input 1-6 and an audio output terminal. TV, or projector (BD/DVD) HDMI OUT HDMI 1 HDMI 2 HD ANTENNA COMPONENT VIDEO UNBAL....MONITOR OUT (VIDEO) Digital output (optical) PR PB VIDEO Y UNBAL. P FM GND AM P Y O OPTICAL ( TV ) AV 1 COAXIAL AV 2 COAXIAL (CD) AV 3 OPTICAL AV 4 AV 5 AV 6 AV OUT AUDIO1 14 En If the TV supports an optical digital output, we recommend that this unit. Connections Connecting a TV monitor or...
Owner's Manual
Page 19
...Yamaha component has the Remote in parentheses are recommended to connect to the external components, make sure that component with composite video output Audio Video Audio Coaxial digital output Composite output Optical digital output AV 3 (CD) AV 4 COAXIAL VIDEO OPTICAL Video Composite output VIDEO Audio Analog audio output AV... HDMI 2 FM GND AM PB Y VIDEO MONITOR OUT HDMI 3 HDMI 4 FRONT OPTICAL ( TV ) AV 1 COAXIAL AV 2 COAXIAL (CD) AV 3 OPTICAL AV 4 AV 5 AV 6 AV OUT AUDIO1 AUDIO2 AUDIO OUT HDMI input (HDMI 1-4) CE Audio output (AUDIO OUT) Audio input (AUDIO ...
...Yamaha component has the Remote in parentheses are recommended to connect to the external components, make sure that component with composite video output Audio Video Audio Coaxial digital output Composite output Optical digital output AV 3 (CD) AV 4 COAXIAL VIDEO OPTICAL Video Composite output VIDEO Audio Analog audio output AV... HDMI 2 FM GND AM PB Y VIDEO MONITOR OUT HDMI 3 HDMI 4 FRONT OPTICAL ( TV ) AV 1 COAXIAL AV 2 COAXIAL (CD) AV 3 OPTICAL AV 4 AV 5 AV 6 AV OUT AUDIO1 AUDIO2 AUDIO OUT HDMI input (HDMI 1-4) CE Audio output (AUDIO OUT) Audio input (AUDIO ...
Owner's Manual
Page 20
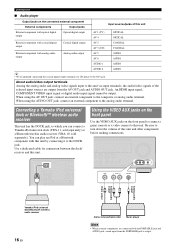
... the analog audio terminal. Connecting a Yamaha iPod universal dock or Bluetooth™ wireless audio receiver This unit has the DOCK jack, to which you can play an iPod or a Bluetooth component with analog audio output Analog audio output AV 5 AV 6 AUDIO AUDIO AUDIO 1 AUDIO AUDIO... AUX VIDEO AUDIO PORTABLE VIDEO L AUDIO R PORTABLE V L R Analog audio output Analog audio output Video output Yamaha iPod universal dock/Bluetooth wireless audio receiver 16 En Game console/Camcorder Music player Note • When external components are output from the PORTABLE jack is output...
... the analog audio terminal. Connecting a Yamaha iPod universal dock or Bluetooth™ wireless audio receiver This unit has the DOCK jack, to which you can play an iPod or a Bluetooth component with analog audio output Analog audio output AV 5 AV 6 AUDIO AUDIO AUDIO 1 AUDIO AUDIO... AUX VIDEO AUDIO PORTABLE VIDEO L AUDIO R PORTABLE V L R Analog audio output Analog audio output Video output Yamaha iPod universal dock/Bluetooth wireless audio receiver 16 En Game console/Camcorder Music player Note • When external components are output from the PORTABLE jack is output...
Owner's Manual
Page 21
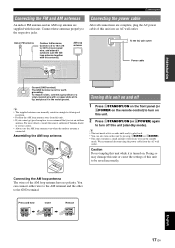
... turn off 1 Press ASTANDBY/ON on the front panel (or fPOWER on the remote control) to turn on . For more details, consult the nearest authorized Yamaha dealer or service center. • Always use the AM loop antenna even when the outdoor antenna is not for earth grounding. Assembling the AM loop...
... turn off 1 Press ASTANDBY/ON on the front panel (or fPOWER on the remote control) to turn on . For more details, consult the nearest authorized Yamaha dealer or service center. • Always use the AM loop antenna even when the outdoor antenna is not for earth grounding. Assembling the AM loop...
