
Owner's Manual
Page 5
... 9 Connections 10 Placing speakers 10 Connecting speakers 11 Information on jacks and cable plugs 13 Connecting a TV monitor or projector 14 Connecting other components 15 Connecting a Yamaha iPod universal dock or Bluetooth™ wireless audio receiver 16 Using the VIDEO ...AUX jacks on the front panel .... 16 Connecting the FM and AM antennas 17 Connecting the power cable 17 Turning this unit on and off 17 Optimizing the speaker setting for your listening room (YPAO 18 Using Auto Setup...
... 9 Connections 10 Placing speakers 10 Connecting speakers 11 Information on jacks and cable plugs 13 Connecting a TV monitor or projector 14 Connecting other components 15 Connecting a Yamaha iPod universal dock or Bluetooth™ wireless audio receiver 16 Using the VIDEO ...AUX jacks on the front panel .... 16 Connecting the FM and AM antennas 17 Connecting the power cable 17 Turning this unit on and off 17 Optimizing the speaker setting for your listening room (YPAO 18 Using Auto Setup...
Owner's Manual
Page 6
...-11, sold separately) or Bluetooth wireless audio receiver (such as YBA-10, sold separately) ■ Automatic speaker setup features • "YPAO" (Yamaha Parametric Room Acoustic Optimizer) for automatically optimizing speaker outputs suitable for listening environments. ■ Other...+ 90 W • CENTER: 90 W • SURROUND L/R: 90 W + 90 W • SURROUND BACK L/R: 90 W + 90 W ■ Speaker/Preout outputs • Speaker jacks (7-channel), preout output jacks (subwoofer) ■ Input/Output terminals Input terminals • HDMI input x 4 • Audio/Visual input [Audio] Digital ...
...-11, sold separately) or Bluetooth wireless audio receiver (such as YBA-10, sold separately) ■ Automatic speaker setup features • "YPAO" (Yamaha Parametric Room Acoustic Optimizer) for automatically optimizing speaker outputs suitable for listening environments. ■ Other...+ 90 W • CENTER: 90 W • SURROUND L/R: 90 W + 90 W • SURROUND BACK L/R: 90 W + 90 W ■ Speaker/Preout outputs • Speaker jacks (7-channel), preout output jacks (subwoofer) ■ Input/Output terminals Input terminals • HDMI input x 4 • Audio/Visual input [Audio] Digital ...
Owner's Manual
Page 12
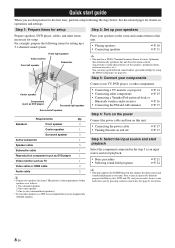
... time, perform setup following items for setup. The priority of the requirement of the speakers, speaker positions, and room acoustics, etc.). For example, prepare the following the steps below. Step 3: Connect your components Connect your speakers Prepare speakers, DVD player,... cables, and other items necessary for setting up your TV, DVD player, or other components ☞P. 15 • Connecting a Yamaha iPod universal dock or Bluetooth wireless audio receiver ☞P. 16 •...
... time, perform setup following items for setup. The priority of the requirement of the speakers, speaker positions, and room acoustics, etc.). For example, prepare the following the steps below. Step 3: Connect your components Connect your speakers Prepare speakers, DVD player,... cables, and other items necessary for setting up your TV, DVD player, or other components ☞P. 15 • Connecting a Yamaha iPod universal dock or Bluetooth wireless audio receiver ☞P. 16 •...

Owner's Manual
Page 16
... If the circuit shorts out, "CHECK SP WIRES!" Set speaker impedance in ) of insulation from the monitor. • Use speakers with a tweeter. Before connecting the speakers, set this unit to enable bi-amplification connections in "ADVANCED SETUP" (see page 45). ■ Connecting to disconnect the ...terminal of this unit and the other end to that of your speaker. • Before connecting the speakers, be sure to the FRONT terminals 1 Remove approximately 10 mm (0.4 in "ADVANCED SETUP" before connecting the speaker cables. appears on the front panel display when this unit and ...
... If the circuit shorts out, "CHECK SP WIRES!" Set speaker impedance in ) of insulation from the monitor. • Use speakers with a tweeter. Before connecting the speakers, set this unit to enable bi-amplification connections in "ADVANCED SETUP" (see page 45). ■ Connecting to disconnect the ...terminal of this unit and the other end to that of your speaker. • Before connecting the speakers, be sure to the FRONT terminals 1 Remove approximately 10 mm (0.4 in "ADVANCED SETUP" before connecting the speaker cables. appears on the front panel display when this unit and ...

Owner's Manual
Page 22
... is as quiet as the video input source of the room. The equalizer is set to "Flat." 18 En Optimizing the speaker setting for the "Manual Setup" procedure. y • See page 39 for your listening position. VOLUME CROSSOVER/ HIGH CUT MIN MAX MIN MAX Subwoofer 2... in progress. Optimizer microphone y • It is in your listening room (YPAO) This unit has a Yamaha Parametric Acoustic Optimizer (YPAO). You can select the following . • All speakers and subwoofer are connected properly. • Headphones are set to the maximum. In "EQ Type," you use...
... is as quiet as the video input source of the room. The equalizer is set to "Flat." 18 En Optimizing the speaker setting for the "Manual Setup" procedure. y • See page 39 for your listening position. VOLUME CROSSOVER/ HIGH CUT MIN MAX MIN MAX Subwoofer 2... in progress. Optimizer microphone y • It is in your listening room (YPAO) This unit has a Yamaha Parametric Acoustic Optimizer (YPAO). You can select the following . • All speakers and subwoofer are connected properly. • Headphones are set to the maximum. In "EQ Type," you use...
Owner's Manual
Page 23
... is successfully completed, "YPAO Complete" appears on the front panel display and the results appear on an AV component. Notes • During the automatic setup procedure, do not want to cancel the automatic setup procedure. The speaker characteristics are adjusted according to obtain the same characteristics. Store it in the following screen appears, remove...
... is successfully completed, "YPAO Complete" appears on the front panel display and the results appear on an AV component. Notes • During the automatic setup procedure, do not want to cancel the automatic setup procedure. The speaker characteristics are adjusted according to obtain the same characteristics. Store it in the following screen appears, remove...

Owner's Manual
Page 24
...is displayed on the result display screen. E-9:USER CANCEL Don't operate any function >Retry Exit [p]/[[]:Select [ENTER]:Return Retry Performs "Auto Setup" again. However, we recommend that you solve the problem first and then perform measurement again. ERROR . Check the error and solve the...20 En We recommend that you solve the problem and perform "Auto Setup" again. 1 Check if "→" is displayed during measurement, "WARNING" is displayed. Details of "WARNING" and press nENTER. Optimizing the speaker setting for your listening room (YPAO) When an error message is...
...is displayed on the result display screen. E-9:USER CANCEL Don't operate any function >Retry Exit [p]/[[]:Select [ENTER]:Return Retry Performs "Auto Setup" again. However, we recommend that you solve the problem first and then perform measurement again. ERROR . Check the error and solve the...20 En We recommend that you solve the problem and perform "Auto Setup" again. 1 Check if "→" is displayed during measurement, "WARNING" is displayed. Details of "WARNING" and press nENTER. Optimizing the speaker setting for your listening room (YPAO) When an error message is...

Owner's Manual
Page 25
...for each input source. Input source Sound field program BD/DVD TV CD RADIO HDMI 1 AV 1 AV 3 TUNER Straight Straight Straight 7ch Enhancer y • When this unit by pressing the ... component with one key. If the condition is not improved, the problem may cause a speaker malfunction. Selecting a SCENE Press ISCENE (or kSCENE). Switching remotely controlled external components linked to... appears on playback. Note • Remote control codes cannot be output in the OPTION menu or SETUP menu, "SCENE Setting Complete" appears on the video monitor (OSD). Volume -18.5dB SW L...
...for each input source. Input source Sound field program BD/DVD TV CD RADIO HDMI 1 AV 1 AV 3 TUNER Straight Straight Straight 7ch Enhancer y • When this unit by pressing the ... component with one key. If the condition is not improved, the problem may cause a speaker malfunction. Selecting a SCENE Press ISCENE (or kSCENE). Switching remotely controlled external components linked to... appears on playback. Note • Remote control codes cannot be output in the OPTION menu or SETUP menu, "SCENE Setting Complete" appears on the video monitor (OSD). Volume -18.5dB SW L...
Owner's Manual
Page 26
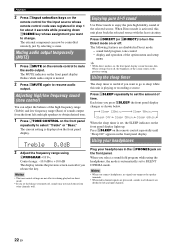
... returns to the previous setting. Notes • The tone control settings are not effective during playback in all channels are divided to left and right speakers to obtain desired tone. 1 Press JTONE CONTROL on the front panel repeatedly to set , the SLEEP indicator on the front panel display lights up.... balance extremely off, sounds may not match those from the front left and right channels. 22 En display and operation of the option menu and setup menu y • While direct mode is set the amount of the selected source. When the sleep timer is on, the front panel display screen...
... returns to the previous setting. Notes • The tone control settings are not effective during playback in all channels are divided to left and right speakers to obtain desired tone. 1 Press JTONE CONTROL on the front panel repeatedly to set , the SLEEP indicator on the front panel display lights up.... balance extremely off, sounds may not match those from the front left and right channels. 22 En display and operation of the option menu and setup menu y • While direct mode is set the amount of the selected source. When the sleep timer is on, the front panel display screen...

Owner's Manual
Page 31
...field effect. You can even enjoy Virtual CINEMA DSP using virtual surround speakers. headphone plug is connected to the PHONES jack. - 7ch Stereo of the sound field program is not available in the setup menu is used. direct mode or straight decoding mode is set "Sur... programs Enjoying unprocessed input sources (Straight decoding mode) In straight decoding mode, sounds are output from only the front left and right speakers. BASIC OPERATION ADVANCED OPERATION ADDITIONAL INFORMATION APPENDIX English 27 En "Straight" appears on the front panel display, and sound is selected. ...
...field effect. You can even enjoy Virtual CINEMA DSP using virtual surround speakers. headphone plug is connected to the PHONES jack. - 7ch Stereo of the sound field program is not available in the setup menu is used. direct mode or straight decoding mode is set "Sur... programs Enjoying unprocessed input sources (Straight decoding mode) In straight decoding mode, sounds are output from only the front left and right speakers. BASIC OPERATION ADVANCED OPERATION ADDITIONAL INFORMATION APPENDIX English 27 En "Straight" appears on the front panel display, and sound is selected. ...
Owner's Manual
Page 42
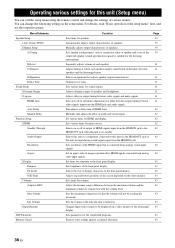
... on a video monitor or the front panel display. Menu/Submenu Speaker Setup 1 Auto Setup (YPAO) 2 Manual Setup A)Config B)Level C)Distance D)Equalizer E)Test Tone Sound Setup 1 Dynamic Range 2 Lipsync HDMI Auto Auto Delay Manual Delay Function Setup 1 HDMI Standby Through Audio Output Resolution Aspect 2 Display Dimmer FL.... Selects the way to be accidentally increased. Sets resolution of the HDMI output that adjusts speaker output characteristics. Operating various settings for this unit (Setup menu) You can change the settings of various menus. Adjusts timing at the time this unit...
... on a video monitor or the front panel display. Menu/Submenu Speaker Setup 1 Auto Setup (YPAO) 2 Manual Setup A)Config B)Level C)Distance D)Equalizer E)Test Tone Sound Setup 1 Dynamic Range 2 Lipsync HDMI Auto Auto Delay Manual Delay Function Setup 1 HDMI Standby Through Audio Output Resolution Aspect 2 Display Dimmer FL.... Selects the way to be accidentally increased. Sets resolution of the HDMI output that adjusts speaker output characteristics. Operating various settings for this unit (Setup menu) You can change the settings of various menus. Adjusts timing at the time this unit...

Owner's Manual
Page 43
... 16 cm or larger and smaller than 16 cm, respectively. Large and Small refer to speakers with "*." 1 Auto Setup Automatically adjusts output characteristics of Speaker Setup take up a full screen. For example, the following screen appears when you select "2 Display... of the item using nCursor k / n, and press nENTER. Video display (OSD) Setup Menu . ;Speaker Setup ;Sound Setup ;Function Setup ;DSP Parameter ;Memory Guard [ ]/[ ]:Up/Down [ENTER]:Enter Front panel display ;Speaker Setup In this unit (Setup menu) "A)Config" display (example) A)Config Center SP None >Small Large y •...
... 16 cm or larger and smaller than 16 cm, respectively. Large and Small refer to speakers with "*." 1 Auto Setup Automatically adjusts output characteristics of Speaker Setup take up a full screen. For example, the following screen appears when you select "2 Display... of the item using nCursor k / n, and press nENTER. Video display (OSD) Setup Menu . ;Speaker Setup ;Sound Setup ;Function Setup ;DSP Parameter ;Memory Guard [ ]/[ ]:Up/Down [ENTER]:Enter Front panel display ;Speaker Setup In this unit (Setup menu) "A)Config" display (example) A)Config Center SP None >Small Large y •...

Owner's Manual
Page 44
...Setup menu) LFE channel signals Parameter Both SWFR Front Subwoofer Output Output Not output Front speakers Not output Not output Output Other speakers Not output Not output Not output Low-frequency components of other channel signals Parameter Both SWFR Front Subwoofer [1] [4] Not output Front speakers [2] [3] [1] Other speakers... selected, "PLIIx Movie" or "PLIIx Music" cannot be selected. Select this when small surround speakers are connected. Select this when no surround speakers are connected. y • When "None" is selected, the sound field programs automatically enter ...
...Setup menu) LFE channel signals Parameter Both SWFR Front Subwoofer Output Output Not output Front speakers Not output Not output Output Other speakers Not output Not output Not output Low-frequency components of other channel signals Parameter Both SWFR Front Subwoofer [1] [4] Not output Front speakers [2] [3] [1] Other speakers... selected, "PLIIx Movie" or "PLIIx Music" cannot be selected. Select this when small surround speakers are connected. Select this when no surround speakers are connected. y • When "None" is selected, the sound field programs automatically enter ...

Owner's Manual
Page 45
.../ h. ■ E)Test Tone Choices: Off*/On Switches between video output and audio output. Unit Choices: meters (m)/feet (ft)* meters (m) Displays the speaker distance in "Auto Setup." R / Sur.B L / Sur.B R / SWFR Adjustable range: 0.30m to 24.00m (1.0ft to test tones when you do not use the ... range: -10.0dB to +10.0dB (0.5 dB step) Defaults: "FR.L/FR.R/SWFR" 0dB* "CNTR/SUR.L/SUR.R/SBL/SBR" -1.0dB Separately adjusts volume of each speaker so that generates test tones. Front L / Front R / Center / Sur. L/Sur. R/ Sur.B L/Sur.B R" y • Different items are at the ...
.../ h. ■ E)Test Tone Choices: Off*/On Switches between video output and audio output. Unit Choices: meters (m)/feet (ft)* meters (m) Displays the speaker distance in "Auto Setup." R / Sur.B L / Sur.B R / SWFR Adjustable range: 0.30m to 24.00m (1.0ft to test tones when you do not use the ... range: -10.0dB to +10.0dB (0.5 dB step) Defaults: "FR.L/FR.R/SWFR" 0dB* "CNTR/SUR.L/SUR.R/SBL/SBR" -1.0dB Separately adjusts volume of each speaker so that generates test tones. Front L / Front R / Center / Sur. L/Sur. R/ Sur.B L/Sur.B R" y • Different items are at the ...
Owner's Manual
Page 46
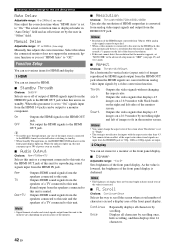
... can set various items for HDMI and display. 1 HDMI You can set to "On" signals input from the speakers connected to this unit is set items for this unit (Setup menu) Auto Delay Adjustable range: 0 to 240ms (1 ms step) Fine adjust the correction time when "HDMI Auto" is on the front... that the monitor supports. Outputs the video signals that the monitor supports, set "HDMI Auto" to the HDMI OUT jack when this unit and the speakers of the input sources connected to the HDMI1-4 must be upscaled. • When a video monitor is increased. ■ FL Scroll Choices: Continue*/Once ...
... can set various items for HDMI and display. 1 HDMI You can set to "On" signals input from the speakers connected to this unit is set items for this unit (Setup menu) Auto Delay Adjustable range: 0 to 240ms (1 ms step) Fine adjust the correction time when "HDMI Auto" is on the front... that the monitor supports. Outputs the video signals that the monitor supports, set "HDMI Auto" to the HDMI OUT jack when this unit and the speakers of the input sources connected to the HDMI1-4 must be upscaled. • When a video monitor is increased. ■ FL Scroll Choices: Continue*/Once ...

Owner's Manual
Page 49
...Yamaha AV receivers, you select initialization in step 3, the initialization is turned on an actual display screen. SP IMP. -XXX Choices: 6 MIN/8 MIN* Selects output impedance of main speakers. You can change . INTRODUCTION PREPARATION BASIC OPERATION ADVANCED OPERATION Advanced setup In the advanced setup...operation of initialization ADDITIONAL INFORMATION APPENDIX English 45 En If another Yamaha amplifier is registered, bTRANSMIT blinks twice. When you change the remote control ID, display "Advance Setup" (see page 12. DSP PARAM: All parameters of ...
...Yamaha AV receivers, you select initialization in step 3, the initialization is turned on an actual display screen. SP IMP. -XXX Choices: 6 MIN/8 MIN* Selects output impedance of main speakers. You can change . INTRODUCTION PREPARATION BASIC OPERATION ADVANCED OPERATION Advanced setup In the advanced setup...operation of initialization ADDITIONAL INFORMATION APPENDIX English 45 En If another Yamaha amplifier is registered, bTRANSMIT blinks twice. When you change the remote control ID, display "Advance Setup" (see page 12. DSP PARAM: All parameters of ...
Owner's Manual
Page 51
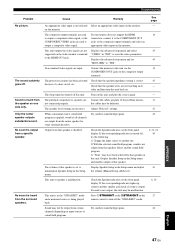
...circuitry has been activated Check that the speaker impedance setting is correct. 45 because of that speaker on input sources or sound field programs. ADVANCED OPERATION APPENDIX English 47 En Output from the surround speakers. Display Speaker Setup in "INIT" to jacks or the ...is malfunction. Connect the monitor to Display Speaker Setup in the Setup menu and adjust 41 minimum in Speaker Setup in the "STRAIGHT" mode and a monaural source is not output from the center speaker for that speaker is disabled. The speaker level settings are Connect the cables properly....
...circuitry has been activated Check that the speaker impedance setting is correct. 45 because of that speaker on input sources or sound field programs. ADVANCED OPERATION APPENDIX English 47 En Output from the surround speakers. Display Speaker Setup in "INIT" to jacks or the ...is malfunction. Connect the monitor to Display Speaker Setup in the Setup menu and adjust 41 minimum in Speaker Setup in the "STRAIGHT" mode and a monaural source is not output from the center speaker for that speaker is disabled. The speaker level settings are Connect the cables properly....
Owner's Manual
Page 52
...are short-circuited. The audio input sources cannot be defective. "Memory Guard!" "LFE/Bass Out" of "A)Config" in "Speaker Setup" of the playback component. 2) When noise is heard from the subwoofer. Connect the audio cables properly. appears on the ... digital or radio frequency equipment. See page 39 39 40 - - 16, 34 43 - 12 - 48 En Consult the manufacturer of the setup menu (Speaker Setup→Manual Setup→A)Config) is set "Decoder Mode" to "SWFR" or "Both." This unit does not operate properly. "LFE/Bass Out" of "A)Config...
...are short-circuited. The audio input sources cannot be defective. "Memory Guard!" "LFE/Bass Out" of "A)Config" in "Speaker Setup" of the playback component. 2) When noise is heard from the subwoofer. Connect the audio cables properly. appears on the ... digital or radio frequency equipment. See page 39 39 40 - - 16, 34 43 - 12 - 48 En Consult the manufacturer of the setup menu (Speaker Setup→Manual Setup→A)Config) is set "Decoder Mode" to "SWFR" or "Both." This unit does not operate properly. "LFE/Bass Out" of "A)Config...
Owner's Manual
Page 61
... Preset, OPTION menu 35 Auto Setup (YPAO), troubleshooting 51 Automatic setup 18 AV 1-6, rear panel 5 AV OUT, rear panel 5 ■B B)Level, speaker setup 41 Basic operation, setup menu 39 BI-AMP connection switch, advanced setup 45 BI-AMP, advanced setup 45 Bluetooth component playback 32 Bluetooth wireless audio receiver connection 16 Bluetooth, troubleshooting 51 ■C C)Distance, speaker setup 41 C.Image, decoder parameter...
... Preset, OPTION menu 35 Auto Setup (YPAO), troubleshooting 51 Automatic setup 18 AV 1-6, rear panel 5 AV OUT, rear panel 5 ■B B)Level, speaker setup 41 Basic operation, setup menu 39 BI-AMP connection switch, advanced setup 45 BI-AMP, advanced setup 45 Bluetooth component playback 32 Bluetooth wireless audio receiver connection 16 Bluetooth, troubleshooting 51 ■C C)Distance, speaker setup 41 C.Image, decoder parameter...
Owner's Manual
Page 62
... 36 Sound field program registration 21 Sound selection key, remote control 7 Sound setup, setup menu 41 SOURCE POWER, remote control 7 SP IMP., advanced setup 45 Speaker cable connection 12 Speaker connection 11 Speaker impedance, advanced setup 45 Speaker indicator, front panel display 6 Speaker layout 10 Speaker placement 10 Speaker setup 39 SPEAKERS terminal, rear panel 5 Specifications 56 Spectacle, sound field program 24 Sports...
... 36 Sound field program registration 21 Sound selection key, remote control 7 Sound setup, setup menu 41 SOURCE POWER, remote control 7 SP IMP., advanced setup 45 Speaker cable connection 12 Speaker connection 11 Speaker impedance, advanced setup 45 Speaker indicator, front panel display 6 Speaker layout 10 Speaker placement 10 Speaker setup 39 SPEAKERS terminal, rear panel 5 Specifications 56 Spectacle, sound field program 24 Sports...


