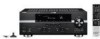

Owner's Manual
Page 4
... for this unit (Setup menu 54 Basic operation of the Setup menu 55 Speaker Setup 55 Sound Setup 57 Function Setup 58 DSP Parameter 60 Memory Guard 60 Using multi-zone configuration 61 Connecting Zone2 61 Controlling Zone2 62 Controlling other components 15 Connecting a Yamaha iPod universal dock or Bluetooth™ wireless audio receiver 17 Connecting a USB...
... for this unit (Setup menu 54 Basic operation of the Setup menu 55 Speaker Setup 55 Sound Setup 57 Function Setup 58 DSP Parameter 60 Memory Guard 60 Using multi-zone configuration 61 Connecting Zone2 61 Controlling Zone2 62 Controlling other components 15 Connecting a Yamaha iPod universal dock or Bluetooth™ wireless audio receiver 17 Connecting a USB...

Owner's Manual
Page 5
... or 480p(576p) → 720p, 1080i or 1080p • HDMI control function supported ■ Automatic speaker setup features • "YPAO" (Yamaha Parametric Room Acoustic Optimizer) for automatically optimizing speaker outputs suitable for listening environments. ■ Other features •... V-AUX input [Audio] Analog x 1 [Video] Video x 1 • DOCK terminal to connect a Yamaha iPod universal dock (such as YDS-11, sold separately) or Bluetooth wireless audio receiver (such as multi-channel digital audio. - model only) • XM Satellite Radio tuning capability, using SiriusConnect...
... or 480p(576p) → 720p, 1080i or 1080p • HDMI control function supported ■ Automatic speaker setup features • "YPAO" (Yamaha Parametric Room Acoustic Optimizer) for automatically optimizing speaker outputs suitable for listening environments. ■ Other features •... V-AUX input [Audio] Analog x 1 [Video] Video x 1 • DOCK terminal to connect a Yamaha iPod universal dock (such as YDS-11, sold separately) or Bluetooth wireless audio receiver (such as multi-channel digital audio. - model only) • XM Satellite Radio tuning capability, using SiriusConnect...
Owner's Manual
Page 11
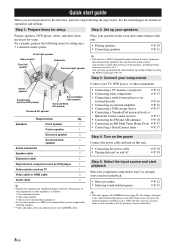
...16 • Connecting an external amplifier ☞P. 16 • Connecting a USB storage device ☞P. 17 • Connecting a Yamaha iPod universal dock or Bluetooth wireless audio receiver ☞P. 17 • Connecting the FM and AM antennas ☞P. 18 • Connecting an XM Mini-Tuner Home Dock ... is a CRT, we recommend that you use magnetically shielded speakers. • Video and audio cables are preset for different purposes for setup. You can select from a scene from those just by using the YPAO technology (☞P. 19). Quick start playback. • Basic...
...16 • Connecting an external amplifier ☞P. 16 • Connecting a USB storage device ☞P. 17 • Connecting a Yamaha iPod universal dock or Bluetooth wireless audio receiver ☞P. 17 • Connecting the FM and AM antennas ☞P. 18 • Connecting an XM Mini-Tuner Home Dock ... is a CRT, we recommend that you use magnetically shielded speakers. • Video and audio cables are preset for different purposes for setup. You can select from a scene from those just by using the YPAO technology (☞P. 19). Quick start playback. • Basic...

Owner's Manual
Page 15
This could damage this unit. Front speakers Right Left 10 mm (0.4 in the advanced setup menu before connecting the speaker cables. Caution Before making bi-amplification connections, make bi-amplification connections to one end of the other cable to the "-" (... and Zone2 speakers) when bi-amplification connections are distorted, place the speakers away from the end of each other end to "ON" in the advanced setup menu (page 64). Connections Caution • A speaker cable is a pair of insulated cables running side by side in ) of insulation from the video monitor. to...
This could damage this unit. Front speakers Right Left 10 mm (0.4 in the advanced setup menu before connecting the speaker cables. Caution Before making bi-amplification connections, make bi-amplification connections to one end of the other cable to the "-" (... and Zone2 speakers) when bi-amplification connections are distorted, place the speakers away from the end of each other end to "ON" in the advanced setup menu (page 64). Connections Caution • A speaker cable is a pair of insulated cables running side by side in ) of insulation from the video monitor. to...

Owner's Manual
Page 20
... EFFECT l TUNING/CH h OPTIMIZER MIC VOLUME VIDEO AUX USB VIDEO AUDIO USB Infrared signal receiver or Yamaha component IR flasher or Yamaha component (CD or DVD player, etc.) y • If connecting a Yamaha component that supports the SCENE control signal reception to the REMOTE OUT jack of this unit,... you can start playback on the front panel to connect a game console or a video camera to this unit, set "SCENE IR" to "OFF" in the advanced setup menu (page 64)....
... EFFECT l TUNING/CH h OPTIMIZER MIC VOLUME VIDEO AUX USB VIDEO AUDIO USB Infrared signal receiver or Yamaha component IR flasher or Yamaha component (CD or DVD player, etc.) y • If connecting a Yamaha component that supports the SCENE control signal reception to the REMOTE OUT jack of this unit,... you can start playback on the front panel to connect a game console or a video camera to this unit, set "SCENE IR" to "OFF" in the advanced setup menu (page 64)....
Owner's Manual
Page 22
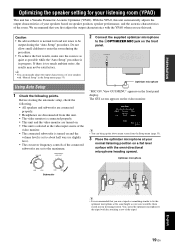
...tripod with the YPAO when you first adjust the output characteristics with the attaching screw of your listening room (YPAO) This unit has a Yamaha Parametric Acoustic Optimizer (YPAO). We recommend that it is too much ambient noise, the results may not be when seated in your speakers..., make sure the room is as quiet as your ears would be satisfactory. If there is normal for your speakers with "Manual Setup" in the Setup menu (page 55). The GUI screen appears on speaker position, speaker performance, and the acoustic characteristics of your listening position. With the...
...tripod with the YPAO when you first adjust the output characteristics with the attaching screw of your listening room (YPAO) This unit has a Yamaha Parametric Acoustic Optimizer (YPAO). We recommend that it is too much ambient noise, the results may not be when seated in your speakers..., make sure the room is as quiet as your ears would be satisfactory. If there is normal for your speakers with "Manual Setup" in the Setup menu (page 55). The GUI screen appears on speaker position, speaker performance, and the acoustic characteristics of your listening position. With the...
Owner's Manual
Page 23
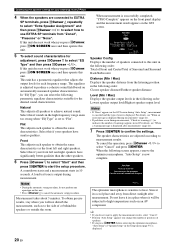
..., do not want to heat. When the following order: Lowest speaker output level/Highest speaker output level Notes • If "Error" appears on an AV component. Auto Setup Result Speaker Config : 3 /4 / 0.1 Distance (Min / Max) : 8.0ft / 8.5ft Level (Min / Max) : -3.5dB / +4.5dB Set ... 5 To select sound characteristics for adjustment, press jCursor n to select "EQ Type" and then press jCursor l / h. Auto Setup Auto Setup Completed ! If this unit does not work when you can select the following parametric equalizer characteristics suitable for each speaker to the side...
..., do not want to heat. When the following order: Lowest speaker output level/Highest speaker output level Notes • If "Error" appears on an AV component. Auto Setup Result Speaker Config : 3 /4 / 0.1 Distance (Min / Max) : 8.0ft / 8.5ft Level (Min / Max) : -3.5dB / +4.5dB Set ... 5 To select sound characteristics for adjustment, press jCursor n to select "EQ Type" and then press jCursor l / h. Auto Setup Auto Setup Completed ! If this unit does not work when you can select the following parametric equalizer characteristics suitable for each speaker to the side...

Owner's Manual
Page 24
... during measurement, "Check xx warning(s)" appears on the GUI screen. Exit Terminates the measurement and "Auto Setup". We recommend that you solve the problem and perform "Auto Setup" again. 1 Press jCursor n / k to select "Check xx warning(s)" and then press jENTER. ... perform measurement again. y • When "E-5:NOISY" appears, you can continue measurement. Retry Exit Move focus Retry Performs "Auto Setup" again. For details on each warning message, see page 75. Auto Setup Result Speaker Config : 3 /4 / 0.1 Distance (Min / Max) : 8.0ft / 8.5ft Level (Min / Max) ...
... during measurement, "Check xx warning(s)" appears on the GUI screen. Exit Terminates the measurement and "Auto Setup". We recommend that you solve the problem and perform "Auto Setup" again. 1 Press jCursor n / k to select "Check xx warning(s)" and then press jENTER. ... perform measurement again. y • When "E-5:NOISY" appears, you can continue measurement. Retry Exit Move focus Retry Performs "Auto Setup" again. For details on each warning message, see page 75. Auto Setup Result Speaker Config : 3 /4 / 0.1 Distance (Min / Max) : 8.0ft / 8.5ft Level (Min / Max) ...
Owner's Manual
Page 27
... at the speaker terminals. • When multi-channel signals are processed, sounds in all channels are output at the bottom of the Option menu and Setup menu - Available information differs depending on the input signal is selected as the input source, only front L/R sounds are disabled in the LPHONES jack on...
... at the speaker terminals. • When multi-channel signals are processed, sounds in all channels are output at the bottom of the Option menu and Setup menu - Available information differs depending on the input signal is selected as the input source, only front L/R sounds are disabled in the LPHONES jack on...

Owner's Manual
Page 31
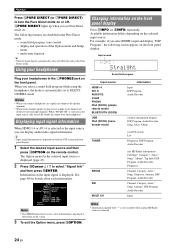
..., presence speakers are reproduced without a sound field effect. 1 To enable straight decode mode, press OSTRAIGHT (or gSTRAIGHT). When the sound field program runs in the Setup menu is selected. - Multi-channel input sources are decoded straight into the appropriate channels and multi-channel sounds are required. When "Surround Speaker" in CINEMA...
..., presence speakers are reproduced without a sound field effect. 1 To enable straight decode mode, press OSTRAIGHT (or gSTRAIGHT). When the sound field program runs in the Setup menu is selected. - Multi-channel input sources are decoded straight into the appropriate channels and multi-channel sounds are required. When "Surround Speaker" in CINEMA...
Owner's Manual
Page 36
..., comedy, family programming, local traffic and weather and news from the satellites to XM, U.S. SIRIUS and XM subscriptions sold separately) to receive the SIRIUS or XM satellite radio service. All programming and fees subject to SIRIUS, U.S. Connecting XM Mini-Tuner Home Dock Connect XM Mini...Mini-Tuner Home Dock. You can access the full lineup on for details. online at this unit. Easy to follow installation and setup instructions are three places to residents of the antenna. The "Best of" packages are also available to restrict channels featuring content that...
..., comedy, family programming, local traffic and weather and news from the satellites to XM, U.S. SIRIUS and XM subscriptions sold separately) to receive the SIRIUS or XM satellite radio service. All programming and fees subject to SIRIUS, U.S. Connecting XM Mini-Tuner Home Dock Connect XM Mini...Mini-Tuner Home Dock. You can access the full lineup on for details. online at this unit. Easy to follow installation and setup instructions are three places to residents of the antenna. The "Best of" packages are also available to restrict channels featuring content that...

Owner's Manual
Page 39
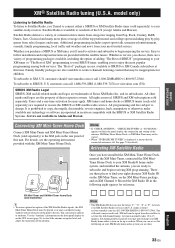
... "Channel" Display example (Antenna) XM Antenna y • You can configure the scroll setting of the front panel display with "Front Panel Display Scroll" in the Setup menu (page 59). • If the XM Satellite Radio information contains a character that cannot be recognized by this feature to turn on the GUI screen...
... "Channel" Display example (Antenna) XM Antenna y • You can configure the scroll setting of the front panel display with "Front Panel Display Scroll" in the Setup menu (page 59). • If the XM Satellite Radio information contains a character that cannot be recognized by this feature to turn on the GUI screen...

Owner's Manual
Page 44
... • You can configure the scroll setting of the front panel display with a space. • When the antenna of the SiriusConnect tuner cannot receive the signals, "ACQUIRING" appears on the front panel display. • When an information is held, the "HOLD" icon appears on the GUI screen...OPERATION Displaying the SIRIUS Satellite Radio™ information Use this unit, the character will be displayed with "Front Panel Display Scroll" in the Setup menu (page 59). • If the SIRIUS Satellite Radio information contains a character that cannot be recognized by this feature to display ...
... • You can configure the scroll setting of the front panel display with a space. • When the antenna of the SiriusConnect tuner cannot receive the signals, "ACQUIRING" appears on the front panel display. • When an information is held, the "HOLD" icon appears on the GUI screen...OPERATION Displaying the SIRIUS Satellite Radio™ information Use this unit, the character will be displayed with "Front Panel Display Scroll" in the Setup menu (page 59). • If the SIRIUS Satellite Radio information contains a character that cannot be recognized by this feature to display ...

Owner's Manual
Page 53
... as you can adjust the level of "Dialogue Lift". Room Size Sur. Initial Delay Sur. For details on the video monitor. 3 Press jCursor n to select "Setup" and then press jENTER. 4 Press jCursor k / n to zero, the position is added too much. →Reduce the effect level. Then, press jCursor h again to execute...
... as you can adjust the level of "Dialogue Lift". Room Size Sur. Initial Delay Sur. For details on the video monitor. 3 Press jCursor n to select "Setup" and then press jENTER. 4 Press jCursor k / n to zero, the position is added too much. →Reduce the effect level. Then, press jCursor h again to execute...

Owner's Manual
Page 57
...jacks to the HDMI OUT jack of speakers. Sets resolution of each speaker outputs sound based on . Dimmer Sets brightness of the Setup menu" first, and see the respective pages. For details, read "Basic operation of the front panel display. Speaker Configuration Speaker ...the listening position. HDMI Sets various items for speakers. Selects on the front panel display. Sets items for volumes. Function Auto Setup (YPAO) Automatically adjusts output characteristics of audio and visual output. Selects an equalizer that supports the HDMI control function is on...
...jacks to the HDMI OUT jack of speakers. Sets resolution of each speaker outputs sound based on . Dimmer Sets brightness of the Setup menu" first, and see the respective pages. For details, read "Basic operation of the front panel display. Speaker Configuration Speaker ...the listening position. HDMI Sets various items for speakers. Selects on the front panel display. Sets items for volumes. Function Auto Setup (YPAO) Automatically adjusts output characteristics of audio and visual output. Selects an equalizer that supports the HDMI control function is on...

Owner's Manual
Page 58
...marked with "*". ADDITIONAL INFORMATION APPENDIX English 55 En Manual Setup Adjusts output characteristics of the Setup menu The Setup menu screen appears on operations, see page 19. GUI screen Setup Menu Speaker Setup Sound Setup Function Setup DSP Parameter Memory Guard 5 Press jCursor k / n...screen, press iON SCREEN. Example (Speaker Configuration) Speaker Configuration Front Speaker Front panel display Small Large ;Speaker Setup In this unit (Setup menu) Function Sets parameters for the sound field programs. Protects some settings against accidental alteration. Items of ...
...marked with "*". ADDITIONAL INFORMATION APPENDIX English 55 En Manual Setup Adjusts output characteristics of the Setup menu The Setup menu screen appears on operations, see page 19. GUI screen Setup Menu Speaker Setup Sound Setup Function Setup DSP Parameter Memory Guard 5 Press jCursor k / n...screen, press iON SCREEN. Example (Speaker Configuration) Speaker Configuration Front Speaker Front panel display Small Large ;Speaker Setup In this unit (Setup menu) Function Sets parameters for the sound field programs. Protects some settings against accidental alteration. Items of ...
Owner's Manual
Page 59
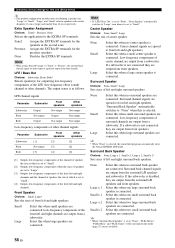
... Not output Output Not output Other speakers Not output Not output Not output Low-frequency components of other channels. Operating various settings for this unit (Setup menu) y • The speaker configuration includes items for the presence speakers. Assigns the EXTRA SP terminals for defining a speaker size: "Large" or "Small". Center Speaker...
... Not output Output Not output Other speakers Not output Not output Not output Low-frequency components of other channels. Operating various settings for this unit (Setup menu) y • The speaker configuration includes items for the presence speakers. Assigns the EXTRA SP terminals for defining a speaker size: "Large" or "Small". Center Speaker...
Owner's Manual
Page 60
...When only one surround back speaker is connected, "SB" appears instead of "SBL" and "SBR". • You can adjust signal levels in "Auto Setup". Unit Choices: feet (ft)*, meters (m) feet (ft) meters (m) Displays the speaker distance in meters. GEQ Channels Front Left, Front Right, Center,... equalizer of your subwoofer has a volume control or a crossover frequency control, set the distance of the graphic equalizer. Sound Setup You can adjust the settings of the currently used parametric equalizer are displayed below that sounds from a subwoofer or front speakers....
...When only one surround back speaker is connected, "SB" appears instead of "SBL" and "SBR". • You can adjust signal levels in "Auto Setup". Unit Choices: feet (ft)*, meters (m) feet (ft) meters (m) Displays the speaker distance in meters. GEQ Channels Front Left, Front Right, Center,... equalizer of your subwoofer has a volume control or a crossover frequency control, set the distance of the graphic equalizer. Sound Setup You can adjust the settings of the currently used parametric equalizer are displayed below that sounds from a subwoofer or front speakers....

Owner's Manual
Page 61
...to the HDMI OUT jack when this unit output signals input from the HDMI 1-4 jacks. HDMI You can set by the user in the advanced setup menu to the HDMI 1-4 jacks must be upscaled. • When a video monitor is muted. when the HDMI signal standby-through function is currently...when the connected TV supports the automatic lip-sync function. Amplifier Outputs HDMI sound signals form the speakers connected to the HDMI OUT jack. Function Setup You can set "MON.CHK" in "Offset" field. TV Outputs HDMI sound signals from the HDMI OUT jack. Set the correction time in...
...to the HDMI OUT jack when this unit output signals input from the HDMI 1-4 jacks. HDMI You can set by the user in the advanced setup menu to the HDMI 1-4 jacks must be upscaled. • When a video monitor is muted. when the HDMI signal standby-through function is currently...when the connected TV supports the automatic lip-sync function. Amplifier Outputs HDMI sound signals form the speakers connected to the HDMI OUT jack. Function Setup You can set "MON.CHK" in "Offset" field. TV Outputs HDMI sound signals from the HDMI OUT jack. Set the correction time in...

Owner's Manual
Page 62
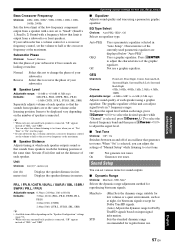
... changing the aspect ratio. 16:9 Outputs the video signals that displays 4:3 images on a 16:9 TV with the volume level. Operating various settings for this unit (Setup menu) Volume You can adjust the volume between -80.0 dB and -5.0 dB (or Mute) when you set this parameter to "-30.0dB" and "Init. When...
... changing the aspect ratio. 16:9 Outputs the video signals that displays 4:3 images on a 16:9 TV with the volume level. Operating various settings for this unit (Setup menu) Volume You can adjust the volume between -80.0 dB and -5.0 dB (or Mute) when you set this parameter to "-30.0dB" and "Init. When...

